From Zero to Marketing in 7 Days


Introduction
We started as a small company consisting of only 3 people, and over the past 6 years have grown to become a company of over 50. Everything I will discuss here today we have learned from trial and error.
When we started the company, I was both Marketing and Customer Support (just me). We tried to promote our program (CleanMyMac) in every possible way that we knew of at the time with almost no budget for advertising and no experience in marketing whatsoever. Since then, our marketing team has grown to 9 people. We do everything from search engine optimization and PR, to online advertising.
Our company’s core value is to stand behind the quality of our products, and to be honest, it makes our work way easier. This may come off as a bit cliche, but we truly feel that in order to promote a product, you need to believe in it and use it everyday. It’s also of the utmost importance that you also listen to your customers and work with their feedback.
So, why don’t we begin by saying that we’re in an ideal world and that you have an ideal product. And now you get a whole 7 days to work a small marketing plan. I’ve divided my presentation into exactly this, a 7-day marketing plan that requires a small budget. Each day you can work in one of the areas that we, at MacPaw, have found to bring the most profit.
Let’s get started (…or you can jump to a section below).
- Day 1: Basics
- Day 2: Optimize your website
- Day 3: Distribution
- Day 4: Public relations
- Day 5: Email marketing
- Day 6: Advertising
- Day 7: Data analysis

Day 1: Basics
Let’s avoid all the marketing blah-blah of segmentation and positioning. Even though it is important to segment your potential markets and create a positioning statements for them, we will skip this and go straight to the things that can be done in one day.
Analyze your competitors
DO’s:
Spreadsheet your competitors Create a spreadsheet with all your competitors and keep it updated. Also, make sure to include yourself! Be sure to list:
- Name
- Company
- URL
- Available platforms
- Prices
- Features (list your features)
- Different Features (the features competitors have that you don’t have)
- Strengths
- Weaknesses
Analyze your table to understand: who the stronger competitors are, what you have that they don’t, and what you need to improve. Click here to see an example of a competitor analysis spreadsheet.
SEMrush and Alexa Use these tools to gain insight on what your competitors are doing. With these tools, you can see where they are getting most of their traffic (paid or organic) and even their referral sites. This tool is very useful for competitor analysis and keyword research.
Set up Google Alerts They’ll help you keep track of your competitors, including what people are saying about them and what they themselves are saying.
DON’Ts:
Trust all tools for research You need to use a few tools to understand the tendencies. Remember, the tools don’t show the real numbers.
TOOLS:
READ:
Keyword research
DOs:
Brainstorm keywords Create a keyword spreadsheet and brainstorm all keywords or phrases you might use in Google to search for your product.
Google Webmaster Tools for keywords Create an account in Google Webmaster Tools, if you haven’t yet already. It’s very easy. You can read this article for more information. In GWT go to Search Traffic > Search Queries. Check the search queries users are entering to get to your site. Add the 10 most relevant ones to your spreadsheet (add also a column with impressions). Pay attention to Impressions and CTR.
SEMRush for keywords Use SEMrush to check what keywords are your competitors using, and write down their top 10 keywords. Also see what keywords you are getting traffic for as well. Add these keywords to your spreadsheet (including their search volume), remove the duplicates, and add the ones missing from your initial brainstorm. Organize the keywords by search volume.
Now you should have the top 10 most relevant keywords. You should use 3 keywords per page, so I chose 10 keywords for now. For more advanced SEO, note that keywords are grouped together and thousands of them are used. In the future, if you need to do a complete keyword analysis, you can use the AdWords Keyword Planner and Ubersuggest.
DON’Ts:
Use keywords that are not related to your product …just because they have high search volume.
Use generic keywords For example we have a product called Gemini: The Duplicate Finder. The keyword “gemini” has a huge search volume, but is far too generic; people searching for “gemini” are probably not looking for our app.
TOOLS:
READ:
Basic copywriting
DOs:
Create different length descriptions for your product These descriptions will go everywhere, from your website to the MAS to different download sites. It is one strong and permanent message that you can use in all your communications. Consider doing different lengths descriptions of your product. I suggest using 45, 80, 250, 450, and 2000 character lengths. The shortest description might also work as your tagline.
Use your keywords ‘Nuff said.
Communicate and anticipate Always provide enough information to address the main product benefits and features. Anticipate what questions or concerns a consumer may have.
Give benefits instead of features Features are important, but benefits are invaluable.
DON’Ts:
Use complicated words or sentences Remember that you might have users whose native language is not English.
Forget to use your keywords
Add too many keywords in a paragraph You’re writing is, first and foremost, for your users. Don’t sacrifice readability for search engines.
READ:
Social Media
Social Media might take a lot of time to keep with, so I recommend that you start slowly and consistently keep at it.
DOs:
Start with Twitter It is the easiest social network to keep up with. You don’t need much content for it, and answering to your users is easy (you can even do it from your iPhone). Not to mention that Twitter users are typically pretty engaging.
Customize your social profile Besides changing the avatar and background, be sure to add your URL and a short description using your main keywords.
Monitor mentions on Twitter Sign up to TweetDeck (a free tool by Twitter) for real-time tracking of your mentions. It also makes it heaps easier to answer questions from your followers.
Answer all your requests (or as many as possible) Real responses from real people to a world of good for your brand.
Participate in conversations, and retweet interesting content Let your personality shine through. Great for gaining followers.
Be mindful of increasing your follower count Kind of obvious, but it can get a bit shadowed when doing a million things at once.
Use tools to find your competitors followers, and start following them Twitonomy is a useful tool for getting information about followers, finding top engagers and most influential users, mentions, and retweets. Unfollowers is a free tool to track followers and unfollowers. Check them both out.
Follow accounts important to your industry …and retweet what you find interesting. Some example accounts:
- TUAW - @tuaw
- MacRumors - @macrumors
- Daring Fireball - @daringfireball
- Macworld - @macworld
- Apple Insider - @appleinsider
- MacLife - @maclife
- The Loop - @TheLoop
- 9to5mac - @9to5mac
- iLounge - @ilounge
- iMore - @iMore
- Macwordl Uk - @MacworldUK
- MacFormat - @MacFormat
- MacTrast - @MacTrast
Use Twitter search to find conversations about your product Or your product’s benefits. Follow people who interact in those conversations and be sure to engage in the conversations yourself. Pay attention to the fact that #cleanmymac, cleanmymac and @cleanmymac are different mentions.
Use Twitter on the download a Twitter app to your phone.
DON’Ts:
Create profiles that you won’t keep updated It is better to not have a Facebook page, than having one with 10 likes and 2 posts.
Spam You don’t want to be one of those guys, right?
Focus on you, and only you Write only about your product and people will get tired of it and you will lose followers.
Get too personal Don’t discuss personal matters or engage in controversial discussions from your company’s or product’s profile.
TOOLS:
READ:
- A Step-by-step Guide to your Social Media Success | Simply Business
- The Beginner’s Guide to Social Media | Moz
Day 2: Optimize your website
DOs:
Indexing
Make sure that your website is indexed. Type in Google Search site:yoururl.com. See how many pages you have indexed. The more pages indexed, the better. Do this with your competitors’ sites, too.
Check your indexed pages in Google Webmaster Tools. Here, you might notice that lots of pages are not indexed. If this is the case, you need to upload your website’s sitemap. You can use a tool like XML-Sitemaps to generate a sitemap. Download the site map and add it to GWT (go to Crawl > Sitemaps > Add New Sitemap).
Content optimization
Each page should be optimized for 2 or (maximum) 3 keywords. But make sure to keep one of the keywords as the main one, and to use it in the Title and description. Don’t overuse keywords, it might end up lowering your ranking. Each page needs to have one H1 title. Content in the H1 title is considered most important, so adding your keyword there will give it more importance.
Optimize metatags
Metatags are HTML attributes that provide a concise explanation of the content on a webpage. They are commonly used on search engine result pages (SERPs) to display preview snippets for a given page. They are not important to search engine rankings, but are very important in getting user click-through from SERPs.
Search snippets
These include Title and description. It is what users will see when they search for you. They need to be relevant, unique, provide value, and have a CTA. Use the Snippet Optimizer Tool to check how your new titles will look before changing them. Always keep the title between 55-60 characters in length, the description under 160 characters, and the URL under 100 characters. Use your keywords, but don’t use more than 1 keyword in the title.
Social snippets
These are the titles, descriptions, and URL shared on social networks. Use the same rules and sizes used on search snippets. But remember that here, you need to make the content sharable. Click here for some templates.
Improve your HTML
Use Google Webmaster Tools to check for HTML improvements. In the left menu, go to Search Appearance > HTML Improvements. Use those tips to improve your site’s ranking.
Set up Google Analytics
This is very easy and you can read step-by-step how to set up it. Read this article.
Set up goals in Google Analytics
First, decide what are the goals you want users to complete on your site. One example would be downloads. Each time a user completes a Goal, a conversion is logged in your Google Analytics account. The easiest type of goal to setup is URL destination, this way you can keep track of specific URLs. Each time someone goes to that URL, they trigger the goal. This is ideal for download pages and confirmation pages. You can set up goals in the administration panel. Read this for more information.
Set up Ecommerce
Ecommerce will let you to track where your purchases come from. This step might be tricky, especially if you use an ecommerce solution that is on a different domain than your site. Here are instructions on how to set up Ecommerce.
Now we need to work in the site itself, a few recommendations:
Add call-to-actions
These are buttons, banners, or some other type of graphic or text on a website meant to prompt a user to click it and continue doing what you want them to do. The main CTA should be all over the site: at the beginning, in the middle, and at the end. Don’t have more than 2 CTAs, and one of them should be your main CTA. For example, Download and Buy can go together, but you need to decide which one is more important. In the future, you need to test CTAs with different delivery messages, color, placement, and so on.
Add social buttons to share your content
Social buttons are important to help users share your content, and they are very easy to implement. Here are instructions on how to generate the buttons and then add them to your site.
Review the content …of the pages you are optimizing. Remember that by now, you have created descriptions for your product and that you can use them. Here are some tips for the content:
- Give users benefits, not features.
- Keep it simple — Don’t use complicated words or phrases. If you are unable to understand what you wrote on the first read, you need to rewrite it.
- People don’t like to read, so keep everything as short as possible.
Add an About section This increases the level of trust for your company. Write either about your company or yourself. You need to show that behind the product there is a real person. Include contact information.
DON’Ts:
Overuse keywords in one page
Have more than 2 CTA per page
Write long and complicated content
Create duplicate content Check Google Webmaster Tools for duplicated pages, and remove them.
Buy backlinks It might be effective at the beginning, but over time you will get penalized.
TOOLS:
- Google Analytics Training
- GA Tag Assistant — will tell you if the Google Analytics tracking code on the page is firing correctly or if there are any issues that need to be addressed.
- Google Analytics Plugin for Wordpress
READ:
- Google Analytics for Wordpress
- Meta Description
- How To Use HTML Meta Tags
- Why “The Fold” Is A Myth – And Where To Actually Put Your Calls To Action
- The Complete Guide to Setting Up Google Analytics
- The 8 Google Analytics Features Every Site MUST Have Enabled
- 7 Little Call-to-Action Tweaks That Could Give Your Conversion Rates a Big Bump
- 11 Elements of Effective Ecommerce Checkout Page Anatomy

Day 3: Distribution
DO:
Use multiple distribution platforms
Including using the MAS. If you are on the MAS, consider launching outside the MAS. If you are outside the MAS, consider launching on the MAS. This is not something you can do in one day, but you should seriously consider doing the duo.
List your product on different download sites
Research your site’s categories, determine your competitors, and determine if you want to use the same category or move to another one where there are less competitors. Use the texts you prepared on Day 1 (including your keywords). The sites we get the most downloads from are:
- Softonic — (for developers ads.softonic.com)
- CNet — (for developers upload.cnet.com)
- MacUpdate
- Softpedia
- MacInformer
Make sure your downloads are available 100% of time
We know how important it is to have availability of installation files all over the world. Hosting is one of the places where you don’t want to skimp out. Proven hosting that guarantees 99.9% uptime is an absolute, must-have. Or, the one day when your sales significantly increase and you have a high volume of downloads, your CDN might fail due to lacking support for such a high volume of people and your app won’t get downloaded. In the end, you’ll lose much more money than you would save.
Try hosting with properly working CDN option. We decided on Amazon Cloud Hosting: it’s proven, and it’s integrated in DevMate, which we use to host, deliver updates, and manage application binaries.
Use beta testing
…to polish your application with the help of dedicated users. Always run beta tests and work with your beta testers. This activity requires lots of time but the feedback you get is priceless. First and foremost, beta testers help you find some unusual scenarios and specific user data. You get early feedback and suggestions on improvements. From a marketing point of view, beta testing can help you can build a really effective community that will promote your app.
In order for us to deliver a beta version of our app to beta testers, we use DevMate. It allows you to collect feedback sent right from the application, along with the screenshot, application log, and system preferences. This kind of stuff significantly helps us identify the exact place in the app that causes issues and the environment that may be causing problems.
Automate everything you can
There are a plenty of things that can be automated to prevent hours of headaches: update deliveries, application protection, activations, licensing mechanisms, collections of crash reports, gathering users’ feedback, and whatever else you put your mind to. You can find many free or paid alternatives to automate these things. First, spend a few days to set up them and then spend an hour each day switching between services and tracking all the data you need. Then, you can take 30-40 minutes to set up frameworks that will collect all essential data and protect your app, and get a backend that gathers and shows all data in one place. Again, for our needs we use DevMate, which does all the things I mentioned above.
DON’Ts:
Stay exclusively in the MAS
It is a relatively small distribution platform, and it is harder to track and optimize than if you’re selling your apps outside of the MAS. And you pay a whole 30% of your revenue!
Try to be on every single download site
Most of them will bring you very little traffic, so concentrate on keeping your pages up-to-date on the top 5 sites. Then, once you’ve got your feet on the ground, consider expanding.
USE:
READ:

Day 4: Public relations
DOs:
Create a story
Journalists are way more likely to write about you if there is a story behind your app. What problem do you solve? How did you come up with your idea? Why are you so special?
Spreadsheet your contacts
It helps to be able to find the right person in the right publication… and to know who you are talking to. Investigate who wrote about your competitors. Don’t pitch business Mac apps to mobile photo apps editors. Here is a list of websites that you should consider getting in touch with:
- MacWorld
- AppleWeblog
- CNET
- Applesfera
- Cult of Mac
- MacMagazine
- TUAW
- Mac1
- LoopInsight
- Gizmodo
- Gigaom
- MacStories
- TheNextWeb
Create a press kit
It can be a zipped folder containing text files with information about your product and your company (or yourself), and HD images of your application and logos.
Provide journalists with specific information
Journalists needs to write something but are typically short on time. Your task is to provide them with the most relevant and accessible information. Keep emails short and include links to the website, Mac App Store, press kit, video, etc.
Build relationships
Engage on Twitter, provide valuable assets for the journalist (your expertise and insights for the BIG guys, giveaways for the small ones). Support the community with competitions, sponsorships, ads, etc. Help spread the word about your reviews via social media and your website (backlinks).
DON’Ts:
Reach too far, too soon
Wait to run massive outreach. Once you have, more or less, a live product (or at least know an exact date of the release), go for it. Coverage without the live product is nice but coverage with live product is 100 times better.
Create one template email for the big guys
You should personalize your emails to let the recipient know why they should care about your product, and what makes you think that they are the right person to be contacted.
Spam journalists
They will add you to a blocked list. If you don’t get an answer after a couple of days, do a follow up and then stop. You can reach them the next time. Rarely journalists answer to email.
USE:
- TextExpander — helps you to save time on outreach
- Nimble — keep track record of your relations with media
- Bananatag — track emails opens and clicks
- BuzzStream — manage marketing campaigns
READ:

Day 5: Email marketing
This is one of the better performing channels, and one that you should pay close attention to. Most of things here you won’t be doing in one day, but they need to be done.
DOs:
Collect emails
From everywhere you can. Add a signup form to your website, the screen after users purchase, and into the application itself. It is important to collect emails, especially if you are only in the MAS, as that will be the only way to reach your customers.
Subscribe to an Email Marketing Solution
One of the best is offered through MailChimp. It will cost less than $50 per month for low volume sendings. But if you have a big base, you should consider cheaper alternatives.
Segment your list
Have a list for paid subscribers and a list for people who just tried your software but didn’t buy.
Create an email template
You can choose to modify it every time you send an email. This gives you a consistent image, and saves you a lot of time.
Set an auto respond to all new subscribers
Using your template, set up an automatic response that thanks your users for subscribing.
Send at least 1 monthly email to your subscribers
So, you know… they remember who you are. You can write a plan for the next 3 emails you will send. For example, send tips and tricks with features about your product, news about a new update, or a request for feedback. Which leads to…
Send emails that are interesting to your audience
Don’t get known for mail that goes straight to the Trash.
Pay attention to your stats
And test different scenarios. In the future, you can analyze your data to find out the best day and time to send your emails, including what topics your users are interested in. Read about:
- Open rate: It shows how interesting your subject line was.
- Click through rate: It shows how interesting your audience found your email.
- Unsubscribe rate: Well… Might have to start again.
DON’Ts:
Import a list of emails that you didn’t collect
Or emails from users who didn’t subscribe to your newsletters. This will ban you from MailChimp and most of other services forever.
Send more than an email per week, or less than an email per month.
Send an email without testing it. Testing it a couple of times is good. It helps you make sure that the subject is correct and all links are working.
READ:

Day 6: Advertising
DOs:
Get a Google AdWords account. Google AdWords is one of the cheapest and most effective ways to start advertising.
Start with a minimal budget. Google provides $75 worth of free advertising when you spend $25 (only for new advertisers).
Go with search ads (in the beginning). Here, you target audience by keyword.
Create a list of keywords you want to use
Begin with 50–100 keywords. Use Adword’s Keyword Planner. There, you can check how much traffic your initial 10 keywords can get.
Brand and specifics
When choosing keywords to bid on, start with using your brand keywords and specific keywords related to your product. Typically, they’re not too expensive and have lower competition. Avoid generic keywords (as they have the highest bids).
Exact > Phrase > Broad
When setting up keywords, use exact match (no changes of alteration to the keyword) and phrase match (can be altered in the beginning and the end of the phrase). Broad match (any modifications of the words in the keyword) bids are higher. But if you have a bigger budget, they can help you to define the ones that you can use in phrase and exact match keywords.
Make a list of negative keywords
And update them on a regular basis. This will help to weed out the irrelevant traffic. For example, in our case, along with “cleaner for Mac computers,” people can search “cleanser for MAC brushes.” This way, after you find out that your ads are shown or may be shown for these kinds of queries, you can immediately add them to the list of negative keywords.
Regularly monitor actual search queries
They are usually different to the keywords that you set up in your campaigns. And make sure to add the new relevant ones to your keywords lists, and add irrelevant ones to the list of negative keywords.
Create landing pages
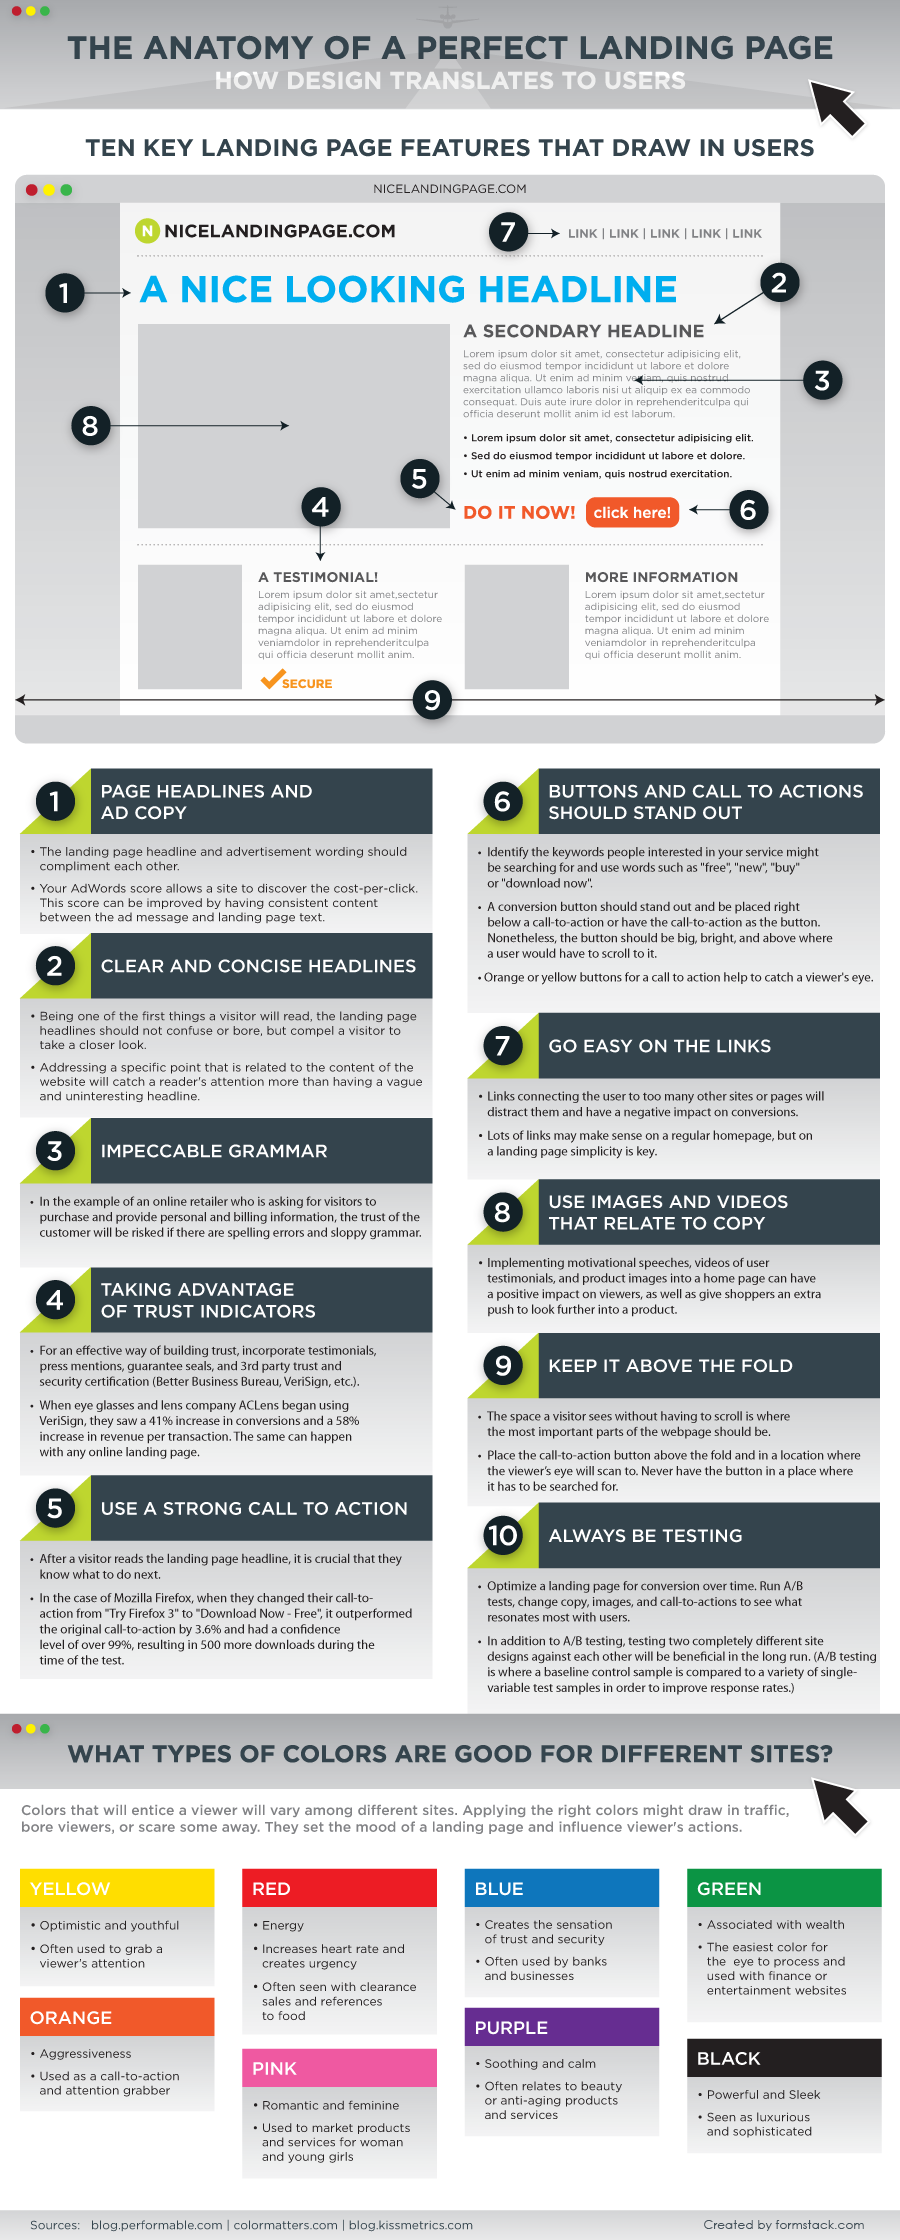
In an ideal world, you need a different landing page for each keyword. For example, if people are searching for “How to speed up my mac,” you need to give them a landing page where that question is answered. You need to show users exactly what they are looking for. For now, you can create a landing page where you answer to most of your keywords. Remember to use a big Call-To-Action and more images than text — people don’t like to read! Here’s an infographic on the anatomy of the perfect landing page.
Link your AdWords account to Analytics. You won’t have to tag links manually. Click here for a “How-to” on linking them together.
Track conversions
Set up conversions in Google. A conversion can be any interaction on your website, landing page, or application; for example, a download, transaction, or pageview.
Test your ad copy
Set a maximum daily budget for each each campaign to avoid overspending
Check how your ads look… And where they are placed with the AdWords Preview and Diagnosis Tool.
DON’Ts:
Bid too low. Too low means you won’t get impressions.
Use generic keywords. They have the highest bids and the lowest CTR.
Waste your ads on the right side. Try to get your ads on the left side of the search results page by bidding high enough to appear among the first search results. The right side is the waste of impressions — ain’t nobody got time to click there.
Forget to add money to your AdWords account. This will make all of your ads stop — This kills the ads.
READ:
- The AdWords Help Center
- Are You Making These 10 Common Google AdWords Mistakes?
- 6 Ways to Reduce Wasted AdWords Spend
Other Notes on Day 6: Advertising
There are two other advertising options you could try with a limited budget.
CNET and Softonic internal promotion tools
Remember on Day 3 how we recommended that you get your apps into the CNET and Softonic apps base? Well, when your app is there, you can try the advertising options that CNET and Softonic offer for developers.
CNET gives you 2 price models
- PPD (Pay Per Download) Tool — Places your app in special Sponsored Section on the upper side of webpage. Price per download is $0.15 and up (depends on how many competitors bid for your section).
- SpotBid Tool — Classic PPC option where you pay-per-click on your ad (price per click is $0.20 and up). We recommend running with the minimum bid. The user lands on the product page on the CNET website, so be sure to write an appealing description to make users download with that ad click.
Softonic price models
They used to have nice pay-per-download option but switched over to PPC. We recommend starting with a Desktop type campaign. Add your relevant keywords and run a small campaign (up to 10 keywords) with minimum bid per keyword.
DOs (for CNET & Softonic):
Track sales Use your internal tracking or iTunes affiliate links.
Optimize your trial to increase the conversion This traffic is really good for testing. Remember that you can feed those sites experimental trials. But make sure the time period is long enough.
Go international Add your app on other Softonic language sites and promote it. Same strategy — up to 10 relevant keys per campaign.
DON’Ts (for CNET & Softonic):
Add irrelevant keys for Softonic ads You will get clicks but lose money.
Spend more than you get Optimization is the key.

Day 7: Data analysis
Now that we’ve gone through 6 days of promoting your app, it’s time to analyze the results! Here we need to pay attention to what is working best and where to head from here.
DOs:
Сheck your data in Google Analytics
GA is very complex, but don’t get overwhelmed! You’ll get it in time. For now, there are a few reports that are easy to understand and I’ll try to explain them here.
Depending on your site purpose, there are different metrics you should pay attention to. For MacPaw, these are the key metrics:
- Sessions (used to be Visits): Total number of Sessions within a date range.
- Bounce Rate: visits in which the person left your site from the entrance page without interacting with the page. The higher, the worse. This is a good gauge on how interesting the content was for the user.
- Goals: Download goal conversion rate.
- In Ecommerce: Revenue, Transactions and Ecommerce conversion rate.
I’ve selected these reports as the most important when it comes to making conclusions about your site and product performance:
- Audience: Geo - Location
Pay attention to which countries brought you the highest number of visits and which ones had the highest ecommerce conversion rate. If you see that you have high conversion rate in let’s say, Canada, but didn’t get enough sessions from that country — you should try to get traffic from them. This is a very good signal to buy ads from Canada.
Also, if you have different localizations of your apps, check what languages have the highest conversion rates and decide which localizations you need to focus on. - Acquisition — All Traffic
Here you can see where your users come from. Source/Medium is the default dimension. The Source is the place users are before coming your content, like a search engine or another website. The Medium describes how users arrived at your content.
For example, “google / organic” means that the Source was google and the Medium was organic search.
If you linked your AdWords account to your Analytics account, you will see “google / cpc,” which is the traffic from google and the medium was cpc (cost-per-click).
You will see referral traffic as well. It comes from a user clicking on a link on another website that brings them to your website. The source will be the original site. For example, “guides.macrumors.com / referral” means that the Source was guides.macrumors.com and the Medium was referral.
You will get (direct) / (none) too. Direct traffic comes from a user typing your website into their internet browser’s navigation bar, or users who have lost their initial cookie for when cookies are disabled.
In the future, when you’ll have different traffic sources, you need to add custom campaigns parameters to your URLs. Take a look here to learn how.
Pay attention to the number of sessions and the ecommerce conversion rate. Also, make decisions based on this information.
Analyze the same metrics that I mentioned before, paying close attention to download conversion rate and ecommerce conversion rate. - Acquisition - Keywords - Organic
Here you can check what keywords brought you traffic. Unfortunately, more than 95% of traffic will be shown as (not provided), and it is difficult to get information for the remaining 5% of your traffic. However, this will still get you information on conversion rates and you will see what keywords bring you the most/least traffic. You need to work on optimizing and creating keyword-optimized pages for the keywords that have the highest conversion rates. - Behaviour - Site Content - Landing Pages
Analyze this to see how different pages on your site are performing. You can also select a “Secondary Dimension” Source / Medium to see how the landing pages perform for different traffic sources.
Use all these reports to define
…the most effective traffic sources. Where do you have the highest ecommerce conversion rate? How do you get more traffic to that source?
Detect what ads are working the best
You can see this either on Google Adwords’ interface or in Google Analytics. Based on your reports, you can also develop a strategy for what kinds of geo-targeting you can use in your AdWords campaigns.
DON’Ts:
Ignore analytics!
READ:

