Clean up years of storage in 3 easy steps

While most of us are comfortable getting a shiny new laptop to replace the old one, we are not as enthusiastic about letting go of our old data. Our typical data storage includes years of accumulated images, music, documents, eBooks, PDF’s - some of which is still relevant to today, some is sentimental, and some is little more than hoarding junk.
For a relevant example, consider those photos that you took on your phone from three years ago, uploaded onto a storage disk that you have since upgraded. You saved the pictures, and others like it, on your desktop in a folder called “PHOTOS TO SORT”. Some of them you uploaded to social media, some you backed up to the cloud, and when you got a new hard drive, you backed them up there too.
And then you upgraded your Mac, and that's when you really lost track of the location of your files. They were at once nowhere and everywhere.
Not only is this an organizational nightmare, but you also know that your precious space is being wasted by an army of old duplicate files.
Free up disk space: eliminate old, useless or duplicate files across your Mac and storage devices
In today’s world of fast-paced change and upgrading, it’s become harder to manage the way we backup and store data. Backups of backups of backups; these duplicate files in your storage – your old backups, clone drives, your network drives, flash drives and cloud storage – take away space to store more of what’s important to you.
Losing Mac drive space to "Backups?" Don't panic! Find old, useless or duplicate files scattered throughout your Mac drives and storage devices. We're going to show you how to reclaim disk space on your Mac it with 3 easy steps.
Step 1 – Consolidate files from multiple drives
The first step should be to consolidate your data into one central location, whether it be an existing drive or a new drive bought expressly for the purpose.
Note - This is easy, but it takes time. If you don't have the time or patience, skip to step 2, where you can still make big positive strides towards cleaning up your data, but with much less effort.
Now you're going to want to find all your USBs, external drives, backup HDDs, cloud backups, and copy all your data onto this drive. As you're copying the files, we recommend having a plan on how to organize everything. If you prefer the tried and trusted folder structure, you can create nested folders in categories like "work" and "music", while users (of Mavericks OS X and up) may prefer to use the new tagging functionality.
To add a tag simply:
- Select files or folders you want to tag.
- Control-click on the selected items.
- Create and select a tag from the shortcut menu that pops up.
Alternatively, you can cross your fingers and hope that Spotlight finds what you need. There is a danger of data loss when you consolidate information, such as merging folders. The problem with merging folders from multiple sources that have the same name and have similar, but not identical content is that folders will be replaced and data may be lost. You can prevent this by using the “ditto” command in Terminal.
In the terminal window, type: ditto ~/source /target
Note - Use the actual name of the folders in place of “source” and “target".
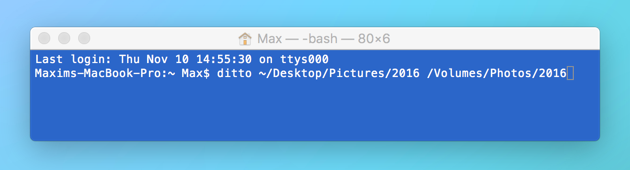
This command will merge Mac folders, but doing this for every folder, each containing hundreds of documents takes a lot of time and attention – one loss of concentration could lead to loss of data.
Apps such as SyncTwoFolders and Big Mean Folder Machine offer folder merge solutions that are much more user friendly.

Step 2 - Get rid of duplicate files across multiple drives
You now either have all your data in one storage location or you skipped step 1, and your data is still spread across several drives. Either way, you can now free up space by finding and removing duplicate files.
Searching for duplicate files used to be a real hassle but now there are specialized duplicate finding apps like Gemini 2 that can do in minutes what used to take hours. Simply connect your storage device(s) to your Mac and Gemini 2 will scan the drives in moments. It is great at immediately finding duplicate files (and not just by filename) and allowing you to choose what happens to them.
Trash or keep, it’s as simple as scan, clean, done. The interface is crisp and intuitive, and if you make a mistake, it is a simple process to restore that deleted file.
Schedule regular scans and from now on, you'll avoid the building up of annoying duplicate files.
You can also use Finder to manually scan for duplicate files, but be warned, this can be a time-consuming exercise.
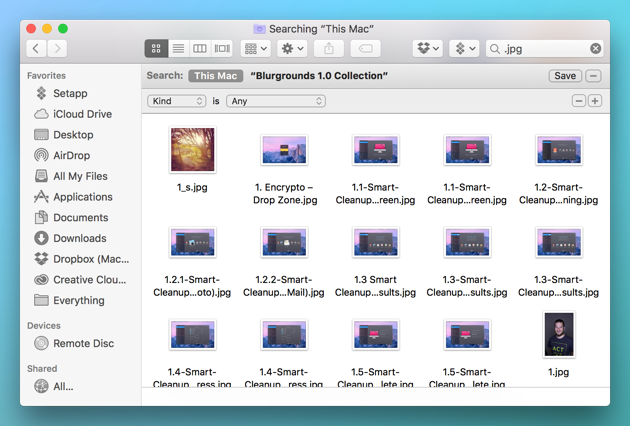
- Open Finder In the Search field, enter the wildcard asterisk symbol (e.g. *.pdf, *.jpeg etc.)
- If you filter by Kind, you’ll be able to scan for duplicates by eye.
To manually find and delete duplicate MP3’s, films, podcasts or other media in iTunes, simply:
- Open iTunes
- Click on File
- Select Display Duplicates
iTunes will then display duplicate media files in the main window.

Step 3 – Create a clean backup drive
Your data storage should now be free of space-wasting duplicates and organized into one location. It's crucial to now create a clone disk or a backup drive, as, if there's one thing we know, it's that drives will eventually fail.
The important thing is to not scatter backups all over the place and create a mess like you had before. You should work in and from your new consolidated data storage, in which you're hopefully now organizing and scanning for duplicates on a regular basis.
Then you can regularly schedule the backing up of that storage drive, so you have a safety net copy that is identical.
Time Machine, the backup utility of Mac, is good for protecting the integrity of your system, but just like fading memories, earlier snapshots of your system are de-prioritized compared to more recent snapshots. Time Machine should therefore never be considered as a reliable archival utility. Instead, we recommend using Mac’s Disk Utility to create a clone copy of your storage drive to an external location. If your storage drive is also your system drive, know that the clone will also be bootable, so that after a crash you can get your system back on its feet in no time at all.
To create a clone HDD:
- Plug your external drive into your powered-off Mac.
- Power-on and hold down Command+R to boot into recovery mode.
- Launch Disk Utility.
- Select the drive/partition you want to clone in the left pane and click on the Restore tab.
- Select the target destination drive and click the Restore button.
Your clone disk will now be created.
Welcome to the world of organized data storage
Congratulations, you’ve now consolidated your data, identified and removed duplicate files with Gemini 2, and created a backup disk that is identical to your new storage drive. You’re finally in control of your data, have more free disk space and, as a bonus, probably also have a bunch of USB and external drives that you can format and use for other purposes.
These might also interest you: