iPhone not charging? 10 tips for when your iPhone won’t charge
We’ve become so reliant on our phones for everyday tasks that an iPhone not charging is a pretty big deal. Fortunately, in most situations, your iPhone isn’t charging because of a very simple issue with an equally simple solution.
Before you start to panic, we’ve got several simple troubleshooting steps you can take to get your iPhone charging again. Let’s take a look at the most common reasons that your iPhone won’t charge, along with some easy tips to resolve the issue.
Why won’t my iPhone charge and what can I do about it?
There are several common reasons for an iPhone battery not charging, and the good news is that most of them are very straightforward and easy to fix.
One of the most common issues for an iPhone not charging is a faulty charging cable or adapter. In most cases, you can simply switch out the cable or try wireless charging, and you will be on your way to a fully charged battery.
Other common issues include dust in the charging port, a faulty outlet/power source, and software glitches. Less common charging problems are caused by your iPhone being physically damaged, having an older battery that doesn’t hold a charge, and using incompatible iPhone accessories.
10 tips for troubleshooting and fixing an iPhone not charging when plugged in
The following tips for handling a stubborn iPhone that refuses to charge are ordered from the easiest and most common situations to the rare and more costly ones. Fingers crossed that the issues that you’re having with your iPhone not charging are as simple as making minor adjustments.
1. Try a different power source to charge your iPhone
This experiment may seem too easy to work, but faulty outlets and power banks exist, and you need to rule out this simple issue before trying anything else. If your iPhone isn’t charging when plugged into a wall outlet, try another one.
Experiment with charging your phone using a USB port on your computer or in your car using your car charger.
2. Check the iPhone charging cable and adapter
Your iPhone charging cable is far more likely to wear out and stop working than your actual iPhone. Look for signs of damage to the cable — fraying, exposed wires, or dark spots around the connectors. Even if there are no visible signs of damage to your charging cable, try charging your iPhone with a different cable to see if that fixes your charging issues.
Are you using an Apple brand charging cable and adapter? While it may be tempting to buy off-brand charging cables to save money, they aren’t always fully compatible with iPhones, and they could cause damage to your phone. If you are willing to spend the extra money for an iPhone, you should also splurge on Apple charging cables and adapters.
No luck? iPhone charger not working? The next step is to switch out your adapter and try again.
3. Clean your charging port
No matter where you keep your iPhone — pocket, purse, holster, backpack — its tiny charging port is a dust and debris magnet. Lint can accumulate in this small opening and obstruct the connection between your charging cable and your iPhone. Carefully clean out the charging port with a wooden toothpick or spray compressed air into the port to blow out the debris. Do not use a paperclip, as this could damage the delicate pins in the charging port. Also, avoid using liquids containing alcohol.
4. Check the Optimized Battery Charging feature
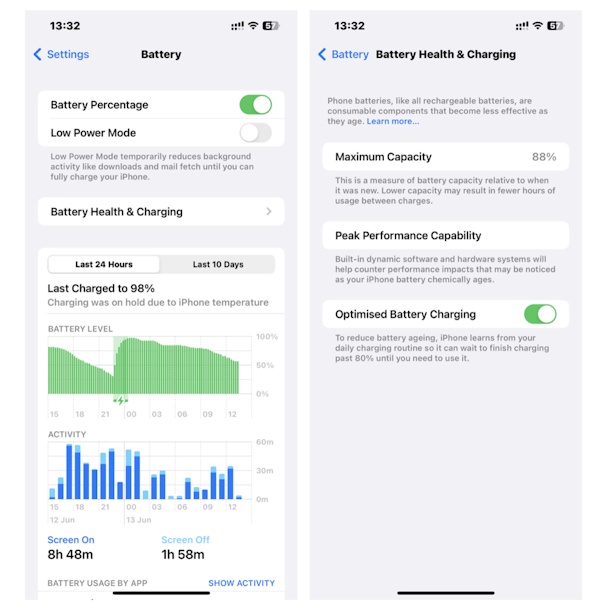
If you notice that your iPhone stopped charging at 80%, no need to stress out. Since iOS 13, there has been a feature aimed at prolonging battery life, and it is named Optimized Battery Charging. Check it in Settings > Battery > Battery Health & Charging.
5. Try charging your iPhone wirelessly
If you have an iPhone 8 or newer model, you should be able to charge your phone wirelessly. To connect your iPhone to a wireless charger, follow these steps:
- Connect your charger to a power source.
- Set the charger on a level surface or other location recommended by the manufacturer.
- Place your iPhone on the charger with the display facing up. It should take a few seconds for your iPhone to start charging.
6. Restart your iPhone
Sometimes a simple reboot is all your iPhone needs to wipe out any software glitches and get your iPhone back on track. Press and hold the power button and either volume button until the ‘Slide to Power Off’ option appears on your screen. Swipe the slider to the right to turn off your phone. Wait for a few minutes and then press and hold the power button to turn your iPhone back on again.
7. Make sure your iPhone’s software is up to date
While not a common issue, sometimes outdated software can interfere with your iPhone’s ability to handle basic tasks like charging when it’s plugged in. To rule out this issue, ensure that your iPhone is running the latest version of the iOS operating system.
- Open your iPhone and navigate to Settings.
- Tap ‘General’ and then go to ‘Software Update.’
- If Automatic Updates are toggled on, you will see a message below telling you which iOS version you are using and whether it is up-to-date.
- If updates are toggled off, tap ‘Automatic Updates’ and when the next screen appears, toggle on ‘Download iOS Updates’ and ‘Install iOS Updates.’
- Once your iPhone has been updated, plug it in and wait for it to charge.

8. Perform a hard reset on your iPhone
If your iPhone still won’t charge, you can try a hard reset. This is a little more involved than simply turning your iPhone off and restarting it. A hard reset completely reboots your processor and takes a bit longer than a simple reset.
If your iPhone is using iOS 16 or newer, here’s how to perform a hard reset:
- Press and quickly release the volume up button.
- Press and quickly release the volume down button.
- Press and hold the side button.
- When the Apple logo appears, release the side button.
- After your iPhone has finished restarting, try charging it again.
For iOS versions older than iOS 16 or an iPhone with a home button, check out this guide from Apple.
9. Reset your iPhone’s settings
You’ve tried restarting and rebooting your iPhone, but it still won’t charge when you plug it in. The last step before calling in a professional is to reset your iPhone’s settings. Yes, this will erase your iPhone’s personalized settings, but all of your data (photos, apps, videos, and music) will remain unchanged. Here’s how to reset your iPhone settings:
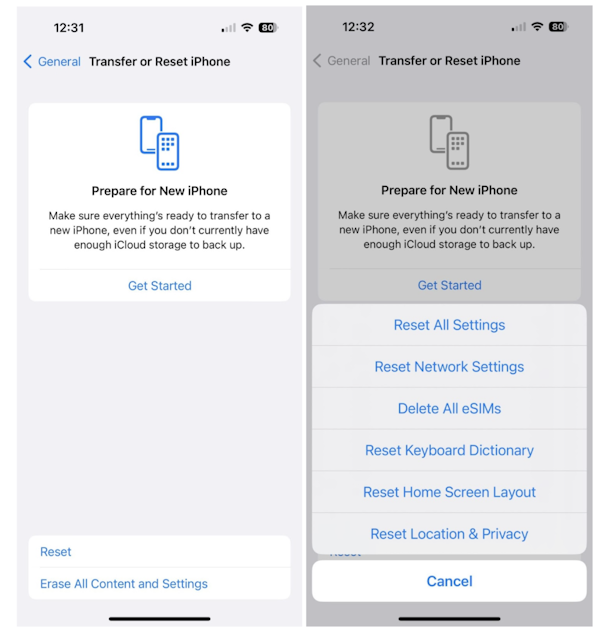
- Open your iPhone and tap ‘Settings.’
- Tap ‘General.’
- Tap ‘Reset’ and select ‘Reset All Settings.’
- Give your iPhone a chance to reset and try charging again.
10. Check for physical damage and seek out professional assistance
If you’ve tried all of the steps outlined above, and you still can’t get your iPhone to charge, there’s a good chance that your battery is faulty or your iPhone has been damaged. Perhaps your phone has been dropped too many times, has incurred water damage, or the connector pins have been bent.
If you suspect that your iPhone has been damaged, it’s time to call in a professional. Visit a nearby Apple Store, contact Apple Support, or visit an authorized Apple service center to have your iPhone diagnosed and repaired by a professional.
Yes, dealing with an iPhone that isn’t charging can be frustrating, but there is a very good chance that a solution can be found with just a few experiments and tweaks. Try the steps outlined above one at a time. If none of the troubleshooting steps work, bring your iPhone to a professional to have it tested and repaired.

