Keeping a recent backup of your iPhone is one of the smartest things you can do to protect your photos, contacts, settings, and files in case something goes wrong. If you lose or break your iPhone, run into a technical glitch, or upgrade to a new phone, you’ll find that having a backup makes life so much easier.
Here’s how to keep your data safe by backing up your iPhone using three different methods, plus how to deal with common issues.
What is iPhone backup, and why is it important?
An iPhone backup is a saved copy of the data on your device, including app data, messages, settings, photos, and more. If you ever lose your iPhone, damage it, or upgrade to a new model, having a backup lets you restore everything in minutes. No starting from scratch, no lost memories.
Think of a backup like a safety net: you hope you never need it, but you’ll be so glad it’s there when you do.
How many options for backing up an iPhone exist?
While there are countless ways to back up your iPhone using different cloud services, we’re going to focus on three main ways to back up your data:
- Use iCloud
- Back up data to your Mac
- Back up data to an external hard drive
How to back up an iPhone in 2025
Each method has pros and cons, and the best one for you depends on your habits, available iPhone storage capacity, and how much control you want over your backups.
Method 1: Back up iPhone to iCloud
Here’s how to back up your data to iCloud:
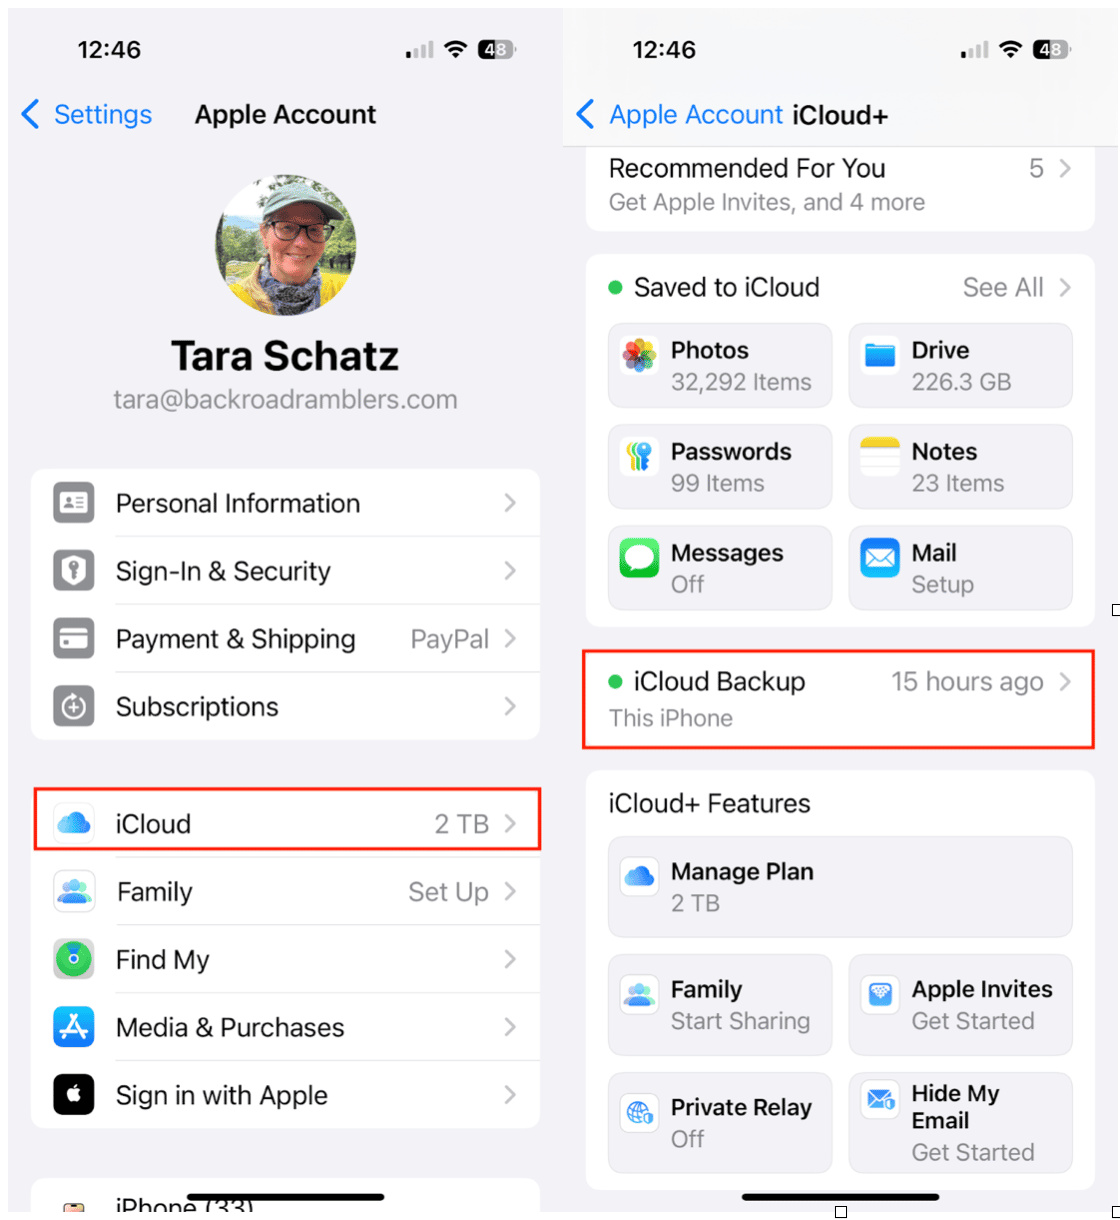
- Go to Settings > Your Name > iCloud > iCloud Backup.
- Toggle ‘Back Up This iPhone’ to ON.
- Tap ‘Back Up Now’ to start a manual backup.
Pros:
- Automatic and wireless.
- Accessible from anywhere with an internet connection.
- No computer needed.
Cons:
- Limited free space (only 5GB) for the free plan.
- Slow if your internet connection is weak.
- Doesn’t include everything (like music not purchased via iTunes).
Method 2: Back up iPhone to Mac
If you have a Mac computer, you can manually back up your iPhone so that all of your data is also stored on your Mac. Here’s how to do it:
- Connect your iPhone to your Mac using a USB cable.
- Open Finder and select your iPhone from the sidebar.
- Under Backups, choose ‘Back up all of the data on your iPhone to this Mac.’
- Click ‘Back Up Now.’
Pros:
- Faster backup and restore compared to iCloud.
- More control over your backup location.
- Doesn’t rely on cloud storage.
Cons:
- You need to remember to do it manually.
- Requires a Mac with enough available space.
- Not as convenient as wireless options.
Method 3: Back up iPhone to an external hard drive
While you still need a Mac to back up your iPhone to an external hard drive, you can transfer data from your Mac to the hard drive to save space. This requires a one-time investment in a hard drive. Here’s how to do it:
- After backing up your iPhone to your Mac using the steps above, locate the backup folder on your Mac (~/Library/Application Support/MobileSync/Backup/).
- Copy this folder to an external hard drive for safekeeping.
Pros:
- Great for long-term storage and archiving.
- Saves space on your Mac.
- Portable backup solution.
Cons:
- More steps are involved in the process.
- Not automatic — requires manual transfer.
Needs physical access to both the Mac and the hard drive.
Main challenges for backing up an iPhone (and how to fix them)
Even the best backup plans hit snags. Here are the most common problems users face, and how to solve them fast.
1. Not enough storage on iCloud
Your backup keeps failing because there’s no space left in iCloud.
Solutions:
- Delete old iCloud backups you no longer need (Settings > iCloud > Manage Storage > Backups).
- Upgrade your iCloud+ storage plan to allow for more space.
- Use CleanMy®Phone to remove junk files and media clutter from your iPhone before backing up. A cleaner phone means a smaller backup!
2. Backup is taking forever
Your backup seems stuck or is taking hours to complete.
Why it’s happening: You likely have a huge amount of data on your iPhone, especially photos, videos, and app data.

Solution:
Use CleanMy®Phone to declutter your storage. The app makes it easy to identify and delete large files and similar or blurry photos, which drastically reduces your backup size and speeds up the process.
3. Not enough storage on your Mac
You can’t complete a backup because your Mac doesn’t have enough free space.
Solutions:
- Clean up your Mac by removing old downloads, cache files, and unused apps.
- Move large files (like photos and videos) to an external hard drive.
Once space is freed up, try the backup again.
Advanced guide on how to prepare your iPhone for backup
Want a faster, lighter backup that doesn’t eat up your iCloud or Mac storage?
Before you hit “Back Up Now,” take a few minutes to tidy up your iPhone. Not only will it speed up the process, but it’ll also save you money on iCloud storage plans. Here’s how to get your device backup-ready:
Step 1: Remove duplicate and blurry photos
Your photo library is one of the biggest culprits when it comes to bloated backups. Download CleanMy®Phone to make the process seamless. With CleanMy®Phone, you can delete duplicate and blurry photos with the tap of a button. Here’s how to do it:
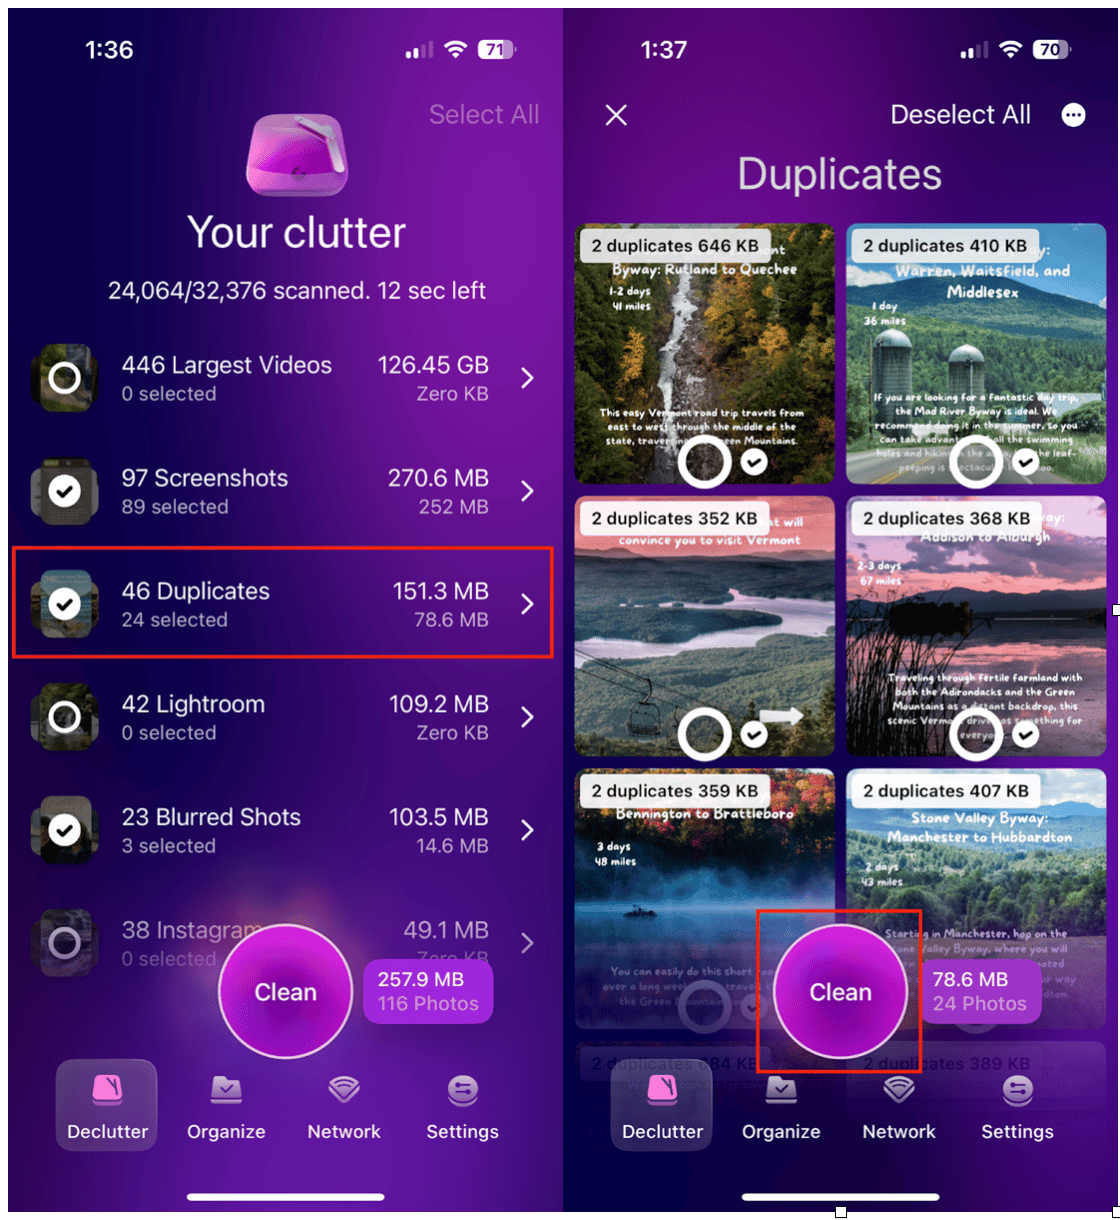
- Find and delete duplicates: Open CleanMy®Phone, tap ‘Declutter’, and choose Duplicates. The app will automatically detect duplicates, so you just have to tap ‘Clean’ and they’ll disappear.
- Remove blurry or low-quality shots: Use CleanMy®Phone to quickly scan and remove photos that are out of focus or just taking up space. Simply tap ‘Declutter’ and ‘Blurred Shots,’ followed by ‘Clean.’
- Clean up screenshots and old videos: Many of us have hundreds of screenshots we never look at again. Choose ‘Screenshots’ and tap ‘Clean’ to get rid of them. Finally, tap ‘Largest Videos,’ select the ones you don’t want to keep, and choose ‘Clean.’
Step 2: Compress or remove large videos
Backup space is precious; don’t waste it on massive video files.
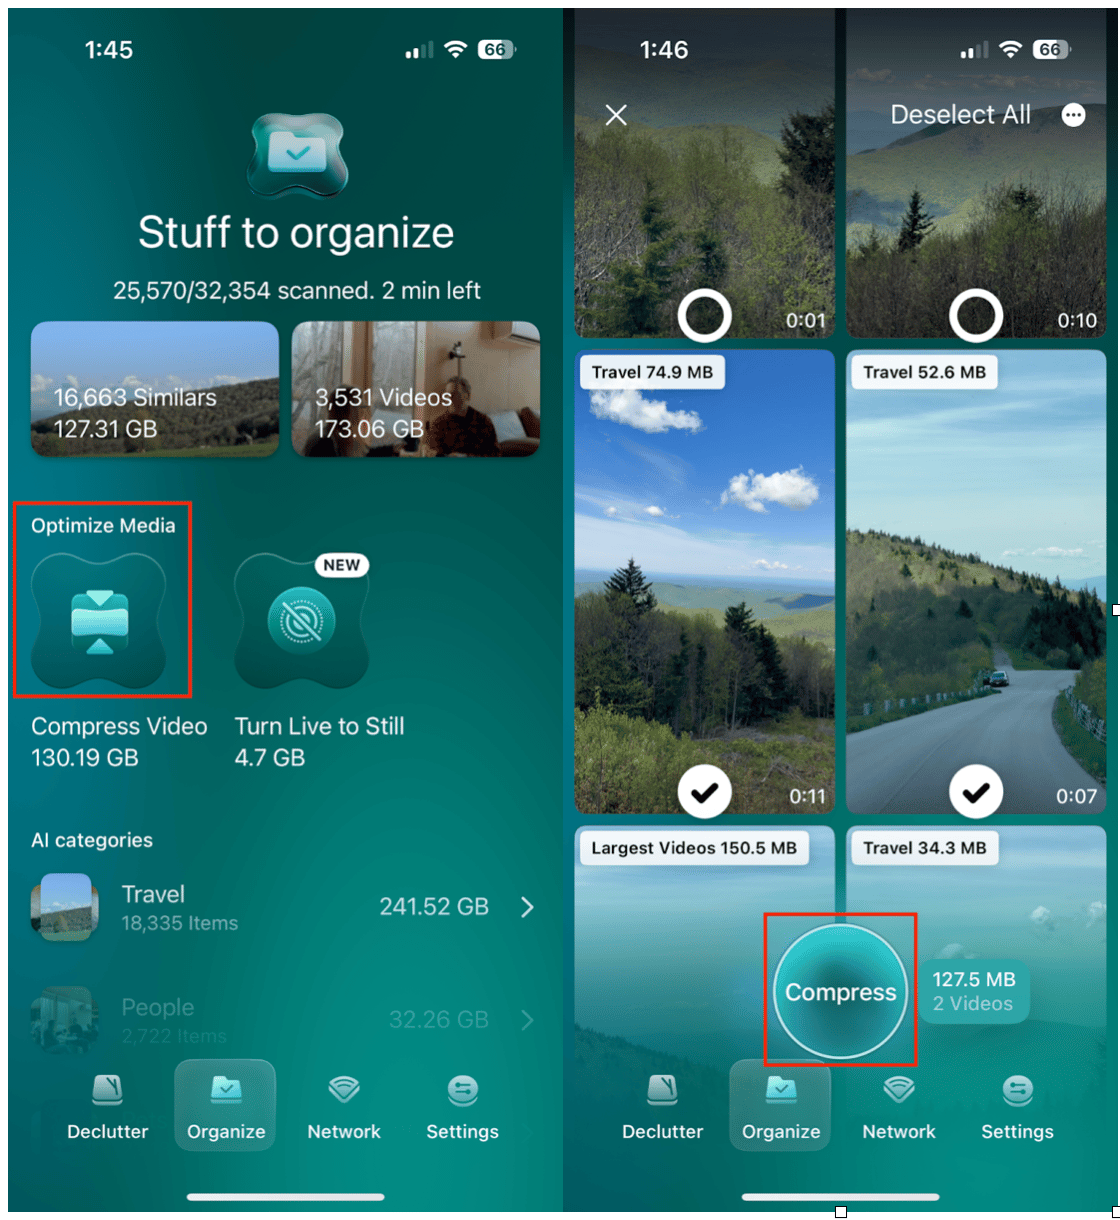
- Use CleanMy®Phone’s video compression tool to reduce the size of your largest files without sacrificing quality. Choose ‘Organize,’ then ‘Compress Video.’ Select the videos you want to compress, then tap ‘Compress’ to save space.
- A new feature also lets you convert Live Photos into still images, freeing up even more space without losing the memory. Under ‘Organize,’ tap ‘Turn Live to Still.’ Choose the photos you want to convert, then tap ‘Convert.’
Step 3: Clear app cache and delete unused apps
Apps can quietly hoard data in the background. Here’s how to lessen their impact and save space:
- Clear cached files from apps to shrink your backup footprint. This feature can usually be found in the Settings for each app.
- Delete apps you haven’t used in months. You can always reinstall them later from the App Store if you decide to use them.
Backing up your iPhone doesn’t have to be complicated, but it does have to be done, if only for your peace of mind. Choose the method that works best for your setup, and consider using tools like CleanMy®Phone to streamline the process. A little maintenance now could save you a major headache later.


