Remember the feeling of a brand-new Mac? A Mac without rainbow wheels that never caused headaches or frustration. There is a way to restore that state of your computer without erasing all content and settings. 14 ways, in fact. Follow the tips below closely and enjoy a faster Mac. Let’s dive in!
Key takeaways: The fastest ways to make your Mac more responsive
These simple steps below won’t take much time but will greatly help to improve your Mac’s performance. If you do these activities regularly, you won’t have to worry about the need to speed up your Mac again:
- Find resource-hungry processes. Open Activity Monitor to identify apps consuming excessive resources, then quit them to boost Mac's speed.
- Free up RAM. Quit memory-intensive apps, or get CleanMyMac to free up RAM quickly.
- Restart your Mac. Restarting clears temporary files and quits unresponsive processes, giving your Mac room to breathe.
- Update macOS. Check for system updates regularly to ensure you're running the latest, most optimized version of macOS.
- Close unnecessary browser tabs. Bookmark important pages and close tabs you've left open for days to enhance performance.
How to test if your Mac is really slow
Sounds like your Mac?
- Mac booting up slower
- Overheating computer
- Browser crashes
- Frequent “beach-balls”
- Unexpected shutdowns or apps crashing
If you thought “yes” to any of these signals, than your Mac may need a tuneup.
Why is your Mac running slow
Here are some obvious reasons:
- Lack of free storage (less than 10% of the overall Mac capacity) — go to System Settings > General > Storage to check
- Running a lot of resource-intensive apps at the same time — memory and CPU hoggers
- The age of your Mac and hardware limitations — Macs tend to get slower over time as they can no longer cope with the strain new macOS versions and apps put on it
Here’s how to speed up your Mac (instant fixes)
Here are 14 proven tips to make your Mac faster and more responsive.
1. Free up RAM
If your Mac runs out of memory, it will naturally slow down. You now know how to check memory and free it up using Activity Monitor. But it’s a lot of work. Luckily, there is a way to do it automatically.
It’s easy to do with a free tool in CleanMyMac. It is a Mac performance improvement app that comes with instruments designed specifically for speeding up slow MacBooks. For example, CleanMyMac has a dedicated feature called Menu App that monitors Memory pressure on your Mac.
Here’s how to free up RAM the easy way:
- Get your free CleanMyMac trial.
- Click a little iMac icon in the menu bar.
- Under Memory, click Free Up.

You can also click the Memory tab and quit top consumers one by one there.
Alternatively, free up your RAM with Terminal
If you don’t want to use a third-party app, you can free RAM instantly with Terminal. You can apply this trick when your system is running out of available memory. In other words, when a particular app freezes up and desperately needs some fresh memory. Follow these steps:
- Open the Terminal app via Launchpad.
- Paste in the following command:
sudo purge - Press Return.
- You will be asked to enter your system password.

2. Restart your Mac now and then
Another quick tip that can help speed up your Mac is restarting it occasionally. It frees up RAM, installs any update that may be awaiting, and quits all apps and processes. On a Mac with Apple silicon, it also performs system checks and resets SMC (System Management Controller responsible for Mac’s important physical aspects: fans, lights, and power) and NVRAM (non-volatile RAM storing vital system information like display settings, speaker volume, time zone settings, etc.). All of these optimize your Mac, thus making it faster. There are no rules here, but doing it once a week may become a good habit.
To restart your Mac, click Restart from the main Apple menu.
If you want to reset SMC and NVRAM on an Intel-based Mac and see if it speeds up your computer, check out this guide on how to do it.

3. Manage your startup items
When your Mac boots quickly, you spend less time waiting around — apps like Safari, Chrome, or Firefox launch instantly. How can you achieve this? Your Mac often loads unnecessary apps during startup, slowing everything down. Fortunately, it's easy to take control and manage what's running when your Mac starts up.
- Go to your System Settings > General.
- Click Login Items & Extensions — you need to scroll down.
- Review the list of apps that open at login and turn off unneeded ones — only keep your antimalware tool if you have one and disable the rest.


There are also unseen apps called launch agents that may slow your Mac down. For example, your internet download speeds suddenly plummeted. How to speed up downloads on Mac? Delete background agents that cannibalize your internet speeds. They can be disabled from the Login Items & Extensions pane as well — just make your way through the apps allowed in the background.
4. Find resource-hungry processes
Some apps are more power-hungry than others and can slow your Mac to a crawl. To see which apps are eating up your system resources, use Activity Monitor. You can open it from the Utilities folder of your Applications folder or use Spotlight to find it.

How to use Activity Monitor to speed up Mac
Activity Monitor details five different resources: CPU, Memory, Energy, Disk, and Network usage.
- If your Mac is running slowly, pay special attention to the CPU section. It shows how processes affect the CPU (processor) activity. When you’re running intensive apps, like video editors or games, they may use more of your CPU capacity. Those apps will be listed at the top of the list in the CPU tab. If some app is using a lot of CPU power, you can quit it: select the app or process and click the “X” in the left corner of the Activity Monitor.
- The Memory tab shows how much memory each process or app is using. The Memory Pressure graph at the bottom of the window helps understand whether your Mac manages memory efficiently. If it’s green, you shouldn’t worry. But if it turns yellow or red, it means your Mac’s running out of free RAM — quit the apps that are on top of the list if you don’t need them running.
- It’s also important to check the Energy tab. The most battery-draining apps will be listed first — see if you need them running. Otherwise, quit those programs to prolong the time between charges.
- There are also system processes listed in the Activity Monitor. These usually have words like system, helper, assistant, and core in their names. To display them all, go to the View menu and select System Processes.
Important: Activity Monitor lists everything running in the background. To be on the safe side, quit only processes related to apps (e.g., Safari or Photoshop). Before quitting anything with hard-to-decipher names (like coreaudiod or the like), conduct a quick search of what the process is responsible for to avoid closing a vital system process.
5. Remove cache and other system junk
One type of system junk that may significantly slow down your Mac is cache files — temporary data used to speed up processes. For example, a web browser will cache web pages to download a website faster when you revisit it. Sounds great, right? Actually, it is, but there is always a “but.” Over time, these cache files take much storage on your Mac, and instead of speeding things up, they slow your computer down.
So, how to speed up MacBook by emptying the caches? There are two ways: you can clean them up manually (step by step), or you can remove them in a second with a Mac cleaner app CleanMyMac.
We recommend using CleanMyMac because it removes only safe-to-delete files so you do not risk corrupting the proper work of your macOS. It has the Cleanup feature that does exactly what you need. Here’s how to clear the cache and other junk automatically:
- Start your free CleanMyMac trial.
- Open CleanMyMac.
- Choose Cleanup.
- Click Scan and then Clean (you can select files for deletion by clicking Review All Junk first).
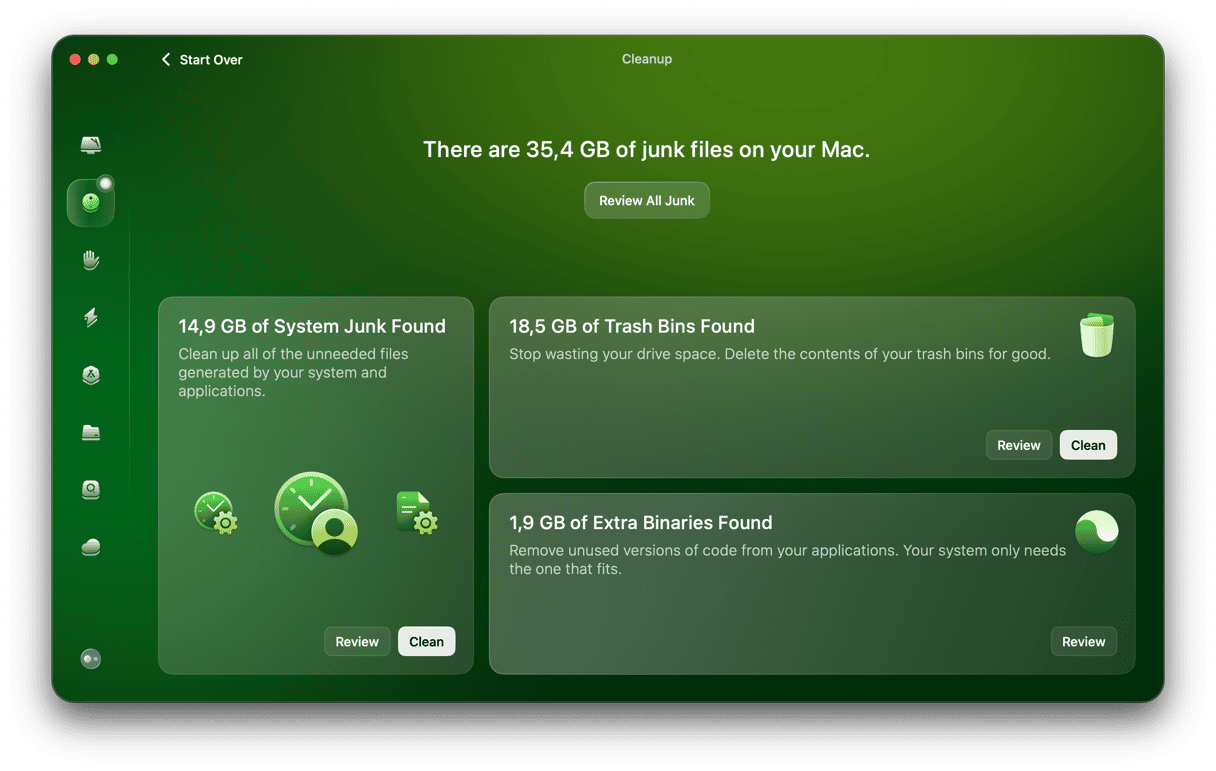


That’s it!
The benefits of using CleanMyMac
- A fast way to delete junk files — on average, the Cleanup scan takes up 6 seconds and 6 more seconds for the clean
- On average, users find and get rid of over 10 GB of junk after the first scan
- Comes with 25+ tools to protect, declutter, and maintain your MacBook
Try CleanMyMac for free — test it for 7 days and see if it speeds up your Mac.
Are Mac cleaner and optimizer apps like CleanMyMac actually worth using?
Of course, you can clear cache manually by diving deep into the Library folder. However, using a Mac cleaner and optimizer like CleanMyMac or its alternative makes the process not only faster but also safer. It is because choosing manual cleanup is associated with the risk of deleting files vital for the proper work of macOS.
Can I clear cache manually?
If you decide that third-party apps are not for you and want to clean cache files manually, it is also possible. For example, you can open a new Finder window and press Command+Shift+G. Paste /Library/Caches followed by Return and delete system cache files from there. Repeat for ~/Library/Caches to remove user cache.

Note, though, that if you decide to do it, double-check what you send to the Trash and delete only files inside the folders.
Be ready that the process is time-consuming, and you will not delete all types of cache from these locations. There are also browser cache and app cache you might want to remove as well.
For more tips, check out this guide on how to clear cache on a Mac.
Besides, consider freeing up space: clear up the downloads folder, empty Trash, delete unneeded applications, and remove large files. You can also enable Recommendations under the colored bar in System Settings > General > Storage as well as check all the categories in here to remove unneeded stuff. For more tips on how to reclaim space, jump to this article.
Also, you will need to clear System Data — one of the largest space eaters that is also known for slowing down MacBooks. Learn more here.
6. Close browser tabs
Another proven way to speed up MacBook Pro, MacBook Air, or iMac is to close unneeded browser tabs. You may be surprised that open tabs consume a lot of resources — one tab can easily eat up more than a gigabyte of RAM. So, if you feel that your Mac is more sluggish than usual, consider closing unnecessary ones. If you need to return to them later, bookmark such tabs or add them to a reading list. Most browsers have the Bookmarks menu in the menu bar from where you can do it.

7. Update your Mac (OS and software)
Typically, Macs take care of themselves. Having the latest software from Apple makes speeding up your Mac simple. To check your version of the operating system, click the Apple icon in the top left corner of your screen and then About This Mac. Make sure you have the latest macOS/OS X installed (or the latest you can install since not all Macs upgrade to macOS Tahoe).
Here’s how to update macOS version:
- Open System Settings > General > Software Update.
- If a new version is available, click Update Now and follow the on-screen instructions to install it.

While you wait for the new macOS version to download, use this time to enable automatic updates. This way, you won’t have to check for any upgrades and install them manually. Here’s how to do it:
- In System Settings > General > Software Updates, click the i next to macOS updates and Security Responses.
- Enable all options — now, your Mac will automatically install macOS updates and updates to apps downloaded from the App Store.

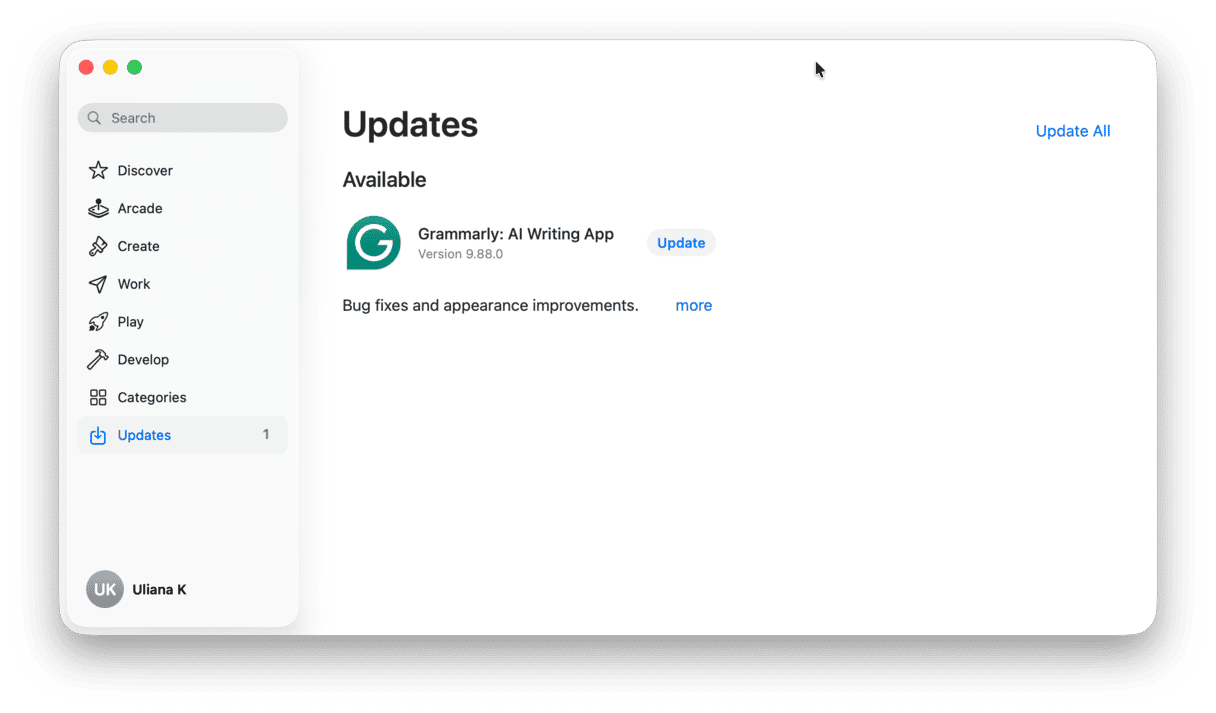
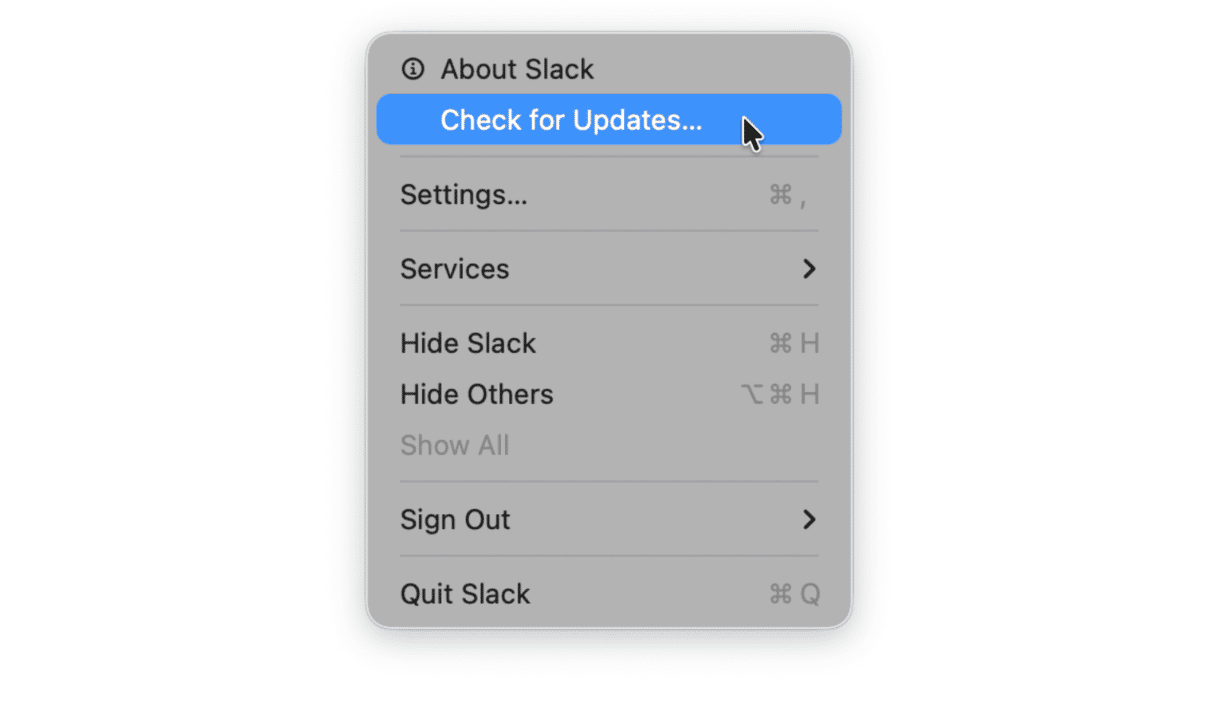
Also, make sure you update all apps. Here are different ways to do it:
- Open App Store and click Updates from the sidebar. Click Update All or Update next to every app.
- Open an app and click its name > Check for Updates from the menu bar.
- Go to the developer’s website and download a new version of the app.


Just like with macOS, you can enable automatic updates for third-party apps. Usually, you can find this option in app settings.
Tip: Consider installing updates when you do not need your Mac. For example, on the weekend or in the evening. By doing so, you will avoid disruptions of your working process or entertainment and make updates smooth and painless.
Should I update macOS to speed up my Mac or will it slow it down?
Many Mac users are concerned about updating older MacBooks. In most cases, a fresh update improves overall efficiency, performance, and security once initial indexing settles. Meaning that you might experience some slowdowns right after an upgrade (it may even last up to 48 hours), but it should fix once the system is fully optimized. This process is running in the background.
8. Reindex Spotlight
If you recently updated your OS, you would be aware of the slowness that occurs when Spotlight is indexing. This only takes a few hours, and then your Mac will be fine. But sometimes, the indexing gets stuck, and you need to speed up a Mac. To solve this problem, you need to reindex Spotlight:
- Go to System Settings > Spotlight.
- Click Search Privacy at the bottom of the window.
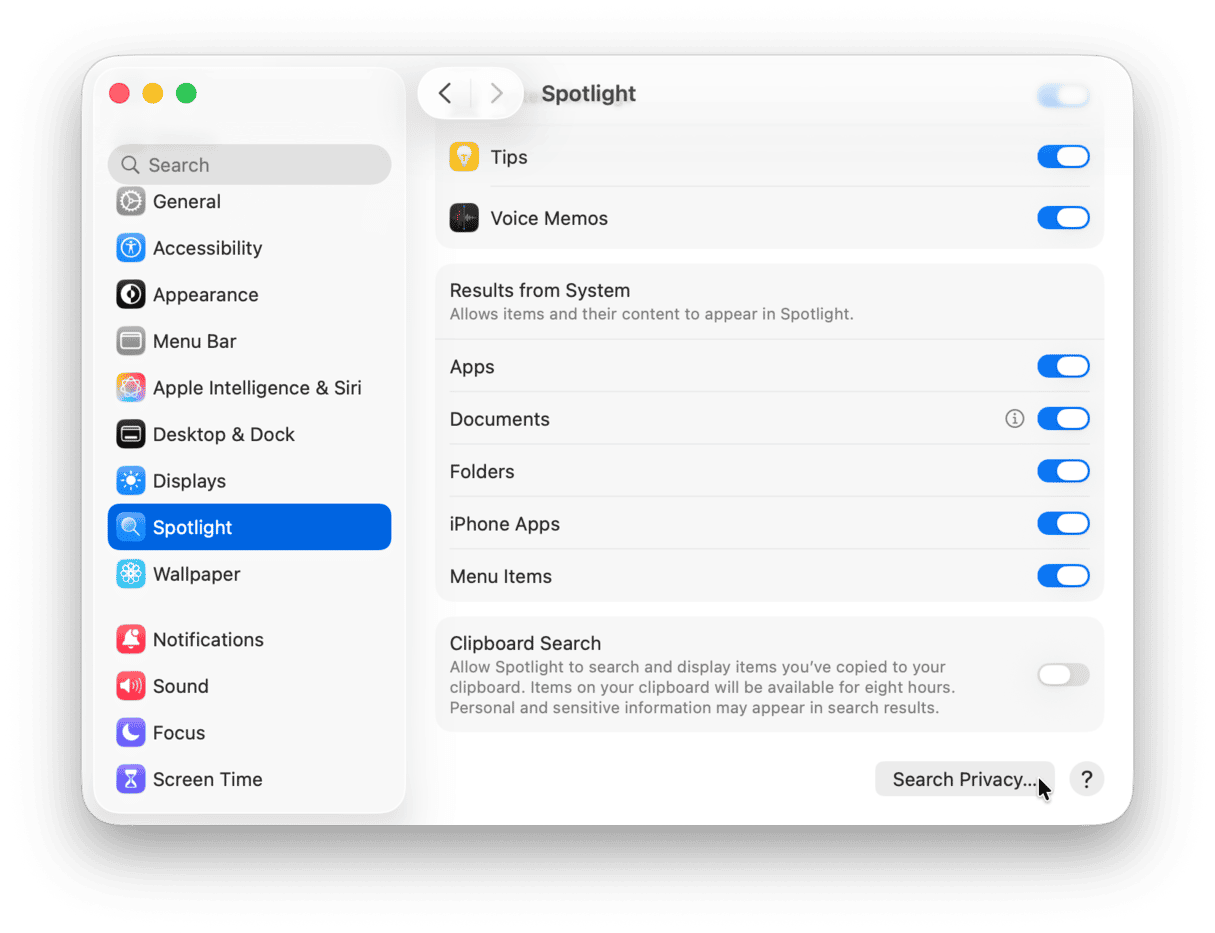
- Now drag your hard drive from Finder into the Privacy List.
- Wait a few seconds, then remove it by clicking the “-” sign.
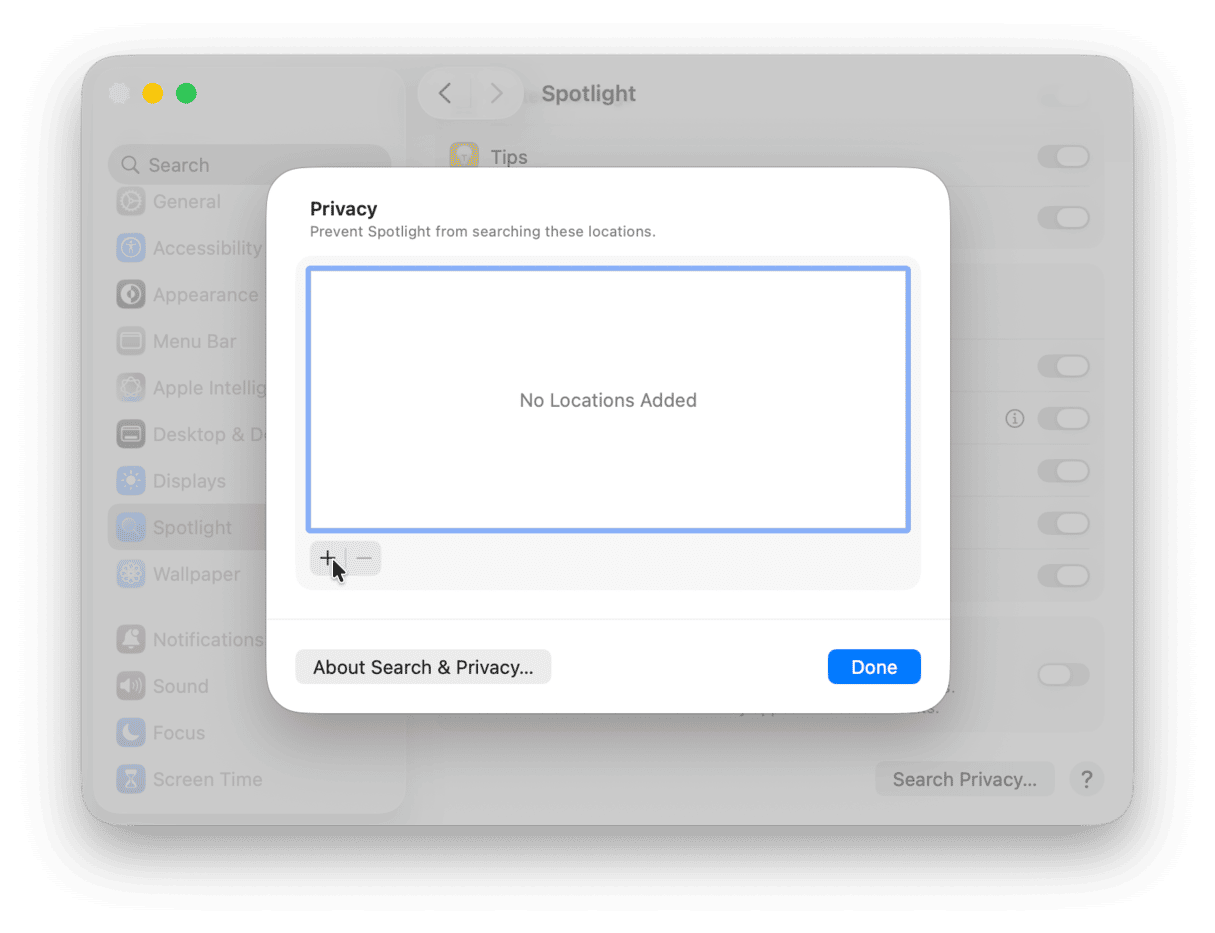


The indexing will start again, but hopefully, after a few hours, it will finish properly and boost your Mac speed.
9. Manage iCloud syncing
iCloud syncing, if you have it enabled, causes your Mac to slow down. You rarely notice it because it happens in the background.
Let’s check your iCloud settings:
- Open System Settings > Apple Account.
- Click iCloud.

If you click See All, you will see what is synced with iCloud. If you turn off some apps in this pane, they will stop syncing with iCloud. iCloud Drive and Photos are prime suspects worth a closer look. Are there too many large documents on your Mac? If so, iCloud will hog up resources trying to sync all that massive data. To ensure that it does not waste valuable system resources, choose only those apps and types of documents you need synced and disable the rest of them. We recommend syncing only essential files.
Now, click Drive and look at that option that says “Optimize Mac Storage.” This setting tells your Mac to stop offloading your files to the cloud and store the iCloud Drive contents locally on your drive. Its main purpose is to free up space. But the price is constant background sync. So, another way to make MacBook faster is to disable that setting.

10. Check your hardware
If you’ve followed the steps above, and your Mac is still slow, it may be that it’s failing. Some tell-tale signs of a failing hard drive are unusual noises (like clicking, whirling, or beeping), frequent freezes, corrupted or missing files, and error messages popping up.
To prevent minor issues from escalating into major ones, consider checking your MacBook’s hardware health. The best way to do it is to contact an Apple-certified repair center. As an alternative, you can upgrade your RAM and run Apple Diagnostics. We’ll show you how to do both later in the article.
11. Check your internet connection
Sometimes, when your internet connection is slow, you may think that it is your Mac that is sluggish, especially when you watch videos, play video games, or do anything else online or work with apps that require being connected to the network.
So, to rule it out, run a quick speed test by using this or other tool freely available online. If your internet connection is slower than usual, try moving your Mac closer to your router, restarting your equipment, or contacting your provider. For more tips on how to fix issues with slow internet, check out this handy guide.

12. Upgrade your RAM and SSD
RAM stands for Random Access Memory, and it is a temporary memory that the CPU uses to hold important information system processes need to run. In case of high RAM usage, your Mac may slow down, so upgrading your RAM may be a great speed-up option.
The more RAM your Mac has at its disposal, the more windows or tabs you can have open without slowing the system down. With more RAM, the operating system isn’t making calls to virtual memory, which uses the hard drive and slows down the system considerably. Here’s a comprehensive guide on how to upgrade your Mac’s RAM.
Along with RAM, you can also upgrade your SSD. It will increase storage capacity, but this option is also limited to a few older Macs only.
| Macs with upgradable RAM | Macs with upgradable SSD |
| pre-2012 MacBook Pro | MacBook Pro (2016-2017) 13-inch (non-Touch Bar) |
| MacBook Pro 17-inch | Mac Pro (2019) Tower |
| MacBook (2007-2011 models) | iMac (2020) Intel-based |
| Mac Pro (all models) | |
| Mac mini (2010-2012 models) | |
| pre-2020 iMac (Intel-based) |
How much RAM do I need?
It all depends on how you use your MacBook, but here are a few basic recommendations:
- 8-16 GB is enough for casual users (browsing, watching videos, and some basic photo editing)
- 24-32 GB is great for power users (moderate video editing, graphic design, software development, and running multiple virtual machines)
- 48 GB is a choice for pro users (high-end 3D rendering, 8K video production, and advanced AI development)
13. Turn off visual effects
A great tip to help you when you wonder how make your Mac less laggy is to turn off visual effects. Turning off some of the features can greatly speed up iMac or MacBook.
Here’s how to speed up a Mac by turning off some visual effects:
- Click System Settings > Desktop & Dock.
- Disable the following options: “Animate opening applications,” “Automatically hide and show the Dock.”
- Next to the “Minimize windows using” option, change the Genie effect to the Scale effect.

14. Run Apple Diagnostics
If you think that your Mac may need a speed-up because of a hardware issue, you may easily test it with Apple Diagnostics. It is also known as an Apple Hardware Test that helps determine which hardware components are not working properly.
The process is different for Mac computers with different processors.
Mac computers with Apple silicon
- Start up your Mac.
- Continue to press and hold the power button as your Mac turns on.
- Release the power button when the startup options window appears.
- Press Command-D to run the Diagnostics.
- Apple Diagnostics will run automatically.

Intel-based Mac
- Start up your Mac and press and hold the D key while it turns on.
- Release the key when the progress bar appears or when you’re asked to select a language.
When the process is complete, it will show a list of the problems encountered, and it will be presented as a list of reference codes. You can find the entire list of Apple Diagnostics reference codes in this article from Apple Support.
Intel vs. Apple silicon optimization
Generally, Apple silicon Macs are snappier and rarely get as slow as older Intel-based Mac. It is mainly explained by the fact the newer macOS and Mac-specific apps are optimized for Apple silicon as well as the nature of these chips themselves.
With this in mind, you may need to maintain your Mac with Apple silicon less frequently than your Intel-based Mac, but still we do not recommend ignoring the basics (having enough free space, restarting your Mac from time to time, and tweaking settings) to keep it in top shape for as long as possible. Remember, maintenance is a key to Mac running flawlessly.
Note: if you install the latest macOS version of a 4-year-old Mac, it will be slower compared with the newest model, even if it is equipped with Apple silicon chip.
There are a few things more annoying than a slow Mac. Luckily, there are numerous tips to help you out, and hopefully, one of the solutions listed here worked well for you. Thanks for reading, and stay tuned for more tips and tricks.
Frequently asked questions
Is it possible that Mac is slow because it is infected with malware?
The short answer is yes. Mac may become sluggish because of malware. It is due to the fact that malicious apps consume significant resources of your system, thus slowing it down. So, one way to speed up your Mac is to check it for malware and remove any threat that you may have found.
What are some less obvious reasons why MacBook becomes slow?
If you have a lot of browser tabs open, a cluttered desktop, and never quit unused apps, all of these may slow down your Mac. Just like anything else running quietly in the background, all of these consume valuable resources and may make your MacBook more sluggish.
Will resetting SMC and PRAM/NVRAM speed up my Mac?
Not always. Even though it may fix some hardware issues, it does not necessarily speed up your Mac. But if you know how to reset them, you can do it and see if it helps. They usually help with unexpected shutdowns and Mac misbehaving.
Do I need to run First Aid to speed up Mac?
Sometimes, using Disk Utility to run First Aid may speed up Mac because it repairs disk permissions and fixes minor glitches. However, that is not always the case, and freeing up space and memory may be more valuable. If you do decide to run First Aid, open Disk Utility (Applications > Utilities or the Spotlight search), select your drive from the sidebar, and click First Aid > Run.
Should I reinstall macOS to speed up Mac?
Reinstalling macOS is not the first step in speeding up Mac. You may reinstall it if simple solutions outlined in this article have not helped. You will need to boot into recovery mode to do it.
Will clean installing macOS help speed up Mac?
Like with reinstalling macOS, it is a drastic measure that is not always necessary. You can try it as a final resort, but back up your Mac first. If you need to clean install macOS Sequoia, check out this guide. And for the steps for macOS Tahoe, jump to this article.


