Dropbox was one of the first cloud storage services to become hugely popular, thanks in part to the free storage it offered as well as the ease with which you could sync files between your Mac and other devices. However, the rise in popularity of other cloud storage services, including Apple’s iCloud Drive, means that Dropbox is no longer as popular as it once was, and many users have moved away from it. If you have decided you no longer want to use Dropbox, we’ll show you how to move files from Dropbox to iCloud.
What is Dropbox?
Dropbox is a cloud storage service that allows you to, among many other features, store files in the cloud and sync them with your Mac, iPhone, and iPad. You can also use it to share files with others by sending them a URL they can use to access a file or folder. By default, it mirrors all the files and folders you store in its cloud storage on your Mac, which means they are quickly accessible but also take up space on your Mac’s startup disk.
Why transfer files from Dropbox to iCloud
The main reason for moving files from Dropbox is that you are already using iCloud to store other files and want to keep everything together. However, moving files from Dropbox to iCloud could also help to save space on your Mac. iCloud has a storage optimization feature that, when storage on your Mac gets low, removes files that are stored in iCloud from your Mac and leaves only a preview. The files remain in iCloud, and you can download them again when you need them.
How to move files from Dropbox to iCloud
How to transfer Dropbox to iCloud on your Mac
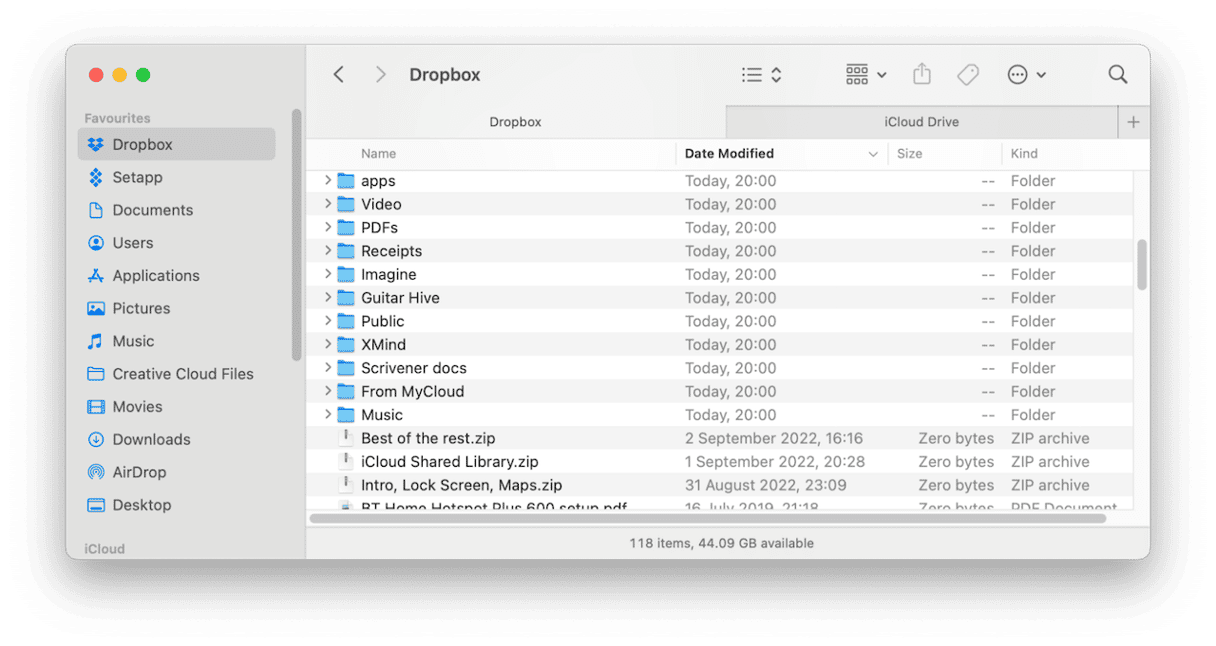
When you open the Dropbox app and log in, a Dropbox icon appears in the sidebar of the Finder window. If you select it, it looks like any other folder. So, you can move files to iCloud, just as you would with any folder.
- Launch Dropbox if it’s not already running and log in.
- Click Dropbox in the sidebar of a Finder window.
- Open a new Finder tab and navigate to the folder in iCloud (also in the sidebar) where you want to move the files to.
- In the Dropbox tab, choose the files you want to move (you can use Command-A to select all the files in a folder). If the files are in more than one folder, you will have to move them one folder at a time or move the whole folder and select multiple folders.
- Drag the files or folders you’ve selected onto the iCloud tab. Wait for it to spring open and then drop the files into the folder.
- Wait for the progress bar to show you that the transfer is complete.
- Make sure the files are in iCloud.
- Check the files have been removed from Dropbox. If not, select them and delete them.

How to move files from Dropbox to iCloud on your iPhone
You’ll need the Dropbox app on your iPhone for the steps below, even though we’re not going to use it. So, if you don’t already have it, go to the App Store, download the Dropbox app, and then log in.
- Tap the Files app to open it.
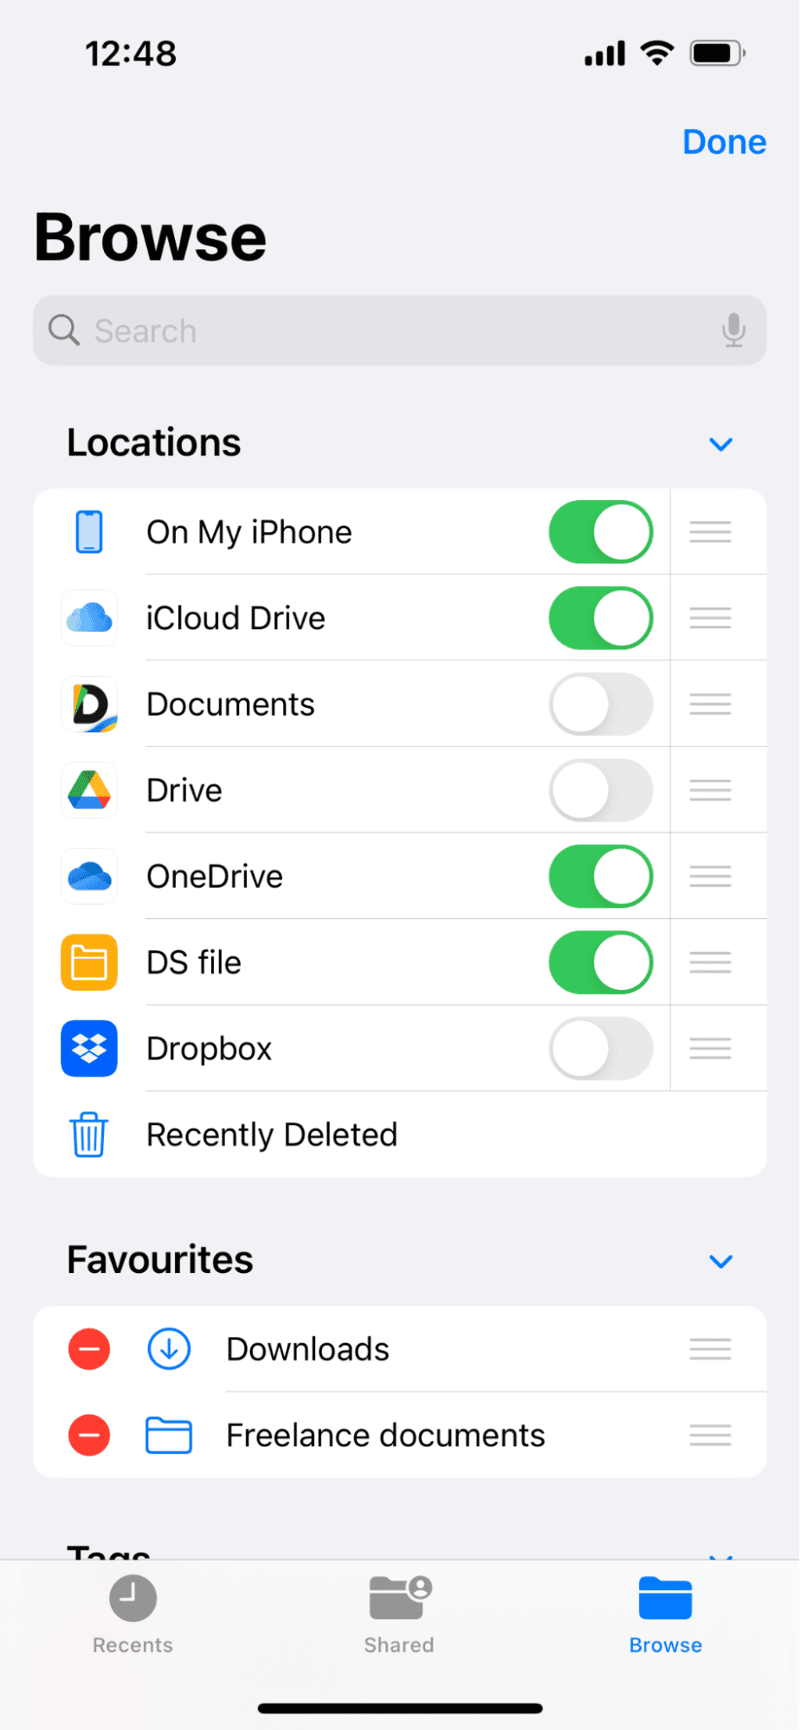
- On the main screen, tap the three dots in the top right corner and choose Edit.
- Toggle the switch next to Dropbox to the on position. Tap Done.
- Tap Dropbox to view the files and folders stored there.
- Tap the three dots at the top right of the screen and choose Select.
- Select the files you want to move to iCloud by tapping on them.
- Once you’ve selected them all, tap the Folder icon in the navigation bar at the bottom of the screen.
- Navigate to iCloud and then the folder to which you want to move the files.
- Tap Copy.
- Once the files have been copied to iCloud, you can go back to Dropbox and delete them.

How to quickly optimize and free up space on your Mac
If you haven’t enabled Optimize Mac storage in System Settings > Apple Account > iCloud, then all the files you move from Dropbox will be copied to your Mac the next time it syncs and will take up space. If there are a lot of them, you might find space on your Mac’s startup disk running low.
Thankfully, there is an easy way to free up space without removing the files you need. To do that, you get rid of junk files instead. Junk files include temporary files that were never deleted, settings files for apps that are no longer on your Mac, and old cache and system log files that are not needed anymore. They can amount to several gigabytes in total.
CleanMyMac’s Smart Care feature scans your Mac, looking for those files, so you can delete them easily. It also scans your Mac for malicious files that may have sneaked onto your computer so that you can get rid of those. And while it’s doing that, it looks for opportunities to speed up your Mac by running maintenance tasks. Just follow these steps:
- Start your free CleanMyMac trial — you can use all the tools for free.
- Open CleanMyMac.
- Click Scan > Run. You can always review what the app will remove and which tasks it will perform before clicking Run.

Dropbox was once the go-to for cloud storage and syncing files. It has free storage and apps for Mac and iOS and allows you to sync files in apps between platforms. It still works very well. But with the arrival of iCloud Drive a few years ago, many Mac users find they no longer use Dropbox and want to move their files somewhere else. Follow the steps above to move your files from Dropbox to iCloud.


