
The ultimate guide to macOS Security
Macs don’t get viruses, right? Well, yes. And no. While macOS is inherently secure and far more so than, say, Windows, that doesn’t mean we should be complacent about security.
While there have been no instances of self-replicating viruses recorded for macOS, these constitute only a small percentage of the malware threats to a modern operating system. We’ll try to avoid using the word ‘virus’ in this guide for exactly that reason – we won’t be talking about viruses in the strict sense and definition of the word. But if we do slip-up, please understand that we’re not talking about viruses in the specific sense but about malware in general.

Malware or virus: Is there a difference?
People often confuse these two terms. Malware is a type of software (anything that is malicious), while being viral is a method of its distribution. If an app doesn’t self-replicate or infect other computers it isn’t a virus, although it could still be a malware.
These days, the biggest threats, as you’ll see from the section below, come from potentially unwanted programs, adware, ransomware and other code that finds its way onto your Mac because it’s bundled with apparently legitimate software or because you actively chose to download it thinking it was something else. We’ll cover all these and more in the guide, and tell you what to look out for, what to do if you find it, and how to make sure you keep your Mac as safe and secure as possible. Let’s get started!

Why would anyone deliberately write malware?
Writing malicious code is a profitable business as of 2019. The creators behind recent WannaCry virus reportedly made $140 000 in Bitcoin during this attack.

This is adware agent under microscope. You can see how it “loads offers” to show the user.
Table of contents:
- macOS Vulnerabilities
- 2 myths about macOS malware
- Types of malware threats you can encounter on macOS
- PUA/PUP
- Browser infections
- And finally, your safety instruction
- Network security basics
- How to use social networks securely
- Mac security tips: What else have we forgot?
- What to do if you are part of a data breach
- New security features in macOS Catalina
macOS Vulnerabilities
No operating system is invulnerable and while the Mac is more secure than most, it’s not perfect. There are vulnerabilities in macOS code that can be exploited, but by far the greatest point of vulnerability is you and me, the user. Most malware gets onto our machines by exploiting our failure to be diligent about links that we click and files we download. However, over the years there have been countless cases of researchers warning Apple about vulnerabilities in its code.
Most malware gets onto our machines by exploiting our failure to be diligent about links that we click and files we download.
The Gatekeeper incident
One recent example occurred in May 2019 when a researcher, having had no response after giving Apple 90 days to fix it, went public with details of a vulnerability he had discovered. The vulnerability in question was in Gatekeeper, the tool that prevents unauthorised apps from being installed on your Mac. Depending on how you set Gatekeeper, it will either only allow apps from the Mac App Store to be installed without user intervention, or apps from the App Store along with those that have been code-signed by their developers. To install anything else, you have to give it explicit permission.
The vulnerability the researcher, Filippo Cavallarin discovered and then described on his blog, exploited the fact that you only have to give permission once, and that when the app is installed, it can run freely.
If the user then accesses the network share, unzips a file and clicks a link, they could run malicious code without realising. That’s just one example of how vulnerabilities in the OS can be exploited, there have been many others.
Tip:
If you’re worried about malware on your Mac, you should scan it with an anti-malware tool. such as the one in CleanMyMac X. Along with the ubiquitous Malwarebytes, there are more recent solutions that could be just as effective. For example, CleanMyMac X by MacPaw. This Apple-notarized tool scans your Mac and compares what it finds against a database of known malware. The database is regularly updated and so has a list of all. The latest malware, allowing it to spot threats on your Mac. Here’s how it works:

-
Click on Malware Removal in the sidebar.
-
Press Scan.
-
Hopefully, CleanMyMac X will report a clean bill of health. If not, press Remove.
Always update your macOS to the newest available version because it likely has patches for earlier discovered vulnerabilities.
2 myths about macOS malware
-
There are no viruses for Mac
This common misperception is exactly what made macOS platform so attractive for virus creators. The fact that Apple computers have been less affected by viruses in the past only means that they have weaker defence mechanisms. Windows computers have been struggling with malware for years and thus have more protection layers built-in.
-
Apple quickly fixes everything
No-one accepts their mistakes easily. The same can be said about Apple. In some cases where users’ security was at stake, Apple was the last to admit their errors in the code. The independent virus researchers who discover fresh security holes would often get vague responses from the company. And when the solution is coming, it doesn’t always come fast.
Types of malware threats you can encounter on macOS
Here’s a rundown of the different types of malware that can find their way onto your Mac.
Download managers
On the Mac, bloatware is most likely to come from sites that offer software downloads and insist you use their proprietary download manager to download it. If you come across a site that does that, treat it as a red flag and don’t download anything.
Spyware
The term spyware covers a number of different types of malicious code, but they all have one thing in common – they try to gather sensitive data. That could be done by taking photos with a webcam, or intercepting information you type into a website. macOS Catalina includes a couple of new features to make it more difficult for third-party apps to spy on you, including notifying you when any app tries to take a screenshot or log keystrokes. You can read more about the new security features in MacOS Catalina at the end of this guide.
Keylogger
A keylogger is a type of spyware. Once installed, it records keystrokes you type and sends them back to the hacker’s server. The idea is that it will record you typing usernames and passwords and so the hacker will have your log in details that they can then use to hack your account.
Keyloggers are relatively rare compared with some other types of malware, but the damage they can do is huge.
Backdoor
A backdoor is a vulnerability in a piece of code that allows unauthorised access to a system. Backdoors are often exploited by hackers in order to access data or place files on a computer or mobile device. They are surprisingly common, even in code as robust as iOS and macOS. However, they are often spotted by ‘white hat’ hackers who alert the software vendor to give them time to fix it before they go public with it.
Backdoor is the most dangerous type of malware intruders.
Ransomware
Distributors of malware have many different goals. One of them is to make money, and that’s the objective of ransomware.
Ransomware encrypts all data on victim’s computer making it unusable. If the victim agrees to pay the hijackers, they receive a special code to unlock their data. For example, the recent macOS attack, KeRanger, demanded that users paid one Bitcoin for their data to be recovered.
It’s very important that if you receive a ransomware threat that you don’t panic and that you think twice before contacting the sender. By making contact and attempting to comply with the ransom demands, you mark yourself as vulnerable and are more likely to be targeted in the future.
Cryptojacker
A cryptojacker is a form of malware that steals your Mac’s resources like CPU and memory in order to mine for cryptocurrency. Cryptocurrencies like Bitcoin are ‘mined’ by computers solving cryptographic puzzles. As more currency enters circulation, the puzzles become more complex and require ever more resources to solve. Unscrupulous cryptocurrency miners often seek to use other people’s computers to maximize their resources. By employing hundreds or even thousands of computers in this way, hackers can mine significant amounts of cryptocurrency.
Trojan Horse (or miners)
A Trojan Horse, usually shortened to Trojan, is a method of installing malware on a computer by hiding it or disguising it as something else, usually an apparently legitimate app which the user then downloads. Trojan programs perform all sorts of covert activity, from copying files to DDOS attacks. They are rather a family of apps and not a particular software. Trojans often hide in the proprietary download managers used by popular download sites.
Botnet
Botnet turns your computer into a remotely operated spam machine. You could be one of those Facebook bots trying to influence another country’s politics without even you knowing. Botnet networks are comprised of millions of computers that may sleep until activated.
Worm
A worm is a type of malware that quickly spreads from one computer to another. Koobface is an example of a worm. When downloaded to a user’s computer, it harvested details of Facebook friends and sent them messages with a link. If a user clicked the linked, they were told they needed to update Adobe Flash Player. If they did so, they were shown adware and their computer was infected with the worm.
Rootkit
A rootkit is a collection of tools designed to provide unauthorised access to the root account of a computer. Once they have access to the root, hackers can install anything or access any data they choose. Normally, unauthorised access to the root of an OS requires sophisticated code and techniques to install it. In 2017, however, it was discovered that macOS High Sierra had a vulnerability that allowed access to the root simply by typing ‘root’ as a username without a password. Apple quickly patched the flaw.
Here is a test Mac computer purposely infected by several types of malware (picture provided by CleanMyMac X antivirus lab).

Download a free version of CleanMyMac X to check your disk for backdoors and keyloggers. This software is notarized by Apple as free from malicious files.
PUA/PUP
Potentially unwanted programs (PUP) or applications (PUA) are a form of software downloaded unintentionally by a user, and that often causes problems on Mac users’ computers. During his speech at the Objective by the Sea security conference in 2019, Sophos’ Sergei Shevchenko noted that 16% of the company’s customers were prevented from being infected with a PUA, compared to 1.06% prevented from being infected with macOS malware.
20% of all Macs in the world are infected by PUPs — Potentially Unwanted Applications.
Source: Objective by the Sea
They usually come in a ‘wrapper’ with another application that the user did intend to download. These wrappers are sometimes put together by download managers from sites that offer free software to download. The PUP/PUA itself is usually a form of adware or spyware. But some have been known to install a rootlet (see above) and gain access to sensitive data like online banking details.
5 PUPs found on Macs according to MalwareBytes

APNToolbar
DriveBooster
AdvancedSystemCare
MacBooster
MalwareCrusher
Browser infections
Much of the time most of us spend using a computer is spent in a web browser. That’s one of the reasons browser-based malware has become so popular in recent years. Many of the most well-known malware attacks recently have come in the form of browser hijackers, for example:
— Time Search Now
— Booking app
— Tapsnake
— Pitch of Case
— Search Quick

Sorry, we stole your ads
Did you know, browser infections can even replace the ads you are seeing to promote all sorts of other things. Worst part? Users rarely realize they’ve been hacked.
Browser infections work by infiltrating web browsers installed on your Mac, usually when you download something that is infected with malware. Often, browser hijackers hide in fake Flash updaters or in browser extensions. Once they have infiltrated your Mac, they re-direct your default search engine and home page in order to display adverts and steal data such as search history and pages you’ve visited.
Zero day vulnerability
A zero day vulnerability is a weak point in a piece of code, like an operating system, that the vendor of the code doesn’t yet know about and so is not patched. Hackers, when they discover a vulnerability like that, can exploit it to inject malicious code and steal data, or cause other problems for users. Not all zero day vulnerabilities result in code being hacked. Often they are discovered by ‘white hats’ who then either inform the vendor of the vulnerability or go public with it.
Zero day vulnerability is yet-to-be fixed security hole in any current version of an OS.
One recent example of a zero-day vulnerability is Buggy Cow. Discovered by Google’s Project Zero team of researchers, BuggyCow was presented in proof-of-concept demonstration code. It was based on a loophole, or vulnerability, in Apple’s code that allowed a piece of malware with limited privileges to gain access to parts of macOS that should be reserved for programs with much greater privileges.
In this case, the vulnerability was related to the way apps use storage space as virtual memory and the fact that that virtual memory can be used by multiple processes at once. A bug in macOS’ memory manager meant that a hacker could unmount a file system and re-mount it with new data, replacing data being used by highly-privileged code. Or more simply put, your computer could be used as somebody’s server for god knows what activities.
These kinds of vulnerabilities are usually patched as soon as they are discovered. But Apple has come under criticism in 2019 for not acting quickly enough to fix vulnerabilities reported to it by, for example, Google’s Project Zero team.

Another example of zero-day vulnerability that affected the Mac in 2019 is Firefox 0Day. You can read more about it on the Objective See blog. Firefox 0Day installed code called Finder.app on infected computers. Finder.app was set as a login item so that it launched automatically at startup. It installed malware called OSX.NetWire.A. Fortunately in this instance, the damage was minimal as OSX.Netwire.A is a seven-year-old piece of malware that had already been incorporated in Apple’s X-Protect/Gatekeeper malware definitions.
Perhaps the most alarming recent example of a zero-day vulnerability was the one discovered by security researcher Jonathan Leitschuh, who went public with it in July 2019. The vulnerability affected Mac users who used Zoom video conferencing software and had the zoom app installed. The app installed a web server that accepted requests from websites that a web browser wouldn’t accept. The result was that it was possible to send a request to a Mac to begin a web conferencing session without the consent of the Mac’s owner. Zoom quickly issued a patch for the vulnerability.
Parts of your system that are affected by malware, PUPs
The so-called Cron jobs, Launch Agents, Login items, and configuration profiles are typical places of malware persistence.
Unwanted app:
(scheduled scripts)
Agents
profiles
Cron jobs are responsible for schedules operations like automated updates or system backups.
Login items, also called startup programs are programs that auto-launch when you start your Mac. This is a primary folder that malwares try to sneak in. You can check your current login items list in System Preferences > Users & Groups > Login items.
Launch agents or daemons are much harder to pin down. They are small supporting applications that sit deep in Library folder. One way to find and disable unwanted Launch Agents is by using CleanMyMac X app (this tool is notarized by Apple).

You can install the free edition of CleanMyMac X and open the Maintenance Tab to find them.
And finally, your safety instruction
Next up, we’ll give you a few Mac security tips you can use in your daily routine.
Always read dialogue boxes
The best way to avoid bloatware on your Mac is to be careful about what you download and install on your Mac. Read dialog boxes before clicking Ok, and check user agreements that show up onscreen before you install an app to make sure nothing else will be installed alongside it.
Browse privately
Most browsers, including Safari, have an incognito mode. In Safari, it’s called Private Browsing. In this mode, the web browser doesn’t log the sites you visit and store them as History, and it doesn’t save searches you make. Also, when you end a browser session, any cookies stored on your Mac during the session are cleared. This means that websites can’t monitor what you do from one session to the next. So, for example, websites that use dynamic pricing – where they increase the price of something each time you visit in an attempt to pressure you into buying – can’t do it.
How to turn on private browsing in Safari
- 1. Launch Safari, and click on the File menu.
- 2. Choose New Private window.
- 3. Alternatively, press Cmd + Shift + N.
Did you know?
- CleanMyMac X can clear cookies and other data stored on your Mac by websites with just a couple of clicks.
Ignore manipulative messages
Manipulative messages come in a number of forms. They can appear as pop-ups on a malicious website, in an email, and even in a messaging app. The goal of phishing emails and messages in messaging apps is usually to persuade you to click on a link. That link will then lead you to a malicious website where you may be enticed to download malware or provide personal details.
Tip
If you think an email or message you have received is a phishing scam, you can report it to Apple using the email address [email protected] Reporting phishing helps Apple combat it in macOS.
Manipulative messages that appear as pop-ups on websites often have a more direct purpose: to extract money from you. These have two common forms:

Fake virus alerts

Alerts telling you there is a problem with a computer

‘Your computer is locked’ message
Fake virus alerts claim that your Mac is infected and are usually written in the most dramatic terms with attention-grabbing large bold text and bright colors. Sometimes, you would hear an accompanying beep sound.
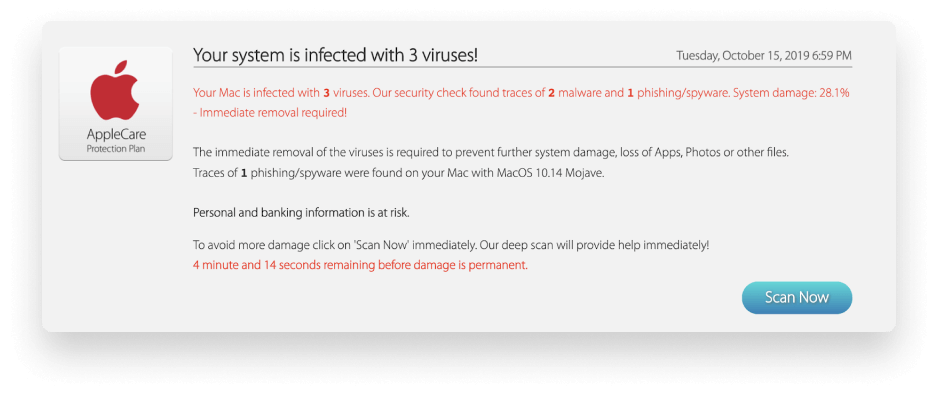
They attempt to persuade you in the strongest terms to download and install anti-virus software by clicking a link or button in order to remove the non-existent virus. Of course, clicking the link is what causes malware to be downloaded. It may also demand payment for the supposed anti-malware tool, and if you provide it, you can be sure it will steal your payment details too. The other kind of alert tells you that there is a problem with your computer, often locks you out of using it to heighten the anxiety and persuade you that there really is a problem, and offers to solve it. These alerts often contain a telephone number for you to call. Of course, it’s a premium rate number and if you call, you will be giving money to the hackers.
You should never click a link in an email or instant message unless you are certain of who has sent it and where it leads to.
Similarly, never click on a link on a pop-up on a website. The more dramatic the warning in the pop-up, the more likely it is to steal your data and your money.
If you see a fake virus alert and are worried that you may have downloaded malware, you can use CleanMyMac X’s malware tool to check. If you find that you have been locked out of a folder or volume on your Mac, use CleanMyMac or another anti-malware tool to remove the malware and then restore the folder or volume from a recent backup.

Did you know?
Fake alerts can be very lucrative for hackers. Researchers at Information Warfare Monitor estimated that the scammers behind Koobface – a social media virus that spread among Facebook friends and displayed alerts persuading users to update their version of Adobe Flash – made over $2m in revenue in just one year between June 2009 and June 2010.
Check your current Privacy settings
Privacy is a huge focus for Apple in both macOS and iOS. The latest versions of each – macOS Catalina, iOS 13, and iPad OS – have additional features to improve the privacy of users. In Catalina, for example, apps must now ask for permission to access your Desktop, Documents, and Removable Volumes folders. You can read more about new security and privacy features in Catalina in the section below.
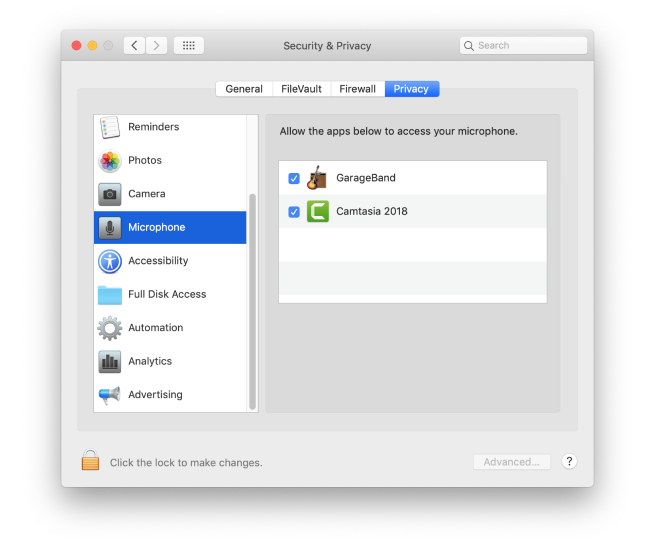
In addition to the new features in Catalina, macOS allows you to control which apps can access Location Services, your Mac’s microphone, FaceTime camera, contacts, and other sensitive data. You can control this in System Preferences.
-
Click on the Apple menu and choose System Preferences.
-
Select the Security & Privacy pane, then the Privacy tab.
-
Go through the list on the left of the window, clicking on one item at a time and review which apps have permission to access each item.
-
Uncheck all the items that you don’t need to give permission in order to user them they way you want to.
-
Pay particular attention to the Accessibility section. This gives apps permission to control your Mac. You should leave everything unticked unless you have a good reason not to.
Configure Safari for safety
To maximize your privacy when you use Safari, make sure you have ‘Do Not Track’ switched on. You can enable this in Safari > Preferences > Privacy.


Do you have ‘Prevent cross-site tracking’ checked?
This stops websites sharing information about which sites you visit with each other. This requests that websites you visit don’t download tracking cookies to your Mac. There’s no obligation on the website to comply with the request, but ethical websites will. If you’re really concerned about privacy, consider swapping your default search engine for DuckDuckGo. It doesn’t record your search queries or make them available to advertisers.
To block all cookies, check the box next to ‘Cookies and website data’.
This will prevent websites from storing new cookies on your Mac, but will also have an impact on how you use the web.
To delete cookies, press Manage Website Data...
In the same window, navigate to General and find ‘Open safe files after downloading.’ Un-tick this checkbox to prevent suspicious apps from auto-installing.
Clear website data
There are lots of other areas where your privacy can be compromised when you use your Mac and it’s important to be vigilant. The most obvious area is when you use a web browser. Websites store files, known as cookies, on your computer that record what you did while visiting the websites. These can be useful, for example, to ‘remember’ what you put in a shopping cart. But they can also compromise your privacy and be used to display adverts related to your browsing activity.
There are a number of steps you can take to check which websites have stored cookies or other data on your Mac and to remove them. The quickest way is to use CleanMyMac X. It allows you to get rid of cache files and cookies with a couple of clicks.

How to clear your browser cookies and other sensitive data:
-
Launch CleanMyMac X and choose the Privacy tool in the sidebar.
-
Press Scan.
-
When it’s finished, click on Safari.
-
To view cookies, select Cookies and click the down arrow next to it.
-
You can either review the cookies and check the box next to the ones you want to remove, or check the box next to Cookies to get rid of them all.
-
Press Remove.

Clear your browser cookies and other sensitive data.
Decide on your password strategy
Creating and using secure passwords is essential if you want to protect your Mac and your data.
You can start with the easiest option: generating passwords in Safari and syncing it between devices via iCloud. It is pretty secure, and easy, you don't have to remember the passwords and they are available to you for auto fill on all the devices you are logged in: iPhone, iPad, all Macs.
There are some other rules you should always follow:

Never use a password that could be guessed by someone who knows a bit about you.
Don’t use a password more than once.
Never write passwords down in plain text.
Do use iCloud Keychain.
Do use a password manager.
Number 2 in the list above is particularly important because re-using passwords allows hackers to use credential stuffing attacks to gain unauthorised access to online user accounts. Credential stuffing attacks use stolen login names and passwords from one site to gain access to other sites. If no one ever used the same password more than once, that wouldn’t be possible.

Tip
How to keep your passwords unique and yet easy-to-remember? When signing up for any new service make the name of that service a first part of your password. The second part will be one of your default passwords. No need to keep so many passwords in memory!
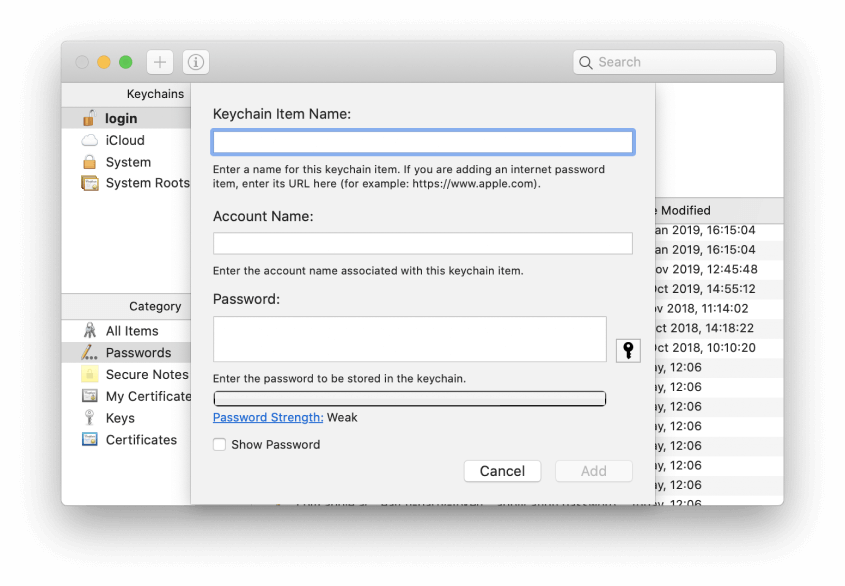
Сreating a secure password using Keychain Access.
How to create a secure password using Keychain Access:
-
Go to Applications > Utilities and launch Keychain Access.
-
Press the ‘+’ button at the top of the window.
-
Fill in the details for the password in the Keychain Item Name and Account Name boxes.
-
Press the key next to the password box.
-
You now have several options.
-
Choose the option you want from the dropdown menu.
How to create a strong password in Safari:
-
Create an account on the website you want to create the password for.
-
Click in the password box.
-
Press Use Strong Password. The password box will now be completed with the strong password and the password and other details of the account and website stored in iCloud Keychain.
You can use CleanMyMac X to remove passwords for websites remembered by your browser.
-
Launch CleanMyMac X.
-
Choose the Privacy tool.
-
Press Scan.
-
When it’s finished click on the web browser where the passwords you want to remove are saved.
-
Check the box next to Saved Passwords.
-
Press Remove.
Cut the annoying notifications
Sometimes it seems like every website you visit wants permission to send you a notification. It can be very annoying. Of course, there may be one or two sites where notifications are genuinely useful. But for most, they are nothing but an annoying inconvenience. Fortunately you can turn them off completely, so if you know you never want to give a website permission to send push notifications, you can prevent all websites from doing it and never have to click No on that dialog box again.
if you know you never want to give a website permission to send push notifications, you can prevent all websites from doing it
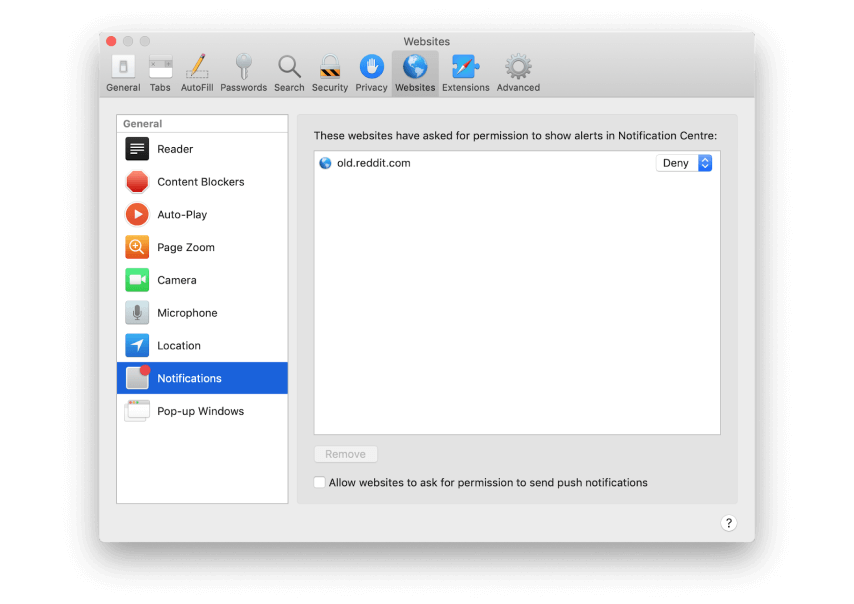
How to turn off push notifications in Safari:
-
Launch Safari.
-
Click on the Safari menu and choose Preferences.
-
Select Websites.
-
Choose Notifications on the left of the window.
-
Uncheck the box labelled Allow websites to ask for permission to send push notifications.
-
While you’re there, review the list of websites that have already requested permission and make sure they are set to Deny, unless you want them to send you notifications.
How to turn off push notifications in Chrome:
-
Launch Chrome and type the following in the address bar: chrome://settings
-
Choose Advanced, then Privacy and Security from the list on the left hand side.
-
Look down the list of settings until you see Notifications, then click on it.
-
To block all notifications, toggle the switch next to ‘Ask before sending’ to ‘Blocked’. That will block all sites from requesting to send you notifications.
-
Scan the list of websites under ‘Allow.’ If there are any that you no longer want to receive notifications from, click on them, scroll down to Notifications and choose Block.
Network security basics
Learn what a VPN is
There are several points of weakness, that hackers can use to gain access to your Mac. One of those is the network you use to access the internet. If you’re at home or at work, connected to a router, wirelessly or by Ethernet, you are reasonably safe as long as you use a strong password and keep your router firmware up to date. Mobile networks are also very secure, as the traffic that travels over them is encrypted.
However, public wifi is much less secure. When you connect to a public wifi network, you are entrusting your data to the owner and administrator of the router and the network. If that’s a large mobile operator, that’s fine. But if you’re in a coffee shop or beach cafe, there is no way of knowing whether you can trust it or not. There could be malware on the router, a computer on the network snooping on traffic, or even another wifi user sitting a few tables away watching what’s going on. While it’s unlikely that, for example, payment details you enter on a shopping site could be compromised in this way, the safest approach is to use a virtual private network (VPN).
A good VPN, a bad VPN
There is a catch, though. A 'bad' VPN can, for example, track all your purchases. Or it could be outdated or prone to attacks. So it is important to choose a reliable VPN app, like NordVPN or TunnerBear. It is recommended to stay away from free VPNs or ‘noname’ programs.
A VPN, once installed on your Mac, directs all web traffic via servers run by the VPN service and encrypts it. That means that even if someone does snoop on your public wifi traffic, they won’t be able to access your data and won’t know which sites you are visiting or what you’re doing. VPNs typically operate on a subscription basis and cost a few dollars per month.
Once you’ve installed it, you can keep it switched on all the time, or only use it when you’re on public wifi. If you use it all the time, you screen the sites you’re visiting from your ISP and prevent those websites you visit from identifying your IP address, giving you anonymity.
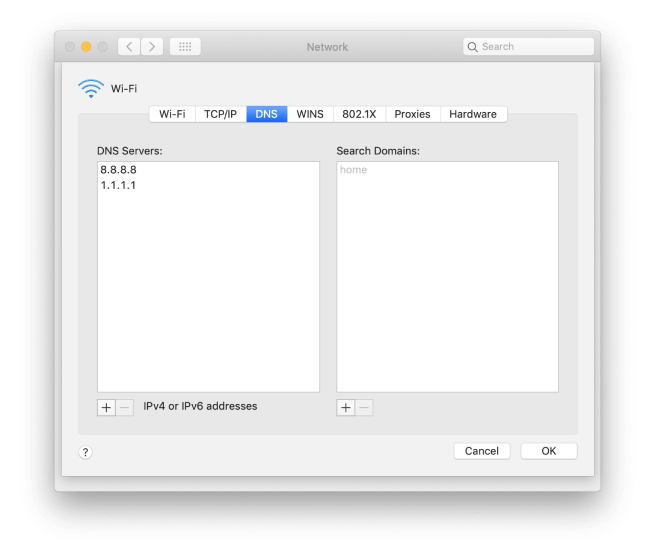
Use a third-party DNS
Every time you surf to a website, your Mac checks with a domain name server (DNS) to match the name of the website with its IP address. Without the IP address, you won’t reach the site. The default for most Mac users is the DNS run by their internet service provider. That’s ok, but not perfect. Depending on which ISP you use, their DNS may or not be sufficiently protected from phishing or distributed denial of service attacks. A hijacked DNS could route traffic to malicious websites, and there would be nothing you as a user could do about it, other than use a different DNS.
Fortunately there are several third-party, free, and very secure DNS options available to all Mac users, and for that reason it’s worth changing the DNS settings on your Mac to one of those services. Two of the best are run by Google and Cloudflare. Here’s how to do it.
-
Click on the Apple menu and choose System Preferences.
-
Select Network.
-
Press Advanced.
-
Choose the DNS tab.
-
Click the ‘+’ at the bottom of the window.
-
Type ‘1.1.1.1’ into the box, that’s the IP address of Cloudflare’s DNS.
-
Press the ‘+’ again.
-
This time, type ‘8.8.8.8’, that’s Google’s DNS IP address.
-
Press OK.
-
Quit System Preferences and click Apply.
Now, whenever you navigate to a website, your Mac will check with Cloudflare to find the IP address. If, for any reason, there’s a problem with Cloudflare, it will check with Google. If you’d rather have Google as the default, swap steps 6 and 8, above.
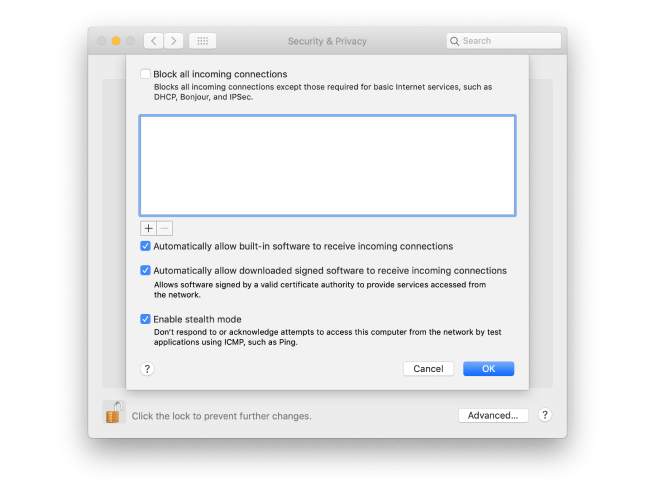
Make sure the macOS firewall is switched on
macOS has its own built-in firewall which protects your Mac from inbound traffic that may contain malware. In essence, it stops hackers targeting your Mac and sending malware over the internet or any other network. It doesn’t stop apps installed on your Mac requesting downloads or from phoning home (sending data back to a central server), but it is a useful protection and should always be on. It should be turned on by default, but it’s worth checking anyway. Here’s how to do it.
Go to the Apple menu and choose System Preferences.
Click on the Security & Privacy pane.
Choose the Firewall tab.
If the green button is lit and you see ‘Firewall:On’ you’re all set. If not, press Turn on Firewall.
You’ll see a list of options, the top one allows you to block all incoming connections except those needed for basic internet access. Check the box if you want to do that.
Further down are options to allow built-in software to accept incoming connections and to allow signed software to accept incoming connections. If you uncheck those boxes you will be prompted every time an app in either of those categories tries to accept an incoming connection.
At the bottom of the window, it’s a good idea to check the box next to Enable Stealth Mode. This prevents your Mac responding to probes, making it effectively invisible on public networks.
Finally, in the middle of the window is a box with a list of apps (it may be empty). If you have blocked incoming connections, you can add apps, by clicking the ‘+’ at the bottom of the window and exclude them from that block. Or, if you have chosen to allow incoming connections, you can add apps to exclude from that.
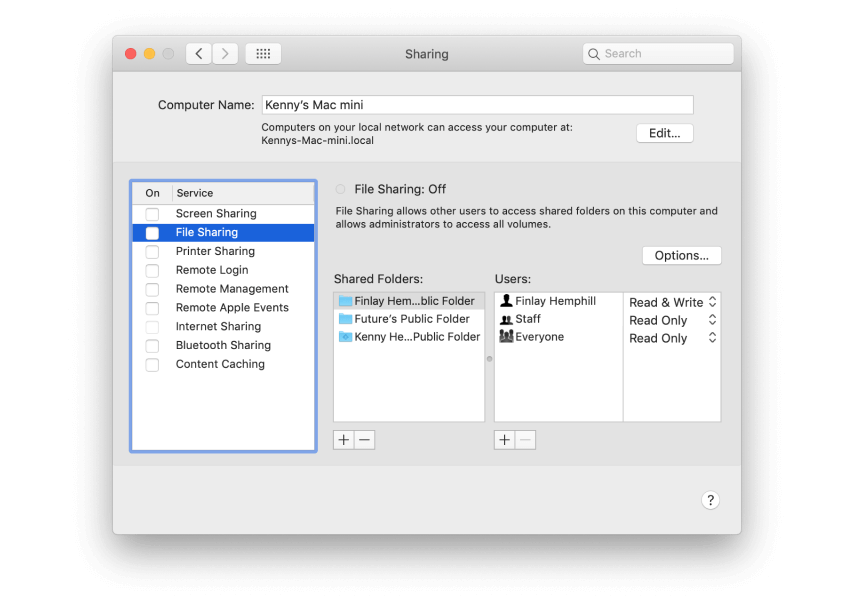
Check what you’re sharing
Your Mac can share files, its screen, its internet connection, and more with other Macs on a local network. It’s a good idea to review what your Mac is sharing periodically.
-
Launch System Preferences and choose the Sharing pane.
-
Review the list in the sidebar on the left. Anything with a tick in the box is being shared.
-
To stop sharing, uncheck the box.
-
If you want to continue sharing files but change how they are shared, click on File Sharing.
-
To add a folder to the list of those that are shared (by default only users’ public folders are shared), press the ‘+’ beneath the list.
-
Navigate to the folder you want to share and click Add.
-
To change the permissions for a folder, click on it.
-
Select a user and then choose Read & Write, Read only, or Write Only from the dropdown menu next to their name.
-
To add another user, press ‘+’ and click on one in the window that opens, then press Select.
If you know you never want to give a website permission to send push notifications, you can prevent all websites from doing it.
You can also share files via Bluetooth, with Macs and other devices. However, depending on how you have set it up, Bluetooth file sharing can allow others to ‘see’ that your Mac is close by and possibly browse a folder or folders. If you need to use Bluetooth file sharing, make sure you configure it to your needs.
-
In System Preferences > Sharing, click on Bluetooth Sharing and tick the box next to it.
-
Choose options from the dropdown menu according to your needs.

Tip
If you only need to share files with other Apple device owners, use AirDrop instead. It doesn’t allow other users to browse your Mac and you’ll need to accept requests from others to send you files. Airdrop is available using the Share menu in Mac apps or the Finder and nearby Macs or iOS devices show automatically, making it easy to send requests. But, unlike Bluetooth file sharing, it only works between Apple devices and other users can’t browse your Mac.
Mac security tips: What else have we forgot?
-
Update macOS as early as possible
Apple issues updates to macOS whenever it discovers or is notified of a security threat or vulnerability. And it doesn’t just issue them for the current version, it does so for earlier versions too. So, whichever version of macOS you are using, you should keep it up to date. And if updates are no longer issued for the version you’re running, you should consider upgrading to a newer release, if you can.
-
Click on the Apple menu and choose About this Mac.
-
Choose Software Update and wait while it checks.
-
If there is a new update available, press Update Now.
-
-
Keep apps up to date
Just as Apple updates macOS regularly, app developers update their apps to squash bugs, add features, and boost security. For apps downloaded from the App Store, you can go to the App Store app, navigate to the Updates section and choose Update all. For other apps, you’ll have to check each one and update them one at a time. However, there is an easier way, and one that I use: CleanMyMac X.
CleanMyMac X can update all your apps one go, it even updates App Store apps. Here’s how it works.
-
Download and install CleanMyMac X.
-
Choose Updater under Applications in the sidebar.
-
When you see a list of apps in the main window, check the circle next to the ones you want to update.
-
Press Update.
-
Back up your data
What’s the most important and valuable thing on your Mac? The computer? The screen? The keyboard? No. It’s your data. Nothing is more valuable than that. So back up your data regularly. Set up a regular, scheduled back up using Time Machine or another backup tool and then forget about it. If the worst happens, you’ll be very glad you did.
-
Disable automatic login
Not having to type in your password every time you open your MacBook or sit down in front of your iMac may be convenient, but it’s not secure. If you can access your data so easily, so can anyone else. Do you really want to allow anyone who gains access to your Mac to be able to get to your data too? Disable automatic login and use a strong password that no one will be able to guess.
-
Go to the Apple menu and choose System Preferences.
-
Click on Users & Groups and then press Login Options.
-
Make sure ‘Automatic Login’ is set to off. If not, click on the dropdown menu and choose Off.
-
-
Use notarized apps
macOS’ GateKeeper blocks some apps from being launched automatically on your Mac. It can be set to allow only apps from the App Store or to allow apps from the App Store and those from identified developers who have ‘signed’ their coded with Apple. This is designed to prevent apps you download accidentally or because you were mislead installing themselves without your knowledge.
In macOS Catalina, Gatekeeper goes one step further. It requires that signed apps are also notarized. That means they have to be submitted to Apple so that it can scan them for malware and carry out other checks on them. Only a notarized-app notarized will be allowed to install by Gatekeeper without user intervention.
To make sure your Mac is as secure as it can be, you should only install apps that are either from the App Store or that are notarized and approved by Gatekeeper.
-
Two-step authentication
No authentication process is perfect, but two-step authentication is about the best we’ve got so you should use it wherever it’s offered. Two-step authentication requires that when you sign in to a website or service in addition to typing in your password (the first step) you also type in a one-time passcode that is sent to you by text message but also sometimes by email, or for Apple services by push notification. Using two-step authentication means that even if a bad actor guesses or otherwise gains access to your password and user ID, they can’t access your account unless they also obtained your phone, computer, or other device.
Messages usually only take a few seconds to arrive, and if you have Messages on your Mac synced with iCloud it will even offer to automatically populate the box with the passcode when it arrives by SMS or iMessage. It’s so easy to do and offers a significant increase in security so there is no excuse for not using it wherever you can.
-
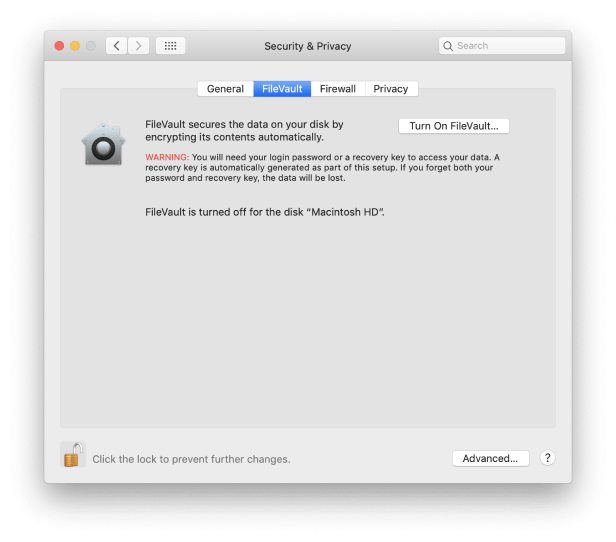
Use FileVault for valuable data
macOS’ FileVault encrypts the data on the volume on which you use it. That means that even if a third party gains possession of your Mac, they won’t be able to access your files without your login password, or the FileVault recovery key or your iCloud authentication details, depending on which method you choose. The only downside is that encrypting and decrypting files takes time and uses CPU cycles.
However, the performance overhead on modern Macs is nowhere near as high as it used to be. If you use a MacBook, MacBook Air, or MacBook Pro and travel a lot, it’s well worth turning FileVault on as an extra level of protection in the event of you losing your Mac or it being stolen. Even if someone removes the SSD and connects it to another computer, they won’t be able to see what’s on it. You can learn more about FileVault here. Here’s how to set it up:
-
Click on the Apple menu and choose System Preferences.
-
Click on Security & Privacy.
-
Press the FileVault tab and then click on the padlock and type in your admin password.
-
Click on ‘Turn on FileVault’. If there are other user accounts on your Mac, you may be asked if you want to encrypt those, too. If you do, click enable.
-
Choose whether you want to create a recovery key or use your iCloud account.
-
Press Continue.
-
Once your disk has been encrypted, your Mac will restart and the startup disk will be encrypted. You will now need to enter your password every time your Mac restarts, wakes up from sleep, or to exit from a screen saver. Automatic login, if it wasn’t disabled already, will be disabled.
-
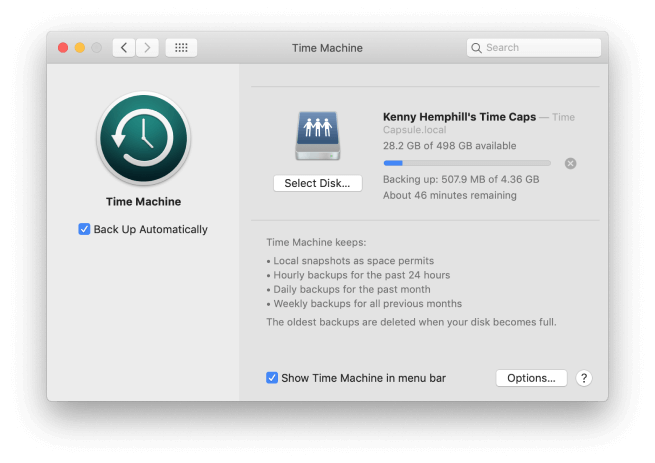
Encrypt Time Machine backups
As well as using FileVault to encrypt the contents of a hard drive or SSD, you can encrypt Time Machine backups. That means that anyone who tries to access the backed up data will need your password.
-
Use a third-party firewall
macOS has its own built-in firewall, as we described earlier. And you should always keep it turned on. However, the built-in firewall only blocks incoming connections, it doesn’t prevent apps from ‘phoning home’ or sending data to an external server. To do that, you need a third-party firewall. We recommend Lulu from Objective-See. It alerts you when an app or service attempts to make an outgoing connection and allows you to block it.
-
Go to System Preferences > Time Machine.
-
Click on Select Disk and then choose the disk you use as a backup.
-
Check the box labelled Encrypt backups.
-
-
Don’t use torrents
Torrents can be a very useful way to share large files. However, they are also a very popular way to distribute malware and even illegal content. There is no way of know what you are downloading when you torrent a file until you try and open it on your Mac. And by then it might be too late.
-
Use KnockKnock to detect persistent software
KnockKnock is a tool from Objective-See that scans your Mac for software that’s persistently installed. This is useful because malware is typically persistently installed – it launches and runs whenever you restart your Mac and launches itself whenever it’s not running. By scanning your Mac for persistently installed software, KnockKnock can help you identify and remove malware.
-
Be careful about the websites you visit
Some websites are more likely than others to display adware or try and trick you into downloading malicious software. Never ignore a warning from your web browser when it says that a website may be unsafe. It’s there to protect you. Be particularly wary of visiting sites that offer something for free that you would normally have to pay for. The same goes for porn sites. They are very popular with scammers and others who want to harm you or your Mac.
-
Never respond to a ransomware request
If you are targeted by ransomware that asks you for money in order to unlock your files or prevent an apparent video or screenshot of yourself or your Mac being released, don’t respond. A response is a sign you are vulnerable and will result in you being targeted further.
-
Plow through your apps
Any Mac has apps that haven’t been opened for months. While they lie dormant, some of them may have their launch agents or automatic updaters running in the background. Finally, not all installed apps are visible in Applications.
You can check how many hidden apps you have using the Uninstaller tool of CleanMyMac X:
Tip
If there is no update available, make sure Automatically keep my Mac up to date is checked. If you click Advanced, you can specify how and what macOS updates automatically.


A note on the recovery key
Setting a separate recovery key is more secure than using your iCloud account, since one aspect of your iCloud login details, the email address is likely to be known to other people. However, it’s also more risky. If you can’t log in to your Mac using your username and password, or if you need to access the disk from another Mac, and you can’t remember the recovery key, your data is gone forever. Apple doesn’t keep a record of recovery keys. Never store the details of a recovery key on the drive whose data it decrypts.

In the Uninstaller you can filter your apps by ‘developer.’ Pay extra attention to the apps under ‘Other’ as they may be suspicious ones. Here you can remove dozens of apps at once — just click ‘Remove.’
What to do if you are part of a data breach
There have been so many large-scale data breaches in big organisations in recent years that many of us have been caught up in them. Sometimes you might get an email from the organization telling you what happened. But often you won’t find out until the next time you log in.
Check if you’ve been hacked
We suggest subscribing for https://haveibeenpwned.com in order to know when one of your accounts has been leaked. You will even find out which app or service mistreated your data.
If it happened to you, here’s what to do:
a. Consider closing your account
If you no longer use your account on the website or service, close it. Dormant accounts are a significant security risk.
b. Change your password
If you decide to keep your account open, this is the very least you should do. Your password has been compromised. Leaving it unchanged is asking for trouble.
c. Use a different email address
If you use the same email address for multiple accounts, hackers now have 50% of your login details for all the accounts you use it with. Changing your email address is a hassle, though, especially if you use it a lot. But you should at least create a new throwaway address and switch your online accounts to that address. And make sure you are vigilant about looking out for phishing emails in the email address that’s been compromised. Never click a link in an email message unless you are certain you know where it leads.
d. Change any other accounts that have the same password
We talked earlier in the guide about credential stealing attacks, where hackers use credentials discovered in one attack or data breach to try and gain access to other accounts. If you use the same password for multiple accounts, you’re vulnerable. So change any passwords that are the same as, or similar to the one exposed in the data breach. And vow never to use a password more than once in the future.
e. Turn on two-factor authentication
Two-factor authentication is a little bit less convenient than just using a username and password, but it’s much more secure. It means that even if your password is compromised, hackers won’t be able to gain access to your account.

New security features in macOS Catalina
Every new version of macOS beefs up security and privacy features, and Catalina is no different. Here are the main ways that it makes your Mac more secure.
-
Gatekeeper
Gatekeeper is the utility that scans every app you launch the first time check if it complies with certain conditions. Is the app from the App Store? Does it come from a trusted source? When Gatekeeper sees an unidentified app, it alerts you and you have to manually intervene to allow it to launch. In Catalina, Gatekeeper has been beefed up so that apps from indentified developers must now be notarized. In Mojave the Gatekeeper check was optional while in Catalina it’s been made obligatory and will likely stay so.
‘Notarized’ app means it’s free from malicious files as confirmed by Apple.
Apps seeking to be notarized must be sent to Apple to be scanned for malware and have other checks performed before Gatekeeper will let them launch without user intervention. Catalina also scans apps periodically after the first launch to make sure they continue to comply.
-
Permission to access folders
Apps in Catalina have to ask for permission to access your Desktop and Documents folder, as well as iCloud Drive and external volumes.
-
Anti-spying features
If an app tries to record keystrokes or take a photo or video of your screen, macOS Catalina will alert you.
-
Sign in with Apple
Sign in with Apple aims to offer the convenience of signing in to an app or website with Facebook or Google, without any of the nasty data sharing. When an app or website offers a Sign in with Apple button and you choose that option, you’ll have the choice to use your regular iCloud email address or be assigned a random one that is forwarded to your iCloud email. There are two benefits to choosing a random address:
-
If the address starts to get lots of spam, you can just kill it.
-
If the service suffers a data breach, the hackers won’t have your real iCloud address.
The other main benefit of signing in with Apple is that you will automatically be protected by two-factor authentication. And because this is Apple, it won’t share any data with the app or website, nor will it use data from the app or website to promote stuff to you. You will also be able to use TouchID or FaceID to log in to your account.
-
-
Activation Lock
On Macs that have the T2 security chip – that’s the 2018 MacBook Pro, MacBook Air, and Mac mini, and the iMac Pro – you will be able to lock your Mac if it’s lost or stolen. That means that the thief or person who finds it won’t be able to use it.
-
macOS on read-only volume
Catalina runs from its own dedicated read-only system volume, so nothing can overwrite it. That means that even if you do download malware, it will only have access to the volume on which data is stored on your Mac and not the system volume.
-
Approve with Apple Watch
macOS currently allows you to approve Apple Pay payments using the side button on an Apple Watch, and to log in with an Apple Watch. In Catalina, this has been extended so that you can use the Apple Watch to authenticate access to some System Preferences, view passwords in Safari, approve app installations, and modify root files.
-
HomeKit secure video
Security cameras that support HomeKit can now store footage in iCloud. The video is encrypted and doesn’t count towards your iCloud storage allowance. If you currently pay a fee for storing security camera footage in your providers cloud service, this could save you money too.
Final thoughts
macOS is a secure, robust operating system. And the new features in Catalina improve that further. However, that doesn’t mean you can afford to be complacent. You should always be vigilant. Take care never to click a link in an email or instant message unless you are sure where it leads, and don’t download software unless you are sure it is safe.
You should also scan your Mac regularly for malware, and keep track of browser extensions, login items and launch agents. You can do all of that using CleanMyMac X, making it a great tool to help you keep your Mac secure.