Every modern computer relies on something you almost never see — a file system. It quietly determines how data is stored, accessed, and organized on your device. For Apple devices, that role is fulfilled by the Apple File System (APFS). It was launched in 2016 as a modern replacement for the Hierarchical File System Plus (HFS+), which had powered Apple’s ecosystem since the late 1990s.
By 2024, macOS had become the second most popular desktop operating system, powering roughly one in four computers worldwide. That means millions of people rely on APFS every day — whether they know it or not.
As APFS grows in prevalence, so does the need to optimize how we work with it. To tackle this, we developed a prototype tool to analyze and compare strategies for scanning APFS, focusing on efficiently measuring the size of macOS file hierarchies. Our goal is to identify the best approach for delivering accurate results quickly, saving time and resources.
Navigating APFS: from access to high-speed processing
To calculate the size of a file hierarchy, you need to know the size of each element in the file tree. APFS tracks two types of sizes: logical size (the actual data in a file) and physical size (the space reserved on the disk, often larger due to system allocation). In our research, we focused on physical size, since it provides a more accurate estimate of space usage, especially when managing storage or performing backups.
Accessing APFS: tools for file system analysis
To analyze file hierarchy sizes in APFS, developers have a few tools at their disposal, each with its pros and cons.
1. NSFileManager – traditional approach
This is Apple’s basic API for interacting with the file system. It’s straightforward and lets you check file sizes, but it struggles with directories. To calculate a directory’s total size, you need to recursively scan every file inside, which can be slow and resource-heavy, especially for large folder structures. It also can’t report physical size, making it less useful for precise disk usage analysis.
2. URLResourceKey – modern API
A more modern alternative is `URLResourceKey`, which uses URL-based access to the file system. This API is faster and more flexible, supporting both logical and physical sizes via `fileSizeKey` and `fileAllocatedSizeKey`, respectively. It still requires recursive scanning for directories, but it’s optimized to fetch only the necessary attributes, making it more efficient than `NSFileManager`. Also, it handles file paths more reliably, minimizing errors from tricky directory structures.
3. du – command line classic
The terminal `du` tool is a fast way to retrieve physical sizes of files and directories without manual recursion. It’s great for speed and supports useful flags like `-s` (summary) or `-d` (depth control). In Swift, you can run it through the `Process` class. However, it introduces some delay since results only become available after the command finishes. It also sometimes hits permission errors, requiring extra care to handle restricted directories.
Strategies for file system traversal
Efficiently scanning the Apple File System means navigating its complex file hierarchy without wasting time or resources. Depending on your goal, different traversal strategies can make a big difference. In our prototype, we experimented with several approaches that scan the file hierarchy in different ways: some prioritize speed, others offer precision, and some try to balance both.
Top-level technique
Top-level technique focuses on the root directory, checking only the files and folders at the top level. This approach is fast because it minimizes file system queries. Using the du command with a depth limit, you can get a quick overview of disk usage with minimal resource use. However, tools like `NSFileManager` and `URLResourceKey` require recursive scanning even for this method, which slows things down, especially with `NSFileManager`. `URLResourceKey` performs better thanks to its optimized queries tailored for APFS.
Full system bypass
Full system bypass dives deep, scanning every file and folder in the hierarchy for a complete picture of disk usage. With the `du` command’s `-a` option, you get a detailed list of all items, or you can achieve the same by recursively walking the file tree using `NSFileManager` or `URLResourceKey`. This method offers the highest accuracy, but also comes with the longest wait time.
Lazy bypass
Lazy bypass offers a more user-friendly approach by delivering results gradually. Using Swift’s `AsyncStream`, this method processes files and directories as they’re scanned, letting you start analyzing data before the entire process finishes. This flexibility makes it ideal for applications where responsiveness matters.
Stop-words filtering
Stop-words filtering optimizes scanning by skipping files or folders with specific names, like temporary or system files. It uses two classic algorithms: Depth-First Search (DFS) and Breadth-First Search (BFS). DFS dives deep into each directory branch, skipping irrelevant items, and excels in speed for complex, nested structures. BFS, on the other hand, processes directories level by level, making it more efficient when exploring wide directory trees. In our tests, DFS tended to outperform BFS in APFS environments, but both have their place depending on structure depth and filtering needs.
Concurrent processing in APFS
Scanning a complex APFS file hierarchy can be a slow process if you handle it one file at a time. Serial processing, where tasks run on a single thread, works fine for small directories or individual files and is easy to troubleshoot. But for large, nested folder structures, it quickly becomes a performance limitation. To speed things up, multi-threaded processing distributes the workload across multiple threads using modern tools such as Swift concurrency and Grand Central Dispatch (GCD) to make APFS scanning faster and more efficient.
Swift concurrency
Swift concurrency, introduced in Swift 5.5, brings a modern approach to parallel processing with features like async/await and TaskGroups. These allow multiple scanning tasks to run simultaneously, tackling different parts of the file hierarchy at once. TaskGroups manage these parallel tasks while handling errors gracefully, ensuring the process doesn’t crash if something goes wrong. Swift’s actors further streamline things by preventing data conflicts – situations where multiple threads try to access the same file data simultaneously – without the need for complex manual locks, reducing the risk of errors like deadlocks.
Grand Central Dispatch
Grand Central Dispatch (GCD), an older but reliable technology, also powers parallel scanning. GCD uses tools like `DispatchQueue` to distribute tasks across threads and `DispatchGroup` to coordinate their completion. It can integrate with Swift’s async/await system. While GCD lacks the sleekness of Swift concurrency’s newer features, it remains a robust choice for handling large file hierarchies efficiently.
How our solution is built
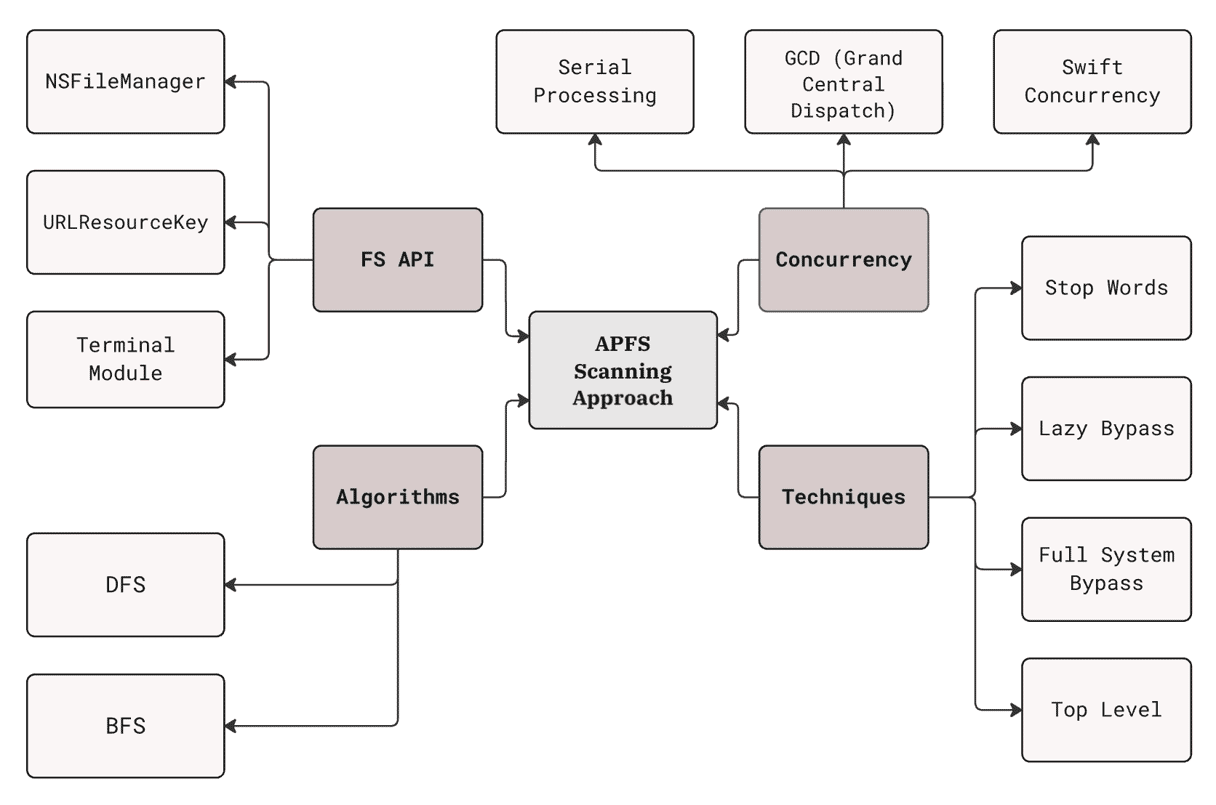
To tackle the challenge of scanning the Apple File System efficiently, our prototype relies on a modular architecture designed for flexibility and scalability. This setup allows the system to adapt to different needs.

The File System Interface connects directly to the file system. Depending on which method is selected, it can work through `NSFileManager`, `URLResourceKey`, or the `du` command line tool. Each of them has its own strengths, as discussed earlier.
The concurrency module powers the scanner’s performance, it handles both serial and multithreaded processing. Using Swift concurrency or Grand Central Dispatch this module allows to scan large file hierarchies quickly by splitting work across multiple threads when needed.
The traversal techniques module implements the scanning approaches: top-level scanning for quick overviews, full system traversal for detailed insights, lazy bypass for a smoother user experience, and stop-words filtering with DFS or BFS to skip unnecessary files.
Thanks to this modular design, the whole solution stays clean, flexible and adaptable. Whether we need to test new APIs, try out different traversal strategies, or optimize for performance, each component can evolve independently without breaking the rest of the system.
Testing our prototype and finding the best approach
To see how well our APFS scanning prototype performs, we put it through its paces using custom datasets that simulate real-world file hierarchies. We used four types of synthetic directory structures:
- Breadth structure (BFS) – wide hierarchies with broad branching at each level
- Depth structure (DFS) – deeply nested folders
- Balanced trees – uniform branching
- Unbalanced trees – irregular, real-world file hierarchies
All tests were conducted on a Mac running macOS Sequoia 15.4.1 with an SSD formatted in APFS, equipped with 16 GB of RAM and an Apple M2 chip (8-core CPU: 4 performance cores and 4 efficiency cores).
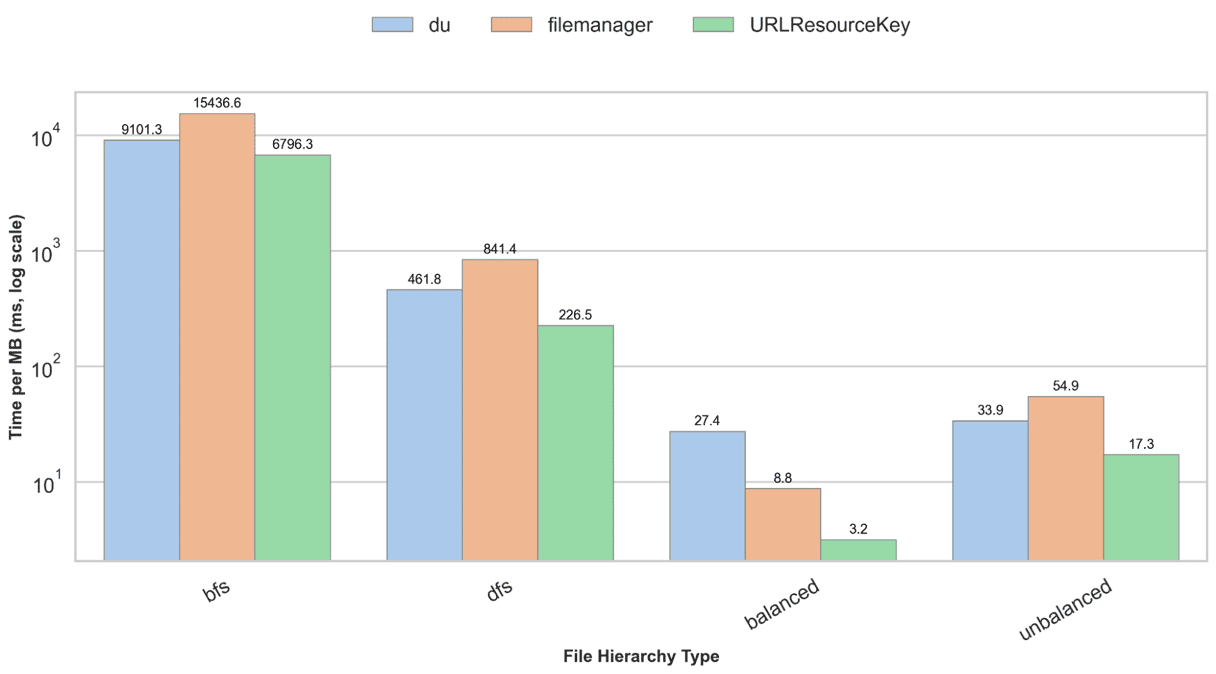
First, we compared the speed of three tools: `NSFileManager`, `URLResourceKey`, and the `du` command across the four hierarchy types, as shown in the graph below. `URLResourceKey` consistently came out on top, scanning hierarchies the fastest. `NSFileManager` was the slowest, only beating du in balanced structures, where its performance was slightly better. This shows `URLResourceKey`stands out as the best choice for quick APFS scanning, especially in complex or irregular structures.

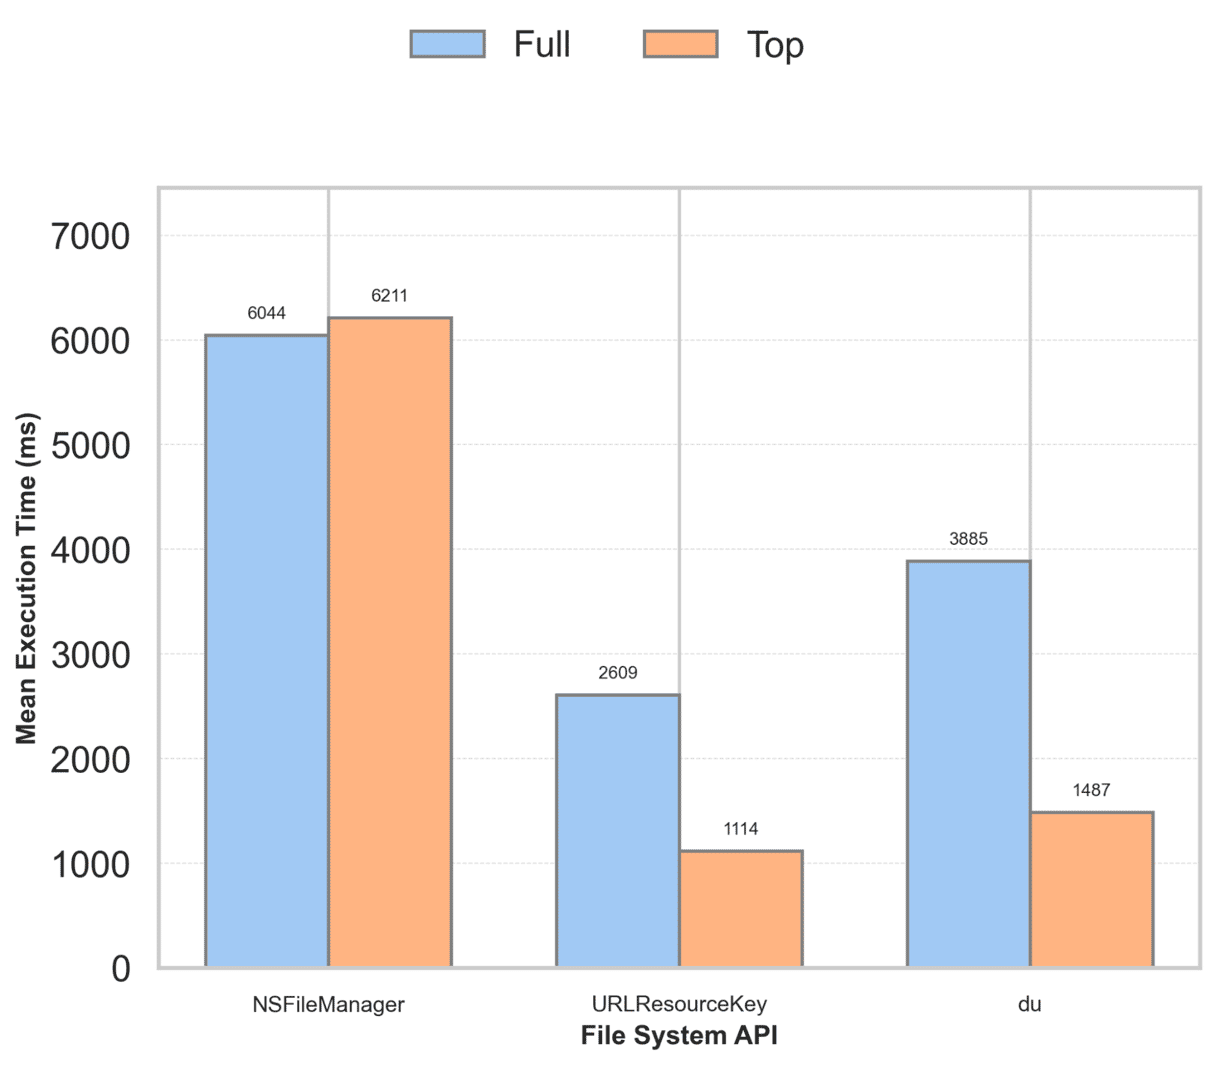
Next, we compared two traversal strategies: a full system bypass and a top-level approach in the graph below. With NSFileManager, the top-level approach didn’t help, it still had to recursively scan the entire structure. But with URLResourceKey and du, top-level traversal was significantly faster, cutting execution time by two to three times compared to full traversal. This makes top-level strategy ideal for quick checks when you don’t need every detail.

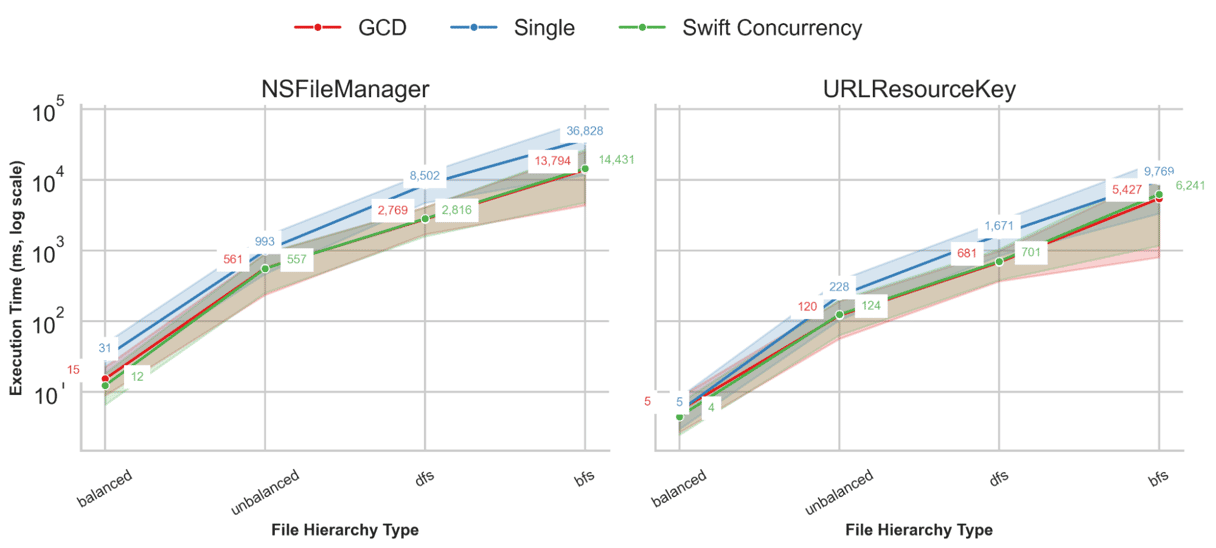
We also looked at processing modes: single-threaded, Grand Central Dispatch and Swift concurrency in the graph below, where time is shown on a log scale. Both GCD and Swift concurrency slashed scanning times by two to three times compared to single-threaded processing. Swift concurrency and GCD performed similarly in terms of speed.

Finally, we checked memory usage across the tools and processing modes. The `du` command was the most memory-efficient. `NSFileManager`, on the other hand, consumes the most RAM. Among the concurrency modes, Swift concurrency used the most RAM, followed by GCD, with serial processing being the most memory-efficient, but of course much slower.
File System API | GCD (MB) | Single (MB) | Swift сoncurrency (MB) |
NSFileManager | 222.0 | 226.5 | 241.1 |
URLResourceKey | 96.4 | 70.2 | 113.9 |
du | 59.9 | 43.5 | 65.7 |
Final Thoughts
Our journey into scanning the Apple File System shows that smarter tools and strategies can make a big difference in calculating file hierarchy sizes quickly and accurately. Testing revealed that `URLResourceKey` paired with Swift concurrency is a winning combination, especially for typical user file structures. Traversal strategies make it easy to tailor the scanning process to your goals, from quick overviews to deep analysis. With the right setup, APFS scanning can be both fast and flexible, ready to meet the demands of modern macOS workflows.
This article draws from a scientific study that details the methodology, results, and limitations. For the full picture, you can read the original paper here.


