Do you use iPhone photo albums to organize your photos? As iPhone storage capacities continue to grow, so does the need for an easy-to-use storage system. How else will you find your favorite cat pics or shots of your grandkids when you need them? This article will cover everything you need to know about iPhone photo albums so you can keep your pics exactly where you want them.
Photo albums help you keep your photos organized so you can find them without scrolling through your whole library. If you’ve never used iPhone photo albums before, you’ll be thrilled to discover how easy they are to use, share, and delete.
How to create an album on iPhone
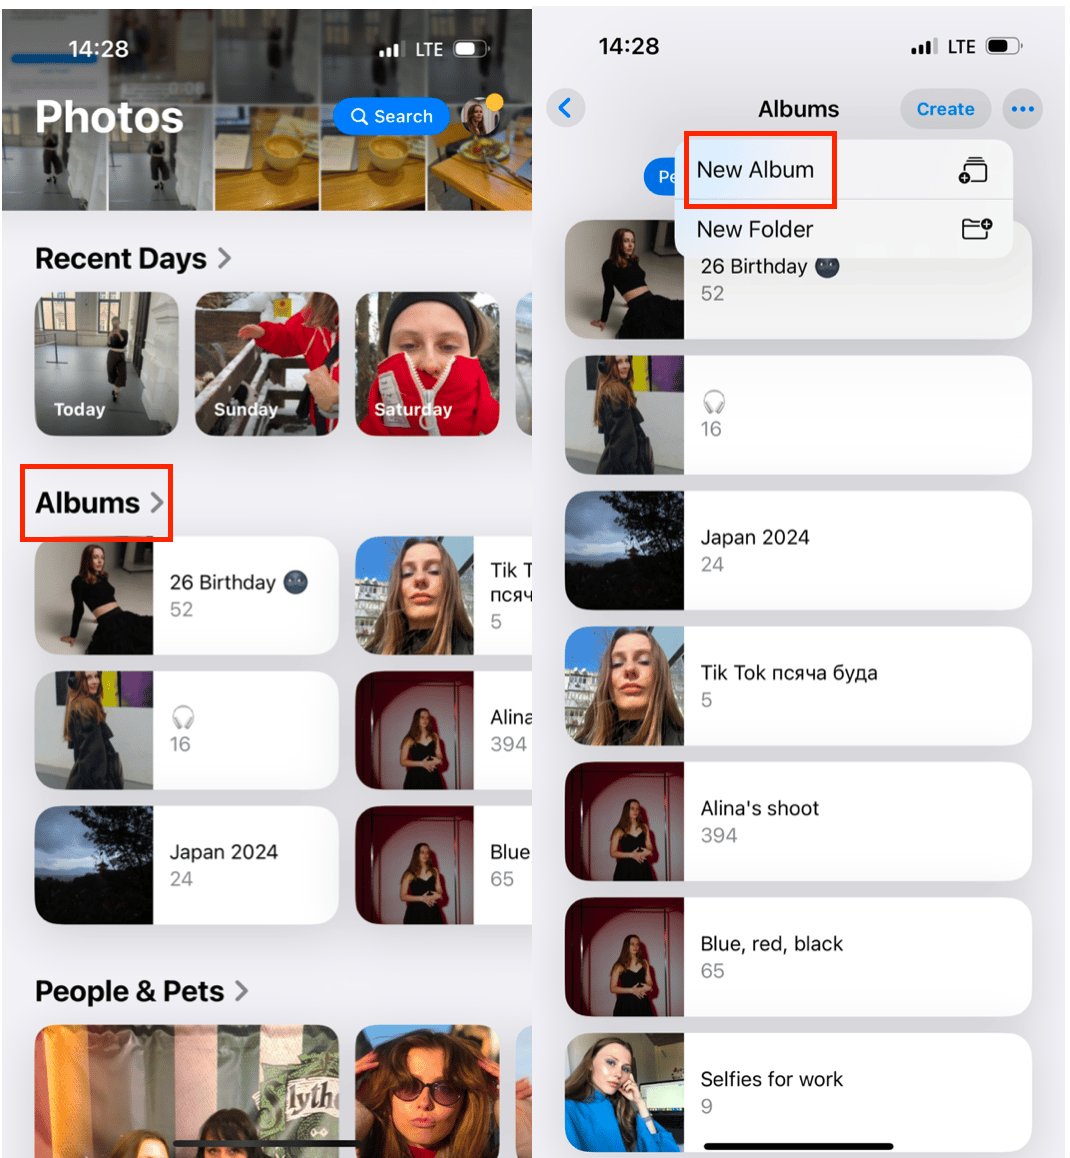
Let’s start at the beginning. Before you can start organizing your iPhone photos into albums, you’ll have to create them. Take some time to think about how you want to organize your albums — will you create albums by date, location, season, or subject? Some albums are created automatically (selfies, videos, panoramas), and others, you have to create yourself. Here’s how to create custom photo albums on your iPhone.
- Launch the Photos app on your iPhone.
- Tap Albums at the bottom of the screen.
- Tap Create
- Choose New Album.
- Enter the name of your album in the pop-up form and then tap Save.
- All of your photos will appear on the screen. You can now scroll through them and tap on the ones you want to add to your new photo album.
- When you have finished selecting photos, tap Done.
How to delete an album on iPhone
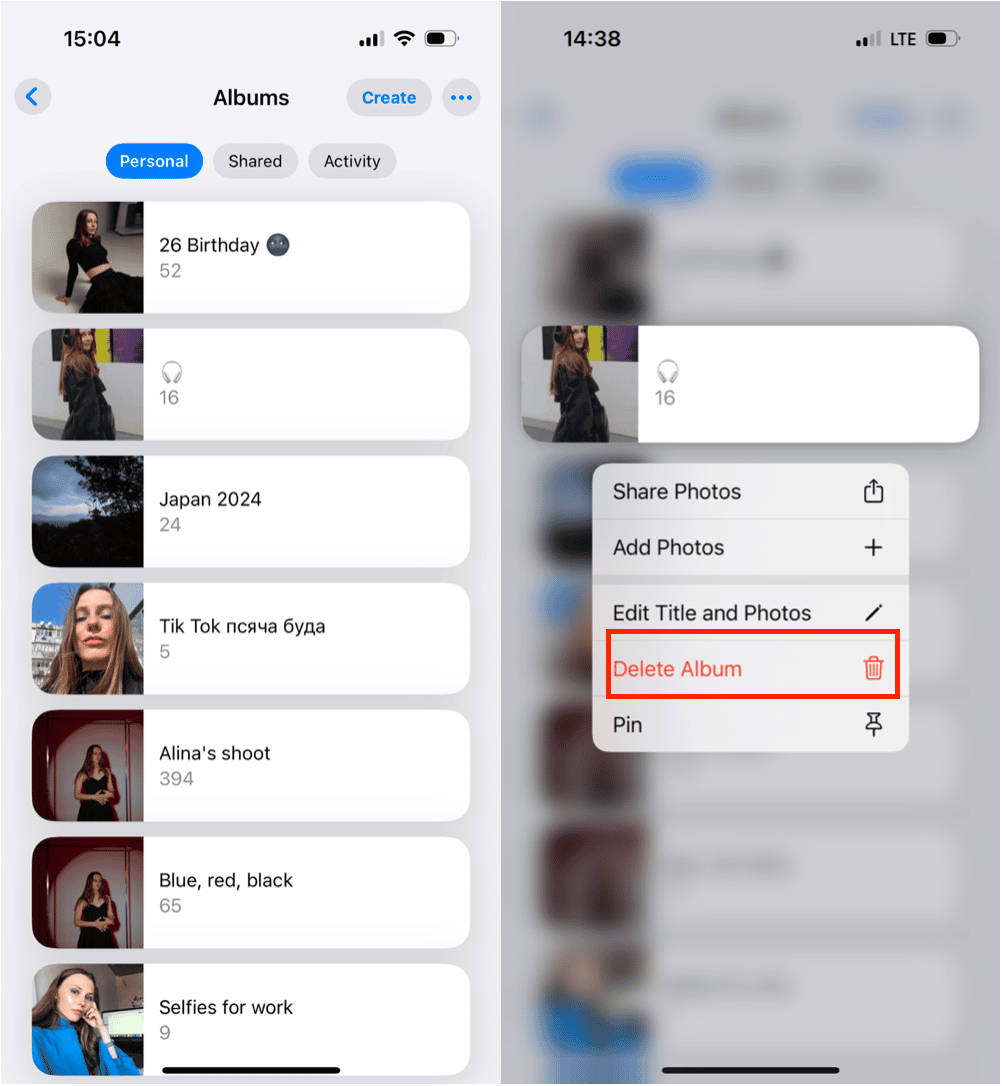
What if you find that your albums are no longer working for you and you want to delete them — either to create new ones or to save space on your computer — it’s easy to delete photo albums from your Camera Roll. The only albums you can’t delete are the stock albums that your iPhone comes with: All photos, Recents, and Favorites. Here’s how to delete an album on your iPhone.
- Open the Photos app on your iPhone and tap Albums at the bottom of the screen.
- Tap See All.
- Click on an album you want to delete
- Tap Delete Album.
How to share existing album on iPhone
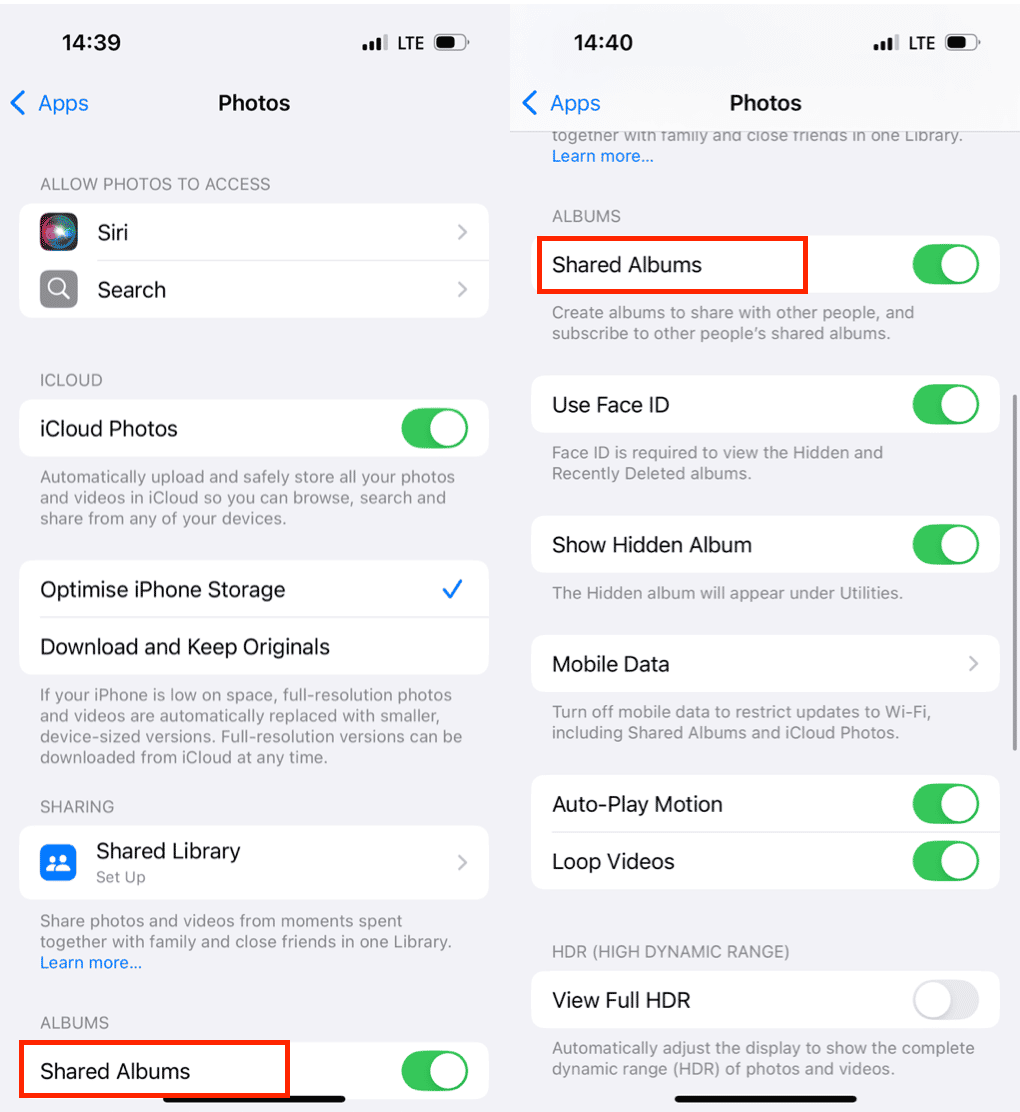
Did you know that you can use the Photos app to share images with your friends, family, and coworkers using Shared Albums? You can do that using iCloud Shared Albums. iCloud allows you to create Shared Albums for others to view, comment on, and add to. Shared Albums are encrypted to protect your privacy and will only be shared with people you’ve invited to the album. Sharing an album is simple once you have iCloud photo sharing set up on your phone. Here’s how to do that:
- Open Settings on your iPhone.
- Scroll down and tap Photos.
- Tap to toggle Shared Albums to the on position.
How to create an iCloud Shared Album
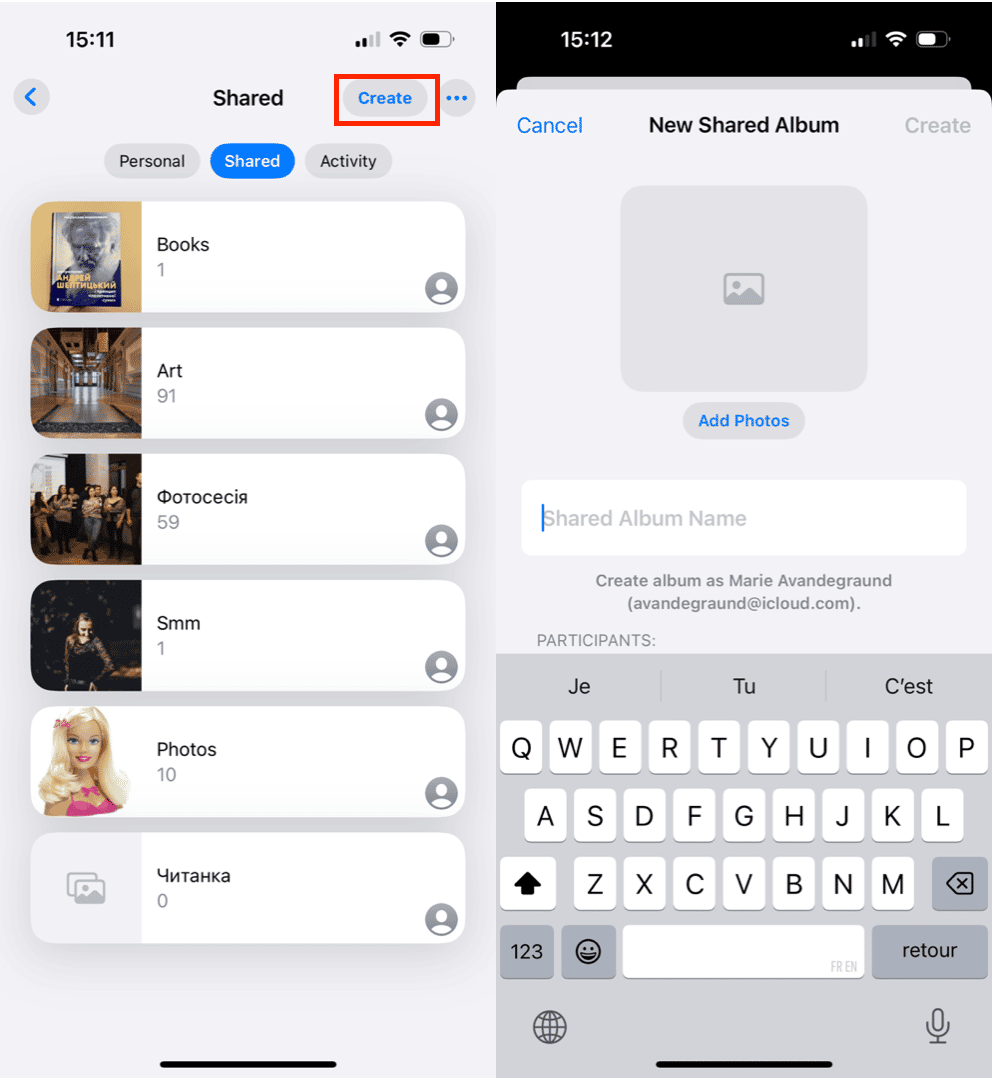
- Open the Photos app on your iPhone.
- Tap Albums.
- Tap the + icon in the upper left.
- Tap New Shared Album.
- Add a name for your Shared Album.
- A pop-up screen will appear where you can type the names of the contacts you want to include in your Shared Album.
- Tap Create.
- You can now add photos to your Shared Album. Your contacts will receive a notification that they have been added to a Shared Album as well.
How to delete a shared album on iPhone
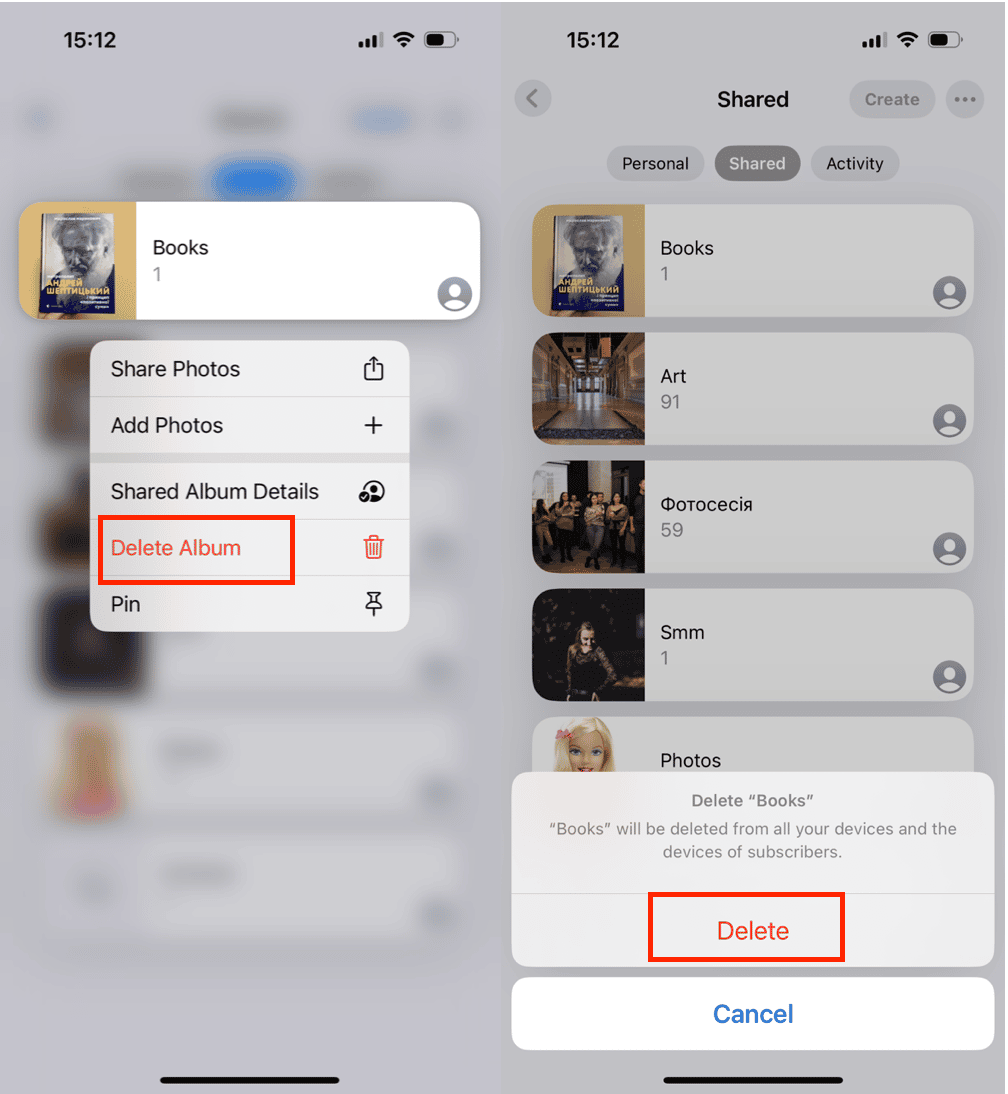
You can delete a Shared Album at any time, as long as you are the original creator. Here’s how to do it:
- Open the Photos app.
- Scroll to Shared Albums.
- Choose a Shared Album.
- Tap Delete.
- Confirm by tapping Delete.
- Tap Done.
How to use hidden albums on iPhone
If you have photos on your iPhone that you don’t want anyone else to see, you can either delete them permanently or keep them private. There’s an easy way to hide them using the hidden album feature. Putting a sensitive photo into a hidden album on iPhone will hide the photo from all other albums, as well as hiding it from Collections, Moments, and Years. Your hidden album will not be password-protected, but it will keep prying eyes from inadvertently happening upon your private content.
How to make a hidden album on iPhone
- Open your Photos app and navigate to the photo you want to hide.
- Tap the three dots on the right corner.
- Scroll down and tap Hide.
- Tap Hide Photo on the pop-up button.

FAQs
How do I find my hidden photo album?
Now that your photos are safe from friends and family who may have access to your iPhone, here’s how to find them when you want to view them.
- Open your Photos app and tap Albums.
- Scroll to the bottom and tap Hidden.
- All of your hidden photos will show up here. If you want to unhide your photo, tap the share button, then Unhide.
How can you lock a photo album on iPhone?
While you can’t lock a whole photo album on iPhone, you can lock your private photos away within the Notes app with passcode protection. (Note that this feature doesn’t work to keep videos private.) Here’s how to lock photos using the Notes app.
- Under Settings, scroll down and tap Notes.
- Tap Password. Set a password that will be required in the future to access your Notes.
- Tap Done.
- To save the photo to your Notes, navigate to the photo and tap the share icon.
- Tap Notes.
- Choose to save your photo to a new note or a note you’ve already created.
- Tap Save.
- Open the note that you’ve just saved a photo to.
- Tap the share icon.
- Tap the lock icon. Your note is now passcode-protected.
- Return to your Photos app and delete the photo you want to hide.
Does deleting an album in Photos delete the photos in it?
The biggest concern when deleting albums is that you will lose all of your photos within each album. Take a deep breath because your photos are safe. They will remain in your Camera Roll. They just won’t be organized into the album that you just deleted.
iPhone photo albums are an easy way to keep your photos and videos organized, especially with the huge storage capacities of newer phones. If you ever find yourself with a few extra minutes with your phone in your hand, start creating photo albums for all of your favorite memories.


