If you use Apple Mail regularly on your Mac, you may have noticed an issue where Mail is not updating on your Mac. There are a number of possible reasons for this, from your Wi-Fi network or broadband connection being down to Apple’s servers not working to a problem with Mail on your Mac. In this article, we’ll show you how to fix it if Mail is not displaying new messages on your Mac.
Why is Apple Mail not updating on my Mac?
There are a number of possible reasons for Mail not updating on your Mac:
- A problem with Apple’s servers
- A problem with Google, Microsoft, or your domain host if the account that’s not updating is not an iCloud email account
- An issue with your Wi-Fi network or broadband connection
How to deal with misbehaving apps
If an app continually misbehaves on your Mac, and nothing you do fixes it, the last resort is to uninstall the app and reinstall it. You can’t do that with Mail, unfortunately, because it is installed as part of macOS. However, it will work for any third-party app.
To uninstall an app completely, you need to track down and remove all the files associated with the app. That’s not easy and is very time-consuming. Fortunately, there is an easy way — CleanMyMac’s Applications Manager makes it easy to uninstall any app on your Mac with just a couple of clicks.
- Get your free CleanMyMac trial — you can use all app’s tools for 7 days at zero cost.
- Choose Applications in the sidebar.
- Click Scan.
- When it’s finished, choose Manage My Applications.
- Locate the application or applications you want to uninstall and select them.
- Click Uninstall.

How to fix it when my Apple Mail is not updating on Mac
Before we can fix the problem, we need to know what’s causing it. If you have another device that is connected to the same email account, check to see if Mail is updating there. If it is, you can rule out a problem with Apple’s servers and with your Wi-Fi network or broadband. If Mail is not updating on any device, check that your Wi-Fi and broadband are working properly by opening a new browser tab and visiting a web page.
If the problem occurs with more than one device and the issue is not your broadband or Wi-Fi network, and the account is an iCloud Mail account, you should check Apple’s server status page here. Look for the iCloud Mail entry in the middle column. If it’s green, then you can eliminate that as the cause. If not, all you can do is wait until the server is back online. If the account is not an iCloud Mail account, check with the email service provider or your own domain host.
If the problem is specific to your Mac, follow the steps below.
1. Synchronize your accounts
- In Mail, click the envelope icon in the toolbar to check for new Mail.
- If that doesn’t work, try Command-Shift-N.
- If it still doesn’t update, click the Mailbox menu and choose Synchronize all Accounts.
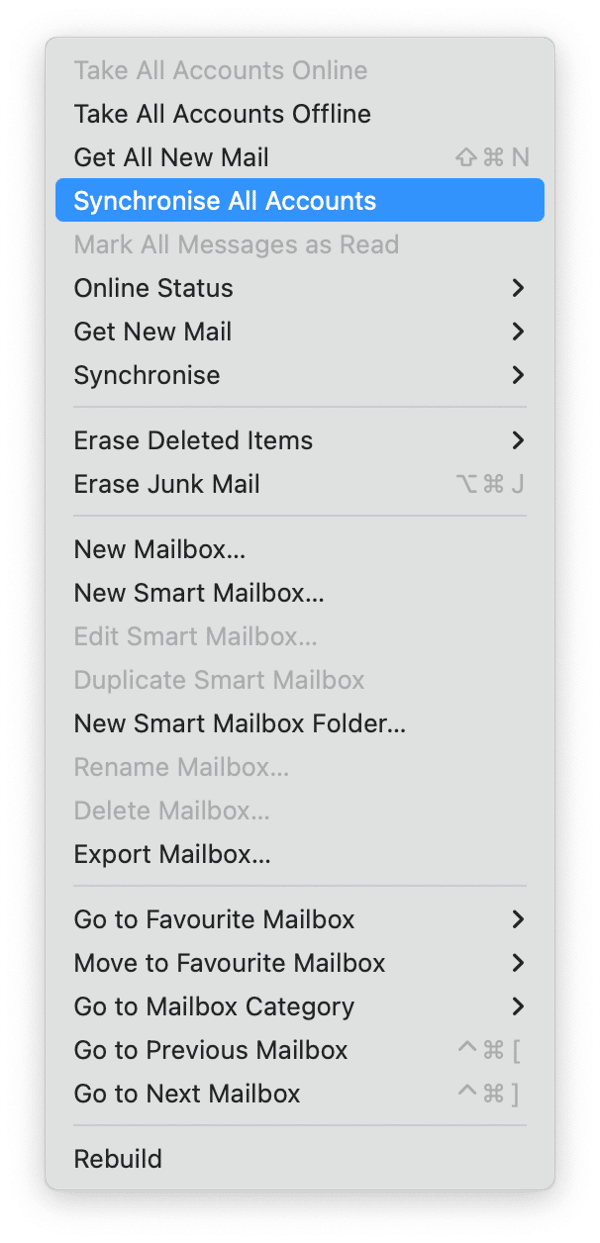
- If that doesn’t work, click the Mailbox menu again and choose Take All Accounts Online if it’s available.

2. Check if an account is enabled
If it still doesn’t update, check to make sure that mail is enabled for the account.
- Click the Mail menu and choose Accounts.
- Select the account that is not updating.
- Make sure that the toggle switch next to Mail is set to on.
- To double-check, click the Mail menu again, choose Settings > Accounts, and select the account. Make sure ‘Enable this account’ is checked. If it’s an iCloud Mail account, there is no ‘Enable this account.’ Click the Mail icon and ensure ‘Synchronize this Mac’ is turned on.

If nothing so far has worked, quit Mail and relaunch it.
3. Update the Mail app
Still no joy? The next step is to check for an update to Mail. Mail is updated along with macOS, so you will need to go to System Settings > General > Software Update and see if there is a macOS update available. If there is, follow the instructions on the screen to install it.

4. Restart your Mac
If there is no update available, restart your Mac. Restarting your Mac clears out temporary and cache files and runs checks on your startup disk, as well as freeing up RAM. Once your Mac has restarted, launch Mail and check to see if Mail is updating.
5. Remove your account and re-add it
If Mail is still not updating, the next step is to remove the email account that’s having problems from Mail and then add it again.
- Go to Mail > Settings > Accounts.
- Select the account.
- Click the ‘-’ at the bottom of the window.
- Confirm that you want to remove the account.
- Click the ‘+’ at the bottom of the window. Then, either log in to the account in the browser window that opens or fill in the server and account details in the Mail window that opens.
- Follow the instructions on the screen to complete setting up the account.

6. Reset the Mail app
Remember how we said that you cannot uninstall the Mail app? But you can reset it if none of the above helped. By reset, we mean removing all app-related files and keeping only the binary.
You can use CleanMyMac to reset the Mail app; here’s how:
- Open CleanMyMac (get your free trial here) and click Applications > Scan > Manage My Applications.
- In the Uninstaller section, look for Mail.
- Click an arrow (>) next to it, select everything except Binaries, and click Remove.

This way, you can reset any misbehaving app without actually uninstalling it.
There are lots of possible factors causing Apple Mail app not updating on your Mac. It could be a problem with Apple’s servers, your internet access or the Mail app itself. Whichever it is, the solution isn’t too difficult. Follow the steps above to find out what the problem is and fix it.