If you’ve switched from Windows to Mac and need to use Word, you’ll know that the interface is very similar, and most of the commands and buttons are the same. But there are one or two differences that are important. For example, many people used to the Windows version of Word wonder where the Manage Document button is on Word for Mac. We’ll answer that question and show you how to access the document recovery features on the Mac version or Word.
Where is the Manage Document button on Word for Mac?
The Manage Document button on Word for Windows appears when you choose Info in the sidebar of the Word document chooser panel. If you click it you’ll see an option to Recover Unsaved Documents. However, if you look at the same panel on Word for Mac, there is no Info option and no Manage Document option anywhere. Does that mean you can’t recover unsaved documents on Word for Mac? Absolutely not. We’ll show you how to do that.
How to manage documents in Word
Although there is no Manage Document button, you can do a few things to manage documents. Here are some of the best features to use.
1. Recover unsaved files
Word has an AutoSave feature that automatically saves your document periodically as you work. However, it needs to be switched on — there’s an AutoSave switch at the top left of the document window. If it’s not on, your document won’t save automatically. Even if AutoSave is on, there may be some instances when it doesn’t work as it should.
If AutoSave is turned on, but the document doesn’t open automatically when you restart Word, try the steps below.
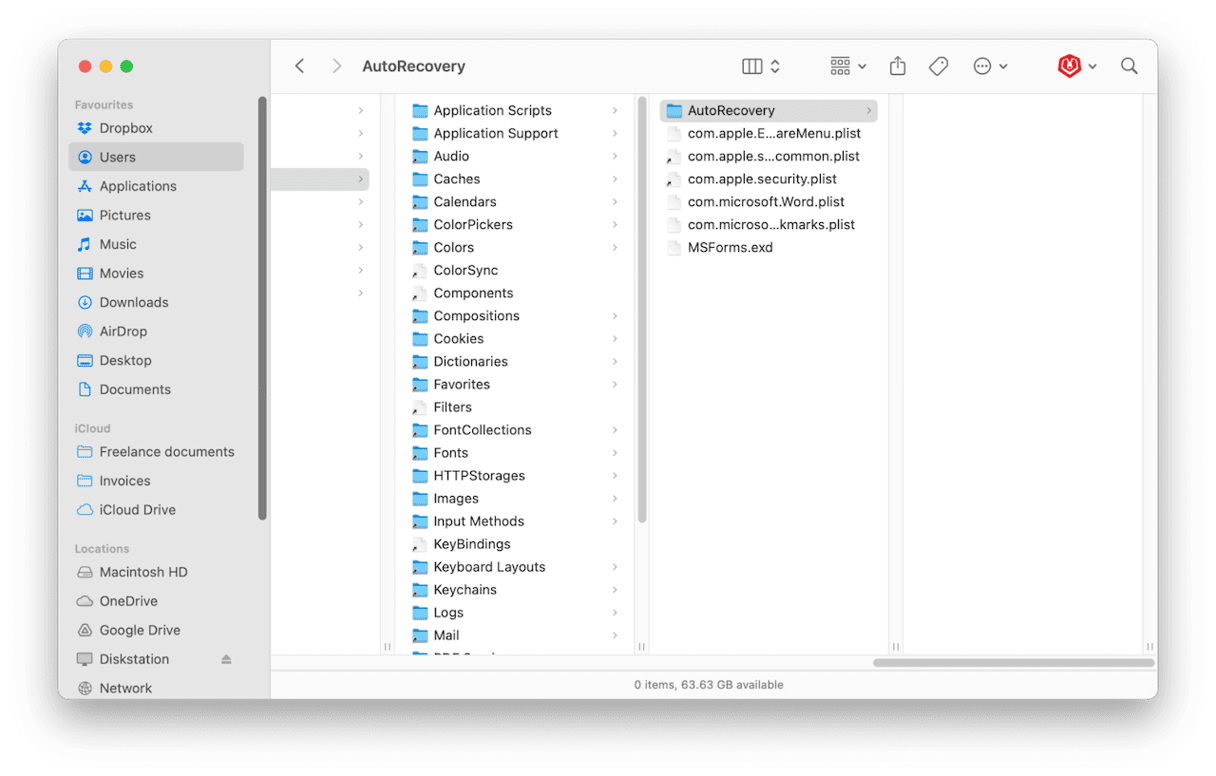
- Click the Finder in the Dock and then the Go menu.
- Choose Go to Folder.
- In the text box, paste this path: ~/Library/Containers/com.microsoft.Word/Data/Library/Preferences/AutoRecovery
- Go through that folder, checking each document one by one until you find the one you’re looking for.
- When you find the one you need, double-click it to open it in Word.

What if it doesn’t open in Word?
If you find the document you need but it doesn’t open in Word when you double-click it, do this:
- Drag the file to your Desktop.
- Open Word, then choose File > Open > On My Mac.
- Select the file on your Desktop.
- If Show Options is displayed, click it.
- Choose Recover Text from the Open menu.
- Click Open.
Pro tip: How to change the frequency of AutoSave
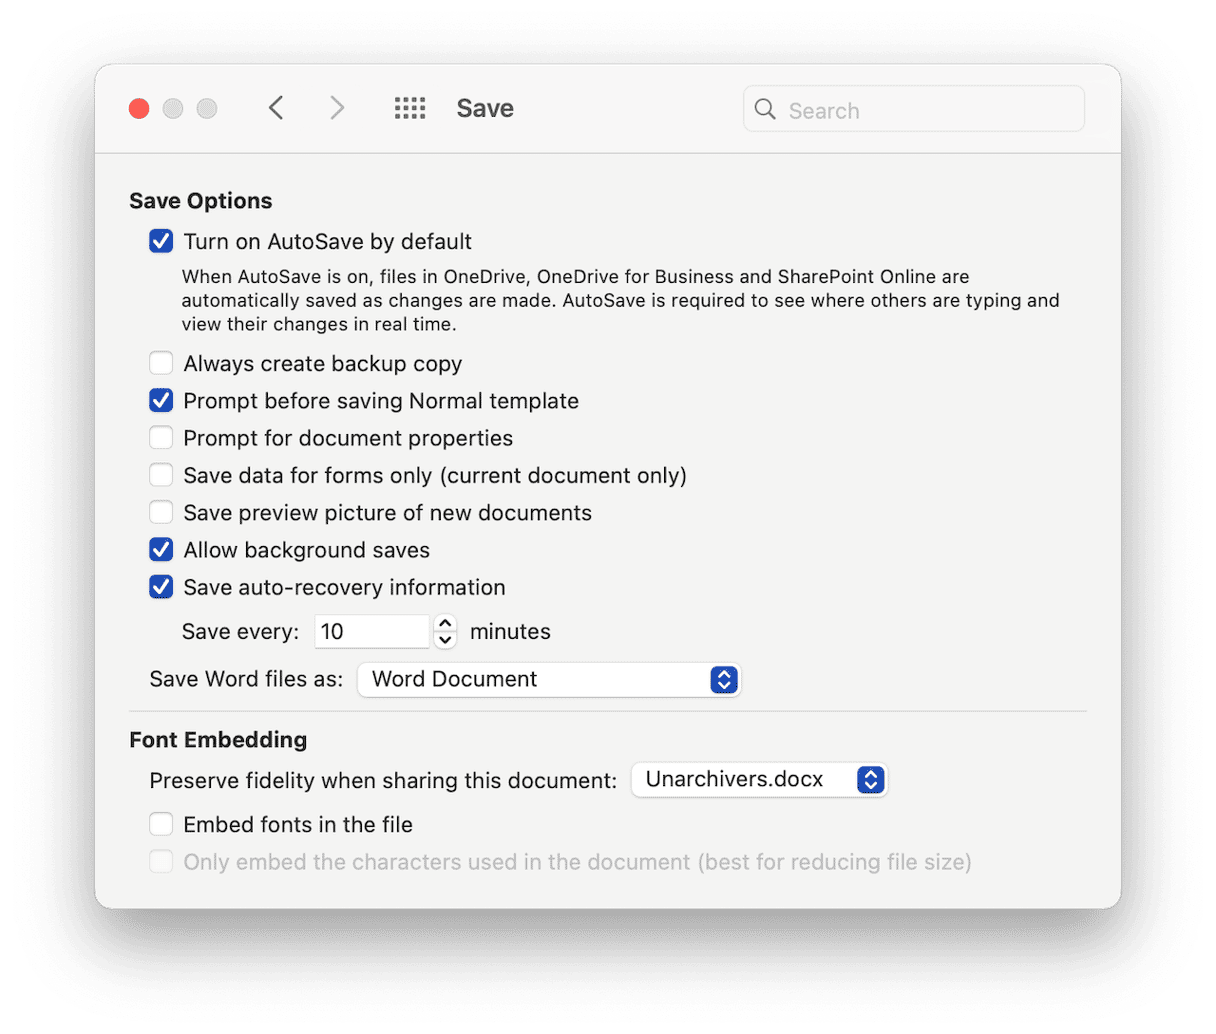
By default, Word autosaves your document every ten minutes. But some people can write a lot in ten minutes or make important changes to a document. So, some pro Word users recommend changing the frequency so that Word autosaves more often. It could save a lot of work in the long run.
- Click the Word menu and choose Preferences.
- In the Output & Sharing section, choose Save.
- In the dropdown menu beneath ‘Save auto-recovery information,’ choose the length of time between saves (make sure that option is checked, along with ‘Allow background saves’).

2. Restore previous versions
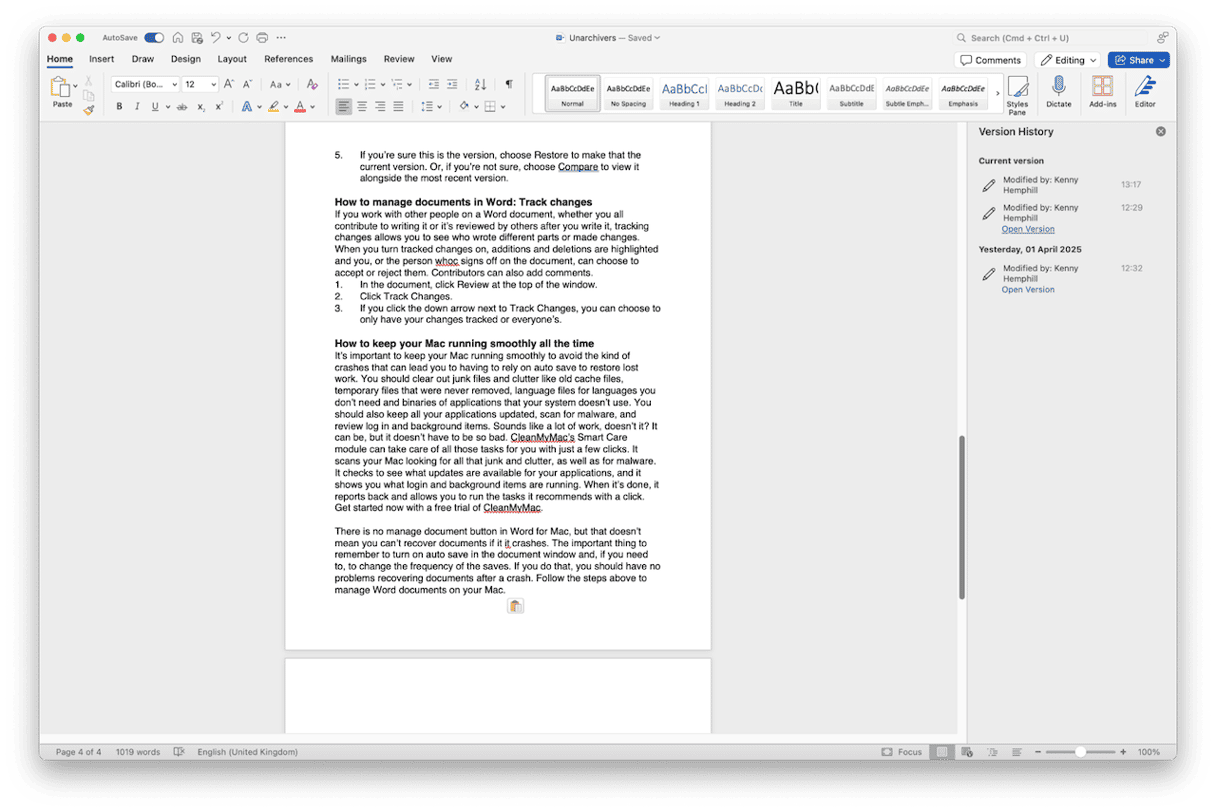
Word’s AutoSave feature doesn’t just write the latest saved version over the previous version; it maintains earlier versions so that you can go back to them if you need to.
Here’s how to use it:
- Open the document in Word.
- Click on the File menu and choose Browse Version History.
- You’ll see a sidebar showing previous versions of your document and a timestamp next to each one.
- Find the version you want to return to and click Open Version.
- If you’re sure this is the version, choose Restore to make that the current version. Or, if you’re not sure, choose Compare to view it alongside the most recent version.

3. Track changes
If you work with other people on a Word document — whether you all contribute to writing it or it’s reviewed by others after you write it — tracking changes allows you to see who wrote different parts or made changes. When you turn tracked changes on, additions and deletions are highlighted, and you or the person who signs off on the document can choose to accept or reject them. Contributors can also add comments.
Here’s how it works:
- In the document, click Review at the top of the window.
- Click Track Changes.
- If you click the down arrow next to Track Changes, you can choose to only have your changes tracked or everyone’s.

How to keep your Mac running smoothly all the time
It’s important to keep your Mac running smoothly to avoid the kind of crashes that can lead you to having to rely on AutoSave to restore lost work. You should clear out junk files and clutter like old cache files, temporary files that were never removed, language files for languages you don’t need, and binaries of applications that your system doesn’t use. You should also keep all your applications updated, scan for malware, and run maintenance tasks.
Sounds like a lot of work, doesn’t it? It can be, but it doesn’t have to be so bad. CleanMyMac’s Smart Care feature can take care of all those tasks for you with just a few clicks. It scans your Mac, looking for all that junk, clutter, and malware. It checks to see what updates are available for your applications, and it shows you duplicate downloads, too. When it’s done, it reports back and allows you to run the tasks it recommends with a click. Get your free CleanMyMac trial — enjoy complete app functionality for 7 days at zero cost.

There is no Manage Document button in Word for Mac, but that doesn’t mean you can’t recover documents if it crashes. The important thing to remember is to turn on AutoSave in the document window and, if you need to, change the frequency of the saves. If you do that, you should have no problems recovering documents after a crash. Follow the steps above to manage Word documents on your Mac.


