The built-in Photos app on your Mac is very powerful and has lots of great features, some of which are well-known, while others are less so. One of the less well-known features is the ability to hide photos. This can sometimes lead to photos being hidden by accident and means they can’t be found. In this article, we’ll show you how to access hidden photos on Mac and tell you everything you need to know about this feature.
What are hidden photos on Mac?
The hidden photos are images that don’t appear in the main photo library or any other album Photos. They are effectively tagged as ‘hidden’ in Photos — in the same way that some photos are tagged as Favorites, Receipts, or Illustrations. If you look in the sidebar of Photos, you’ll see a section called Utilities that houses Favorites, Illustrations, Receipts, and, yes, Favorites.
How to find hidden photos on Mac
So, if hidden photos have their own album, all you need to do is click that selection to see them, right? Not quite. The Hidden Photos album is, well, hidden by default. If you look at the sidebar under Utilities, it won’t be there. You need to make it visible. Also, depending on how the Hidden feature has been set up, you may also have to type in your login password or use Touch ID to make hidden photos visible. Here’s how to see hidden photos on Mac Photos.
- Open the Photos app.
- Click on the View menu and choose Show Hidden Photo Album.
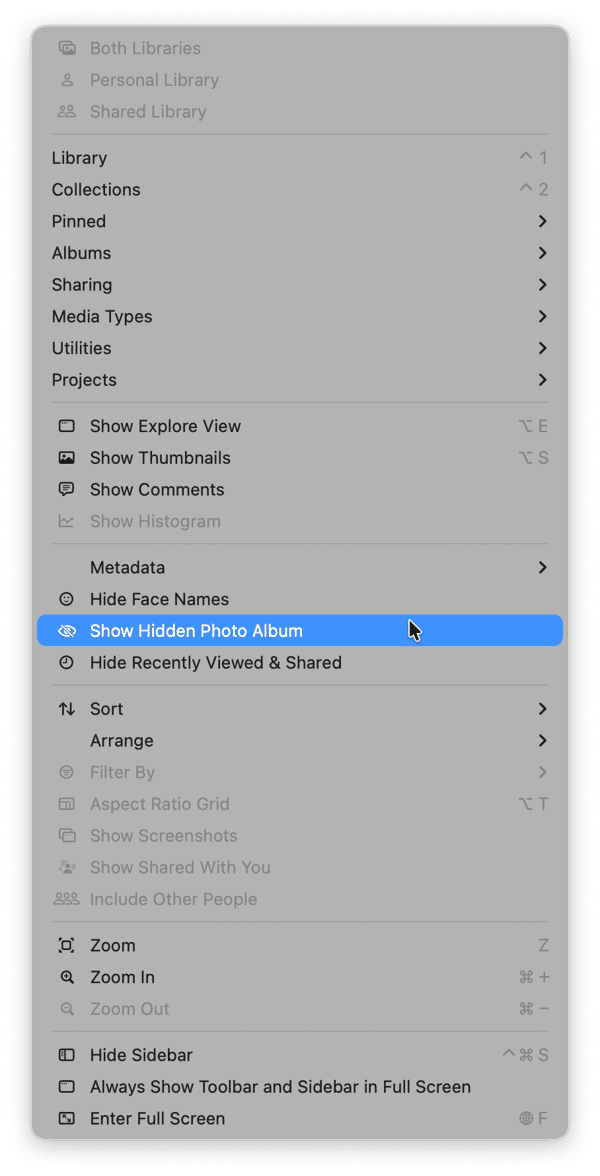
- In the sidebar, look for the Hidden album under Utilities and select it.
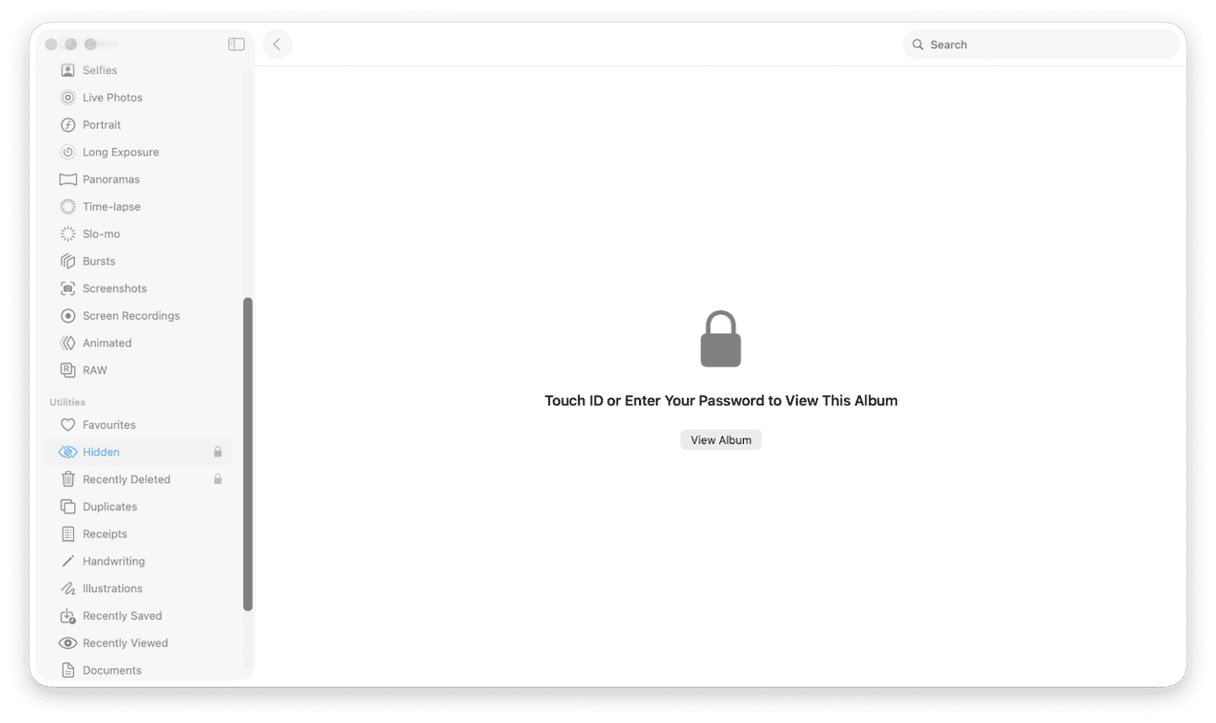
- If there’s a lock beside ‘Hidden,’ you will be asked to confirm you want to see hidden photos. Click View Album and type in your login password or use Touch ID to authenticate.
- When you’ve done that, you will see all the photos that have been marked as ‘hidden.’
- To see a larger version of any photo, just double-click it as you would normally do.


How to change the security setting for hidden photos
As we said above, you can set Photos to require a password in order to display hidden photos. If you set it up that way, you will also have to type in a password or use TouchID to view the Recently Deleted section. Here’s how to configure it.
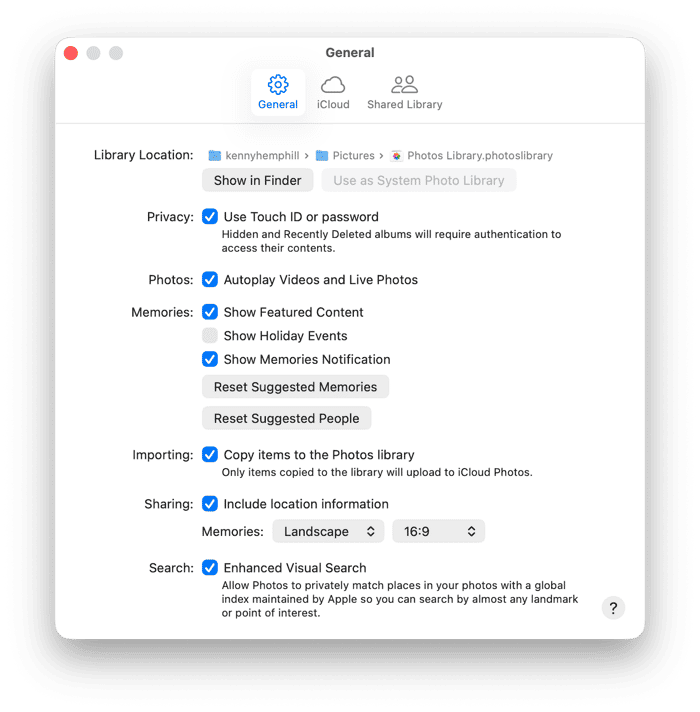
- Click the Photos menu and choose Settings.
- Go to the General tab.
- Check or uncheck the box labeled ‘Use Password.’
- Type in your password or authenticate with Touch ID if you’re asked.
- Quit Settings.

How to unhide photos
If you want a photo to be permanently visible and removed from the Hidden album, you can either right-click it and choose Unhide 1 Photo. Or select it, click the Image menu, and choose Unhide 1 Photo. If you want to unhide more than one photo, just choose all the ones you want to unhide and use the same command. You can also select the photos and press Command-L to unhide them.

How to get rid of clutter on your Mac
We all love having a new Mac that runs speedily and isn’t filled with thousands of unnecessary files that slow it down. Over time, it becomes filled with duplicate files, photos that are almost identical, and downloads that stay in the Downloads folder and are never used or moved anywhere else. Then there are all those old files that litter the Pictures, Documents, and Movies folders and are never opened.
They all take up space and could slow your Mac down. Most of us know we should delete or archive them, but we never get around to it because it’s time-consuming and boring.
Well, there’s no excuse now — CleanMyMac’s MyClutter feature can do it for you. It scans your Mac and identifies duplicates, similar images, and old downloads. And it allows you to quickly see which files haven’t been opened for a long time and which files are taking up the most space on your startup disk. You can then decide what you want to do with them.
Here’s how it works:
- Get your free CleanMyMac trial — check out how it works for 7 days for free.
- Open CleanMyMac and choose My Clutter in the sidebar.
- Click Scan.
- When it’s finished, click Review in the panel you want to know more about or Review all Files to see everything.

The Hidden feature is useful if you want to keep some photos in your Library but don’t want them to be displayed when you browse. But once you’ve hidden a photo, it’s not obvious how to view it. That’s because the Hidden album is itself hidden by default. Follow the steps above to unhide the album and see hidden photos on your Mac.
Frequently asked questions
Why can't I see hidden photos on Mac?
Most likely, the Hidden album is not enabled in the View menu. Even if it is, sometimes, it won’t appear if it is empty. So, hide at least 1 photo and check the sidebar again.
Where are hidden photos on Mac?
Hidden photos are in the Photos app’s sidebar. Look under Utilities to see this collection.
How to hide photos on Mac?
If you want to hide a photo, just right-click it in the Photos app and select Hide 1 Photo. You can select multiple photos and hide them at the same time. An alternative hiding option is to use the Image menu in the menu bar.