
macOS Catalina guide
macOS Catalina is the latest version of our favorite operating system and has lots of new features and improvements. In this guide, we’ll tell you everything you need to know to get started installing, using, and most importantly, having fun with it!
Did you know?
Catalina is named after Santa Catalina (above), an island off the coast of Los Angeles. Santa Catalina is home to around 4,000 people and famous for its wildlife. Catalina is the latest version of macOS to be named after a California landmark. Others include Yosemite, after the national park, Mojave, after the desert, and Mavericks after the surfing location.

Jesse Allen and Robert Simmon, NASA Earth Observatory — public domain
Prepare for Catalina
Before you start making plans to upgrade, check whether your Mac is compatible with Catalina. Here’s a list of all the Macs that can run Catalina. If your Mac is on it, you’re in luck. If not, it’s a good excuse to upgrade to a newer one!
MacBook
2015 and later
MacBook Air
2012 and later
MacBook Pro
2012 and later
iMac
2012 and later
IMac Pro
2017 and later
Mac Pro
2013 and later
Approximate amount of junk you can delete. A link to download the free edition of CleanMyMac X
Clean up your computer
This step is pretty important, because in order to prepare the backup of your Mac it has to be stripped clean of all the outdated and junk files. As a bonus, if you get rid of them first, the process of backing up will be quicker. You could track down these files yourself by sifting through your Mac’s Library folder and each user’s Library folders, but there is a much quicker and easier way, and it’s one that I use.
CleanMyMac X scans your Mac, hunting down those junk files you don’t need and identifying them. You can then go through the results and review what it’s found, or go ahead and delete them all, freeing up possibly tens of gigabytes of disk space on both your Mac and on the backup.
Back up your Mac
Please. Before you do anything else, backup you your Mac. Even a straightforward upgrade can go wrong and cause you to lose data. And no one wants that. If you already use Time Machine to regularly back up your Mac, run a manual backup just before you start the upgrade process. Here’s how:
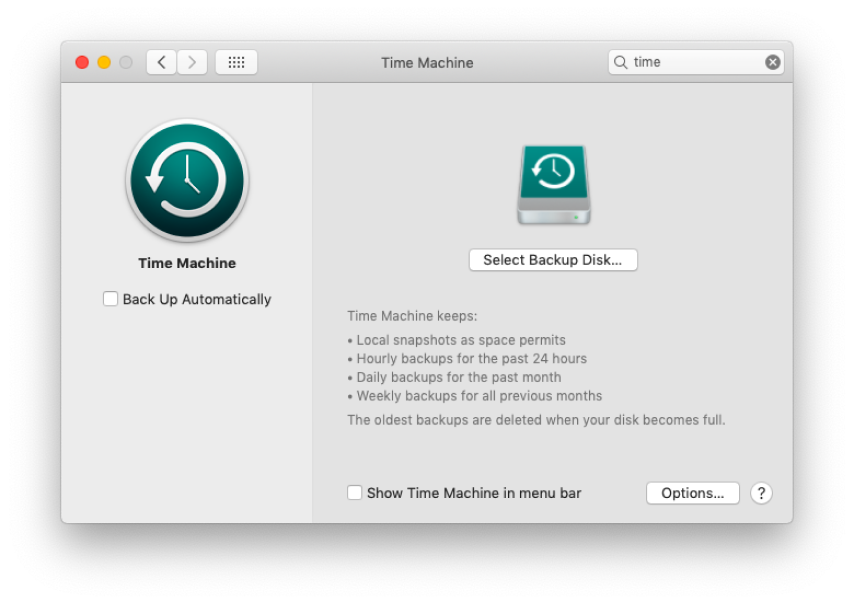
- Click on the Time Machine icon in the menu bar.
- Choose BackUp Now.
- Wait for it to finish.
If you have some folders excluded from your regular Time Machine backup and they contain data you don’t want to lose, you should back those up separately. You can just copy them manually to another hard disk, USB stick, or cloud storage service.
Backup software for Mac
If you don’t use Time Machine or have another regular backup routine, you really should start one. In the meantime, use a tool like Get Backup Pro or Super Duper to make a bootable clone of your Mac. That way, if something catastrophic happens, you can reboot your Mac from the clone and reinstall macOS on your main boot drive.
Tip: Check out the free uninstaller tool in this app , it has a filter for 32-bit applications.
Check your 32-bit apps
Have you got any old apps? As we will see next, some of your apps may not be optimized for Catalina, especially if they are 32-bit applications. You may consider deleting these applications along with other rarely-used software. These apps clutter your startup disk, taking up valuable space and possibly impeding performance. There’s no point in copying them to a clone or backup, they will just clutter that up too.
Consider what kind of upgrade you want to do
There are two options here. You can install Catalina over the top of your current version of macOS. Or you can do what’s known as a clean install and wipe your boot drive completely and then install Catalina. Each has advantages and disadvantages.
Regular install
Fast
Less likely to run into problems
Less chance of data loss
‘Junk’ files from previous OS not removed
More likely to have problems
Likely to run more slowly
Clean install
Clears out junk files
Your Mac will run more quickly than it will following a regular install
Any problems with previous install eradicated
Slower
More risk of data loss
Need to reinstall apps and recover data
How to create a bootable installer
If you decide to go the clean install route, you’ll need to create a bootable installer for Catalina. Here’s how you do that:
Bootable installer
This is a copy of macOS Catalina that will auto-install on your Mac either from a USB stick or from an external hard drive.
There are a couple of different ways to create a bootable installer. One for when you're comfortable using Terminal, and one for when you're not. We'll show you how to do both, below. Before that, though, you'll have to grab yourself a copy of macOS Catalina, and how you do that depends on whether you're reading this before or after it has been launched.
Before launch day
-
Go to https://beta.apple.com/sp/betaprogram/ and sign up for the public beta program.
-
Once you've signed up and followed all the instructions, download the beta.
-
Quit the installer if it launches automatically and put the downloaded file into your Applications folder.
After launch day
-
Launch the App Store app and search for 'Catalina'.
-
When the results appear, click on Catalina , then choose ‘Get’.
-
Wait for the file to download, and then quit the installer as soon as it launches.
-
The installer file is now in your Applications folder.
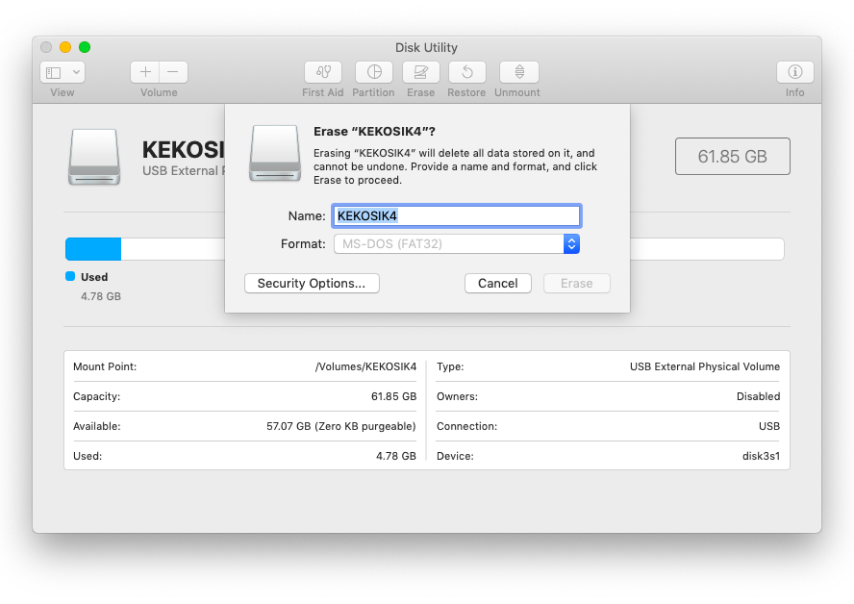
To create a bootable installer you will need a USB stick or an external hard drive with at least 16GB of free space.
Whichever method you use, you will need a USB stick or an external hard drive with at least 16GB of free space. You’ll also need to use Disk Utility to create a new partition (or container if it’s formatted as AFPS), unless you plan to use the whole disk. In any case, copy any data on your disk to another location and erase it in Disk Utility.
Creating a bootable installer
Remember I said there were two ways to create a bootable installer, depending on whether you are comfortable with Terminal? Here’s how to do it without Terminal.
Without Terminal
-
Go to https://diskmakerx.com and download a copy of Diskmaker X.
-
Plug in your freshly-formatted USB stick or hard drive.
-
Once you’ve downloaded and installed Diskmaker X, follow the on-screen instructions to point it to your USB stick/hard drive and Catalina installer file.
Wait for it to finish and you’re done!
Currently, it only works with Mojave, so if you plan on creating a bootable installer for the Catalina public beta, you’ll need to use the Terminal method, below. Once Catalina ships, there should be a version that supports that too.
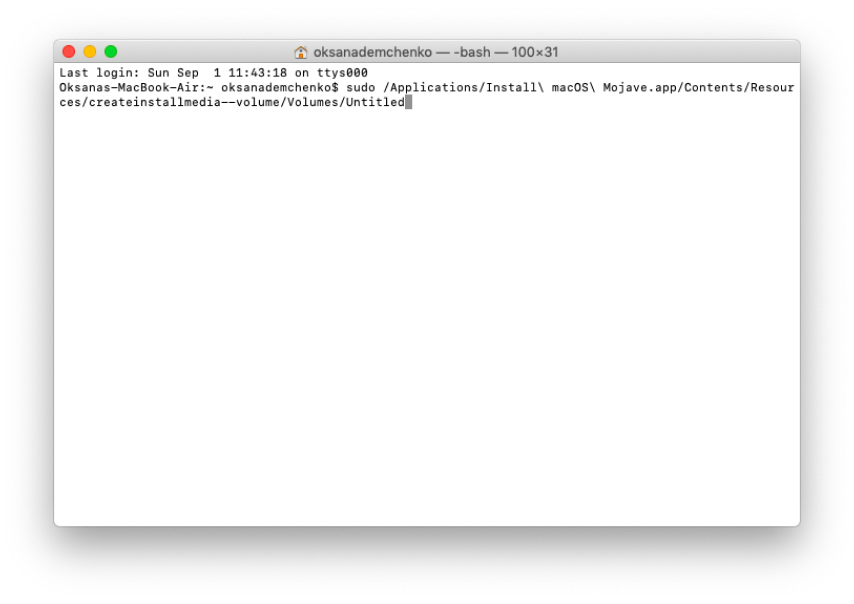
Via Terminal
-
Plug in your USB stick or hard drive.
-
Go to Applications > Utilities and double-click Terminal.
-
In the Terminal window , type:
-
Press Return and wait for ‘Done’ to appear in the Terminal window.
Quit Terminal
sudo /Applications/Install\ macOS\ Mojave.app/Contents/Resources/createinstallmedia -- volume/Volumes/ Untitled
‘Untitled’ is the name of your USB stick or hard drive
Creating a bootable installer via Terminal.
How to upgrade to macOS Catalina
Ok. Finally, we’re getting to the exciting bit — installing macOS Catalina! We’ll start with the clean install, so if you’re using that method, grab the bootable installer you just created.
3 basic steps:
Before you do anything else, check that the backup you made earlier is working.
Before you do anything else, check that the backup you made earlier is working. Plug it into your Mac, select it in System Preferences as the startup disk and restart. Once you’re happy that everything is ok, go back to System Preferences, select your regular boot disk in the Startup pane and restart. Then unplug the backup and put it somewhere safe.
The clean install procedure:
-
Plug the USB stick or hard drive you used to create the bootable installer.
-
Restart your Mac , holding down the Option (alt) key.
-
When you see the options for booting on the screen, choose the installer disk you just plugged in.
-
When the macOS Utilities screen appears, select Disk Utility.
-
In Disk Utility, choose the Erase tab and select your regular startup disk (Macintosh HD or whatever you have renamed it as).
-
Give the disk a name (Macintosh HD is fine).
-
Choose a format. If you have a recent Mac with an SSD boot disk, choose AFPS. If you have an older Mac with a mechanical hard drive or Fusion Drive, select either AFPS or MacOS Extended (Journaled).
Click Erase.
-
Once Disk Utility has done its thing and wiped your boot disk, go to the Disk Utility menu and choose Quit.
Now, choose Install macOS.
Press Continue.
-
Choose the drive you just erased as the destination.
-
When macOS Catalina has finished installing, your Mac will reboot and you can follow the usual setup process , adding a user account, connecting to wifi, and logging into your iCloud account.
AFPS has replaced MacOS Extended as the default format in macOS, so you should choose this unless you have a good reason not to.

Next, you will need to connect your backup disk and copy back your files from that to your Documents folder, and the other folders in your user directory. If you use iCloud Photo Library, you don’t need to copy the Photos Library across. Once you’ve done that, you can start re-installing your applications.
The regular install a.k.a. Upgrade
If you don’t want to go through the process of having to copy data back and re-install apps, you can do a regular install, or upgrade (it’s the same thing). However, before you do that, and if you didn’t do it before backing up your Mac, don’t forget to clear out the junk files your Mac has accumulated. These include temporary files, cache files, broken downloads, and all sorts of other stuff you don’t need.

Mac cleaning tool, CleanMyMac X. Smart Scan process.
Сlear out the junk files with a Mac cleaning tool, CleanMyMac X:
-
Install and launch CleanMyMac X — download it for free here
-
In the sidebar on the left, choose Smart Scan.
-
Press Scan and wait for it to finish scanning your Mac for junk files.
When it’s done, press Clean.
-
Alternatively, if you want to look at what it’s found first and decide for yourself what to delete, select Review files before you press “Clean”
Installation after the cleanup:
-
Make sure your Mac is connected to the internet and has a reliable connection. If you’re using a MacBook, MacBook Air, or MacBook Pro, plug it into mains power.
-
Launch the App Store app and search for ‘macOS Catalina’.
-
When you have located it, click ‘Get’.
-
Catalina will now download. When it’s down and ready to install, press Continue.
-
If asked, type in your admin username and password.
-
Wait for the installation to complete. Your Mac may restart several times, that’s perfectly normal. If you’re installing onto a MacBook, MacBook Air, or MacBook Pro, don’t close the lid!
Once Catalina has finished installing, you can continue using your Mac. You don’t need to set it up again or reinstall applications. It will look exactly as it did before you upgraded, except it will have all the shiny new features of Catalina.
macOS Catalina in numbers


newly added features

GB of required RAM
GB of required storage space
-bit apps will not be supported

minimal OS compatibility

New features in macOS Catalina
Sidecar
Screen Time
Project Catalyst
FindMy app
Voice Control
Apple: Music, TV, Podcasts
-
iTunes has gone
It’s taken a while, but Apple has finally killed off iTunes. The app that popularised ripping CDs to your Mac, and then started the MP3 download revolution, has gone. Why? It just became too big and too buggy. Over the years it became a tool for watching TV and movies, listening to podcasts, backing up iOS devices and numerous other tasks.
iTunes has been replaced by not one, but three new apps: TV, Podcasts, and Music.
The Music app has a player that allows you to see lyrics while the song is playing. The Apple TV app allows you to buy or rent 4K titles and supports Dolby Atmos. It will also curate collections of programmes from multiple sources and make personalised recommendations. There’s a new Kids sections, and Apple TV is also the home of Apple’s new TV+ streaming service.
With iTunes gone, the Finder is now the place to backup, update, or restore an iOS device.
When you plug an iPhone, iPad or iPad Touch into your Mac, instead of iTunes launching, you’ll see it appear in the sidebar of Finder windows. Click on it and you’ll see options for what to do next.

iTunes has been replaced by not one, but three new apps: TV, Podcasts, and Music.
-
Sidecar
If you have an iPad, you’ll love Sidecar. It allows you to use your iPad as a second screen for your Mac.
If you have an iPad, you’ll love Sidecar. It allows you to use your iPad as a second screen for your Mac. You can mirror your Mac’s display or extend it. And you can use it wirelessly or with your iPad connected to your Mac. It also allows you to use your iPad like a graphics tablet for your Mac or to markup PDFs in Preview. You can also use gestures on your iPad to control apps on your Mac and if an app has TouchBar support but your Mac doesn’t have a TouchBar, one will appear on your iPad screen.
-
Find My

In Catalina, FindMyiPhone and FindMyFriends have been combined into one app.
In Mojave, if you wanted to access Find My iPhone (or Find My Mac), you had to log into iCloud in a browser. Not anymore. In Catalina, FindMyiPhone and FindMyFriends have been combined into one app. And it will even be able to find your Mac if it’s offline or sleeping, so long as Bluetooth is switched on and it’s within range of another Apple device. It doesn’t even have to be your device. FindMy crowdsources locations by having other users’ devices near the last known location of your Mac detect its Bluetooth signal and then report its location to you. It’s all anonymous and encrypted so no one has access to anyone else’s location data.
-
Better Apple apps
Reminders has been completely redesigned in Catalina to match the new version in iOS 13, allowing you to create Smart Lists and add attachments. You can tag someone in a reminder and be notified about it the next time you chat to them in Messages. And Siri will suggest new reminders based on what it finds in Messages. The Photos app has a new layout that highlights your best shots of the day, month, or year, hiding duplicates and things like screen grabs. It also highlights moments like birthdays, anniversaries, and trips.
There’s a new Gallery view in the Notes app, and improved search. You can share folders of notes and collaborate on them with friends and colleagues. And there are new checklist options that allow you to move completed items to the bottom of a list or drag and drop items to re-arrange them.
There’s new start page in Safari, to allow you to more easily find your favourite and most frequently visited sites. And Siri can suggest things here, too, including bookmarks from your lists, reading list items, tabs open in your other devices, and links in the Messages app.
You can now view video as picture-in-picture from the audio tab in Safari, and it will alert you if it thinks passwords you create for websites are weak.The Mail app in Catalina allows you to block all mail from specific senders and when you do, all messages from them will be sent to the Trash. You can also unsubscribe from commercial email messages by clicking a button above the header. And you can mute threads – messages will still arrive in your inbox but notifications will be muted.
-
Voice control
Catalina lets you navigate your Mac using just your voice. You can launch and interact with apps, as well as click and drag files using just your voice.
Catalina lets you navigate your Mac using just your voice. You can launch and interact with apps, as well as click and drag files using just your voice. Dictation has been improved too! Catalina is smart enough to understand the difference between text you dictate and commands you issue. It give you fine-grain control over text editing, allowing you to say “move up two lines” or “Replace ‘I don’t know’ with ‘I’ll go and check’”. You can also add custom words to its dictionary.
-
Privacy and security
Gatekeeper has been beefed up in Catalina. Instead of just signing their code to allow their apps to install without user intervention, recognised developers will now have to submit it to Apple to have it scanned for malware and other vulnerabilities.
There are other privacy and security features, too. You will now have to give permission to apps that want to access your Desktop or Documents folders, and the OS is stored on its own read-only volumes so you can never write over important files.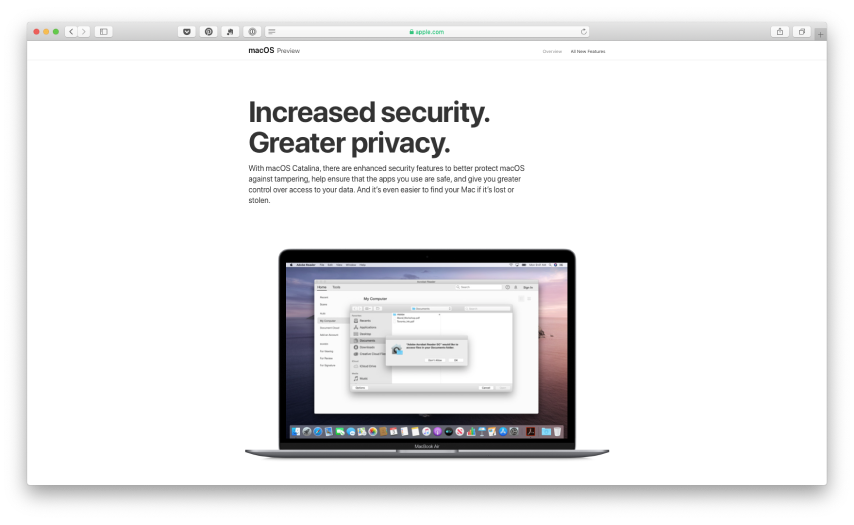
You will now have to give permission to apps that want to access your Desktop or Documents folders.
-
Screen Time

You can set limits for apps and websites, create groups, schedule downtime, and monitor usage.
If you use Screen Time in iOS to manage the amount of time that you or members of your family spend in front of the screen, you’ll love that it’s now in macOS too. You can set limits for apps and websites, create groups, schedule downtime, and monitor usage. So, for example, you could create a group called social media and include within it Twitter clients, Facebook’s website, and any other social media services your family uses. You can then set time limits for when they can be used. Thanks to Family Sharing, you can also limit who children in your family communicate with.
-
iCloud Drive
iCloud Drive is becoming a serious competitor to the likes of Dropbox and OneDrive, and now it allows you to share folders, as well as files, with a private link. It also works better with third party services.
-
iPad apps on the Mac
Apple introduced software to help developers port iPad apps to macOS last year, and used it itself in the likes of News and Voice Memos. Now it has made it even easier. Among those announced at WWDC were Asphalt 9: Legends, DC Universe, Jira, TripIt, and Fender Play. Expect to see lots more iPad apps come to the Mac very soon.
-
Restore from snapshot
The Recovery partition in MacOS Catalina stores snapshots of your Mac so if you install an update and find one of your apps is not compatible with it, you can just roll back to the previous version.
There are lots of other new features. QuickTime Player gets picture-in-picture support and the ability to create movies from folders of images. If you have an Apple Watch you can use it to authenticate with passwords stored in iCloud Keychain. And HomeKit-enabled security cameras can now store video footage in iCloud.
What’s missing in MacOS Catalina?
Apart from the obvious, iTunes, there are a few other omissions in Catalina. The most significant is support for 32-bit apps. If you still have any 32-bit apps on your Mac, you will need to upgrade them to the 64-bit versions, or find alternatives if you want to install Catalina.
Did you know?
CleanMyMac X can update all your apps in one go. It’s a great way to make sure you’re running the latest version of all your apps. And if you need to update 32-bit apps to 64-bit versions, it’s very handy.
How to check how many 32-bit apps you have:

- Open CleanMyMac X — the free version will do for this job
- Click the the Uninstaller tab
- Click on the 32-bit tag
Now, you can make use of the Updater tab (it’s found just below Uninstaller) and update the 32-bit apps to their newer versions (if they are available, of course).
What else is missing from Catalina?
Dashboard has also gone. That won’t come as a surprise, of course, as it has been switched off by default in recent versions of macOS. And many of its widgets, like stocks and weather are available in Notification Center.
Also in the category of things that most users had forgotten is QuickTime 7. As of Catalina, it will no longer work on the Mac, because it’s a 32-bit app. Why does it matter? Because, although Apple introduced QuickTime X many years ago, it dropped features that were present in QuickTime 7. Those included support for some older video formats, and the ability to do some very basic editing, like pasting video clips into QuickTime Player’s Timeline. For that reason, lots of people carried on using QuickTime 7. If you were one of them, you’ll need to find an alternative to use with Catalina.
Catalina problems and fixes
Like any operating system, macOS Catalina has its fair share of problems. Fortunately, they have fixes, too.
-
Problem #1: Can’t install Catalina
Try these solutions
-
Check your Mac is compatible.
As we said earlier, not all Macs that can run macOS Mojave are supported in Catalina. As a reminder, here’s the list of supported Macs:
-
MacBook
2015 and later
MacBook Air
2012 and later
MacBook Pro
2012 and later
iMac
2012 and later
IMac Pro
2017 and later
Mac Pro
2013 and later
If your Mac is on that list and you can’t install Catalina, there could be a number of reasons. Remember that the installation can’t take a while, several hours, even. So you may just need to be patient. If you think the installer has stuck or isn’t working, press Command + L to see progress. That should confirm whether it’s working. If it’s not, do the following steps in order.
-
Restart your Mac in Safe mode
Restart your Mac from. the Apple menu if you can, or by holding down the power button. Hold down the Shift key while it restarts. When it has restarted, try running the installer again.
-
Reset the PRAM (NVRAM)
This is one of those fixes that used to be common but is rarely necessary on modern Macs. However, it’s worth a try.
-
Shutdown your Mac.
-
Restart while holding down Command + Shift + P + R.
-
Hold the keys down until your Mac has restarted.
-
-
Reset the SMC
The system management controller (SMC) controls the hardware in your Mac – speakers, LEDs, and so on. Like the PRAM, it rarely needs resetting, but doing so causes no harm, so it’s worth a try.
-
Shut down your Mac, or turn it off using the power button.
-
Hold down Control + Shift + Option and press the power button to start your Mac.
-
Hold the keys for 10-15 seconds and release.
-
Restart your Mac.
-
-
Free up disk space
The system management controller (SMC) controls the hardware in your Mac – speakers, LEDs, and so on. Like the PRAM, it rarely needs resetting, but doing so causes no harm, so it’s worth a try.
If you’re worried about malware on your Mac, it’s a good idea to scan it regularly. You can do that using a dedicated malware tool – there are several available for macOS. But my preferred way is to use CleanMyMac X — this app is notarized by Apple, by the way.
If you see a message telling you that Catalina can’t be installed, it could be that you don’t have enough free disk space. Apple’s system requirements state that you need 15GB of free space. But that really is a bare minimum and you should keep more free to avoid running into trouble when you upgrade to Catalina.
You could manually track down large files on your Mac and archive them on external storage disks or move them to cloud storage. However, I prefer to use CleanMyMac X and I recommend you do, too. CleanMyMac X makes it really easy to remove junk files that accumulate on your Mac and that alone can free up tens of gigabytes of space. However, it also has a tool that analyses your startup disk and highlights the largest files, making it really easy to see what’s taking up space. And, of course, CleanMyMac X can remove those files, too – though you may want to copy them to a different location first. Here’s how to use it.

CleanMyMac X makes it really easy to remove junk files that accumulate on your Mac and that alone can free up tens of gigabytes of space.
-
Download , install, and launch CleanMyMac X.
-
Choose Space Lens from the sidebar.
Press Start.
-
When it’s finished, you will see a list of folders and, on the right, a ‘cloud’ of the same folders, with the size of the files inside them illustrated by the size of the folder and its place in the cloud.
-
Click on one of the larger folders to see its contents. Click again to drill down.
-
When you’ve identified a file or folder you want to remove, check the box next to it in the list to the left of the cloud.
Press Remove.
-
Problem # 2: Catalina installs but freezes when it reboots
This problem seems to be caused by misbehaving kernel extensions (files with the .kext extension). The solution is to move them to a different location, temporarily. You’ll need to use Terminal to do that.
-
Go to Applications > Utilities and double-click Terminal to launch it.
-
Type the following at the prompt: mkdir ~/Extensions-Backup && sudo mv /Library/Extensions/* ~/Extensions-Backup/
-
This puts kernel extensions in a folder called ‘Extensions-Backup’ in your user folder. Once you’ve completed the install, you can move them back to ~/Library/Extensions manually.
-
-
Problem # 3: apps no longer work or misbehave in Catalina
The first thing to do is to check that the app in question is a 64-bit app. As we said earlier, Catalina doesn’t support 32-bit apps.
-
Click on the Apple menu and choose About this Mac.
Press System Report.
-
In the menu in the left, click on Applications, it’s under Software.
-
Scroll to the right of the window and click the 64-bit column header to sort applications according to whether they are 32- or 64-bit.
-
If the misbehaving apps are labelled 32-bit, you need to upgrade them or replace them with something else.
If updating all your apps to 64-bit doesn’t solve the problem, you can try resetting them. This takes them back to their freshly installed state and can fix any problems that have crept in through preferences or other related files.
You can reset apps with CleanMyMac X, too, using the Uninstaller tool. Note, that resetting an app doesn’t delete the actual application data and your user-created files. It simply rolls the app back to its default state, keeping the main data intact.
-
Launch CleanMyMac X and choose the Uninstaller.
-
Locate the misbehaving app in the list of apps.
-
Check the box next to it, and click and hold where it says ‘Uninstall’.
-
Choose Reset from the dropdown menu.
Press Reset.
-
-
Problem # 4: Sidecar doesn’t work
This new feature of Catalina, which allows you to use your iPad as a second screen, or even a graphics tablet, for your Mac can be problematic. Here’s what to do if it doesn’t work.
-
Check your wifi connection. If you’re using Sidecar wirelessly, make sure your wifi network is working properly and that both your Mac and iPad are connected to it.
-
Swap wifi for USB. Plug your iPad into your Mac with its charging cable, instead of using a wifi connection. If you have an iPad Pro and a Mac that doesn’t have a USB-C slot, you’ll need a hub with USB-C connectors, or a USB-C to USB-A cable.
-
Make sure the app you are using on your Mac is compatible with Sidecar, not all apps are. If you’re not sure, check by opening a PDF in preview and using your iPad to annotate a PDF. If that works, the problem is with the app, not Sidecar.
-
Make sure your Mac, iPad and the apps you’re trying to use with Sidecar are up to date. You can use CleanMyMac X to update multiple apps on your Mac very quickly.
-
Restart both your Mac and your iPad
-
-
Problem # 5: Catalina is running slowly
There are a number of reasons why Catalina might be running slowly. However, there is one issue that, during the beta phase at least, seemed to be more common than others. There is a background process known as ‘fileproviderd’ which copies data backward and forward between iCloud and your Mac.
-
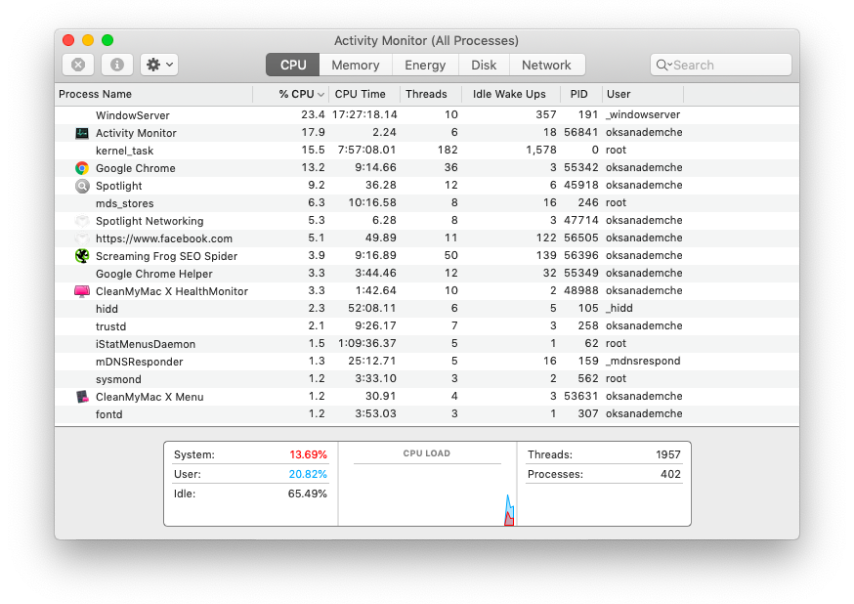
Check the ‘fileproviderd’ process
As many users report analyzing macOS Catalina Beta, this process seems to be buggy, causing it to crash. You can check whether this has happened on your Mac like this:
-
Go to Applications > Utilities and launch Activity Monitor.
-
Click the CPU column header to order processes according to the percentage of CPU cycles they’re using.
-
If you see fileproviderd near the top of the list, occupying 80% or more of your Mac’s CPU cycles, it’s crashed.
-
Select fileproviderd and press the Quit Process button.
Quit Activity Monitor.
-
If you see fileproviderd near the top of the list, occupying 80% or more of your Mac’s CPU cycles, it’s crashed.
That won’t solve the problem permanently, but it will allow you to speed up your Mac while you do the next step: log out of iCloud.
Go to System Preferences and click on the iCloud pane.
Press Log out.
Once you’ve logged out, log back in again.
CleanMyMac X can remove both Login Items and Launch Agents quickly and easily.
-
Remove login items and launch agents
These apps and processes start automatically when you boot your Mac, run in the background, and may be slowing down your Mac. You can remove login items manually like this:
-
Launch System Preferences and click on Users & Groups.
Choose your user account.
Press Login Items.
-
Check the box next to the items you want to prevent launching at startup.
-
Press ‘-‘ at the bottom of the window.
I have found, though, that it’s much quicker and easier to use CleanMyMac X to do the job. It can remove both Login Items and Launch Agents quickly and easily. This is the method I recommend you use.
-
-
Close extra browser tabs
Close any browser tabs you don’t need. Having lots of browser tabs open at once uses memory and can use processor cycles, too, if, for example the web page is auto-playing a video.
What else can you do?
The app I’ve told you about, CleanMyMac X has a few tools that address macOS speed. For example they allow you to run “Maintenance Scripts” that boost system response. Also, you can Free Up RAM with a dedicated command. The latter is found under the Maintenance tab in CleanMyMac X.
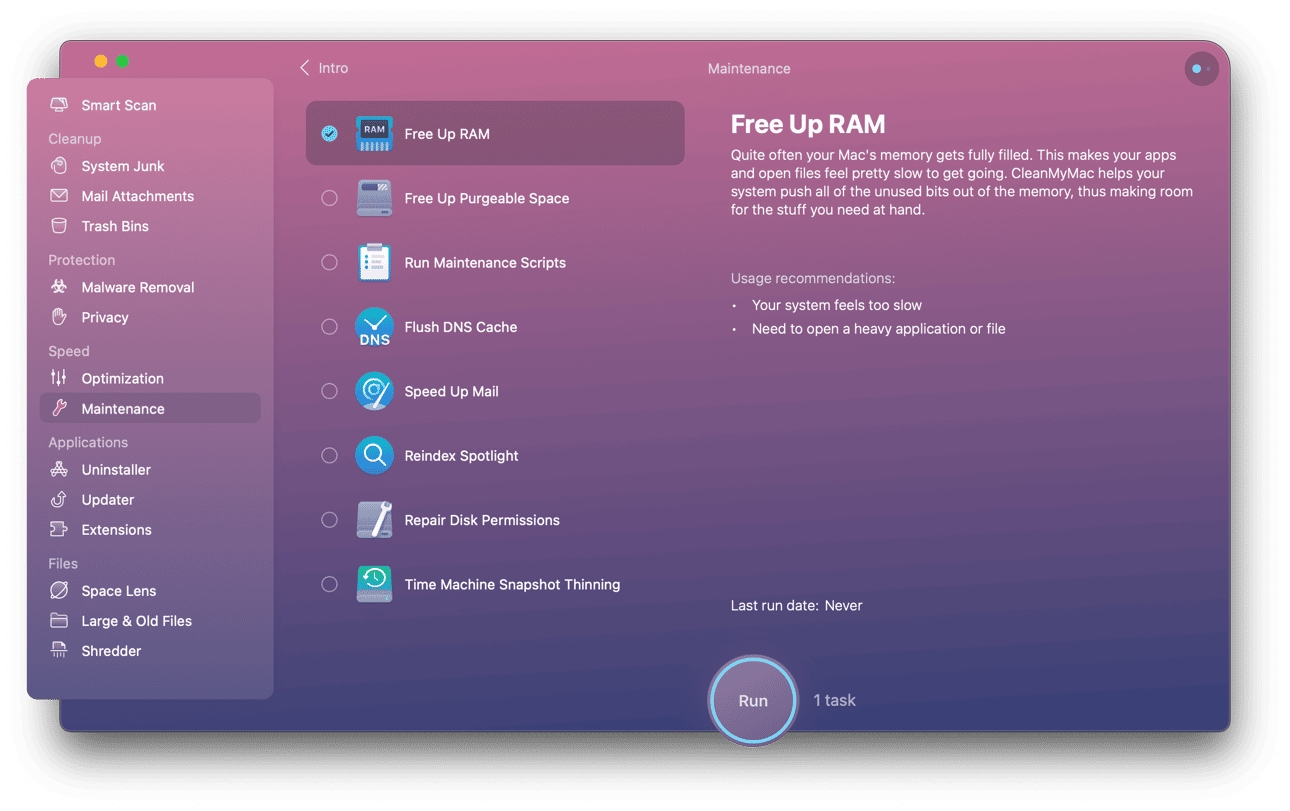
This command, Free Up RAM, is helpful when a certain app freezes and your Mac is lacking fresh virtual memory.
-
-
Problem #6: Battery draining faster after you install Catalina
You can use Activity Monitor to find the culprit.
Launch Activity Monitor and press the Energy tab.
Look for the apps and processes using the most energy.
If a web browser is top of the list for energy use, closing tabs may help and so prolong battery life. However, you may also want to consider deleting any browser extensions you don’t need. These may not be compatible with Catalina and may be causing your Mac to slow down or the battery to drain more quickly. Lucky for us that CleanMyMac X can also get rid of browser extensions.
-
Problem # 7: Can’t connect to App Store
If you’ve run a clean install of Catalina, one of the first things you will need to do is log in to the App Store to re-download your apps. So, if you can’t connect, it’s a significant problem. Thankfully, the solution is likely to be simple.
Check your internet connection and wifi network.
-
If you are logged into iCloud, log out and then log in again from the iCloud pane in System Preferences.
Restart your Mac.
-
Problem # 8: Bluetooth is not working
The easiest solution is to trash the Bluetooth plist file, which will force your Mac to create a new one and should get Bluetooth working again.
In the Finder, click on the Go menu and choose Go to Folder.
Type: Library/Preferences
Look for the file: com.apple.Bluetooth.plist and drag to the Trash.
-
Problem # 9: Finder keeps crashing
If the Finder beachballs or crashes in any way, the first thing to do is to force it to relaunch. There are a number of ways to do, and which one you choose will be down to how badly it’s crashed and personal preference.
-
Click on the Apple menu and Choose Force Quit. When the window opens, select he Finder and press Relaunch.
-
Press Command + Option + Escape. Choose the Finder, press Relaunch.
-
Right-click on the Finder in the Dock and select Relaunch.
-
Go to Applications > Utilities and launch Activity Monitor. Select the Finder and press the Quit Process button.
-

Relaunch Finder in Terminal
Did we say four? Here’s a bonus option, for the most geeky user. You can use Terminal to relaunch Finder.
-
Go to Applications > Utilities and launch Terminal.
-
Type: killall -KILL Finder
If relaunching the Finder doesn’t work, the next step is to trash the Finder preferences file. Bear in mind that this will reset all the Finder’s preferences back to their default settings.
-
In the Finder, click on the Go menu, choose Go to Folder, and paste this: ~/Library/Preferences
-
Look for the file com.apple.finder.plist and drag it to the Trash.
If none of that works, restart your Mac in safe mode by holding down the Shift key while it restarts. This reboots your Mac with some kernel extensions disabled. If the Finder works on in Safe mode, it’s likely that something loading automatically at startup is causing a problem. You can isolate which launch agent or Login item is causing a problem by using CleanMyMac X to disable them one at a time.
-
Problem # 10: Safari extensions don’t work
This one actually pre-dates Catalina by a few months and was first spotted in the Safari Technology preview in February 2019. Safari no longer supports extensions with the .safariextz suffix in their filename. Apple no requires Safari extensions to be code-signed and delivers them through the Safari Gallery or App Store. If you try to use an older extension, you will see a message telling you that it’s unsafe and won’t run. The solution is to go to Safari > Safari Extensions and find an alternative.

Safari no longer supports extensions with the .safariextz suffix in their filename.
If you have a lot of legacy extensions that will no longer run on Safari, you can remove them all quickly by using the Extensions module in CleanMyMac X. It scans your Mac for extensions and displays those you have installed. You can then select the ones you want to get rid of, and remove them with one click.
Frequently asked questions
-
Can I dual boot Catalina and Mojave?
Yes! You will need to install Catalina on an external hard drive, SSD or USB stick. Once that’s done, all you have to do is choose the external disk in System Preferences’ Startup Disk pane and then restart your Mac. Alternatively, you can restart while holding down the option key and choose the external disk when it asks you to choose which one you want to boot from. You can read detailed instructions on how to dual boot Catalina and Mojave here.
-
Can I downgrade from macOS Catalina if I don’t like it?
You can. The process differs in different situations, and we’ve covered them all in this article.
It’s much easier to downgrade if you make preparations before upgrading. Backup your Mac using Time Machine, before you upgrade to Catalina and make a note of the date and time of the upgrade. That way, when want to downgrade, you can boot into the recovery partition and restore from the Time Machine backup made while you were still running Mojave. It’s important to note that when you downgrade, you will be deleting everything on your Mac’s boot disk. So, as well as backing up, you should make notes and take screenshots of licence keys, settings, any other information you are likely to need when you reinstall and configure applications.
-
Will macOS Catalina support old apps?
Yes! And no. Catalina is the first version of macOS that doesn’t support 32-bit apps, at all. It won’t even open them. So, if you have 32-bit apps on your Mac you should upgrade them to 64-bit versions, as we explained earlier, or replace them with other apps that have 64-bit versions. Remember that the easiest way to upgrade lots of apps at once is to use the Updater tool in CleanMyMac X.
-
Will Catalina offer better protection from malware than Mojave?
Yes! Security is a big feature of macOS Catalina. One of the most common ways that malware finds its way onto your Mac is by pretending to be legitimate software, such as an upgrade to Flash or some other to you use. In Catalina, as in Mojave, you will have to override Gatekeeper in order to install any app that is not signed by a recognised developer.
What are notarized apps
However, in Catalina any developer that wants to sign their code and have it approved to bypass Gatekeeper, will have to be notarized. That means their developer will have to submit it to Apple for checking. One of those checks will be for malware. So no app with malicious code should be installed on your Mac unless you manually give it permission. Also, even code signed and notarized apps won’t be able to access your Desktop or Documents folders, or iCloud Drive, or any external volume, without your permission. And if an app wants to record your screen or log key presses on the keyboard, it will have to ask for your permission.
In addition, if anything were to access your Mac and cause serious damage, in Catalina, the system lives on its own read-only partition, separate from everything else, so you won’t risk corrupting your data.
If you’re worried about malware on your Mac, it’s a good idea to scan it regularly. You can do that using a dedicated malware tool – there are several available for macOS. But my preferred way is to use CleanMyMac X — this app is notarized by Apple, by the way.
Here’s how it works.
- Launch CleanMyMac X.
- Choose the Malware removal tool in the sidebar.
- Press Scan.
- If it gives you a clean bill of healthier, great! You don’t need to do anything else.
- If not, press Remove to get rid of the malware.
-
What about other types of security, is Catalina strong there too?
It is. Catalina introduces Activation Lock. It works in the same way as on the iPhone and iPad. So if your MacBook is stolen, you can use the FindMy app, to lock it so that only you can erase or re-activate it. That means the thief is stuck with a MacBook they can’t access and can’t wipe.
If you have an Apple Watch, Catalina allows you to use it to approve app installations, view passwords in Keychain, and view locked notes.Sign in with Apple is new in Catalina. It allows you to sign in to services and websites using your Apple ID. This is convenient as it means you don’t have to create lots of new user IDs and passwords. It’s also secure because your login details for those sites will be protected by two-factor authentication. Best of all, you can choose to be assigned a random email address which is forwarded to your iCloud email, so the site or service never knows your real email address.
-
I’m still on the fence, should I really upgrade now?
Catalina was in Beta testing for four months – the first month with just developers, and then three months or so with regular users. Feedback from the beta program helps Apple’s developers refine it and fix bugs. So, by the time the final version is released, it should be bug free and work well on every Mac on which it’s supported. That’s what should happen. However, it doesn’t always work like that. Bugs do stick around, or new ones creep in. There’s no guarantee that the final version is completely bug-free.
If you’re reading this just before Catalina ships, or within a few weeks of launch, and you can’t afford to be without your Mac for a few hours at a time, the safest thing to do is wait. Wait until any problems with the version 1.0 release have been discovered and fixed. Let others test it before you jump in.
If, on the other hand, you don’t mind taking the very slight risk of running into problems and having to spend a few hours fixing them, go right ahead and upgrade as soon as you can. -
If I decide not to upgrade, is it safe to continue using Mojave?
Yes, absolutely! The only reason to stop using a version of macOS for safety reasons is if Apple stops issuing security updates. When that happens, you’re own your own when it comes to keeping your Mac safe from malware (with the help of malware scanning tools like CleanMyMac X, of course). Currently, Apple issues security updates for operating systems as far back as Sierra. That may change soon, however. You can check for yourself by visiting Apple’s Security Updates page here.
Once the version of the OS you’re running drops off the list of operating systems that are still being updated, it’s best to upgrade. You could still use your current OS but you would be risking your security. And remember, even if you continue running an older version of macOS, you may keep applications up to date using the tool in CleanMyMac X.
Conclusion
macOS Catalina is the best version of macOS yet. The new features like Sidecar and Voice Control, along with the new apps, Music, Podcasts and TV, and the improved existing apps make it very exciting. If you’re still running 32-bit apps, you may be disappointed that they won’t run in Catalina, but it’s a great opportunity to find replacements.
The improvements to security and privacy are also very welcome. If you haven’t yet installed it, we hope that this guide will have given you everything you need to jump right in and get started. Before you upgrade, however, remember. To do a bit of housekeeping and give your Mac a bit of a spring clean, using CleanMyMac X to clear out junk files and clear the way for Catalina.