
Most of us have at some point installed a new version of macOS on our Macs. And most of us know that when we do that, it installs the new OS on top of the existing data on our Macs, including settings and other system files. Do that repeatedly, and it can create problems, including causing your Mac to slow down or become unstable. The solution is to do a clean install. In this article, we’ll show you how to clean install macOS Golden Gate.
Important
Before we go any further, it’s important to note that Golden Gate only runs on Macs with Apple silicon, so if you have an Intel Mac, you won’t be able to install it.
What does clean install mean?
Clean installing a new OS simply means wiping everything on your Mac’s boot disk before you install the new system. By contrast, a regular install installs the new OS on top of your existing data. The regular install is faster and simpler, and retains all your existing settings, but it can also, after repeated installs, lead to a buildup of junk files and possibly cause files to conflict with each other.
Before you clean install macOS Golden Gate
First off, clear out the junk and clutter, optimize your Mac, and check for malware. The easiest way to do that is to use CleanMyMac's Smart Care feature. One scan finds junk files, outdated caches, malware threats, and vital app updates — so when you come to the next step, backing up your Mac, the backup will be leaner.
Here’s how it works:
- Start your free CleanMyMac trial — you can test it for 7 days.
- Open CleanMyMac and choose Smart Care in the sidebar.
- Click Scan.
- Click Run to apply all recommendations or Review to choose individually

Now, here are a few more basic preparatory steps:
- Back up your Mac. This is essential because you will be wiping your startup disk completely. So, anything you don’t back up and that isn’t stored elsewhere, such as a cloud storage service, will be lost. It’s best to use Time Machine for this because you can back up all your settings and then restore from the backup after you install Golden Gate.
- Check that your Mac is compatible with Golden Gate. Make sure your Mac has at least an M1 chip. The quickest way to do that is to click on the Apple menu and choose About this Mac. In the window that opens, you will see the chip under the name of the Mac. Find the list of supported Macs in this article from Apple.
- Find a USB stick that has a capacity of at least 24 GB and which either has nothing on it or that you’re happy to erase. Use Disk Utility to erase and reformat the USB stick if necessary. Name it ‘macOS Golden Gate installer’
- Make sure your internet connection and Wi-FI are stable.
How to clean install macOS Golden Gate
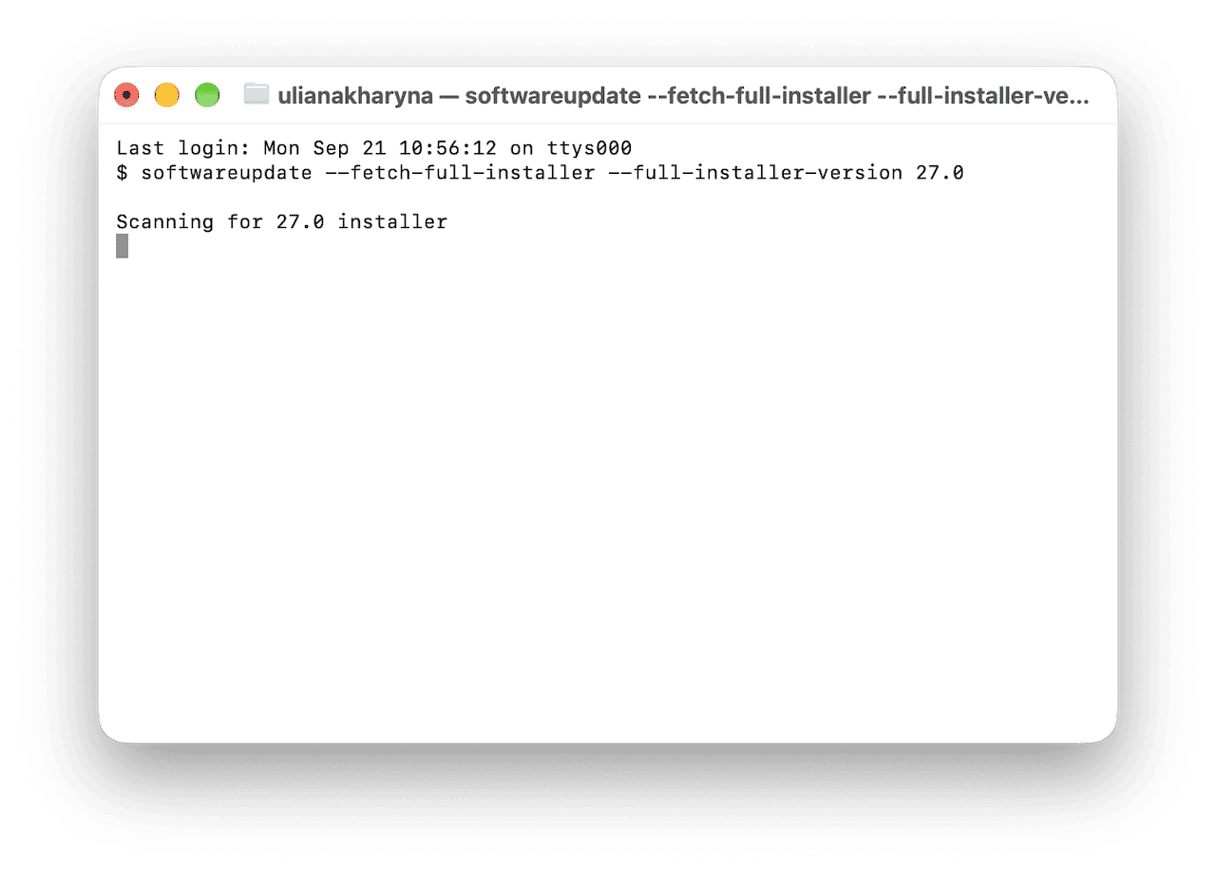
- Open Terminal and type in this command:
softwareupdate --fetch-full-installer --full-installer-version 27.0 - If the installer launches automatically after it has downloaded, quit it. The download will remain in your Applications folder.
- In Terminal, type or paste this command: sudo /Applications/Install\ macOS\ 27\ Golden\ Gate.app/Contents/Resources/createinstallmedia --volume /Volumes/macOS Golden Gate installer
Press Return. Type in your admin password if asked. Wait for the installer to be created.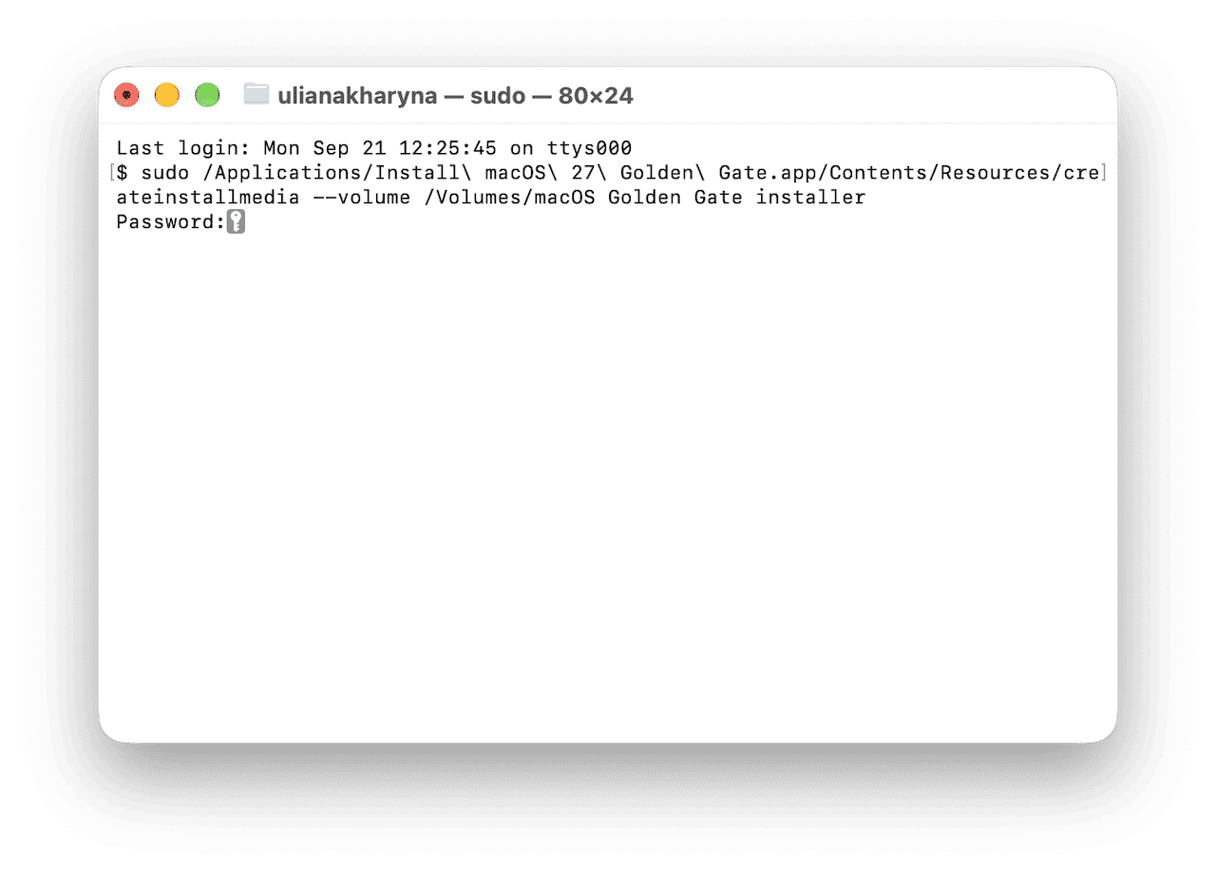
- Erase your startup disk. Remove your Mac from Find My and log out of your Apple account. Then, go to System Settings > General > Transfer or Reset > Erase All Content and Settings and follow the instructions to erase your Mac.
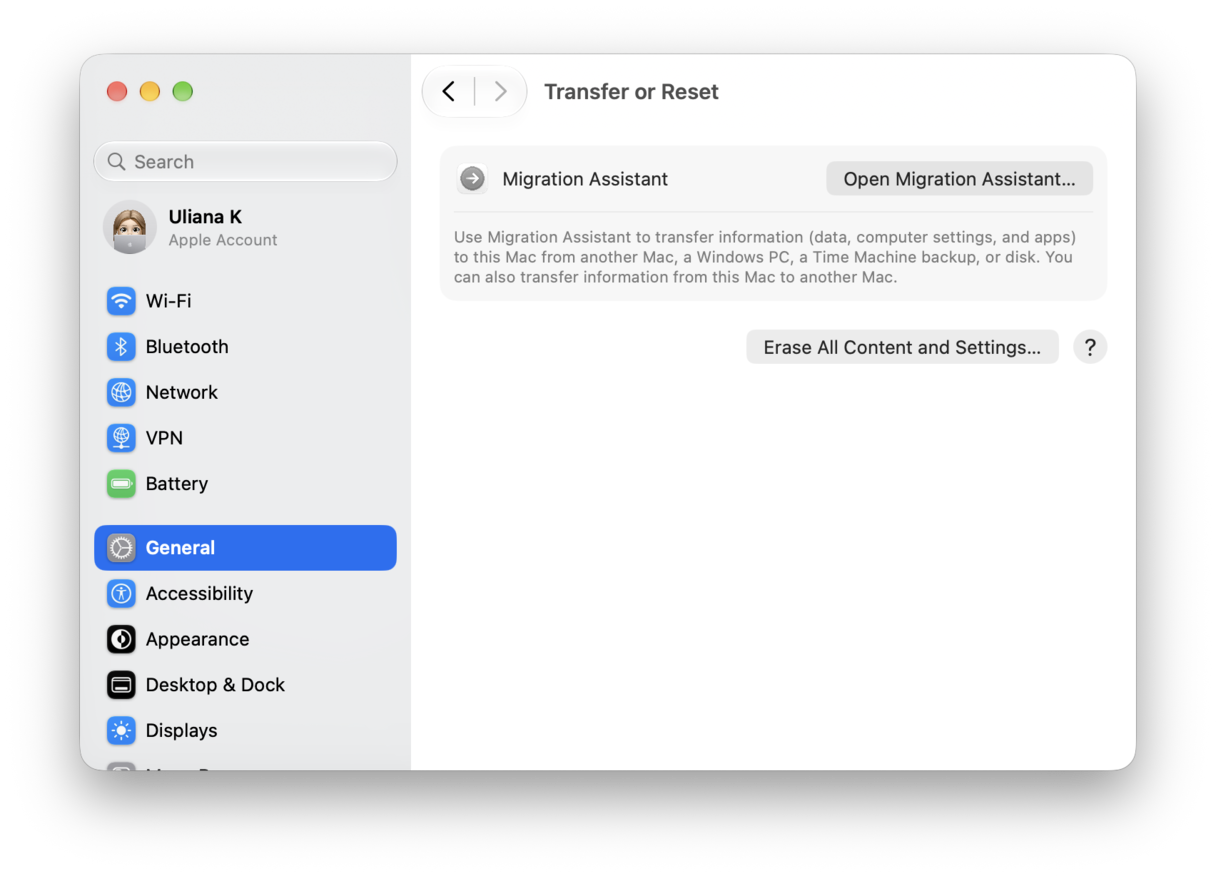
- Shut down your Mac, then plug in the USB stick. Press and hold the power button. When you see the Startup Options screen, choose the USB stick as the startup disk.
- Follow the on-screen instructions to install macOS Golden Gate. Your Mac may restart a couple of times, and the process will take a little while.
- When the OS is installed and Migration Assistant launches, connect the Time Machine disk if it’s not already connected and choose it as the disk to migrate from.


How to reinstall macOS Golden Gate (without erasing your startup disk)
- Back up your Mac using Time Machine.
- Boot your Mac in recovery mode. Shut it down, press and hold the power button until you see “Loading startup options” or the Options icon, and then release the power button.
- Click Options, then Continue.
- If you’re asked, choose an admin account for which you know the password. Click Next and type in the password.
- When you see the macOS Utilities window, choose Reinstall macOS and click Continue.
- Wait for macOS to reinstall.
- When the setup assistant launches, work through it until Migration Assistant, then choose Restore from Time Machine backup.

There you have it. You now know how to clean install macOS Golden Gate and how to reinstall it without erasing your MacBook.
Frequently asked questions
What Macs support macOS Golden Gate?
Golden Gate is only supported on Macs with Apple silicon. That means M1-series and later. If your Mac has an Intel chip, it’s not supported to run Golden Gate.
Will a clean install delete my files?
Yes. A clean install deletes everything on your startup disk. So, you must back up first.
Do I need an internet connection to perform a clean install?
You only need an internet connection to download the installer. Once you’ve downloaded and created the bootable USB, you no longer need an internet connection.
Can I go back to macOS Tahoe?
Yes, you can create a USB installer with Tahoe on it using the same process as above, but replacing macOS Golden Gate and 27 in the Terminal command with macOS Tahoe and 26. Back up your data, then wipe your startup disk using Transfer and Reset, and boot from the bootable installer.