If you’re planning to upgrade to the latest version of macOS and want to make sure it runs as speedily and smoothly as possible, one option is to clean install it. That will ensure that you get rid of all the junk and clutter that has built up on your Mac as you’ve been using it and allow you to make a fresh start. In this article, we’ll show you how to clean install macOS Tahoe.

What does a clean install mean?
The difference between a clean install of a new operating system and upgrading to the new OS in System Settings is that when you use the latter method, you install the new OS over the top of the old one and retain all the junk files and clutter that were on your Mac. Performing a clean install means that you wipe your startup disk completely clean — hence the name — before you start. You can then install macOS Tahoe on the empty startup disk.
Are there any downsides to doing a clean install?
Aside from losing your data if you don’t back up beforehand, the only downside to doing a clean install is that it takes more time and involves more effort than upgrading using System Settings.
Before you start a clean install
If you’ve upgraded to macOS Tahoe and it feels sluggish, so you decide to opt for a clean install, maintain your Mac first: remove junk and unnecessary files, update your apps, and run a few speedup tasks. The easiest and quickest way to do all of that is to use CleanMyMac’s Smart Care feature. It scans your Mac looking for junk files, clutter, and malware threats, as well as opportunities to boost performance and updates for your apps.
Here’s how to use it:
- Get your free CleanMyMac trial — you can test the app for seven days for free.
- Open CleanMyMac and choose Smart Care in the sidebar.
- Click Scan.
- When it’s finished, click Run to run all of its recommendations or Review to find out more about each one.

If you choose to proceed with a clean install, make sure to back up your MacBook first. If you don’t, you will lose precious files and other data. The best method for backing up is to use Time Machine and back up to an external hard drive, SSD, or USB stick. You can then restore your data and settings from the backup during the set up process for the new OS.

Before a backup, get rid of unneeded stuff. When you back up your Mac, whether you use Time Machine or another tool, it will copy every file on your Mac to the backup destination. That includes all the junk files and clutter on your Mac. It’s much better to get rid of it first. That will speed up the process of backing up and mean that you use up less space on the destination drive. It will also save time when you restore from the backup after you install macOS Tahoe.
If you’ve already run Smart Care, you’re good to go. If not, consider doing it or use your own cleanup routine.
How to clean install macOS Tahoe
There are three steps to doing a clean install:
- Create a bootable USB installer of the new OS.
- Wipe your startup disk.
- Install the new OS from the bootable installer onto your Mac’s built-in disk.
1. Create a bootable installer
- Find a suitable USB stick. It should have a capacity of at least 16GB.
- Open the App Store app and search for macOS Tahoe.
- When you see it in the App Store, click Get to download it.
- The installer will probably launch as soon as it is downloaded. If it does, click Command-Q to quit it. The installer file will be in your Applications folder.
- Plug the USB stick into your Mac.
- Go to Applications > Utilities and launch Disk Utility.
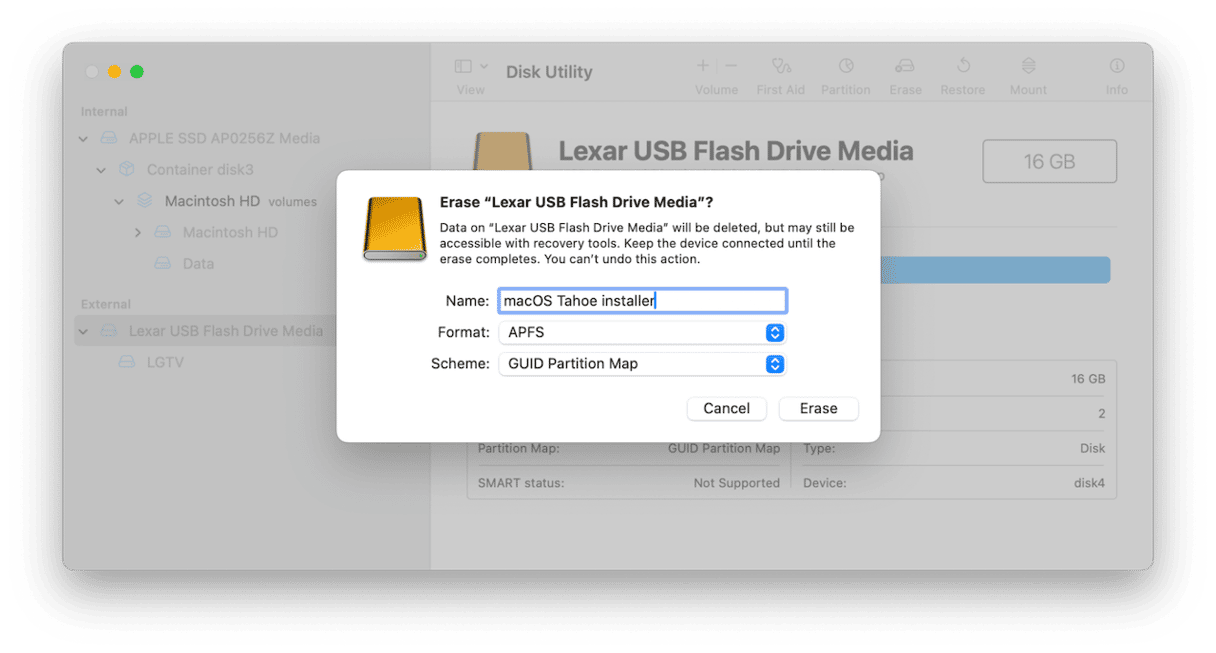
- Choose the USB stick in the sidebar and click Erase in the toolbar.
- Set the format to APFS and make the name ‘macOS Tahoe installer’.
- When Disk Utility has finished erasing and formatting the USB stick, quit it.
- Go to Applications > Utilities and open Terminal.
- Type the following command: sudo /Applications/Install\ macOS\ Tahoe.app/Contents/Resources/createinstallmedia --volume /Volumes/macOS Tahoe installer
- Press Return.
- Type in your admin password when Terminal asks for it.
- Wait for Terminal to create the installer.

2. Erase your startup disk
To erase the startup disk on your Mac, you need to first boot it into recovery mode.
On an Intel-based Mac, shut the Mac down and then press Command-R and the power button. Release Command-R when you see the Apple logo or another image.

To boot a Mac with Apple silicon into recovery mode, shut it down and then press and hold the power button. Release the power button when you see ‘Options’ or ‘Loading Startup Options’. Click Options, then Continue.
In both cases, you will see the macOS Utilities menu.
- Choose Disk Utility from the menu.
- Select your startup disk and choose Erase.
- In the Format menu, choose APFS.
- Give the disk a name — Macintosh HD will do.
- Click Erase.

3. Install macOS Tahoe
Now that you have created a USB installer and have wiped your startup disk, you’re ready to install macOS Tahoe.
- Shut down your Mac.
- Plug in the USB stick with the Tahoe installer on it.
- If you have a Mac with Apple silicon, press and hold the power button until you see Startup Options on screen, then choose the USB stick. If you have an Intel-based Mac, hold down the Option key and press the power button. When you are asked to choose a startup disk, choose the USB stick.
- Follow the instructions on the screen to install macOS Tahoe.
How to restore data from a Time Machine backup
If you made a backup of your files using Time Machine before you wiped your startup disk, you will be able to restore your data during the setup process for macOS Tahoe. Once you’ve completed the first steps in Setup Assistant, it will ask you if you want to transfer information from another Mac, a PC or a Time Machine backup.
- Make sure the Time Machine disk is connected to your Mac.
- Choose ‘From a Time Machine backup’ and click Continue.
- If you are offered a choice of backups, choose the one you want to restore from and then click Continue.
- Choose the data you want to transfer to your Mac and click Continue.
- Complete the setup process.
- When it’s finished, you will be able to log in to your user account in macOS Tahoe.

How to revert to an older version of macOS
If you have installed macOS Tahoe and decided you don’t like it or don’t want to use it, you can revert to the version you were using previously. The method for doing that is different for Apple silicon and Intel-based Macs.
Intel-based Mac
- Shut down your Mac.
- Press Command-Shift-Option-R and then press the power button.
- Release Command-Shift-Option-R when you see the Apple logo.
- Choose Reinstall macOS from macOS Utilities. That should install the version of macOS that was installed on your Mac when it shipped. You can then upgrade in System Settings to the version you want.
If that doesn’t work, follow the steps below for a Mac with Apple silicon.
Apple silicon
- Restart your Mac in recovery mode.
- Choose Disk Utility and erase your startup disk the same way as you did when clean installing macOS Tahoe.
- Restart your Mac in recovery mode and choose Reinstall macOS. That should reinstall the version of macOS you were using before you clean installed macOS Tahoe.
If that doesn’t work, you can go to the App Store and search for the version of macOS you want to revert to, then download it, and create a USB installer as you did for Tahoe (replacing macOS Tahoe in the Terminal command with the version of macOS you want to revert to). Then, boot from that USB stick and follow the instructions on screen.
Once you have reinstalled the older version, you can use Migration Assistant (Applications > Utilities) to restore your data from Time Machine.
Clean installing macOS Tahoe means wiping your startup disk completely and installing it on a freshly formatted disk. It takes longer than a normal upgrade, but is likely to make your Mac run more smoothly and speedily. Follow the steps above to clean install macOS Tahoe on your Mac.