Erasing a Mac is an important step before giving it away or selling it. If you’ve been wondering how to factory reset a MacBook, MacBook Pro, MacBook Air, or iMac, don’t worry — it’s easier than it sounds. Depending on your macOS version, the process looks a little different. But we’ll cover everything there is to know about how to factory reset MacBook Air without password. And any other Mac, too.
Quick recap
- Back up your Mac first (consider decluttering before backing it up).
- Check About This Mac to determine your macOS version, the year of your Mac's release, and whether it is Intel-based or with Apple silicon (If you see M chip, it is with Apple silicon).
- For macOS Monterey or later, use Erase Assistant.
- For macOS Big Sur or older, sign out of iCloud and iMessage, reset NVRAM, boot into recovery mode, erase the drive, and reinstall macOS.
- To wipe a Mac without password, boot into recovery mode, erase the drive, and reinstall macOS.

The ultimate guideline to factory reset MacBook Pro
Before you start, take your time to prepare MacBook for the factory reset. It includes backing up data and finding out what Mac you have and what macOS version it runs.
1. Back up your data
When you factory reset MacBook, all the information on your drive is wiped off. That’s why to save valuable files and data, you need to create a backup. This is like cloning your drive so you can keep having access to needed files.
You can, of course, back up files and apps manually by copying everything to an external drive or iCloud. However, a much faster and more secure way to back up is with Mac’s built-in software — Time Machine. It allows you to recover individual files and restore an entire drive in case of a catastrophe.
But here’s the thing: prior to using Time Machine, make sure to clean up your Mac. You don’t want to back up all the junk it contains, do you? Plus, a backup will go faster and more smoothly if your Mac is not cluttered.
For a quick cleanup, we personally like using specialized applications. The app that works for me is CleanMyMac. It removes large and old files, useless apps, caches, and system junk in a few clicks.
Here’s how to use it:
- Get your free CleanMyMac trial.
- Open the app and click Scan.
- Click Run.

The benefits of using CleanMyMac
- With the help of the Smart Care feature, on average, users find and remove over 14 GB of files (based on internal reports).
- On average, users remove 1 malware after the first scan (based on internal data).
- With other tools, on average, users find and remove 9 GB of unnecessary system files, 4 duplicates, and 5 similar images (according to internal reports).
Try CleanMyMac for free — test all 25+ tools for free and see how much space you can reclaim with just a few clicks.
Once you’ve cleaned up your Mac, enable Time Machine backup:
- Go to the Apple menu in the top left corner of your screen and choose System Preferences or System Settings > General.
- Select Time Machine.
- Click the Select Disk button. Or click Add Backup Disk and follow the onscreen instructions to set up the disk if you haven’t done it before.
- Choose the disk you’d like to use as a Time Machine backup, right-click it, and click Back Up to [disk name] Now.

That’s it!
Now, your first backup may take a while, depending on how many files you have. But don’t skip this step — the backup will allow you to restore all your data in case something goes wrong when you restore MacBook to factory settings.
Tip: You can learn more about how to back up Mac to Time Machine in this guide from Apple Support.
2. Check your Mac’s main info to know which reset method applies to your specific Mac
Now that you’ve backed up your Mac, it’s time to check what Mac you have. The easiest way to do it is to go to About This Mac from the main Apple menu. There, look at the year and macOS version.

If you have a Mac newer than 2018 and running a macOS version later than Monterey, you’ll run Erase Assistant to restore Mac to factory settings. It also includes a Mac with Apple silicon.
Otherwise, you’ll follow instructions from a 6-step guideline we also provide below.
How to wipe a MacBook with Erase Assistant
If you have a newer Mac with macOS Monterey and later, resetting it to factory settings is easy, thanks to Erase Assistant. Opening it, however, varies across different macOS versions.
For macOS Ventura and later (Sonoma, Sequoia, Tahoe):
- Open System Settings.
- Go to General > Transfer or Reset > Erase All Contents and Settings.

For macOS Monterey:
- Open System Preferences.
- From the menu bar, click System Preferences > Erase All Contents and Settings.
Now, all you have to do is enter your admin credentials and follow the onscreen instructions. Erase Assistant will do the following:
- Sign you out of all Apple services.
- Turn off Activation Lock and Find My.
- Erase all contents and settings.
- Uninstall any apps you have installed.
- Erase all volumes.
- Erase all user accounts along with their data.
- Unpair all Bluetooth devices (in macOS Ventura).
It is the fastest way to erase your Mac.
Note: If you have not backed up your Mac, Erase Assistant will ask you if you want to do it. If Time Machine is not enabled, it will let you do it.

What to do if the Erase All Content and Settings button is greyed out?
If this button is greyed out or completely missing, it means that a restriction/unfinished repair is preventing the reset.
Here are a few fixes:
- Have administrator permissions: You must be signed in with an Administrator account and enter the password you use to log in to your Mac to unlock the Erase Assistant. Standard user accounts cannot trigger this reset.
- Finish the repairs: On Macs with Apple Silicon, an unfinished repair can disable the erase feature. You will need to use the Apple Repair Assistant to finish or check the state of the repair before you can erase it. Check out this guide from Apple to learn how to use Repair Assistant.
- Contact your admin: If you use a Mac owned by an organization, it might be that an active Mobile Device Management (MDM) profile is installed and restricts users from factory-resetting the device. Ask your admin for help.
How to reset MacBook without Erase Assistant
If you have a MacBook older than 2018 or running Big Sur or an older macOS version, follow the steps below one by one.
Step 1: Sign out from iCloud
Sign out of iCloud to make sure that any remnants of the cloud data, such as bookmarks, notes, reminders, etc., are not visible to a new user.
Follow the 3-step formula to turn off iCloud:
- Choose Apple menu > System Preferences.
- Select Apple ID, then select Overview in the sidebar.
- Click Sign Out.

If you’re running macOS Mojave or earlier, go to the Apple menu > System Preferences and choose iCloud. Then click Sign Out.
Step 2: Sign out from iMessage
Before you restore MacBook to factory settings, remember to sign out of iMessage.
This time, an easy 4-step formula to help you do that:
- Open up Messages.
- Click Messages in the menu bar in the top left corner of your screen.
- From the drop-down menu, choose Preferences.
- Click iMessage, then click Sign Out.

As simple as that!
Step 3. Reset NVRAM
NVRAM (non-volatile random-access memory) is a type of memory your Mac uses to store certain settings, such as your selected startup disk, sound volume, screen resolution, and the last kernel panic. Resetting NVRAM will restore certain features you might have changed previously:
- Shut down your Mac.
- Start up Mac and press and hold Option-Command-P-R for 20 seconds, then release.

Step 4: Boot into recovery mode
Steps for booting into recovery mode vary for Intel-based and Apple silicon Macs.
For an Intel-based Mac:
- Go to Apple menu > Restart.
- Immediately press and hold Command+R.
- Don’t release the keys until you hear Mac’s startup sound or until the Apple logo appears.

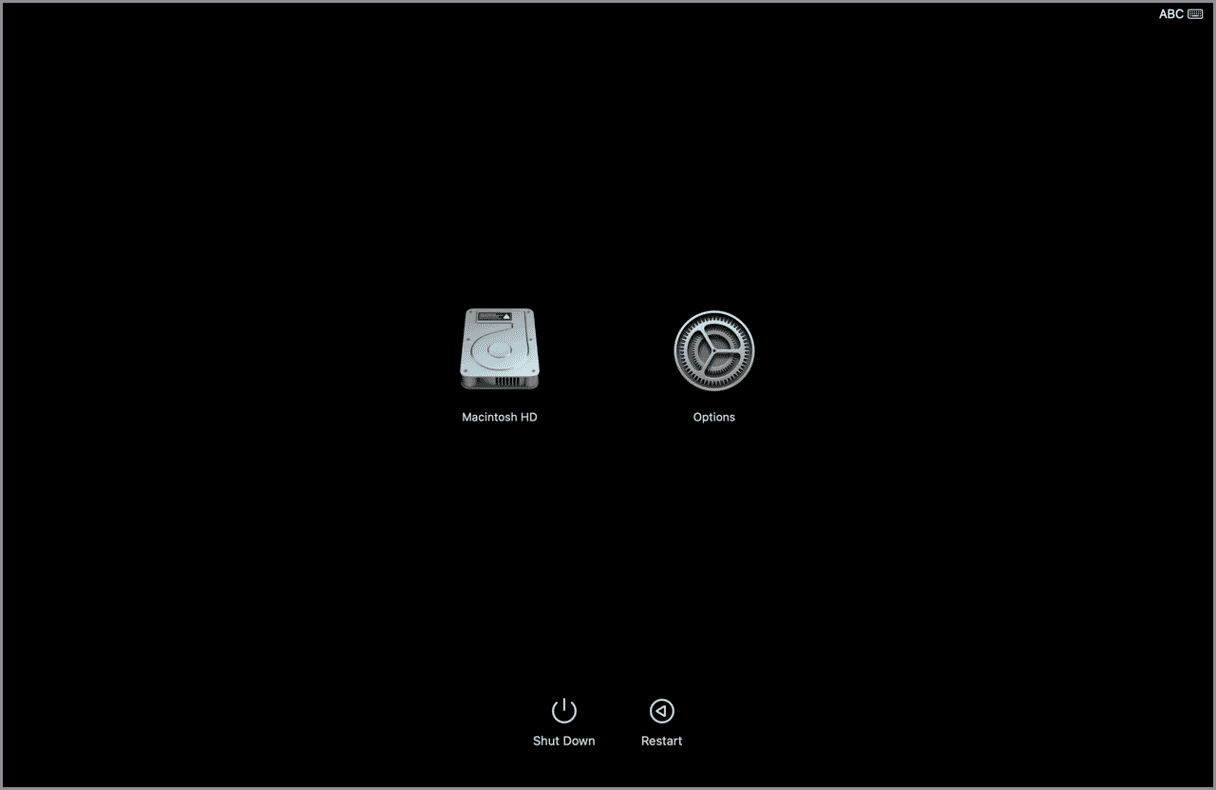
For a Mac with Apple silicon:
- When turning on your Mac, press and hold the Power button.
- Keep it pressed until you see startup options.
- Click the Gears icon (Options) and hit Continue.
- You may be asked to select a user and enter their administrator password. Follow onscreen instructions and press Next after any action you take.
Step 5: Wipe Mac drive
If you plan to sell or give away your Mac, you need to erase your Mac’s startup disk. The startup disk is built into your MacBook. Its default name is Macintosh HD.
- After booting into recovery mode, choose Disk Utility in the Utilities window.
- Select your built-in startup disk, “Macintosh HD.”
- Click Erase at the top of the Disk Utility window and enter the next details:
Name: Macintosh HD
Format: APFS or Mac OS Extended (Journaled) - Click Erase Volume Group. You may need to enter your Apple ID for confirmation.
When the process is complete, select other internal volumes in the sidebar and press the “—” button to delete them. Then, quit Disk Utility.
Now, your Mac will restore to factory settings and reboot. You can now reinstall macOS.
Step 6: Reinstall macOS
Mission accomplished! You’ve reformatted your drive and reset your Mac to factory settings. Now you can reinstall your operating system. Simply click Reinstall macOS from the Utilities menu. Confirm that you really want to do it, then follow the instructions on the screen.
Once the macOS is installed, a setup assistant will appear. However, if you are not going to keep your Mac, it would be better to quit the setup process and let the new owner enter all the necessary information. Hold down the Command-Q keys and then choose Shut Down to turn off your Mac but leave it waiting for a new user.
How to factory reset MacBook (Pro, Air, iMac) without a password
To erase the data and reinstall macOS yourself, you need an admin password. If you’re not able to access it, don’t worry. Keep reading to learn how to factory reset your Mac without a password.
Before you start the process of factory resetting the MacBook, make sure your Wi-Fi and broadband connection are working properly. The process below uses Apple’s Internet Recovery to reinstall macOS. If you are concerned that the connection might fail, it’s a good idea to create a bootable USB installer. You can find out how to do that here.
- Boot your Mac into recovery mode. How you boot in recovery mode depends on the type of Mac you have. Follow the process for your Mac below.
Turn off your Mac. Press and hold Command and R and then press the power button. Release Command and R when you see the Apple logo or you hear a chime. You should see the macOS Utilities window after a few seconds.
Intel-based Mac
Turn off your Mac. Press and hold the power button until you see the startup options screen. Click Options, then Continue. You should eventually see the macOS Utilities window.
Mac with Apple silicon
- Once your Mac has booted in recovery mode and you can see the macOS Utilities screen, choose Disk Utility.
- When Disk Utility opens, choose your Mac’s boot disk in the sidebar. It will be the topmost drive in the sidebar, probably called Macintosh HD. Make sure to choose the disk and not the volume beneath it.
- Click Erase in the toolbar. Give the disk a name and format it as APFS.
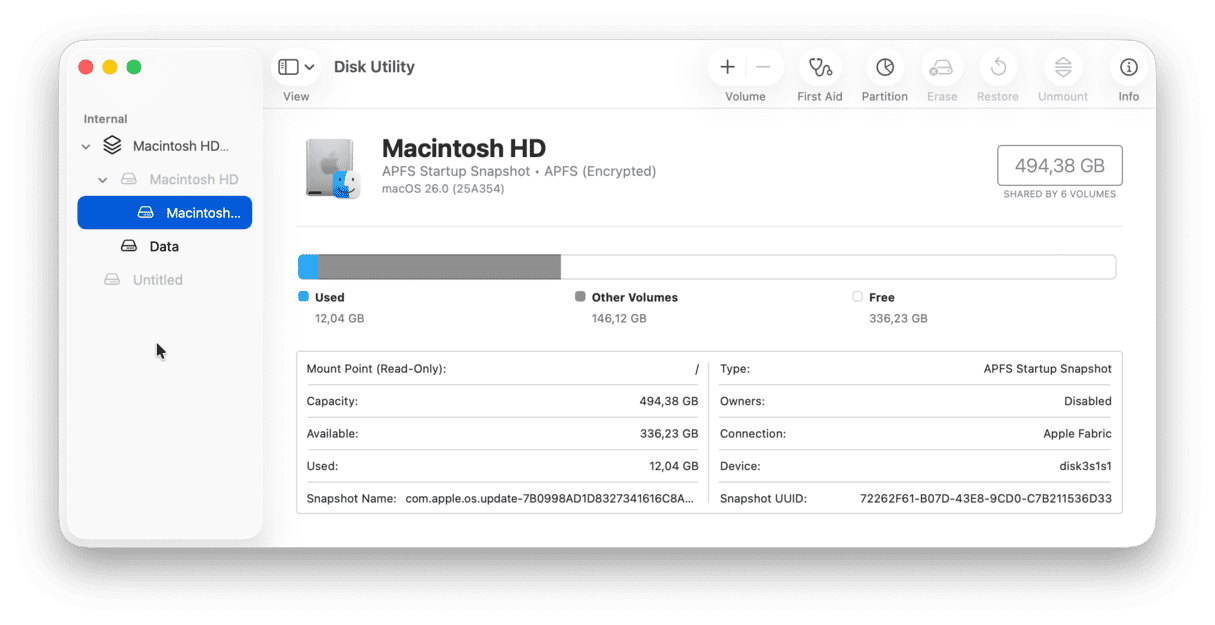
- Click Erase.
- When you see a message saying the disk has been successfully erased, quit Disk Utility.
- From the macOS Utilities screen, choose Reinstall macOS.
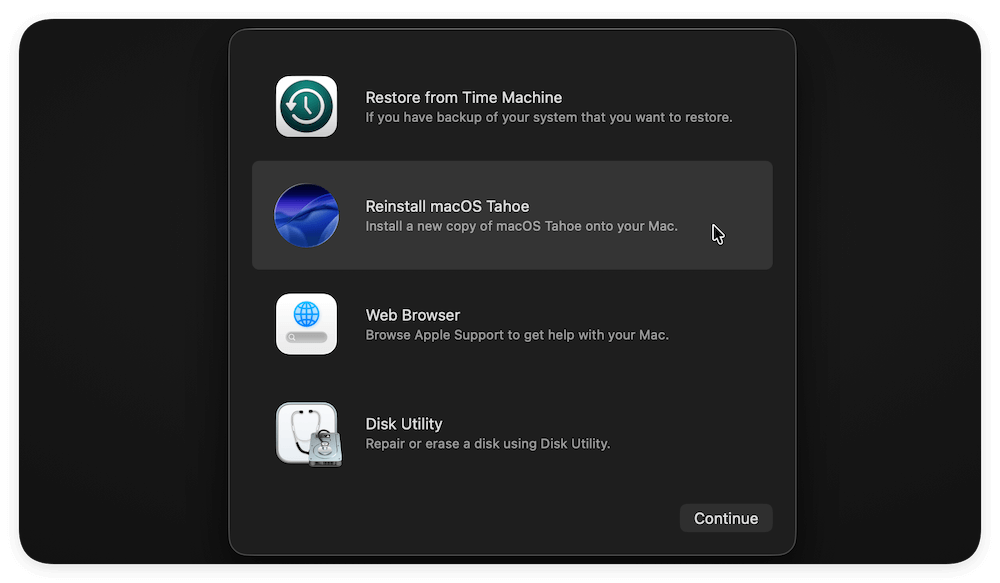
- Follow the instructions to reinstall macOS.
- Reinstallation may take quite a while. Once it’s complete, your Mac will restart and will go into set-up mode as if it were a new Mac. From the Hello screen, you can follow the onscreen instructions to create a new admin user account and set up the MacBook the way you want it.


Note: On a Mac with Apple silicon, you might get either the current version of the most recently installed macOS or the macOS that you were using before upgrading. On an Intel-based Mac, you can also get the latest macOS that is compatible with your Mac.
Follow the same steps to reset a Mac that won't boot or is stuck in a crash loop.
That’s all. Now you know how to wipe a MacBook. It is clean and ready for a fresh start. So, you can proceed with restoring it from Time Machine if you continue using it.
Frequently asked questions
Why do I need to reset a Mac to factory settings?
The most common reason for wiping a MacBook is to prepare it for selling or giving away so that no personal data or files are shared with a new owner.
How to perform a factory reset?
There are two ways to restore Mac to factory settings: either run Erase Assistant for newer Macs and macOS versions or follow the steps outlined in this article for older Mac computers and macOS versions. The only difference between the two is that Erase Assistant does all the prep steps for you, so you only have to reinstall macOS as the final step.
Can I perform a factory reset without a password?
You can, but you might encounter limitations such as not being able to back up data.
Do you need to turn off FileVault to do a factory reset?
Complete factory reset covers erasing your startup disk (described in Steps 5 and 6), which will make the recovery of your data impossible. Therefore, there is no need to turn off FileVault, as your data can’t be accessible in any readable form after you erase the drive.
Which version of macOS will be installed during factory reset?
For Intel-based Macs:
- If you use ⌘ + R at startup : Reinstalls the most recent macOS that was on your Mac.
- Option + ⌘ + R: Upgrades to the latest macOS compatible with your Mac.
- Shift + Option + ⌘ + R: Reinstalls the macOS version your Mac originally came with.
For Apple Silicon (M1, M2, M3) Macs:
- Automatically reinstalls the latest macOS version that was running on the device.
What is Activation Lock and why does it matter?
Activation Lock is a security feature built into macOS (and iOS) through Find My. If you’re selling or giving away your Mac, you must turn off Find My Mac and sign out of your Apple ID before factory resetting. Otherwise, the new owner will be locked out and unable to use the device.
What is the difference between hard reset and factory reset?
Hard reset (or force restart) simply reboots your Mac. It’s a quick fix when your system freezes or becomes unresponsive. Factory reset, on the other hand, erases everything from your Mac — all your data, settings, and apps — and reinstalls macOS. It’s used when you’re selling, giving away, or starting fresh with your Mac.
What should I see on screen after successful factory reset?
After a successful factory reset, your Mac will restart and display a setup screen that welcomes you and guides you through initial settings like language, Wi-Fi, and signing in with an account — just like when it was brand new.