

From work to entertainment and communication, we need an internet connection for virtually everything we do on our Macs. So it’s very frustrating when it won’t connect to Wi-Fi, especially when other devices will. It can happen for different reasons, and whatever causes the issue in your case, we’ll tell you how to fix it.
Why won’t my MacBook connect to Wi-Fi but other devices will?
If other devices in your home or office are connected to the internet, then you know that your broadband connection is working. So, the possible causes of your Mac not connecting are that there is a problem with either connection between your Mac and the router or your Mac. If it’s a problem with your Mac, it’s likely to be software and, therefore, probably straightforward to fix. However, the only way to find out is through trial and error, ruling out possible causes one by one.
How to fix it when your Mac won’t connect to internet
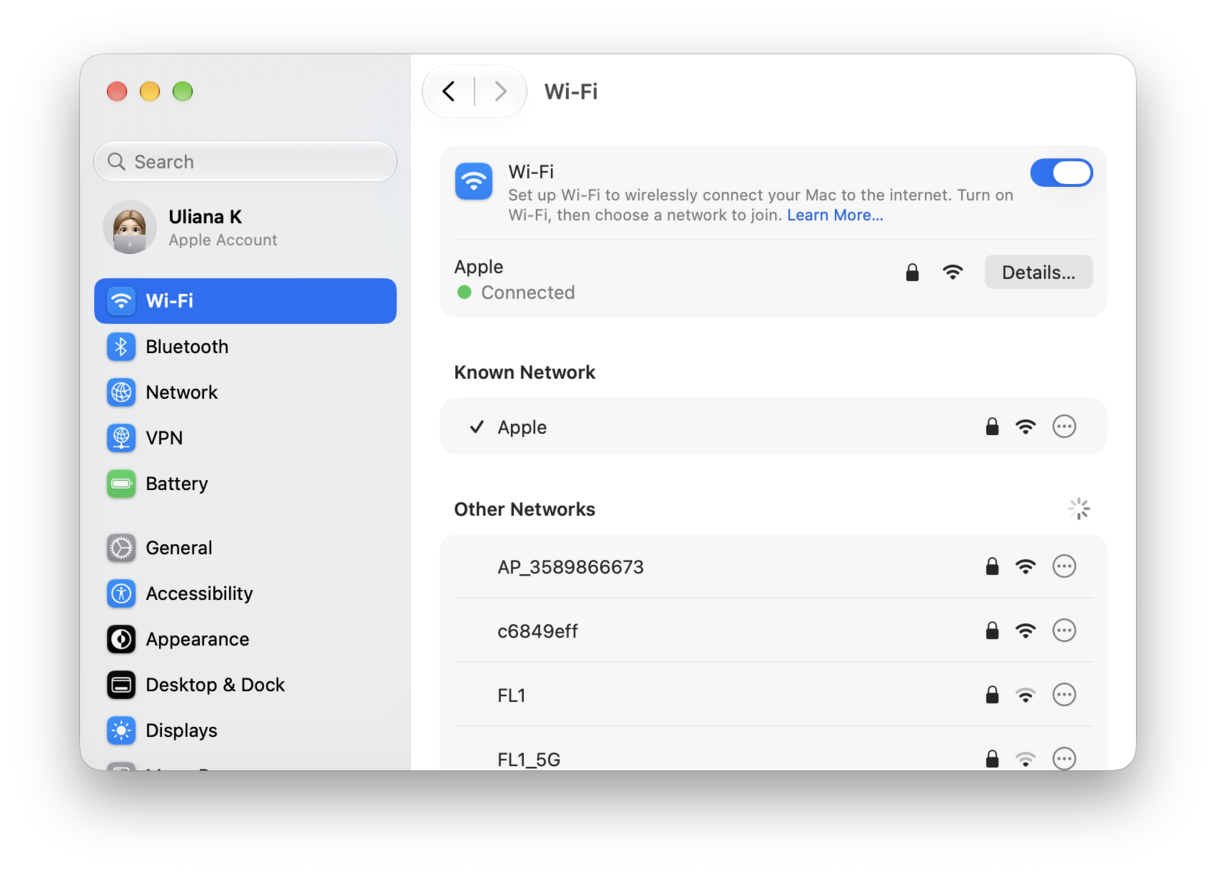
1. Turn Wi-Fi off and then on again
Sometimes, it really is as easy as that to fix Wi-Fi and internet connection problems. Click the Wi-Fi icon in the menu bar, or click the Control Center icon and select Wi-Fi, then toggle the switch to the off position. Wait for a few seconds and then switch it on again.
2. Restart your Mac
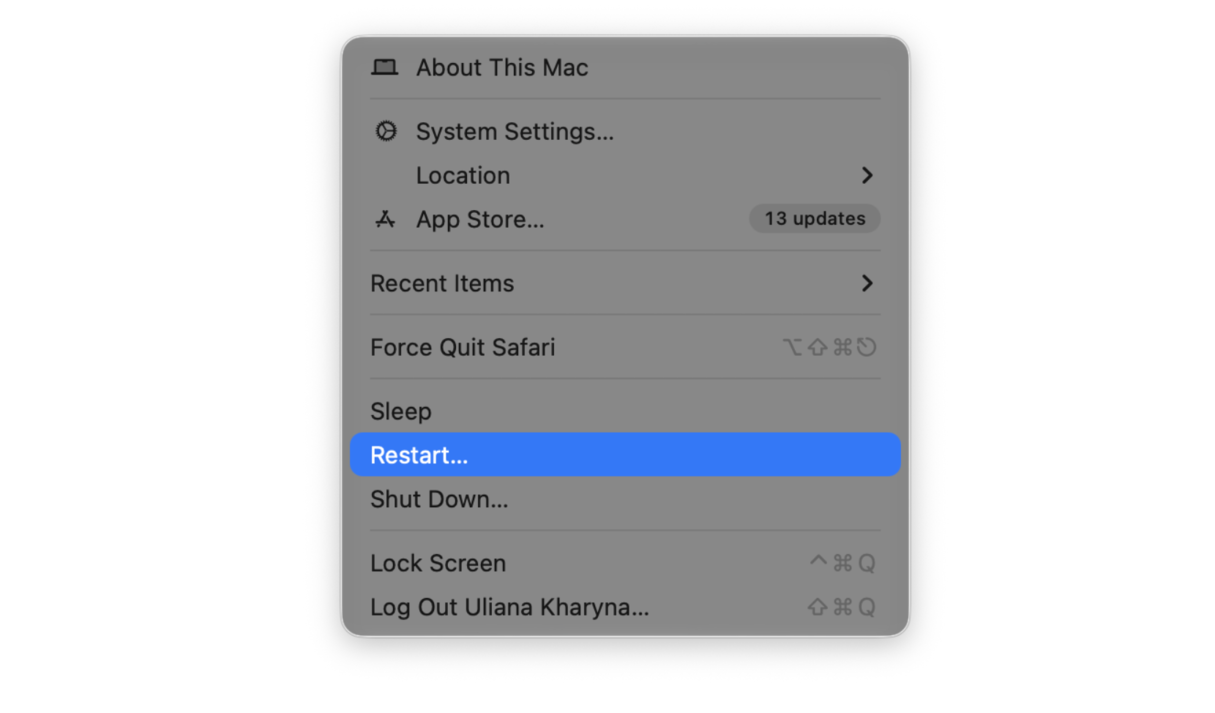
Before you do anything else, try restarting your Mac. That will clear out temporary files and restart the app you were using when you tried to connect. That could be enough on its own to fix the problem.
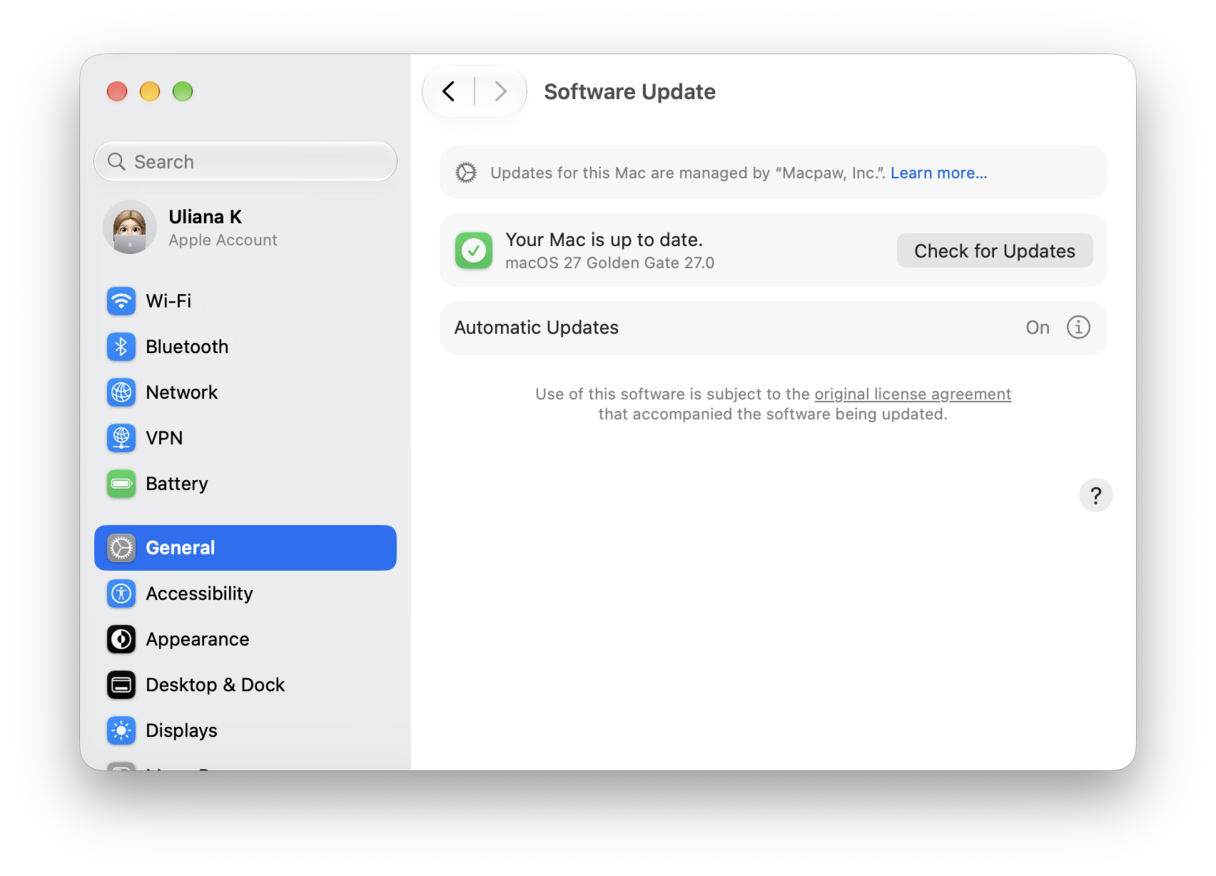
At this stage, you should also check for macOS updates in System Settings > General > Software Update or Apple menu > About This Mac > Software Update on pre-macOS Ventura systems.
3. Reconnect to your Wi-Fi network
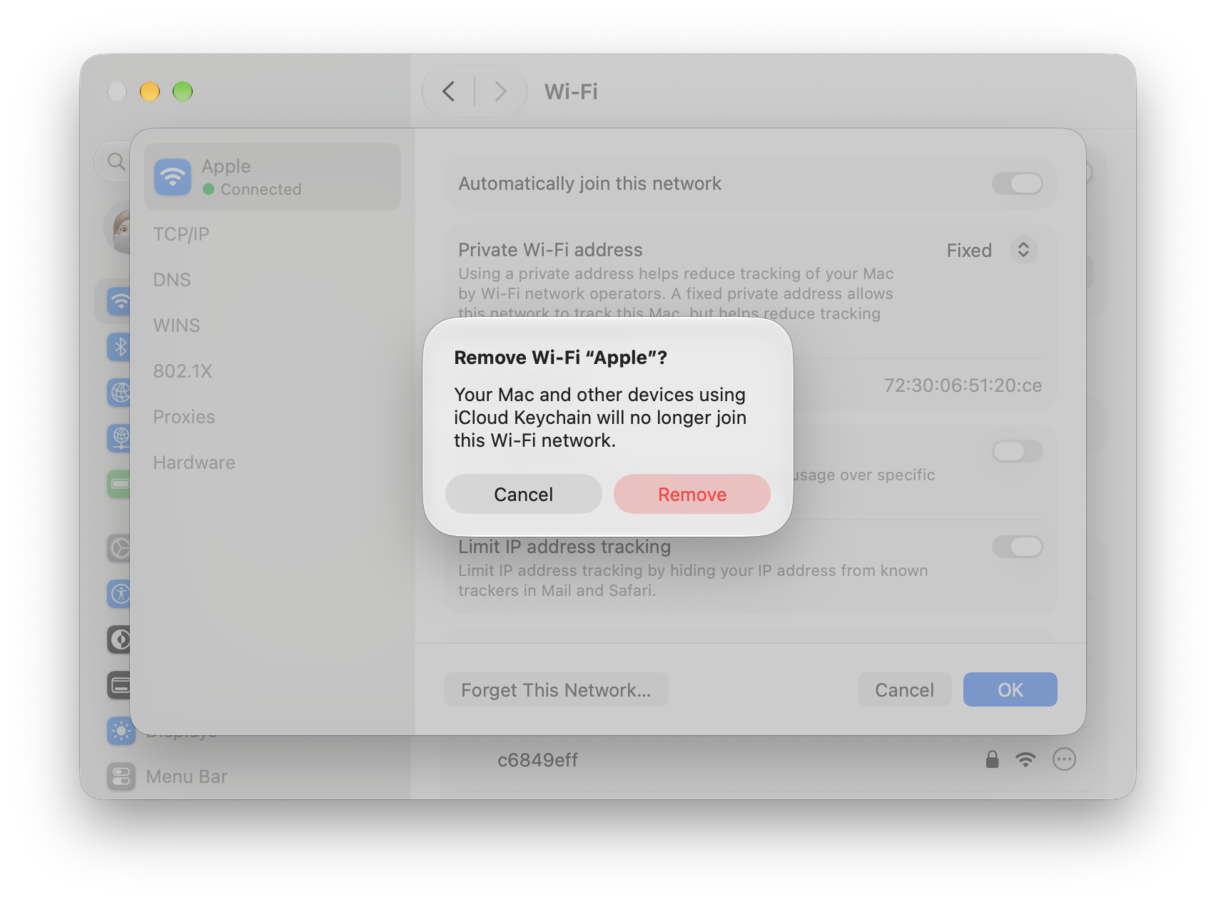
If your MacBook Air won’t connect to Wi-Fi but other devices will, the next thing to try is to make your Mac forget the network. That way, you’ll have to reenter your Wi-Fi password, and the connection will be renewed completely. Click the Wi-Fi icon in the menu bar and select Wi-Fi Settings. Click Details next to the network name, then click Forget this Network. Now, click the Wi-Fi icon in the menu bar again and click the dropdown arrow next to Other Networks. Choose your Wi-Fi network and type in your username and password. Just like other solutions we list, this tip works for any Mac model.
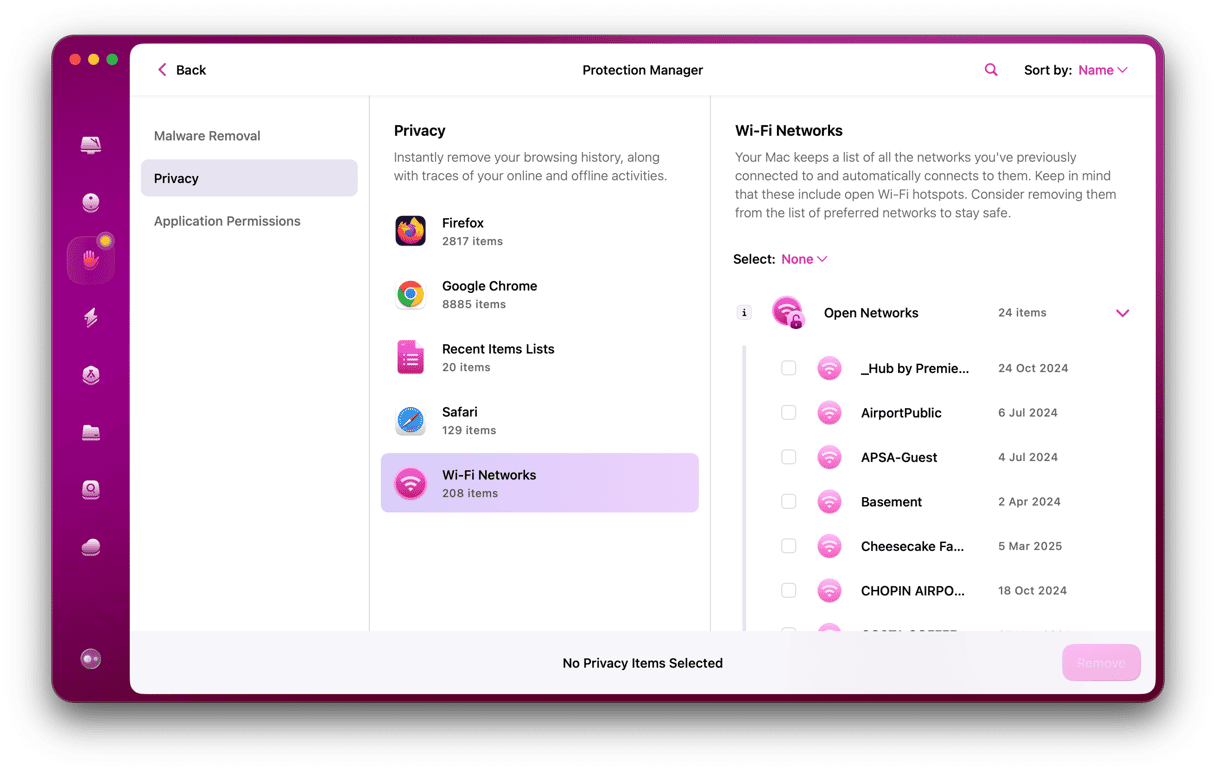
Did you know that your Mac keeps a record of all the Wi-Fi networks you connect to so you can reconnect when you’re near them? Most of the time, that’s useful. However, it could be a problem if a public Wi-Fi network is insecure. Your Mac will automatically try to connect to it the next time your Mac is within range, and that could put your data at risk. The best way to avoid that is to clear out the list of Wi-Fi networks you’ve previously connected to. And the easiest way to do that is to use the Protection feature in CleanMyMac. Start your free CleanMyMac trial, go to Protection in the sidebar, click Scan, and then Manage Privacy Items. Navigate to Privacy and then Wi-Fi Networks to see unsafe open networks.
4. Check you’re connected to the correct Wi-Fi network
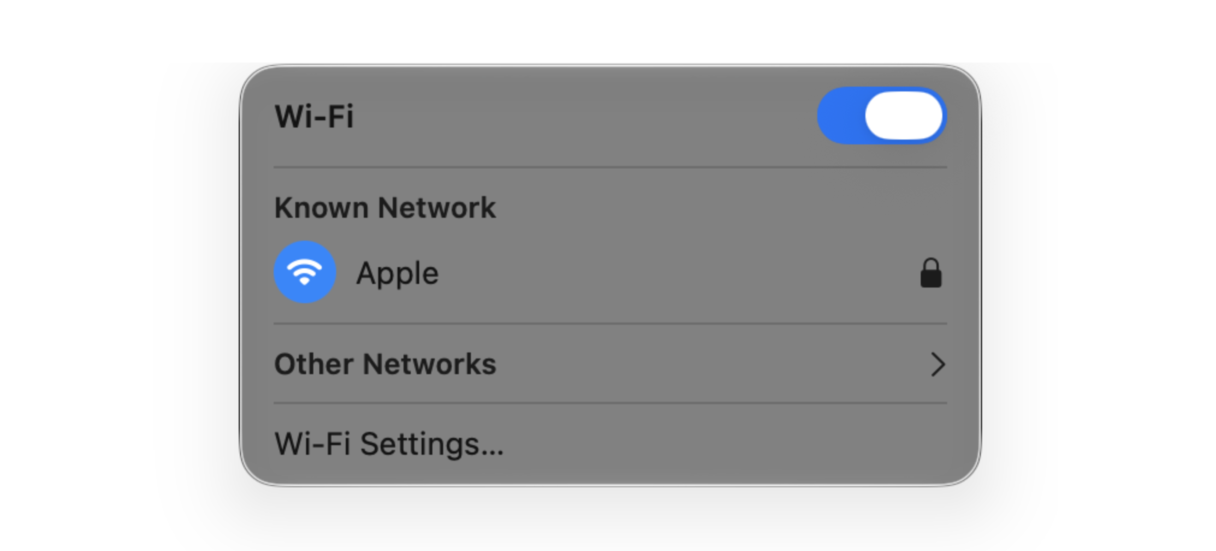
Your Mac should connect automatically to the network with the strongest signal, but sometimes it doesn’t. If it connects to a network that’s further away, that could make it seem like you’re not connected at all because websites fail to load. Click the Wi-Fi menu and check which network is highlighted in blue. If it’s the wrong one, click the correct one.
5. Move closer to your router
If you’re using a MacBook Air or MacBook Pro and can move closer to your wireless router, try that. Wi-Fi signals get weaker the further away you are from the router. Even if the menu bar icon is showing a strong signal, your Mac may still be having problems maintaining a stable connection. You could also try moving your router, if possible. Wireless routers should be away from walls wherever possible and definitely away from other devices that may cause interferences, such as microwave ovens.
6. Restart your router
Even if other devices connected to the router can connect to the internet, the fault may lie with the router. For example, it may have failed to allocate your Mac an IP address for some reason. To fix that, restart the router.
7. Change your DNS settings
When you navigate to a website on your Mac, the web browser you’re using matches the URL of the page you want with an IP address. It does that by cross-checking against a domain name system (DNS) server. Usually, that DNS server is one set by your internet service provider. If there’s an issue with that server, your Mac won’t connect to any websites. To fix that, you can change the DNS settings on your Mac so that they use Google’s DNS, which is fast and stable.
- Click the Apple menu and open System Settings.
- Go to Wi-Fi and then click Details next to the Wi-Fi network you’re connected to.
- Click DNS in the sidebar and then the ‘+’ under DNS Servers.
- Type: 8.8.8.8
- Click OK.
- Quit System Settings.
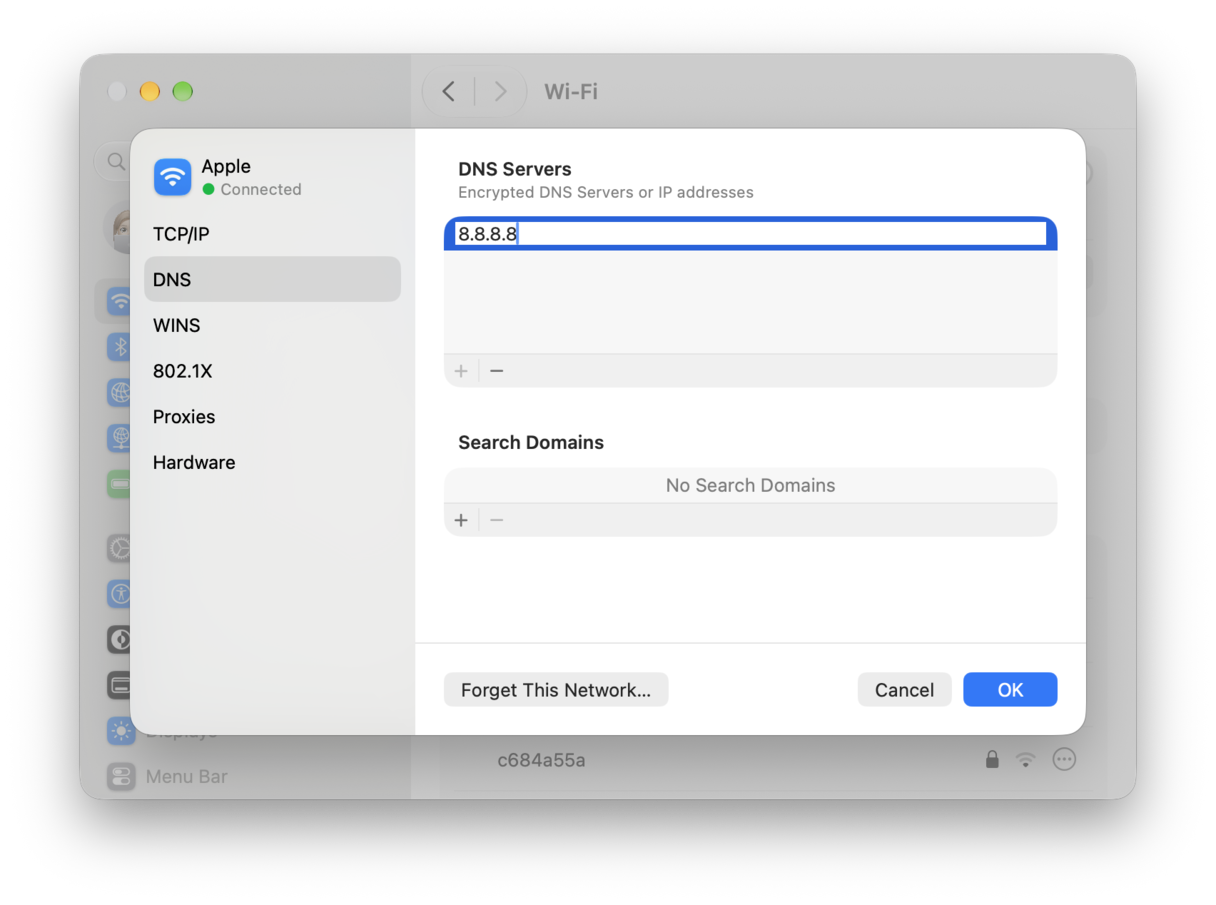
Now, when your Mac tries to reach a web address, it will check Google’s DNS server instead of the one set by your service provider.
How to fix other common issues
If none of the above has helped, there are a few more things you can try. They can fix Mac connection glitches and some other network-related issues.
1. Reset Wi-Fi sleep mode settings
In some cases, sleep mode settings cause Wi-Fi drops on Mac, so it wouldn’t turn on again. Try this simple fix that many users found helpful:
- Go to System Settings > Battery > Options.
- From the dropdown next to Wake for network access, select Never.
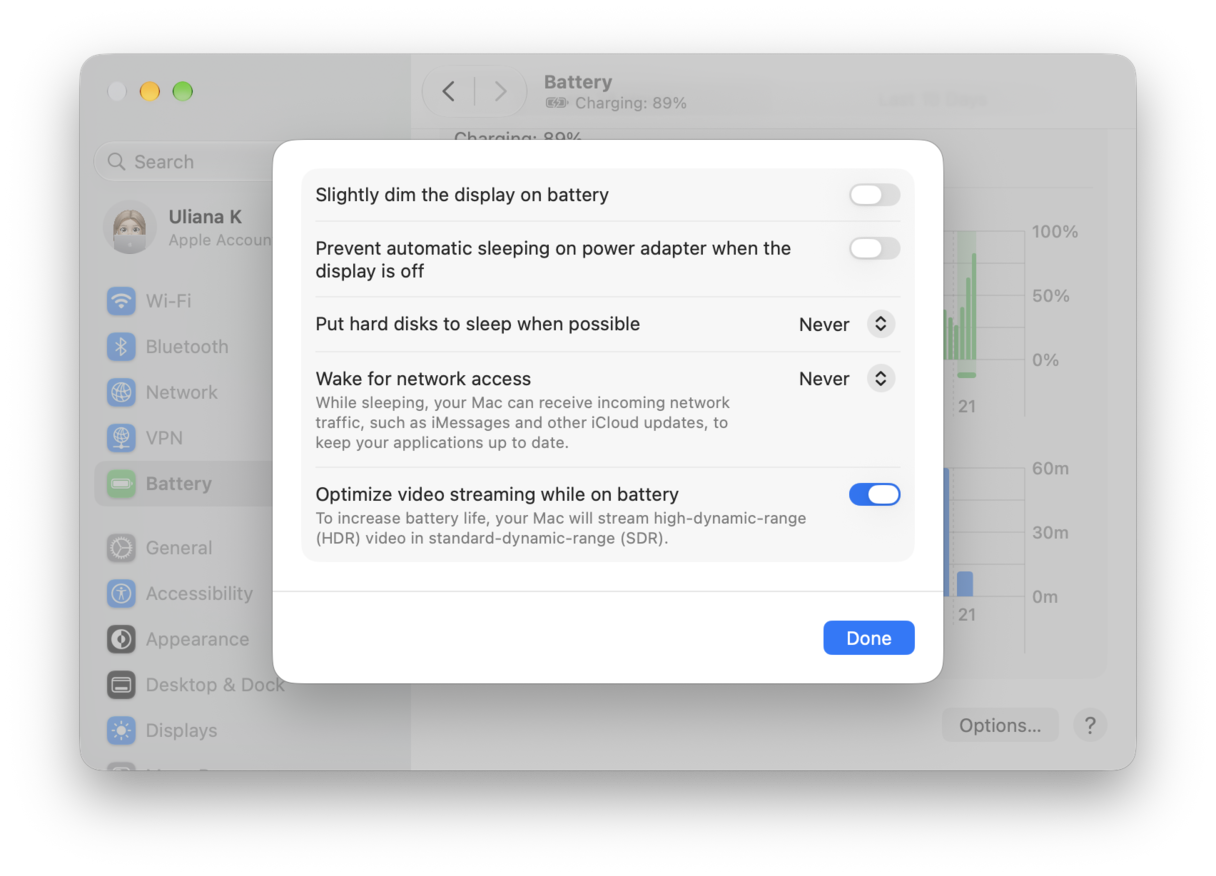
Now, check your Wi-Fi (cross your fingers). Did it do the trick? If not, let’s move on to the next step.
2. Flush DNS cache
Another way to fix Mac Wi-Fi not working or Mac dropping it Wi-Fi connection is to flush your DNS cache. DNS service helps your Mac find IP addresses, much like a phone book. It even has a cache folder of its own. Removing these cache files is helpful when your Wi-Fi slows down or you can’t access certain websites.
Here’s a quick workaround to save you from meddling with critical system folders:
- Open CleanMyMac (get your free trial here).
- Click Performance in the sidebar > Scan > View All Tasks.
- Go to Maintenance Tasks and select Flush DNS cache.
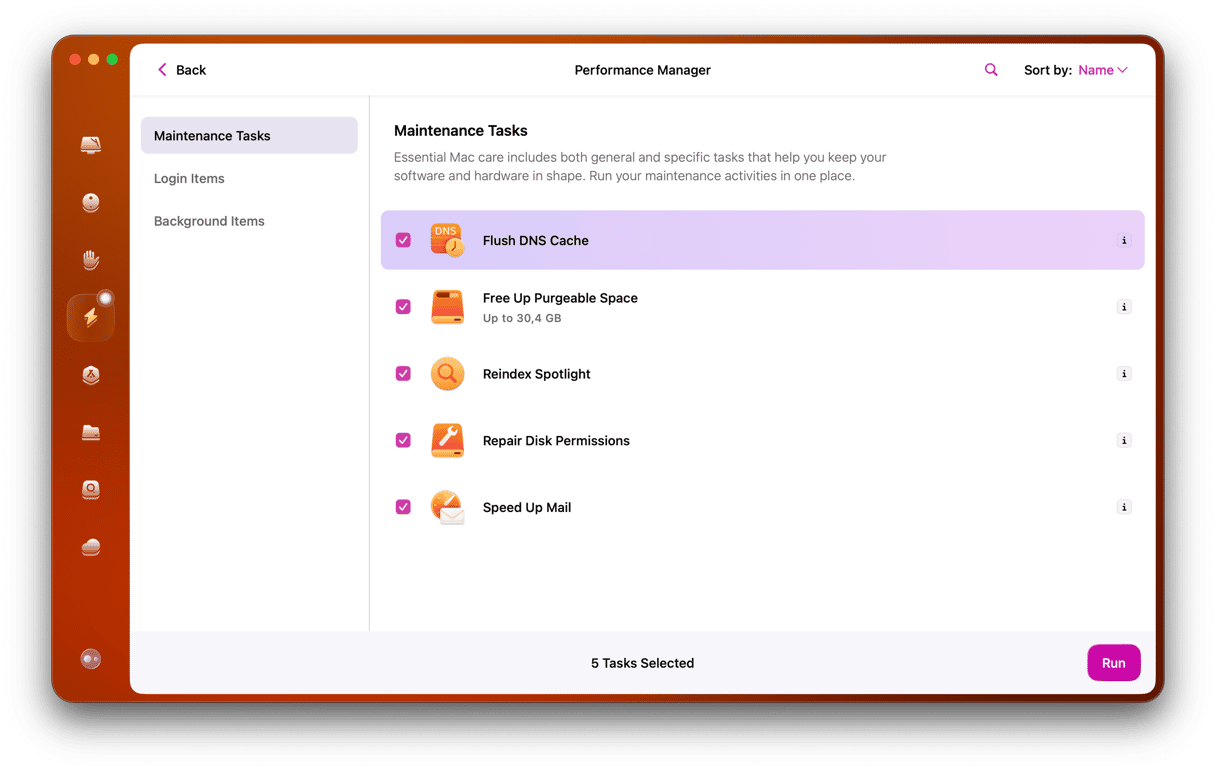
That’s it! This solution is 100% free and takes no more than a minute.
By the way, CleanMyMac is pretty much an indispensable tool if you want to keep your Mac clean and junk-free. It removes up to 74 GB of junk files on an average Mac, giving it a spin, just in case.
3. Check VPN and security software
Sometimes, VPN and security software may interfere with Wi-Fi, especially if the Wi-Fi signal is weak. It’s because they interact with your network connection and may affect it in a way you don’t expect. So, another hack to help you fix your Wi-Fi on Mac is to disable them to find out if the issue persists. If it helped, you may then enable them one by one to find out what was at fault for connectivity issues.
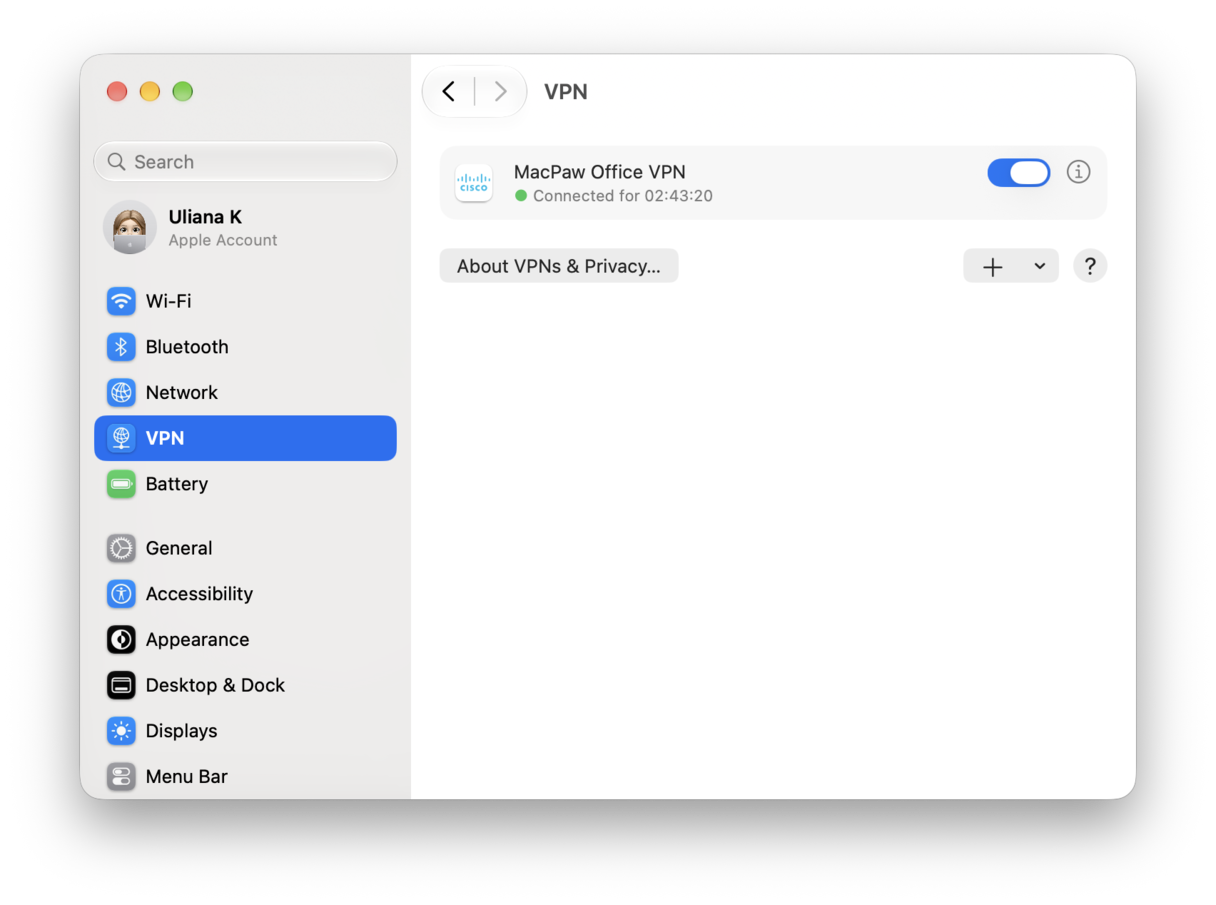
Also, check network software. There have been reports that third-party apps for monitoring network activity (like Little Snitch) can interfere with your Wi-Fi, especially after upgrading to a new macOS version. So, if nothing so far has helped, try quitting these apps and test your internet connection again. If you cannot quit an app, uninstall it. It is also recommended to update all of your apps to make sure that they do not cause conflicts leading to Wi-Fi problems. The same goes for extensions.
4. Reset your Location Services (yes, seriously)
If you're having problems connecting to Wi-Fi when you wake your device from Sleep, as odd as it might sound, try turning Location Services off and back on, followed by another restart:
- Go to System Settings > Privacy & Security > Location Services.
- Turn off Location Services.
- Next, restart your device from the main Apple menu.
- When your Mac relaunches, turn your Location Services back on.
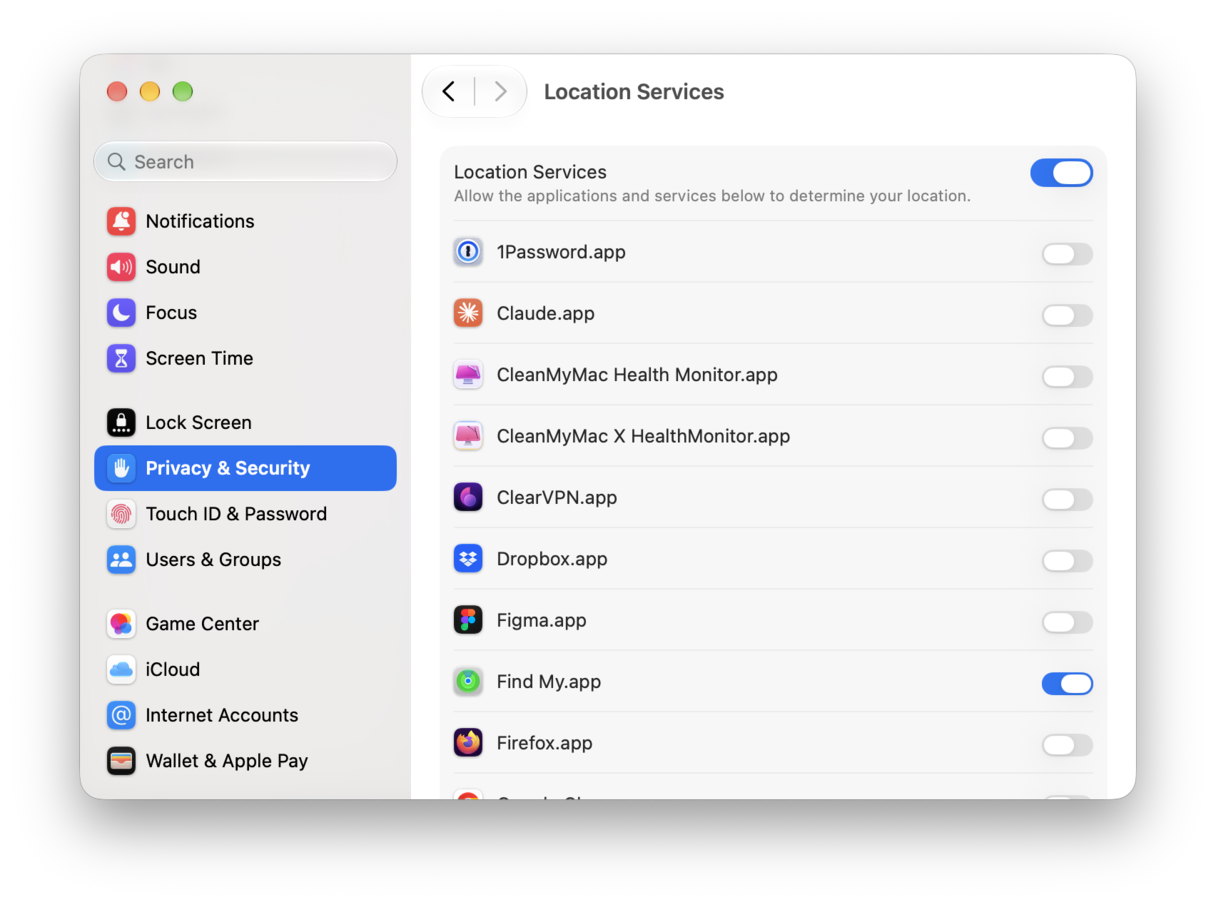
There's definitely some race going on between Wi-Fi and the location boot sequence in macOS.
5. Turn off Firewall
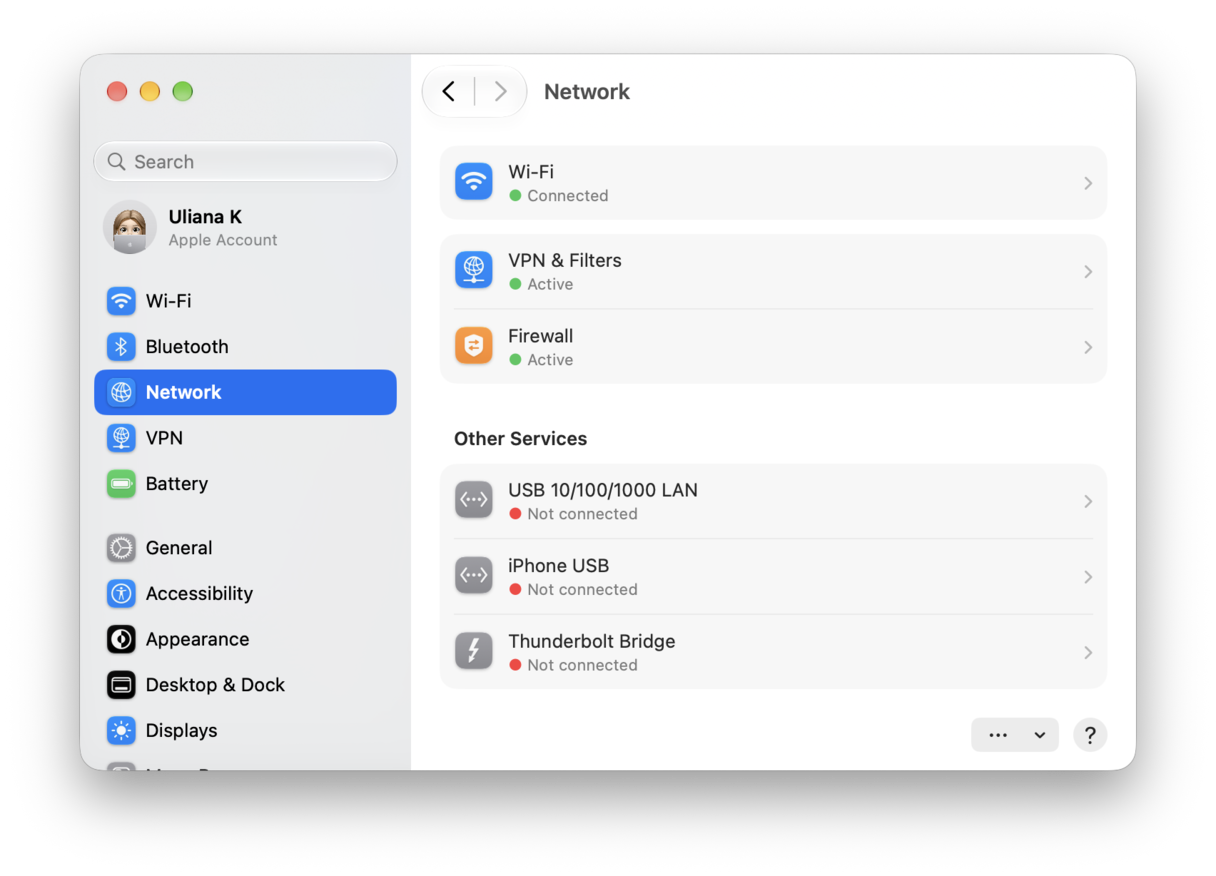
Firewalls manage incoming connections to your Mac, so they shouldn’t affect your Mac’s Wi-Fi. But, if nothing else has worked, it’s worth checking whether the Firewall is the issue by switching it off. If you use third-party firewall software, turn it off there.
If you use macOS’ built-in firewall, go to System Settings > Network, choose Firewall, and toggle the switch to off. Remember to turn it back on again once you’ve checked.
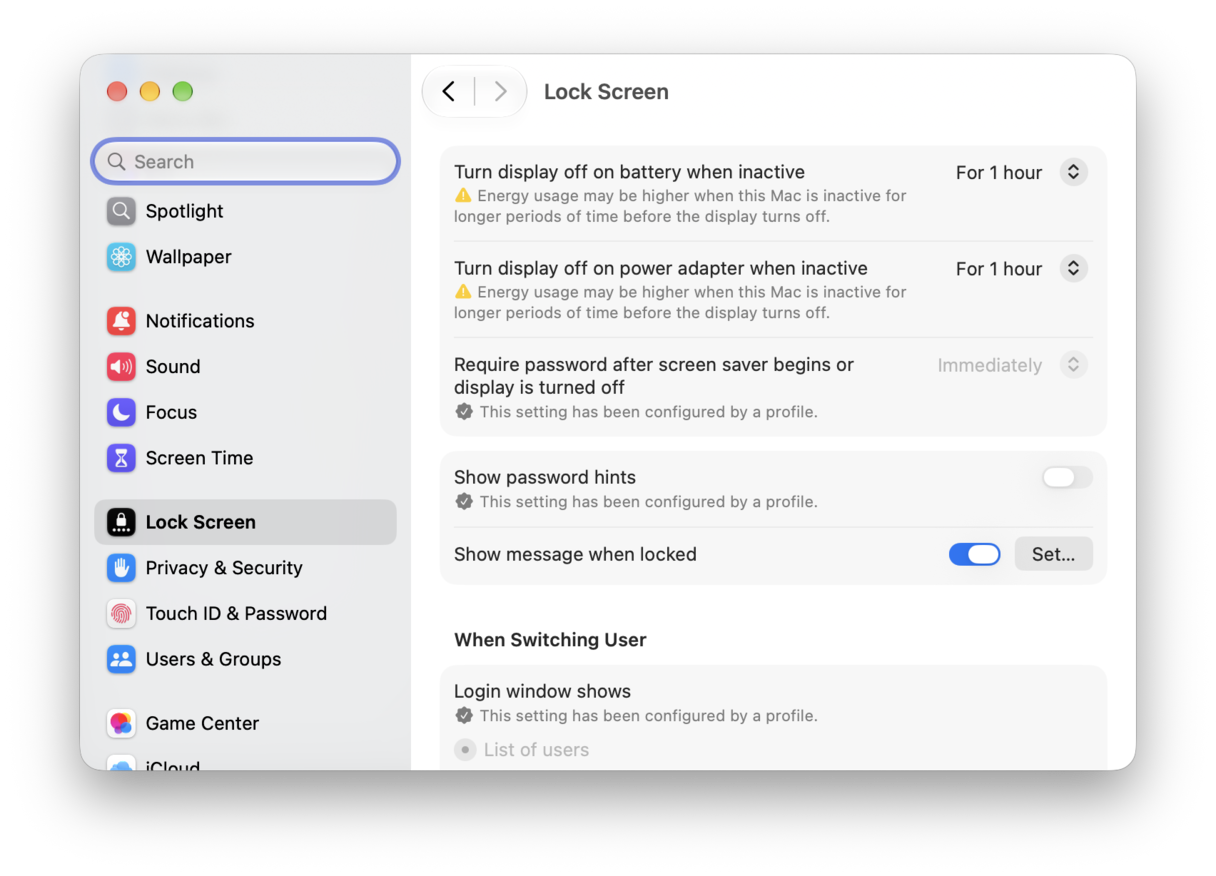
6. Adjust Lock Screen settings
- Go to System Settings > Lock Screen settings and Set Turn display off on battery when inactive to five minutes or less.
- Do the same for Turn display off on power adapter when inactive.
- Optionally, delay your screen saver so the system doesn't get caught in a double sleep state.
7. Check Wi-Fi range
Another trick that can help fix it when Wi-Fi is not working on a Mac is checking Wi-Fi range. To do it, follow these steps:
- Press Option and click Wi-Fi icon from the menu bar.
- Look at the number next to RSSI.
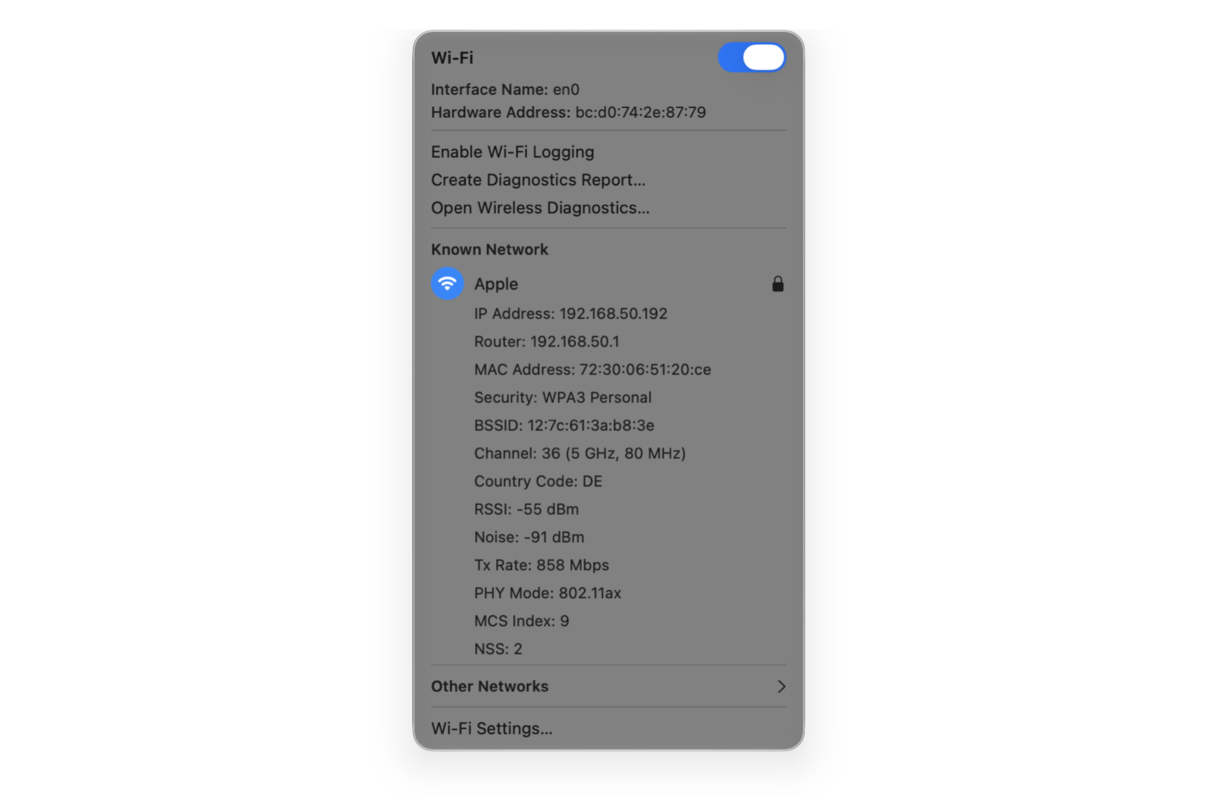
RSSI stands for Received Strength Signal Indicator. Anything between -30 dBm and -67 dBm points out a good connection. Anything between -70 dBm and -90 dBm is a poor connection. If you see -90 dBm, the signal is bad, meaning that you are almost out of Wi-Fi range and have to move closer to the router.
If your MacBook Pro won’t connect to Wi-Fi when other devices will, it means that the problem isn’t your broadband connection. It could be a problem with the communication between your Mac and your Wi-Fi router or an issue with the Mac. Whichever it is, it’s probably straightforward to fix. Follow the steps above to identify the problem and fix it not only on MacBook Pro but on any other Mac model.
Frequently asked questions
What do I do if my Mac is connected to Wi-Fi but has no internet access?
If your Mac is connected to Wi-Fi but lacks internet, you should restart your router, forget and rejoin the network, disable VPN if it is on, or check your date and time settings in System Settings > General > Date & Time. Also, the fix may include renewing DHCP lease (System Settings > Wi-Fi > Details next to your connected network > TCP/IP in the sidebar > Renew DHCP lease). Another fix is to stop mDNSResponder via Activity Monitor.
Why does my MacBook keep disconnecting from Wi-Fi?
A MacBook keeps disconnecting from Wi-Fi due to network profile corruption, IP address conflicts, or router band steering issues. Fix it quickly by forgetting the network, renewing your DHCP lease, or restarting your router.
How do I reset network settings on a Mac?
macOS does not have a single "Reset Network Settings" button. Instead, you can reset your network connection by forgetting your Wi-Fi network, deleting system configuration plist files, or resetting network locations by following the steps in this article from Apple Support. plist files are in /Library/Preferences/SystemConfiguration/ (look for com.apple.airport.preferences.plist and preferences.plist and send them to the Trash).