Mac Accessibility settings can completely reshape how someone interacts with their computer. If you're dealing with visual strain after long work days or you're trying to help a friend who relies on VoiceOver, macOS offers thoughtful, built-in tools. And they're not hidden away, you just have to know where to look.
Since updating to macOS Sequoia, I've spent some time getting well acquainted with all the features, and while they are designed for accessibility, I've found them surprisingly useful in everyday workflows, like using keyboard shortcuts to reduce reliance on the trackpad.
Here's a hands-on breakdown of how I navigate, customize, and make the most of Mac accessibility tools, plus some personal insights on when and why you might want to turn them on or off.
What is Mac accessibility?
Mac accessibility is Apple's suite of features built into macOS to make the system usable for everyone, especially those who are blind or have low vision, deaf or hard of hearing, or with motor disability. But the features can be, of course, used by anyone, and there are some surprising productivity boost advantages to customizing your Mac.
For example, lately I've used Display accommodations during late-night editing sessions, and the Dictation function has saved me from wrist strain during longer writing sprints.
There are quite a lot of benefits, so let's take a look.
How to access your Mac Accessibility settings
First, let's cover the basics of how to access the settings.
- Click the Apple menu (top-left corner of your screen).
- Choose System Settings.
- Scroll down the left-hand sidebar and click Accessibility.
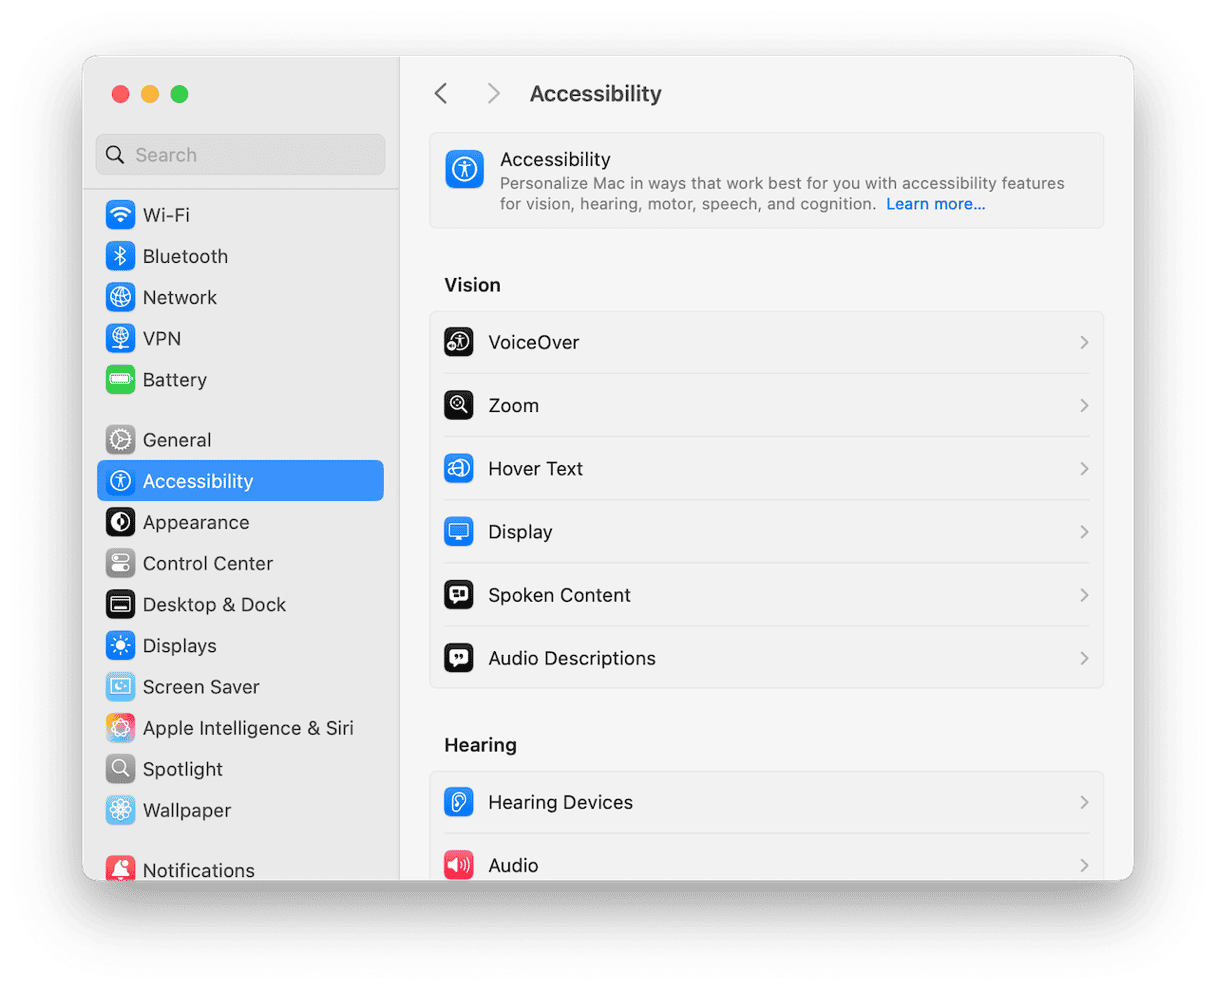
- From here, you'll see the main categories:

- Vision: VoiceOver, Zoom, Display adjustments
- Motor: Voice Control, Keyboard, Pointer Control
- Hearing: Audio, RTT
- General: Siri, Spoken Content, and more
Tip: You can also use the search bar at the top of System Settings. Typing Zoom or VoiceOver jumps you right to the relevant panel. Saves time.

Turning Accessibility features on or off
Most features are toggled with a simple switch. But what surprised me is how customizable many of them are after you turn them on.
Let's say you enable VoiceOver:
- macOS launches a full tutorial. It's optional but worth skimming.
- You can tweak the voice, speed, and verbosity.
- You can even add custom keyboard commands.

Want to turn something off? Just head back to the same panel and toggle VoiceOver off.
But here's a heads-up: a few settings (like Dictation) live outside Accessibility and need to be disabled in Keyboard > Dictation. It's not super intuitive, and I had to dig a bit to figure that out.

My personal picks: Features worth trying
1. Zoom (under Vision)
I've used Zoom more than I expected, especially when I'm screen-sharing on calls. The hover text and keyboard shortcuts let me zoom in temporarily without resizing the whole screen. If you ever squint at system menus, this is gold.

2. Display > Reduce Motion
Enabling this removes a lot of the subtle animations in macOS. It feels snappier and less distracting, especially on older computers. My MacBook Pro runs smoothly on macOS Sequoia, but I still keep this one on during focused writing sessions.

3. Voice Control
Voice Control under Motor does take some getting used to, but the level of detail in command recognition is wild. You can open apps, edit documents, even move your mouse, all by voice.

Keep your Mac running smoothly for accessibility tools
Some Accessibility features, like VoiceOver or real-time captions, really do depend on your system being responsive. I've noticed that when my Mac's been running for days without maintenance, things like Zoom or Dictation can lag or start to behave oddly. I usually take a moment to tidy things up, and that's where the Smart Care feature from CleanMyMac comes in handy.
It clears out system clutter, runs basic maintenance tasks, and helps me spot anything that might be slowing performance. It's not a requirement, but it's one more way to make sure everything runs as smoothly as possible, especially if I'm enabling multiple accessibility features at once.
- Get your free CleanMyMac trial — enjoy unlimited app functionality for 7 days.
- Open the app.
- Click Smart Care > Scan.
- Select your tasks and click Run.

Mac Accessibility settings are tools for everyday comfort and efficiency, and they're even more refined than ever. I'd recommend experimenting slowly. Turn on one feature at a time. Customize it, then revisit what works and what doesn't. You might find a setting that fits so well, you forget it's even on.