When it comes to recording video on an Apple device, most of us immediately think of using an iPhone. After all, it has a great camera and is always with us. It’s also easy just to take it out of a pocket or bag and start shooting wherever we are. But you can also record video on a Mac, and there are some situations in which it makes more sense than using an iPhone. For example, if you’re recording a play-through or tutorial video for YouTube and want to show both what’s on your Mac’s screen and your face, you could use the FaceTime camera to record the video and screen recording software to record the screen. In this article, we’ll show you how to record video on your Mac.
Benefits of recording video on your Mac
The main benefit of recording video on your Mac is that if you want to edit the footage later, it’s already on your Mac, so you don’t have to worry about transferring it from another device. The other is that your Mac is already sitting on a stable surface and won’t move during the recording, so you don’t have to set up a tripod.
Optimize your Mac before you start recording videos
Recording video on your Mac is quite resource-intensive, so it’s a good idea to make sure your Mac is free from junk and clutter and performing as smoothly as possible. That means running maintenance tasks, scanning for malware, and updating all your apps.
That’s not easy to do manually and would take quite a while. Happily, you don’t have to do it manually. CleanMyMac’s Smart Care feature can do it for you. With one click, it scans your Mac, looking for junk files and clutter, checking for malware, working out what maintenance tasks need to be run, and detecting vital updates for all your applications. When it’s finished, you can run all of its recommendations with another click or review what it has found and choose for yourself what to run.
Here’s how it works:
- Get your free CleanMyMac trial — test it for 7 days free.
- Choose Smart Care in the menu bar.
- Click Scan.
- When it’s finished, either click Run or choose Review in one of the panels to see what it has found.

Options for recording videos on your Mac
When it comes to what camera to use to record on your Mac, you have a few options:
- Your Mac’s FaceTime camera
- A third-party webcam connected by USB
- If you have a recent MacBook and a recent iPhone, you can use your iPhone’s camera to record the video on your Mac
As far as software goes, the easiest option is to use QuickTime Player or PhotoBooth. However, you can also record yourself using iMovie, one of a number of third-party video tools, or even a website like screencapture.com
How to record video on your Mac
Before you start, decide which camera you’re going to use to record the video. If you are going to use your Mac’s built-in FaceTime camera, you don’t need to do anything else. If you want to use your iPhone, it needs to be connected to the same Wi-Fi network as your Mac, have Bluetooth turned on, and be signed into the same Apple Account as your Mac.
QuickTime
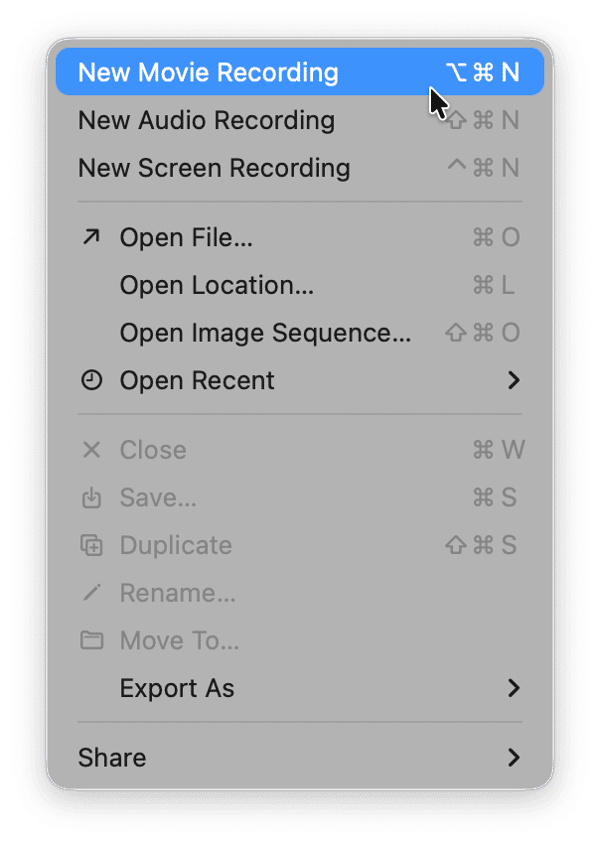
- Open QuickTime on your Mac.
- Go to the File menu and choose New Movie Recording.
- When the window opens, click the down arrow on the control palette and choose the camera you want to use. You can also choose which microphone you want to use.
- Click the camera icon in the menu bar and choose the options you want, such as Studio Light or Portrait. Tip: You can remove the background and replace it with a gradient or image by clicking Background and selecting an option.
- Click the record button to start the recording.
- When you’re finished, click the stop button in the menu bar.
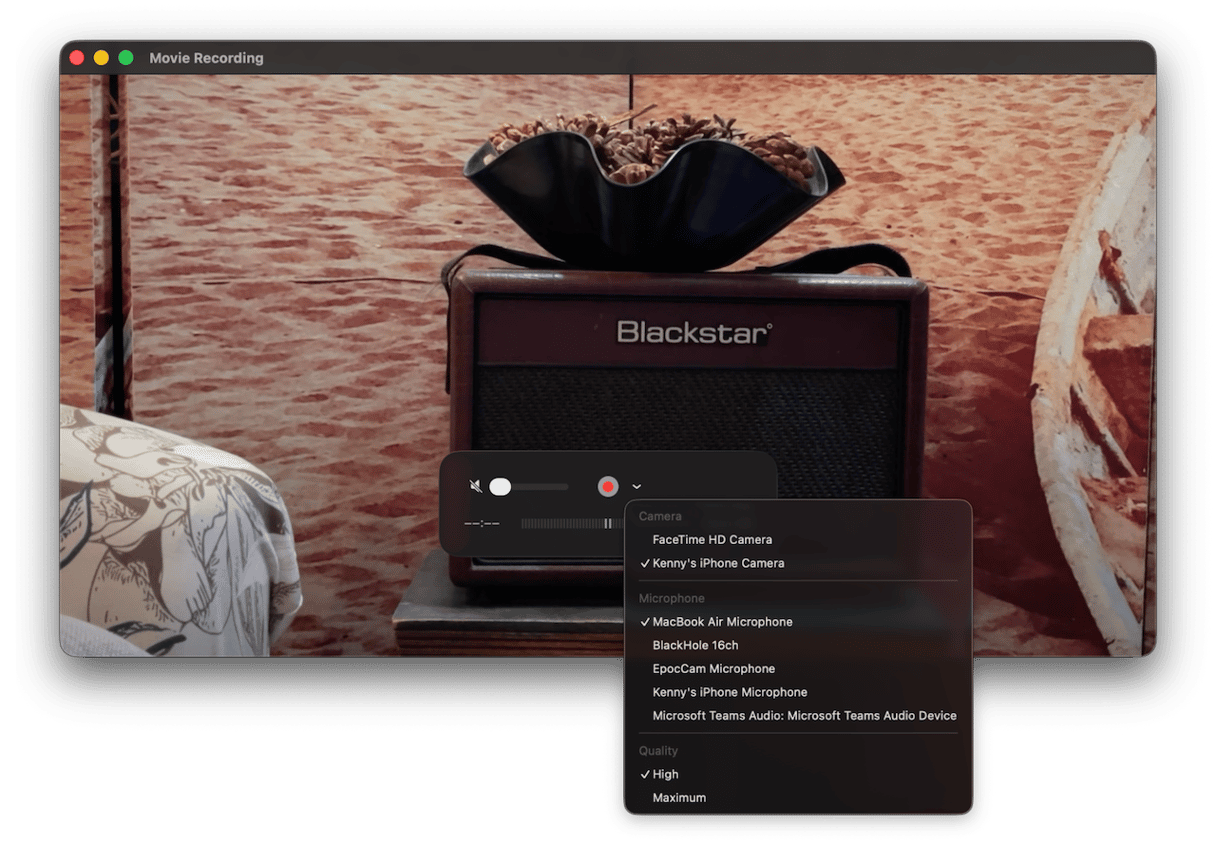


Photo Booth
- Open Photo Booth on your Mac.
- Click the Camera menu to choose the camera you want to use.
- If you want to add effects to your video, choose Effects and choose the one you want.
- You can also click the camera icon in the menu bar to choose from the options there.
- Click the Record button to start recording.
- When you’re finished, click the stop button.

iMovie
- Open iMovie.
- Click the down arrow icon in the menu bar above My Media.
- Under Cameras in the sidebar, choose the camera you want to use.
- In the ‘Import to’ menu, choose where you want the recorded clip to go.
- Click Record.
- Click the Record button again to stop recording.

Frequently asked questions
Where are video recordings stored?
That depends on what app you use to record them. QuickTime Recordings are saved on the Desktop. Photo Booth recordings go to a hidden Pictures folder inside your user Pictures folder (~/Pictures/Photo Booth Library/Pictures/). And iMovie recordings go to whichever iMovie project you selected in the ‘Import to’ menu.
Why can’t I see anything when I select my iPhone as the camera?
If you have previously selected Background in the camera menu and chosen to hide the background, you’ll see a blank screen when you select your iPhone. The solution is to deselect Background in the camera menu.
Can I choose a different microphone?
That depends on which application you use to record. In QuickTime Player, you can choose a microphone from the same menu you use to choose a camera.