We all have really important and sometimes irreplaceable stuff on our iPhones. From pictures to text conversations, there are things you’d be devastated to lose. So what do you do? You look for a simple backup solution like iCloud to keep things on your iPhones safe. But then, in a couple of months, you get that dreaded notification that says you need to upgrade your iCloud account because there’s insufficient storage to back up your phone.
Upgrading your iCloud account is an option, but it comes at a monthly cost. Alternatively, there’s the free option of backing up your iPhone to your Mac. That latter option is a little less automatic, but keep reading, and we’ll help you understand how to make it seamless.
Before you backup your iPhone
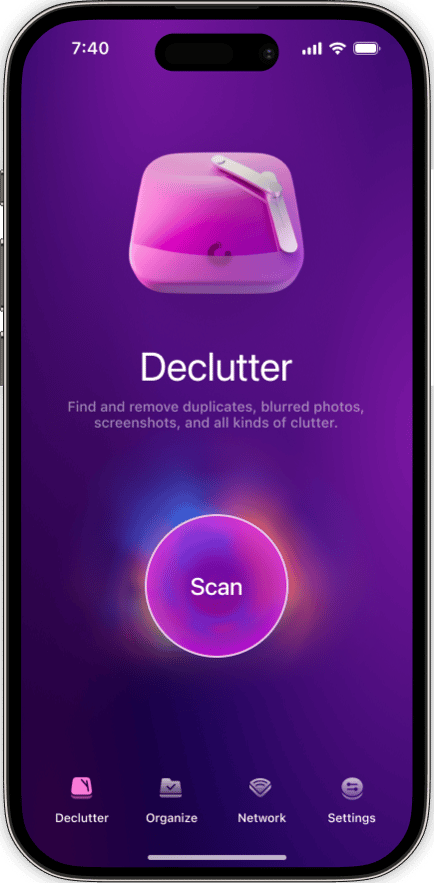
Before you backup your iPhone, it is crucial to get rid of all the unnecessary clutter. When it comes to gobbling up storage on your iPhone, apps are definitely one of the biggest culprits. Photos are a close second. To quickly sort and delete unwanted photos, download CleanMy®Phone. It shows you all your duplicate and similar images, so you can make fast decisions on what stays and what goes.
- Get CleanMy®Phone.
- Tap Declutter > Scan.
- The app will analyze your photo clutter and group it into folders, like Duplicates, Screenshots, Blur, etc.
- Tap any folder and clean the clutter.

How to back up an iPhone to a Mac in Finder
To back up your iPhone to a Mac using Finder (available in macOS Catalina and later), follow these steps:
- Use a USB or USB-C cable to connect your iPhone to your Mac.
- Click on the Finder icon in your Dock to open a new Finder window.
- In the Finder sidebar under Locations, you should see your iPhone listed. Click on your iPhone's name.
- If prompted, click Trust on your Mac.
- On your iPhone, tap Trust and enter your passcode to establish a secure connection.
- In the main Finder window, you'll see information about your iPhone.
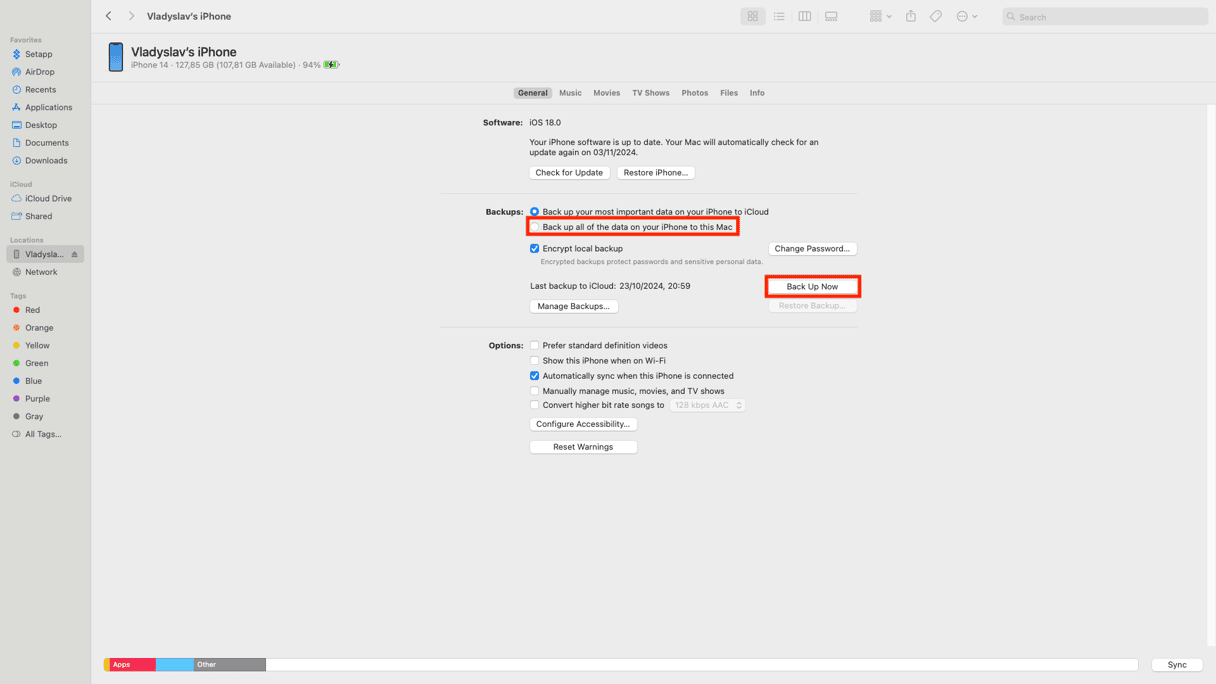
- Under the General tab, scroll down to the Backups section.
- Select Back up all of the data on your iPhone to this Mac. To encrypt your backup (recommended for saving passwords, health data, and more), check the box Encrypt local backup and set a password.
- Click on Back Up Now to begin the backup process.
- A progress bar at the bottom of the Finder window will indicate the backup status.
- Once the backup is complete, you can see the time of your latest backup under Latest Backup in the Backups section.
Now, your iPhone is fully backed to your Mac. Congratulations.
How do I find iPhone backups on Mac?
Whether you’re trying to restore your iPhone from a specific backup or want to save space by cleaning up old iPhone backups on your Mac, there’s a couple of things to keep in mind.
To look at the recent backups using Finder, follow these steps:
- Use a USB or USB-C cable to connect your iPhone.
- Click on the Finder icon in your Dock to open a new Finder window.
- In the Finder sidebar under Locations, you should see your iPhone listed. Click on it.
- In the main Finder window, ensure you're on the General tab. Scroll down to the Backups section. Click on Manage Backups.
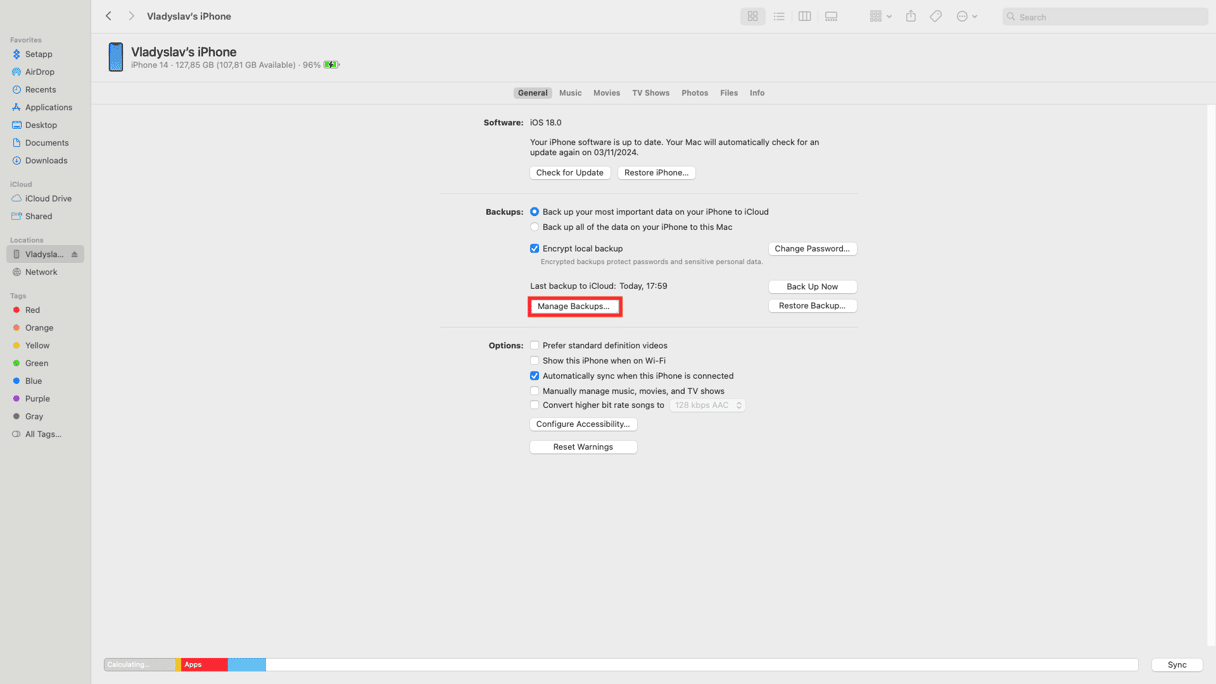
- A list of your backups will appear.
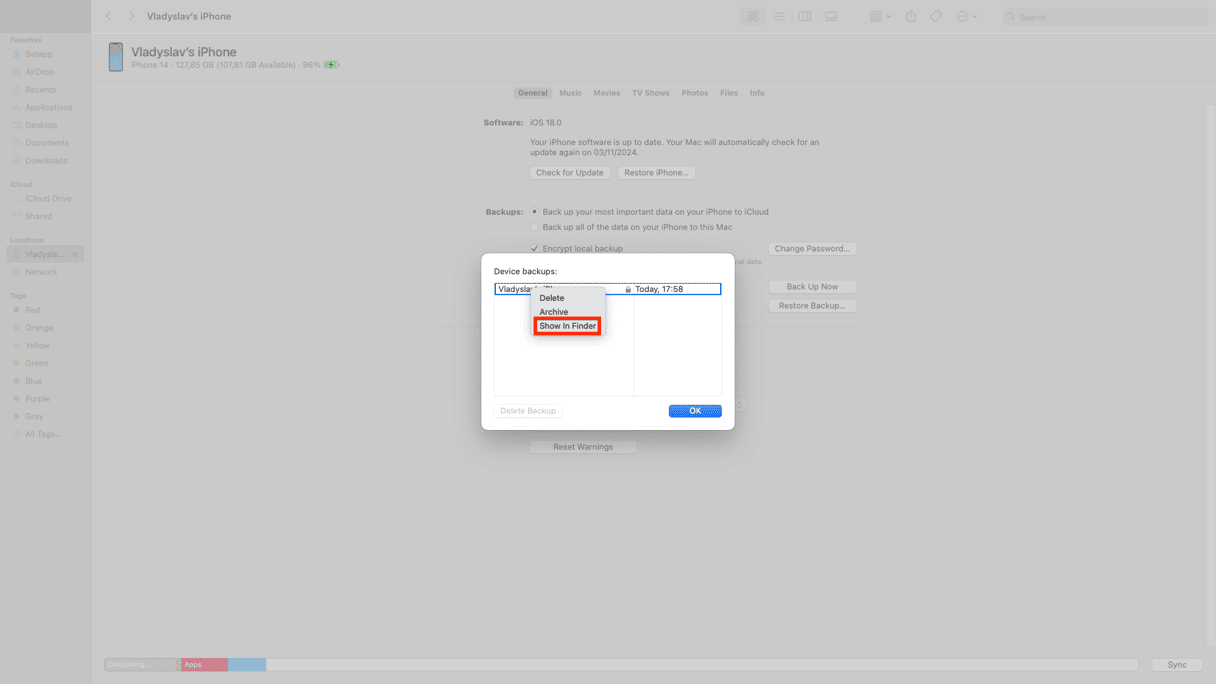
- Control-click (or right-click) on the backup you wish to find.
- Select Show in Finder from the context menu.
To find the recent iPhone backup folder manually, you need to do the following:
- Click on the Finder icon in your Dock.
- In the menu bar at the top of the screen, click Go.
- Select Go to Folder... or press Shift + Command + G on your keyboard.
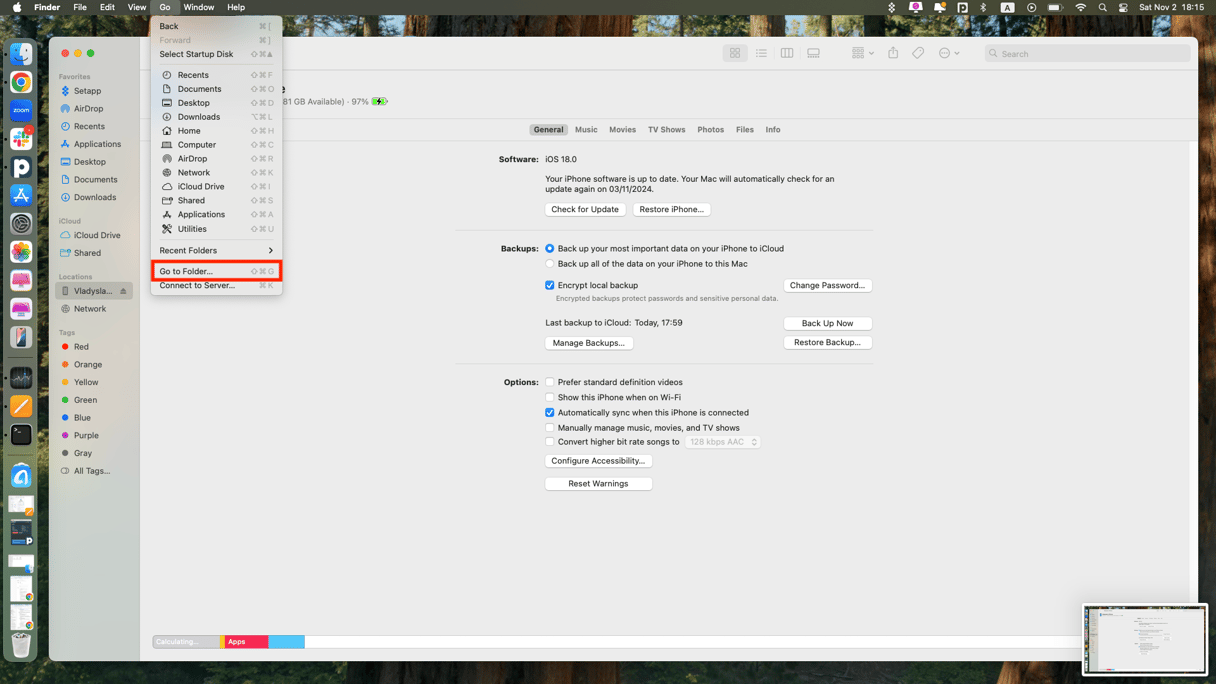
- In the dialog box that appears, type the following path exactly: ~/Library/Application Support/MobileSync/Backup/
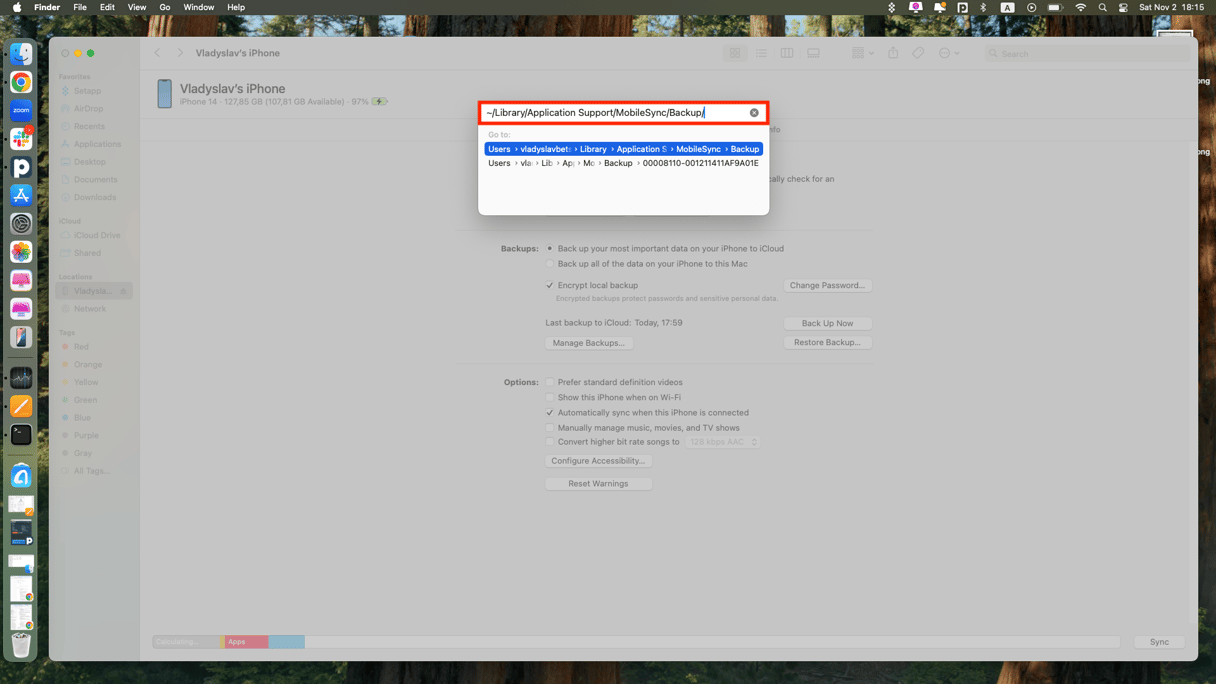
- Press Enter or click Go.
- The Finder window will navigate to the Backup folder.
- Here, you'll see folders with long alphanumeric names. Each folder represents a backup of your iPhone.
Now, you have at least two ways to access your iPhone backup folder. However, there are some important notes you need to keep in mind when dealing with backups:
- Avoid moving, renaming, or editing any files in the Backup folder. Altering these files can corrupt your backups and may prevent you from restoring your iPhone in the future.
- The backup files are stored in a proprietary format. You cannot directly view or extract individual files like photos or messages without specialized software.
How do I back up my iPhone on a Mac if I run out of storage?
Basically, if you are running out of space and want to backup your iPhone, there are several key things you can do:
- Reduce the size of your backup. Before starting a new backup, you can get rid of all the unnecessary clutter. Use
CleanMy®Phone to remote duplicate photos and old screenshots. After the app will do its job, your backup file size will be reduced drastically.
Transfer old backups to an external drive. Free up space on your Mac by moving older iPhone backups to an external hard drive. Navigate to the backup folder on your Mac ~/Library/Application Support/MobileSync/Backup/, and copy the older backup folders to your external drive. Once transferred, you can delete the old backups from your Mac to make room for new ones.
One of the most important habits to develop regarding your iPhone is regularly backing it up. And thanks to Finder and your skills it’s never been easier to back up all of the contents of your iPhone. So if you’re not already backing up your iPhone somewhere, now’s a good time to start. Your future self will thank you.
FAQs
Why do I need to back up my iPhone and my Mac?
Backing up your iPhone to your Mac ensures that all your important data—such as contacts, messages, photos, videos, and app data—is safely stored. This allows you to restore your information if your iPhone is lost, stolen, damaged, or when transferring data to a new device.
Why can’t I back up my iPhone to my Mac?
If you're unable to back up your iPhone to your Mac. It could be due to several reasons: insufficient storage space on your Mac, outdated macOS or iTunes/Finder software, faulty USB connections, or software glitches. Ensuring your Mac and iPhone are updated, checking your connections, and freeing up storage space can help resolve the issue.
Does backing up an iPhone to a Mac save photos?
Yes, backing up your iPhone to your Mac saves your photos and videos stored in the Photos app, along with other data like contacts and messages. However, if you use iCloud Photos, your photos are stored in iCloud and might not be included in the local backup. To ensure all photos are backed up to your Mac, you can import them directly using the Photos app.


