What would you do if you lost all of the stuff saved on your iPhone? That’s exactly why backing up your iPhone is so important. And if you want to be extra cautious with your data, you could always save your backup on an external drive. Not sure how to do it? Keep on reading, and you'll learn everything there is to know about backups, including different ways to back up photos only.
Can you back up an iPhone to an external hard drive?
Yes, but it requires some additional steps. While Apple doesn't provide a direct method, you can use third-party applications. Alternatively, you can back up your iPhone to your Mac using the Finder and then manually copy the backup files to your external drive for extra safekeeping.
Before you back up your iPhone
While it’s tempting just to jump in and back up your iPhone, it’s best to do a little bit of cleaning up first. By organizing things like your photo library, you’re reducing the size of your backup, so not only will it take up less space, but the backup process will also go faster.
To quickly clean up your photo library, you can download an app like CleanMy®Phone to your iPhone. This careful cleaner will scan your library for clutter like old screenshots and duplicate photos you don’t want anymore. Here’s how to get your photo library cleaned up before the backup:
- Download CleanMy®Phone and open it.
- First, tap Declutter. This tool finds useless stuff like large videos, blurred photos, duplicates, screenshots, and screen recordings.
- Tap on any of the groups of photos. Check photos preselected for deletion.
When you’re finished, go to the Photos app on your iPhone. Tap Recently Deleted > Select > ellipsis bottom right > Delete All to remove all the pictures from your iPhone.

How to back up your iPhone to an external hard drive
While backing up your iPhone to your computer is relatively intuitive, the initial steps may require a bit more effort. There are a couple of different methods you can use, including a third-party app or other macOS native apps. It all depends on the level of effort you want to put into it and whether you don’t mind spending a little time on a more straightforward process.
Step 1. Back up an iPhone to an external hard drive using Finder
Backing up your iPhone to an external drive using Finder is a little bit more complicated. Basically, to do that, you need to go through the process of creating a so-called symbolic link to redirect the backup location. Here's how:
- Connect your external drive and your iPhone to your Mac.
- Open a new Finder window and press Command + Shift + G.
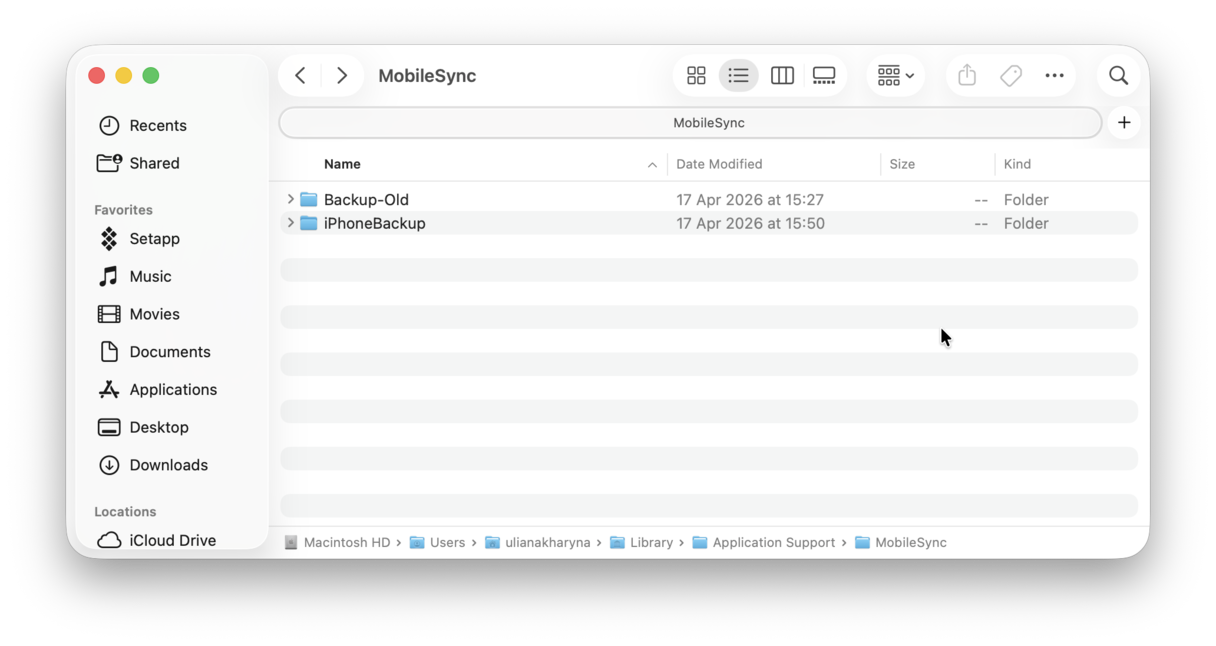
- Paste ~/Library/Application Support/MobileSync/ into the window that pops up and press Return. You'll see a Backup folder. To preserve all the past backups, rename this folder to something like Backup-Old.
- Now, on your external hard drive, create a new folder. The one where you will store your backups. For example, iPhoneBackup.
- Go to Applications > Utilities > Terminal.
- In the Terminal, type the following command:
ln -s /Volumes/ExternalDriveName/iPhoneBackup ~/Library/Application\Support/MobileSync/Backup
Replace ExternalDriveName and iPhoneBackup with your external drive's name and backup folder name.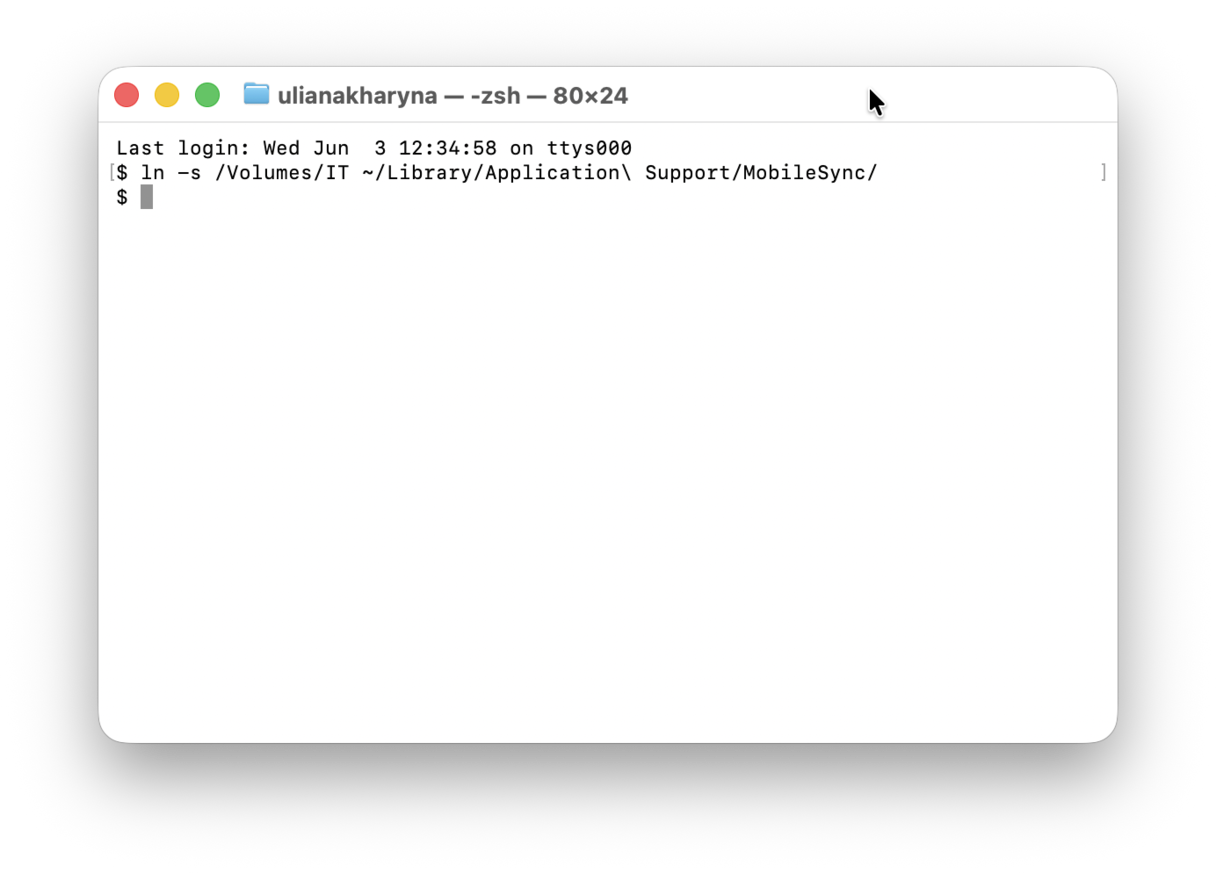
- Press Return, and the command will create a symbolic link telling your Mac to save iPhone backups to your external hard drive. Now, when you back up your iPhone, backups will be saved to your external drive if you have it connected.


As a final step, you can reconnect your iPhone. Then, open Finder, locate your iPhone under devices, and click Back Up Now.

Step 2. Check if the backup to an external drive is done
To make sure your backup to the external drive is complete:
- After the backup, in Finder under your iPhone's settings, look at the Latest Backup time to confirm it matches the current time.
- Navigate to the backup folder on your external hard drive.
- Check the Backup folder for a recent modification date and sizable content (iPhone backups can be several gigabytes).
- Open the Backup folder to see if it contains files and folders with alphanumeric names. This indicates that the backup data is present.
Here you have it. The backup is done and verified.
Bonus tip: How to create a backup of your iPhone on the Mac without the Finder
First and foremost, if you don't want to use Finder, for some reason, you can back up your iPhone using iCloud. Here's how to do that:
- On your iPhone, go to Settings > Apple Account > iCloud.
- Scroll down and tap iCloud Backup.
- Toggle on Back Up This iPhone.
- Tap Back Up Now to initiate an immediate backup.

Now, your iPhone is backed up to iCloud.
If you want to back up only pictures and do not care about other data, keep on reading to learn about the best ways to do it automatically.
How to back up iPhone photos automatically
When iPhone was first released over a decade ago, the only way to back up your photos was by physically connecting your phone to a computer and syncing with iTunes. Today, there are several ways to do it. Most of them are with a cloud service, meaning your photos sync whenever your iPhone is connected to the internet, and you never have to think about plugging it in. A few popular cloud-based services include:
- iCloud Photos
- Google Photos
- Amazon Photos
1. iCloud
If you’re looking for a way to automatically back up iPhone photos that doesn’t require plugging your iPhone into your computer, then you can use the Apple service iCloud Photos. To use this, you’ll need to sign in with an Apple Account. If you don’t have one yet, you can create it first. To use iCloud Photo Library:
- On your iPhone, Tap Settings > [your name] > iCloud.
Note: If you don’t see your name after you open Settings, that means you’re not signed in to an iCloud account. Instead of tapping on your name, tap Sign in to iCloud.
- Tap Photos.
- Turn on iCloud Photos.

Something to keep in mind is that you only get 5GB of storage for free with iCloud. That means you should definitely clean up your photo library before you start backing up. If you still need more space, you can pay to upgrade your storage limit.
How to get photos back from iCloud
To retrieve your photos from iCloud:
- Go to Settings > [your name] > iCloud > Photos.
- Turn on iCloud Photos.
- Your photos will automatically sync back to your device.
For more detailed instructions, you can check this article on how to download photos from iCloud.
2. Google Photos
If you like the idea of backing up without having to continually plug your phone into your computer but don’t want to pay to back up your entire library, then Google Photos offers a solution. Google offers unlimited photo backups, as long as you allow it to save compressed photos as the backup.
- Download and open Google Photos on your iPhone.
- Sign in to your Google account.
- At the top, tap the Menu icon.
- Tap Settings > Turn on backup.
- Choose the option that works best for you > Confirm.

How to stop Google Photos backup on iPhone
If you need to stop Google Photos from automatically backing up your photos:
- Open Google Photos on your iPhone.
- Tap the Menu icon.
- Go to Settings > Backup.
- Turn off “Back up photos and videos on this device automatically.”
If you want to back up your original, uncompressed photos, you can use Google One storage. You get 15 GB for free, and, like iCloud, if that’s not enough, you can pay to upgrade your storage limit.
3. Amazon Photos
Another backup solution for your iPhone photos is Amazon Photos. If you’re a fan of free, automatic, wireless backups but want something that doesn’t compress your pictures, then this is the service for you — especially if you’re already an Amazon Prime member.
- On your iPhone, download and open Amazon Photos.
- Sign in using your Amazon Prime account.
- Allow Amazon Photos to access your photo library.
- Make sure Auto-save is turned on.
- Leave the app open to sync.

If you’re logged in but Auto-Save isn’t on, you can turn it on in the app by tapping More (you initial/photo) > Settings > Upload settings.

Free uncompressed storage is a great bonus if you’re already a Prime Member. But if you’re not a prime member, you can get 5 GB free, and, like iCloud and Google, you can pay to upgrade that storage limit.
Backing up your iPhone is vital. You use your phone on a daily basis for so many things, and it would be unwise to have your data stored on your iPhone alone, without any backup. That’s why it’s critical to get into a routine of backing up your iPhone — even having a backup of your backup isn’t such a bad idea.
Frequently asked questions
Can you back up an iPhone to an external hard drive without a computer?
No, you cannot directly back up an iPhone to an external hard drive without a computer. Apple does not support connecting external storage devices directly to an iPhone for backup purposes. You need a computer to facilitate the backup process to an external drive.
How do you move iPhone backup to an external drive?
To move an existing iPhone backup to an external drive. First, locate the backup folder with this path: ~/Library/Application Support/MobileSync/Backup. Second, copy the entire backup folder to your external drive.
How do you back up an iPhone directly to an external hard drive without a computer?
At the moment, it's not possible to back up an iPhone directly to an external hard drive without using a computer. You can back up your iPhone to iCloud wirelessly or use a computer to back up to an external drive, but Apple does not support direct backup from an iPhone to external storage.
Does iPhone backup include photos?
Yes, iPhone backups can include photos. When you back up your iPhone using iCloud or iTunes, photos can be included if you enable iCloud Photos or ensure that photos are part of your backup settings.
What is the best way to back up iPhone photos?
The best way to back up your iPhone photos depends on your preferences. Popular options include using iCloud Photos for seamless integration with Apple devices, Google Photos for unlimited compressed backups, and Amazon Photos for free uncompressed storage if you are a Prime member.
Where to store photos from iPhone?
You can store photos from your iPhone using various cloud services like iCloud Photos, Google Photos, and Amazon Photos. Each service offers different storage limits and features, so choose one that best fits your needs for storage space and photo quality.


