Apple ID — now named Apple Account — opens a whole new digital world for you. It lets you access Apple Music, App Store, FaceTime, and other apps and stores your settings and preferences, making your user experience smooth. It also lets your family quickly locate you in case of an emergency.
To create an Apple ID, you need to provide your email address. What if you can’t access the address you’ve provided? Not a problem. In this article, we’ll shed some light on how to change your Apple ID and Apple ID password as well.
Forgot your Apple ID?
If you forgot your Apple ID and now want to change it to another one, there is an easier way. Apple stores all your data, including your login information, and, of course, lets you access it if you are signed in. So, to check your current Apple ID (or find out if you have one), you need to choose Apple Menu and then System Settings > Apple Account.
You can also go to App Store, then choose the Store from the menu bar. Select Account to find out your Apple ID.
How to change your Apple ID
If you can’t access the email you used as your Apple ID, it’s necessary to change it. It’s easy to do so if your current Apple ID is a third-party email address, for example, Gmail, Yahoo, Outlook, etc. You can choose another third-party email and set it as your Apple ID. Here’s how to do that on Mac:
- Go to account.apple.com from your browser.
- Sign in using your Apple ID and password.
- Click Email & Phone Numbers in the Sign-In and Security section.
- Click minus (-) next to primary email.
- Provide a new email address to use as your Apple Account.
- Follow the on-screen instructions to change it.

How to change your Apple ID if it’s a phone number
If you used your phone number as an Apple ID, you could change it to another number as well. Apple has allowed this option for some countries only, so it may not be working in your region. To change your Apple ID to another phone number, follow the instructions:
- Sign out of your Apple ID on every Apple device.
- Go to account.apple.com from your browser and sign in.
- In the Sign-In and Security section, navigate to Apple Account and click on it.
- Enter a new mobile phone number under Change Apple Account and confirm the change with the verification code.
- Sign in on all your Apple devices with your new Apple ID.
How to change Apple ID password on Mac
For privacy reasons, it’s good to change your passwords once a year. Of course, many of us neglect this rule, but keeping the same password for a very long time isn’t safe. There are several ways you can change your Apple ID password on Mac. Here’s how to do it:
- Go to the Apple menu and choose System Settings.
- Click Apple Account > Sign-In and Security.
- Go to Password & Security and click Change password.
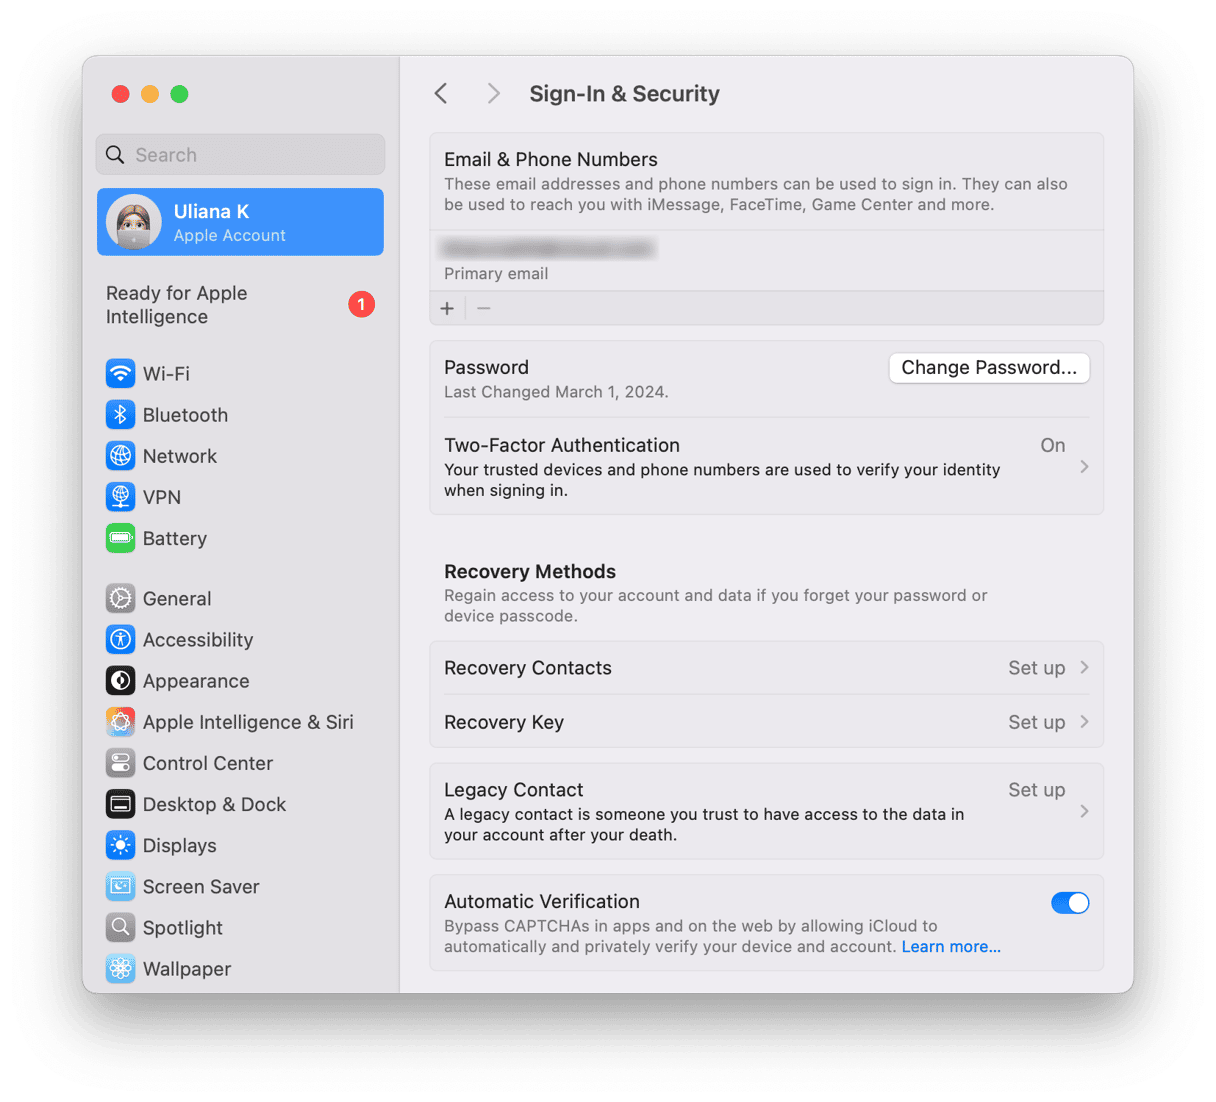
- Enter the password you use to unlock your Mac and press Allow.
- Enter your new Apple ID password, verify it, and click Change.

Done! Your password has been changed!
In case you can’t change the password from System Settings on your Mac, there is another way.
Change your Apple ID password on the web
If you aren’t signed in on your Mac and can’t change your password, you can comfortably do that on the web.
- Go to account.apple.com and sign in.
- In Sign-In and Security, click Password.
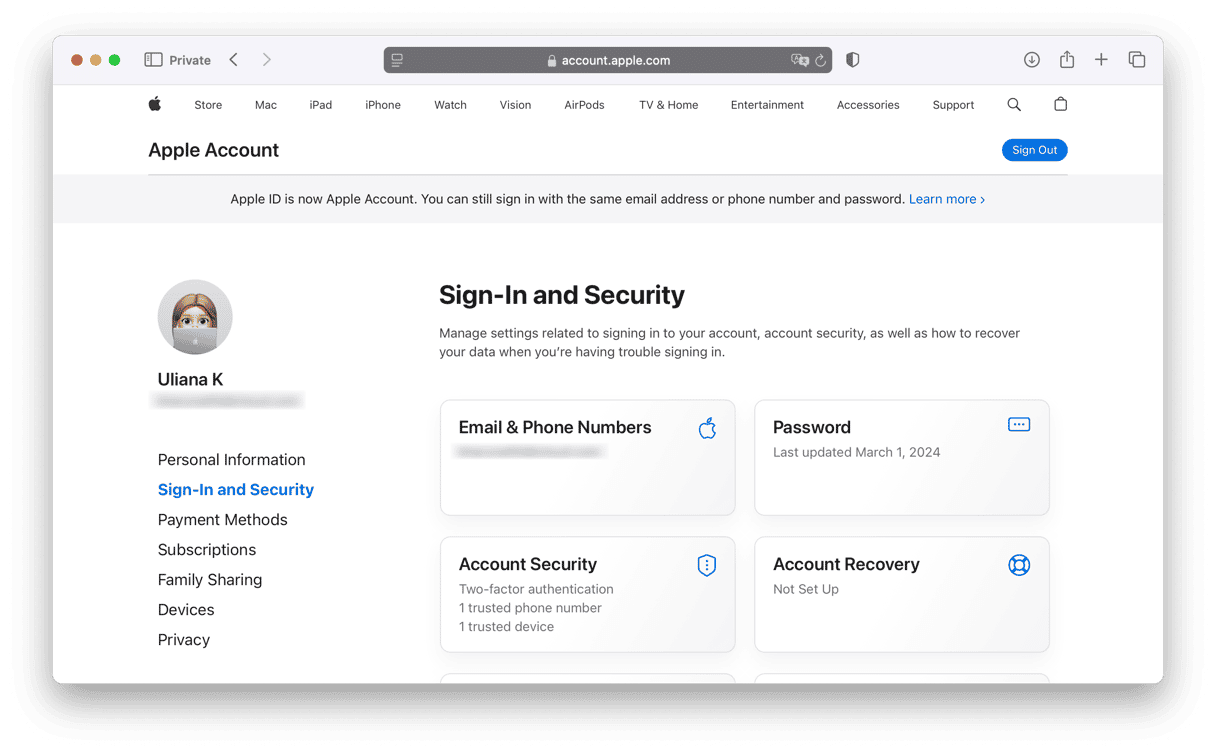
- Enter your current password and then create your new one and confirm.
- Click Change Password, and you’re done!

Bonus tip to keep your data safe
In terms of keeping your information private, changing passwords isn’t enough. Malicious websites and extensions, hackers, spyware, and worms can attack your MacBook while you aren’t expecting them. So, scanning your Mac once in a while for those nasty things is a must. We love how CleanMyMac deals with malware, so we recommend you give this cleaner a try.
- Get your free CleanMyMac trial.
- Install and open the app.
- Go to Protection and hit the Scan button.
- Click Remove if any threats are found.

Apps like CleanMyMac help you protect your data from malicious actors. Scanning your Mac for worms and viruses is a great habit to pick up, along with changing your passwords. You can also review additional privacy vulnerabilities CleanMyMac has found like unprotected Wi-Fi networks or unneeded applications permissions.
Hope your Mac is safe and sound!