Nobody could fault you for saying that you practically live on your iPhone. It’s probably the place where you keep your important day-to-day information like contacts and calendars, not to mention all of the irreplaceable memories you have stored in your photo library. And because it has all the data you need, it’s good to get into the habit of backing up your iPhone regularly.
But it’s also easy to get behind once you run into an issue with your backup. That’s why this article aims to help identify some of the common issues that come up when backing up your iPhone and what you can do to fix it.
iPhone not backing up
Using iCloud to back up your iPhone can be wonderfully convenient. This service is designed to automatically back up your phone, so you never have to think about it. The problem, though, is that it can be equally frustrating when it doesn’t work the way it’s supposed to. But if you know what to look out for, you can fix it fairly quickly.
1. "iCloud backup is not working" due to a lack of storage
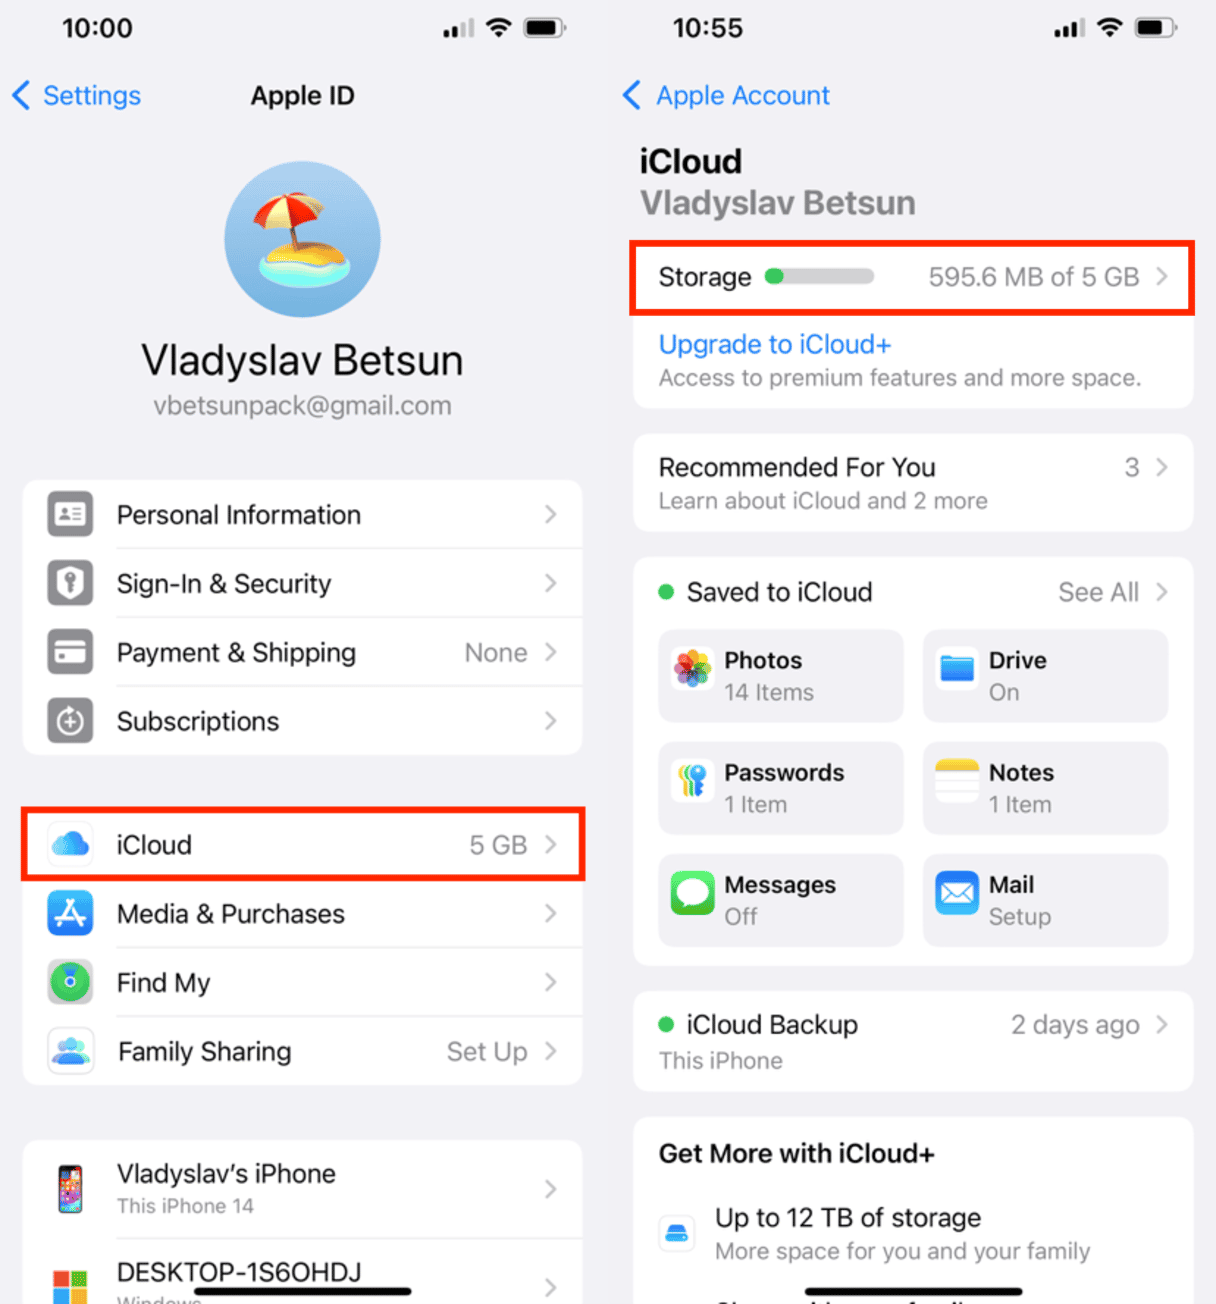
This might seem like common sense, but your backup won't be successful if there’s not enough free storage left on iCloud. With the free iCloud plan, you only get 5 GB of storage, which is minimal, especially if you’re backing up pictures and videos. Here’s how to check how much space you have left:
- On your iPhone, open the Settings app.
- Tap [your name] > iCloud.
- On this screen, you can see your free space and tap Manage Storage to see what’s taking up space.

How to fix it: Free up space in iCloud
One of the quickest ways to free up some space in iCloud is by cleaning up your photos. Thankfully, the CleanMy®Phone app can help you declutter and organize your library both on your phone and in iCloud with a few taps.
Here’s how to use this careful cleaner app:
- Verify that iCloud Photos is turned on by going to Settings > [your name] > iCloud > Photos.
- Open CleanMy®Phone and grant it full access to your photo library. Worry not, all photos are scanned on device, meaning they are safe from prying eyes.
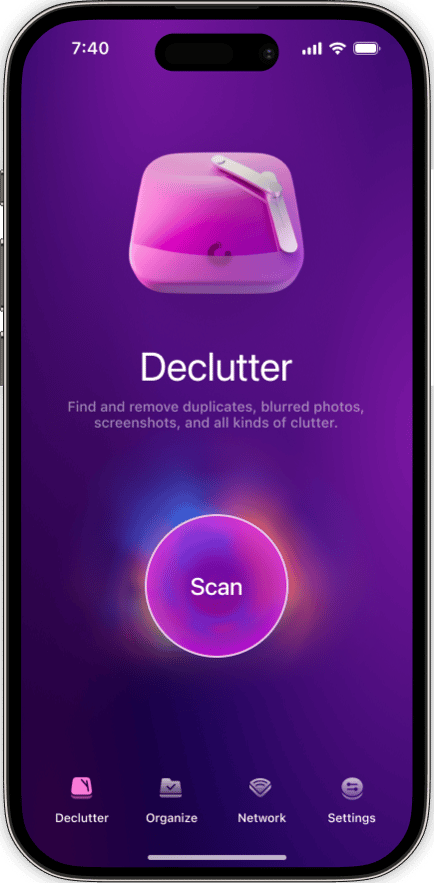
- Now, remove duplicates and other junk. Tap Declutter > Scan. Browse through the categories: Screenshots, Screen Recordings, Duplicates, TikTok, Blur, and App Folders. Deselect pics you want to keep and tap Clean.
- Next, get rid of similar images. Tap Organize, choose the time frame or set up a custom filter, and tap Scan. Check photo categories (Travel, Pets, Food, Portraits, Text, and Other) and select images you want to delete. Tap Clean.
- Now, go to the Photos app. Tap Recently Deleted > Select > ellipsis icon bottom right > Delete All to remove all the pictures.

Why won't my iPhone backup when I have enough storage
So, now you have enough storage. However, the iPhone still refuses to back up. Let's take a closer look at what the problem looks like.
2. Not meeting backup requirements
If you’re having issues with your automatic backups to iCloud failing, it could be because there are specific requirements that are not being met. Those requirements include:
- Being connected to Wi-Fi.
- Being plugged into power.
- Your iPhone is on the lock screen.
How to fix it: Manually back it up to iCloud
While your iPhone isn’t automatically backing up, you can try to back it up manually to see if there’s a bigger issue going on with your iPhone or iCloud account.
- Make sure your iPhone is connected to Wi-Fi.
- Open the Settings app.
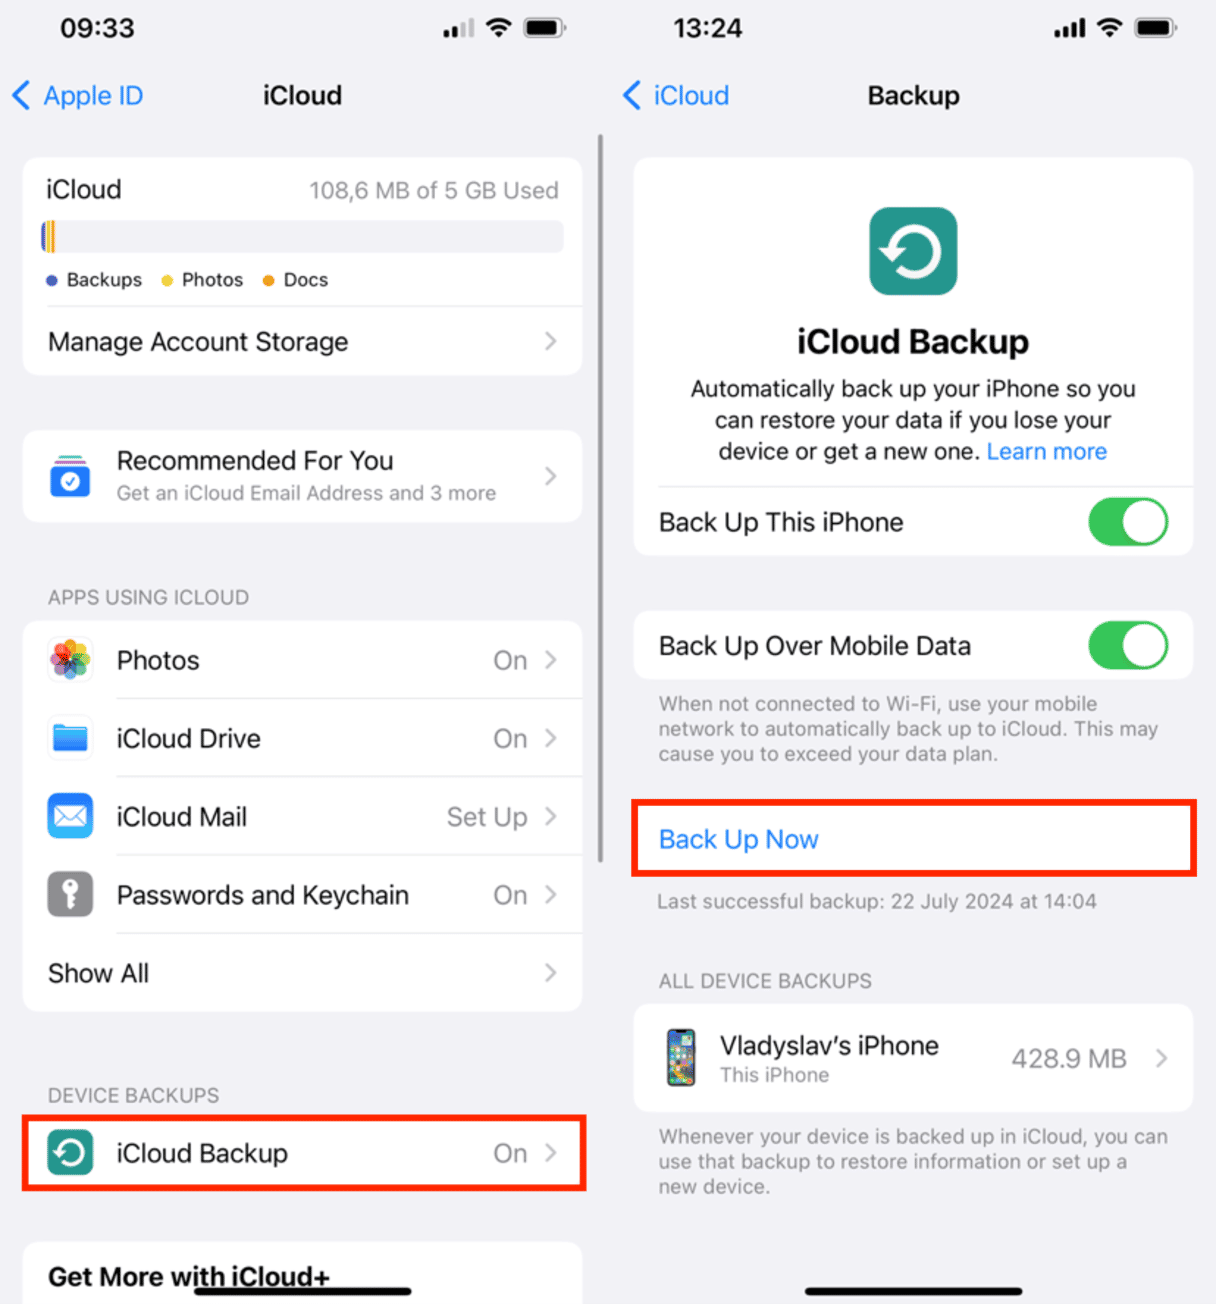
- Tap [your name] > iCloud > iCloud Backup > Backup Now.

If the manual backup fails, you should sign out of your Apple ID and sign back in by going to Settings > [your name] and then tapping Sign Out.
iCloud backup takes forever
The first time you back up your iPhone to iCloud, it’s perfectly normal for it to take a bit of time. The same applies if you’ve just connected to Wi-Fi after taking many new pictures or videos. But if you notice it consistently taking upwards of an hour or longer, that isn’t normal. Keep reading for a couple of common issues that could be hindering your iCloud backup speed.
1. Slow Wi-Fi connection
Because iPhone backups are usually large files, you have to be connected to a Wi-Fi network to do them. You can’t do them from your cellular connection. That being said, your iPhone won’t check to see if it’s a strong or fast connection—just as long as you have a connection.
How to fix it: Back up from a different network
If you have another Wi-Fi network at home, you can try connecting to that and backing up. But if that’s not an option, maybe you could try backing up at a friend’s house. And lastly, you can try connecting and backing up from a public place that offers free Wi-Fi, like a local library, a school, or a coffee shop.
2. "iPhone won't back up" large files
The reason your first iCloud backup should be your longest one is because iCloud only backs up the changes. So if your subsequent backups are taking longer than you expected, you may have downloaded some files or an app that is creating large files and causing your iCloud backup to slow down.
How to fix it: Manage which apps are being backed up
Thankfully, you can tell iCloud which apps to back up and even delete app data if it’s already been backed up.
To turn off specific app backups:
- Open the Settings app on your iPhone.
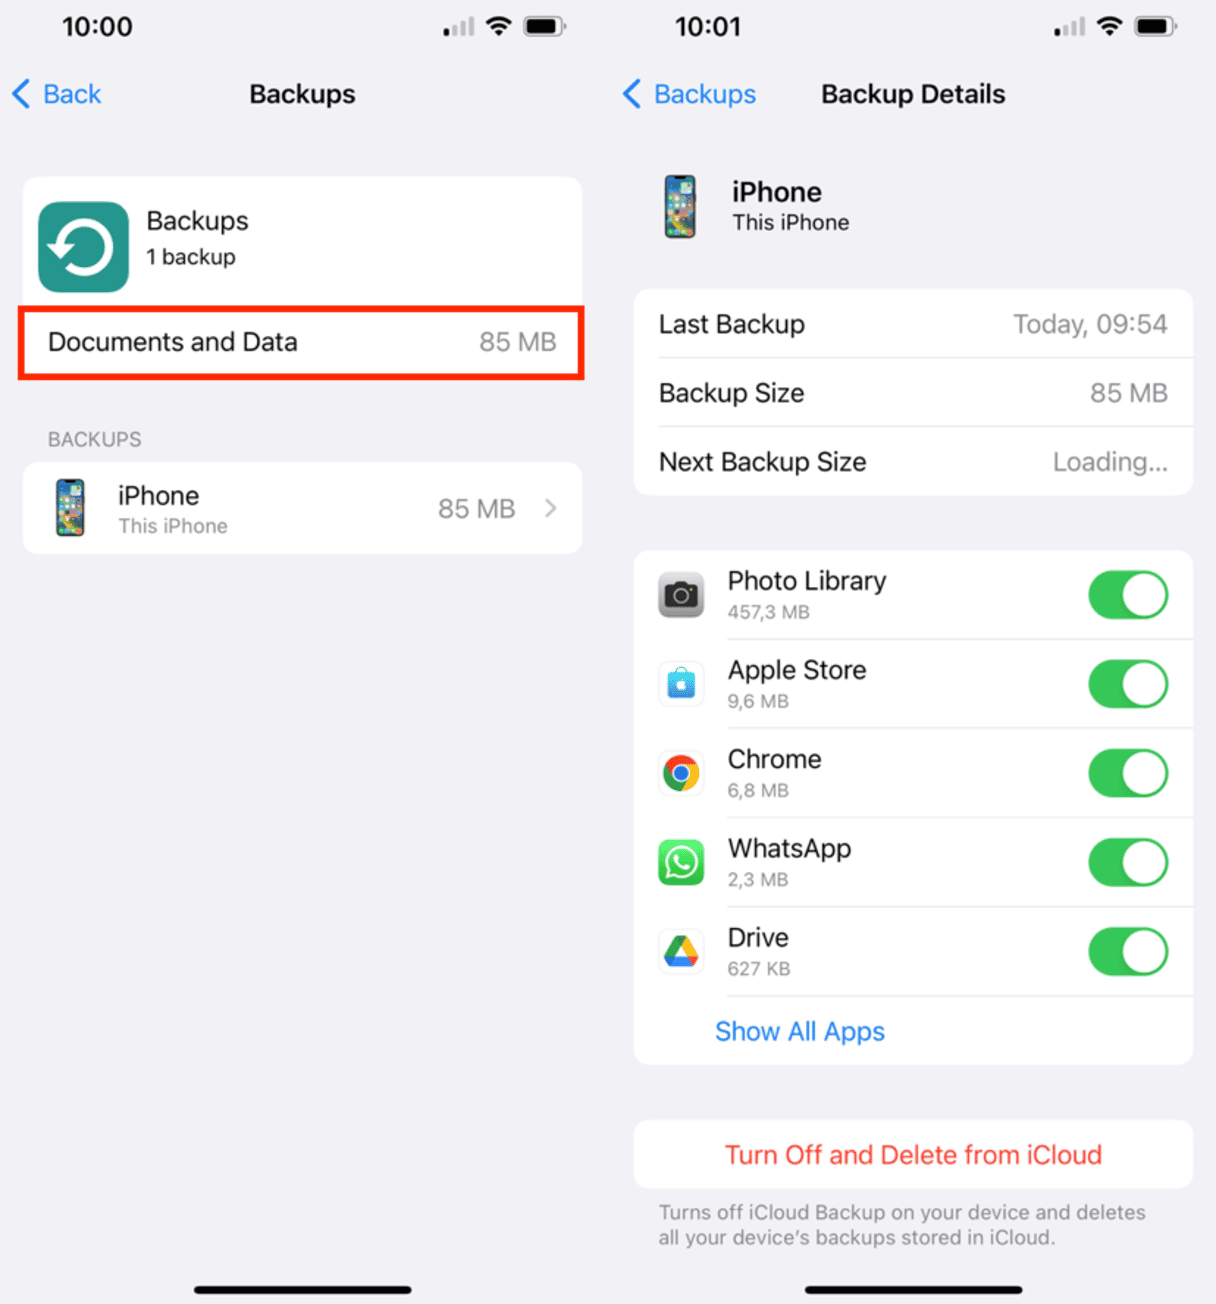
- Tap [your name] > iCloud > Manage Storage > Backups > This iPhone.
- Toggle off the apps you don’t want to be backed up.
To delete app data that’s already been backed up:
- Tap Settings > [your name] > iCloud > Manage Storage.
- Select the app(s).
- Tap Turn Off and Delete from iCloud.

3. Too little available storage on your iPhone
If your iPhone doesn’t have enough free space to perform optimally and is already running slow when doing other tasks, then it’s going to be slow when backing up your files. It’s recommended to keep about 10% of storage space free in order for your iPhone to run properly. So, for instance, if you have a 128 GB iPhone, you should aim to keep 12 GB to 13 GB free.
How to fix it: Free up some storage on your iPhone
A good place to start decluttering your phone is your photo library. CleanMy®Phone was mentioned earlier as an option to help you clean up space on iCloud, but if you don’t sync your photos to iCloud, it will still help save storage space on your iPhone. You can also go into Settings > General > iPhone Storage to see which apps are taking up the most space.
iPhone won’t back up to iTunes
Maybe iCloud backups haven’t worked for you in the past, or you just prefer to back up your iPhone to your computer. Fortunately, you can still do that with iTunes (on Windows and macOS Mojave or earlier).
But if you’re running into issues with the backup completing, there are a couple of things you can look into. Before you jump into any of the troubleshooting reasons below, though, we would be remiss not to recommend that you restart both your computer and iPhone at this point.
1. iTunes is out of date
If you do most of your work on your iPhone but don’t plug it into your computer very often, then there’s a possibility that your iTunes could be out of date and may be incompatible with your current iPhone and/or iOS.
How to fix it: Check for iTunes updates
Checking for iTunes updates will vary based on whether you’re using a Mac or PC.
For Macs:
- On your Mac, open the App Store.
- Click Updates.
- Install any available updates for iTunes.
For Windows computers:
- Open iTunes.
- In the menu bar at the top of iTunes, click Help > Check for Updates.
- Follow the prompts to install.
2. Bad USB connection
If your iPhone backup keeps failing in iTunes, one of the commonly overlooked causes could be the USB connection. USB ports and cables can short out over time, so even though your computer detects your iPhone, it may fail when attempting to transfer data.
How to fix it: Use a different USB cable and/or USB port
Try connecting your iPhone to a different USB port on your computer and then backing up. If the backup still fails, you’ll want to try using a different USB cable altogether.
It’s important to get in the habit of keeping your iPhone backed up and fixing any issues that occur with your backups. Your iPhone plays a pivotal role in your day-to-day life, and if anything happens to it, you should have peace of mind knowing that your data is safe.


