Ever since Apple introduced macOS Catalina, Mac and iPhone users have had to manage backups through Mac’s Finder instead of iTunes. In many ways, Finder is an easier system to navigate, but what happens when your Mac won’t recognize your iPhone?
Occasionally either your Mac, your iPhone, or the cable that connects the two decides to be glitchy, and you won’t see your iPhone listed on the sidebar menu in Finder. If you rely on manual backups instead of iCloud, not being able to use Finder can be a real hassle.
We’re going to cover a few tips and suggestions for what to do when your iPhone doesn’t show up in Finder.
How to fix an iPhone not showing up in Finder
The first thing you should do when your iPhone isn’t showing up in Finder is troubleshoot the issue so that you can pinpoint exactly where the connection is going awry. Are you using a faulty cable? Is your USB port malfunctioning? Is it your computer’s hardware or the software that is malfunctioning?
Here are a few steps you can take so that you know which component is giving you trouble.
Does your Mac recognize your iPhone?
The first step is to find out if your Mac recognizes your iPhone. If it does, then you will know that the problem isn’t with your hardware, your cable, or your USB port but with your Mac’s iOS.
Here’s how to check this by connecting your iPhone to your Mac:
- Connect your iPhone to your Mac using a USB or USB-C cable.
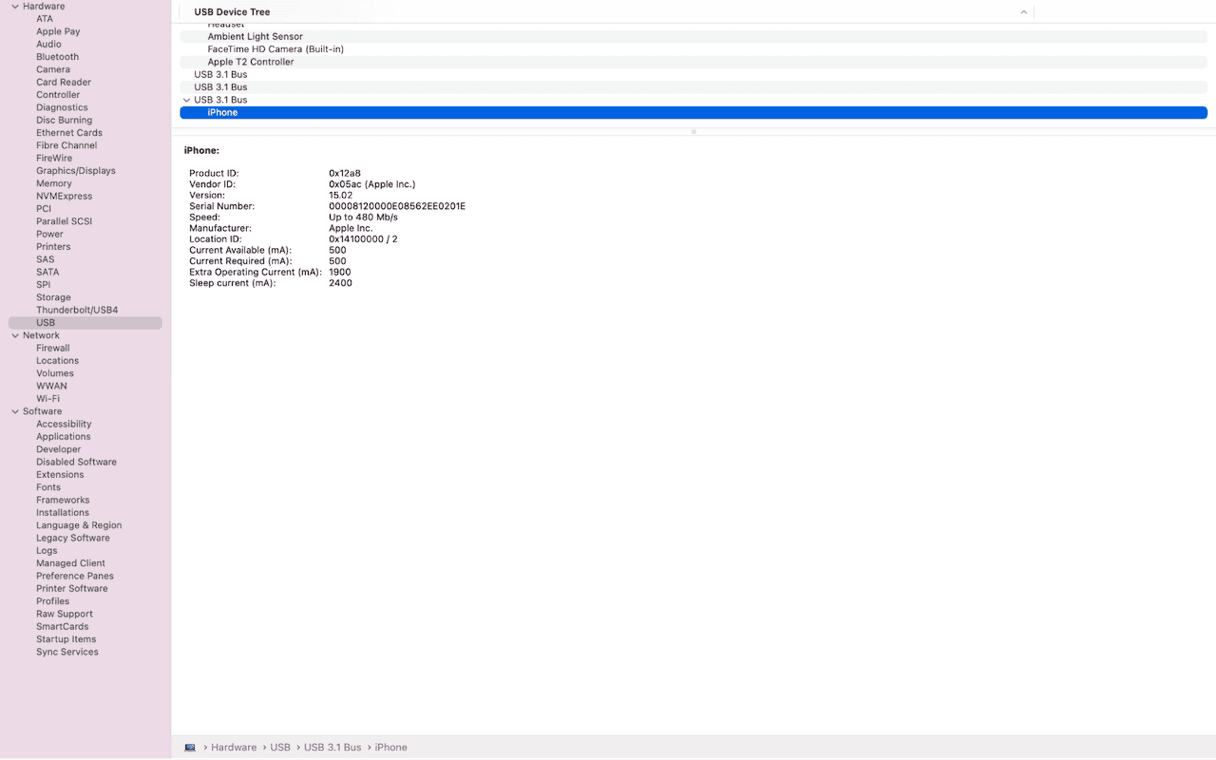
- Click on the Apple icon in the upper left, hold down the ‘option’ key, and select ‘System Information.’
- On the sidebar, click ‘USB.’
- Scroll the dropdown menu at the top of the screen and look for your iPhone under the USB ports listed.
- If you see your iPhone listed, then your Mac recognizes the phone, and this is likely a software issue.
- If you don’t see your iPhone listed, then a hardware component is malfunctioning — either the port on your Mac or the cable you are using.
Check your USB or USB-C Cable and port
If you didn’t see your iPhone listed in the step above, the next step is to replace your cable or borrow one from a friend and try again. Cables wear out with overuse, and it’s very likely if your iPhone isn’t showing up in your Mac’s system, your cable is to blame.
If you don’t have any luck with a new cable, try using a different port on your Mac. Ports can also suffer from overuse, or they may be stuffed with lint and dirt that needs to be gently removed with a toothpick.
Update your iOS and macOS to the latest version
If your iPhone was recognized by your Mac using the ‘System Information’ option above but is still not showing up in Finder, it’s most likely that the issue lies with the software in your Mac or your iPhone.
The next step is to ensure that both your iPhone and your Mac are running the latest operating system and to update them both if they’re not.
How to check and update your macOS
- Disconnect your iPhone from your Mac and close all tabs and programs.
- Click on the Apple icon in the upper left of your Mac’s screen.
- Click ‘About this Mac.’
- A window will open, telling you which macOS you are currently using.
- Now, go to System Settings > ‘General’ and click ‘Software Update.’
- Your Mac will run a check to ensure that your Mac is running the latest operating system. If it’s not, it will prompt you to ‘Upgrade Now.’
- Your Mac will update to the latest version of macOS and will restart. Connect your iPhone and open Finder.
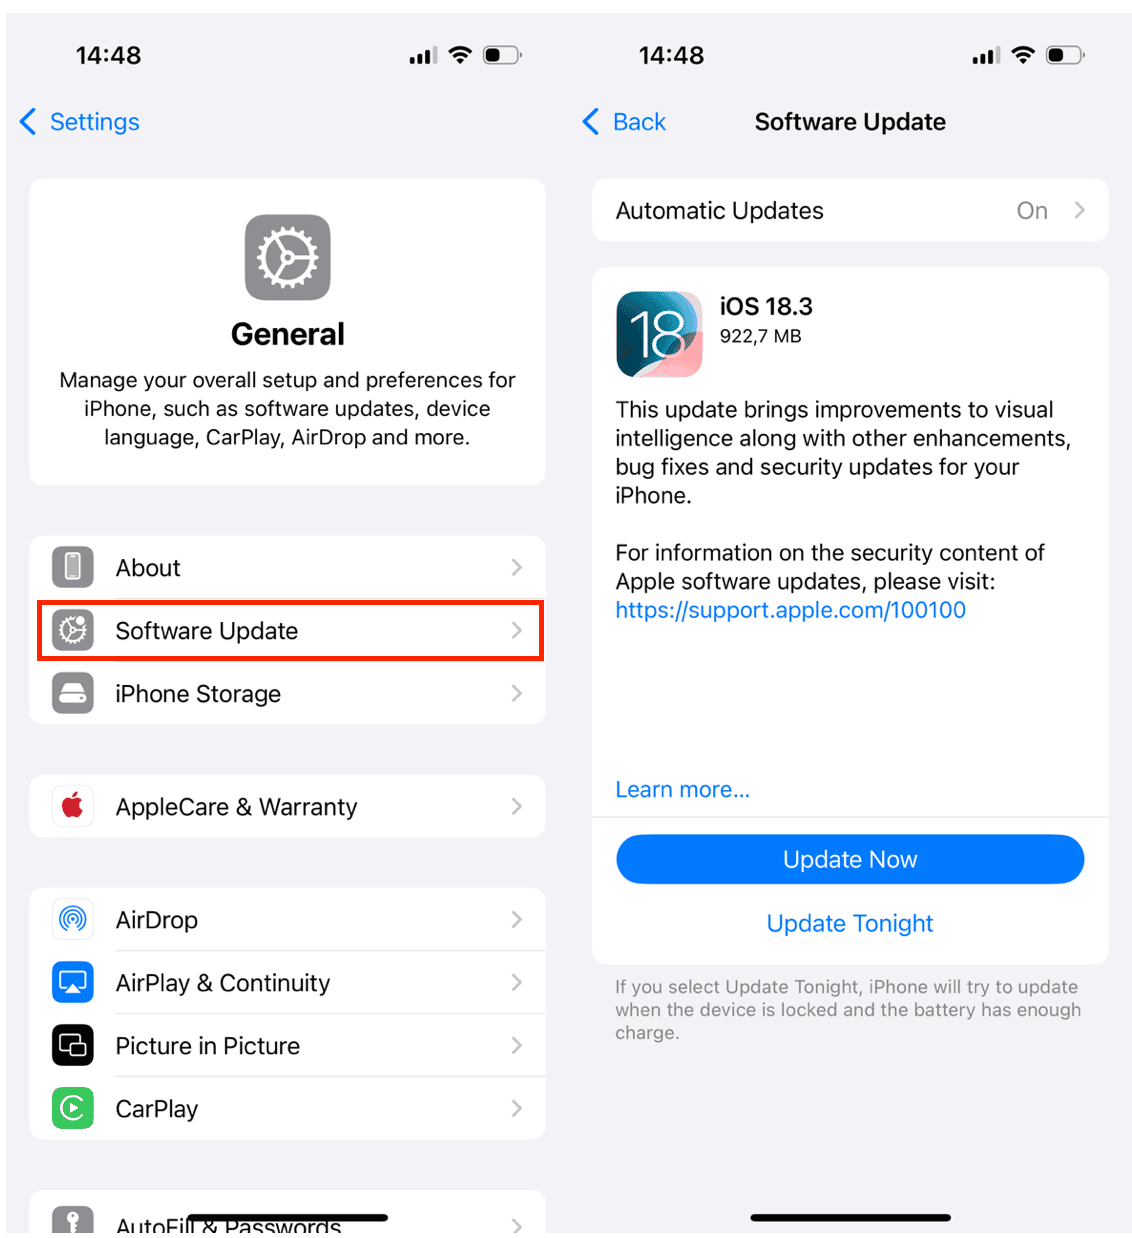
How to check and update your iOS on iPhone
Check to see if your iOS needs updating, too, as sometimes an outdated iOS can cause glitchy behavior. Here’s how to do it:
- Go to Settings on your iPhone.
- Tap on ‘General.’
- Tap on ‘Software Update.’
- If there are iOS updates available, they will show up on the next screen. Tap ‘Install Now’ and type in your passcode.
- Once your iPhone’s iOS has been updated, you can reconnect to your Mac and open Finder.
Reset your iPhone’s list of ‘trusted computers’
Your iPhone maintains a list of trusted computers that it pulls from when establishing a secure connection. Each time you connect your iPhone to a new computer, you are asked if you want to trust that computer. At any time, you can delete this list so that you are creating a new connection between your iPhone and your Mac. Here’s how to reset your iPhone’s list of trusted computers:
- Open your iPhone and go to Settings.
- Tap ‘General.’
- Tap ‘Reset.’
- Choose ‘Reset Location & Privacy.’
- Enter your passcode and confirm that you want to perform a reset.
- Reconnect your iPhone to your Mac using a USB or USB-C cable.
- When the pop-up alert appears on your iPhone, tap ‘trust’ to re-establish a connection.
- Open Finder and look for your iPhone.
If your iPhone isn't showing up in Finder, following the steps above should help re-establish a connection, allowing you to sync music, data, and perform updates. However, if your iPhone still doesn’t appear in Finder after completing these steps, it could indicate a hardware issue with your device.
As a last step, try connecting your iPhone to the Mac of a friend or family member. If you can see your iPhone in Finder, you know that the issue is with your computer. Reach out to Apple Support or visit an Apple Store for additional troubleshooting.


