If you use a MacBook and connect it to an external display to use with the lid open, or if you have a desktop Mac with a second, third, or even fourth display, you’ll know the frustration that comes with trying to position the Dock. It sits on one screen by default, but what do you do if you want it to display on the other screen? And once you’ve figured that out, what do you do if it jumps back to the original screen? And how do you set one of your screens to be the primary display? We’ll answer all of those questions and show you how to move the Dock to the other screen on your Mac.
Before we start, one thing we need to tell you: the Dock can only be displayed on one screen at a time. There’s no way in macOS to put the Dock on all the screens you’re using.
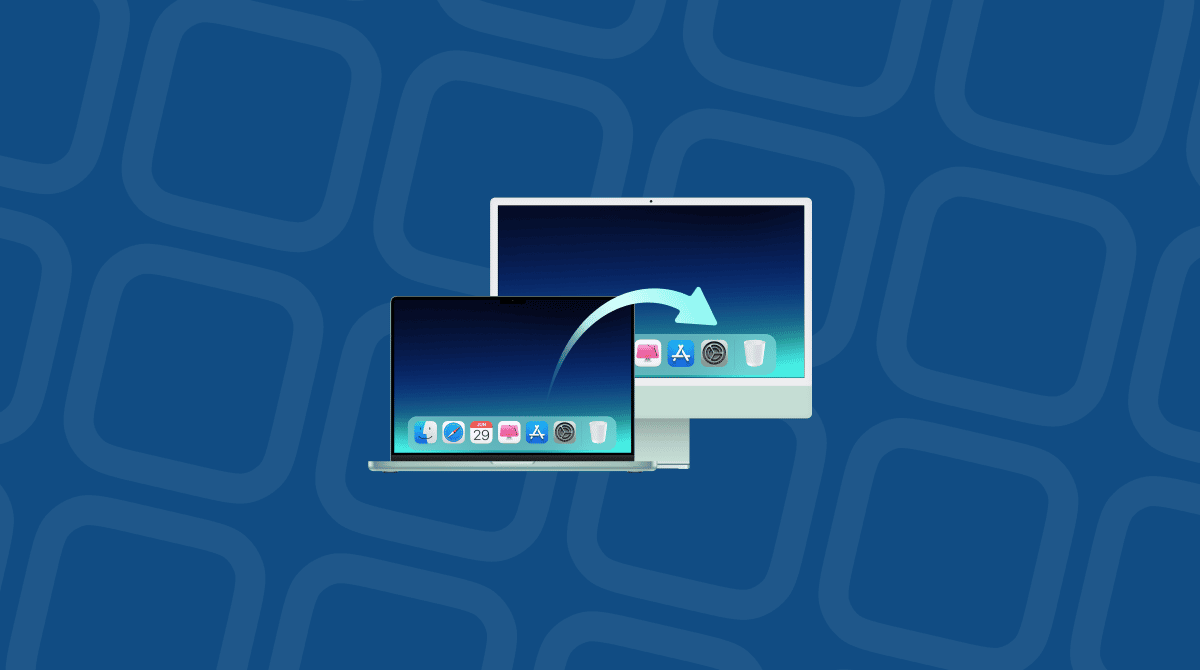
How to move the Dock to another screen
If you find yourself staring at two or more screens and the Dock is on the wrong one, here’s how to change that.
- If the Dock is not positioned at the bottom of the screen, you will need to put it there for this method to work. Go to Apple menu > System Settings > Desktop & Dock and set ‘Dock position on screen’ to Bottom.
- Move the cursor to the bottom edge of the screen you want to move the Dock to and hold it there for two or three seconds. The Dock should move to that screen.
- If the Dock doesn’t move to that screen, try moving the cursor down to the very bottom edge.

If, after step 3, the Dock still doesn’t move, it could be that your screens aren’t properly aligned in Display Settings. See the section below on how to fix problems to find out how to change that.
How to move the Dock by changing the primary display
This method is the one to use if you want to anchor the Dock to a different display permanently. The Dock is always shown on the primary display by default. So, by changing the primary display, you can change where the Dock appears. This is the most reliable method and the one that will stick, meaning you don’t need to use the cursor trick to get the Dock to move.
- Go to the Apple menu and choose System Settings > Displays.
- Click on the display you want to use as the primary.
- Select the dropdown menu next to ‘Use as.’
- Choose Main Display.

The Dock and the menu bar will move to that display, and new windows will also open on that display.
When to use this method instead vs the cursor trick:
- Use the change primary display method when you want to move the Dock to the other screen permanently; this is useful if you use a large display with a MacBook.
- Use the cursor trick if you only want to move the Dock temporarily, especially if you don’t want to change other display settings.
Note: When you change the primary display, the menu bar will also move to the other display. There’s no way to change that. So, if you want to keep the menu bar on the current screen, this method may not work for you.
Why the cursor method sometimes fails — and how to fix it
There are a few possible reasons for the cursor method not working as it should. If that’s happening for you, it’s probably because of one of the following:
- The Dock is not at the bottom of the screen. The cursor method only works if the Dock is at the bottom of the screen. If it’s not, go to System Settings > Desktop & Dock > Position on screen and choose Bottom from the menu.
- Display alignment is off in Arrange settings. The two displays must be aligned perfectly in Display Settings so that their bottom edges are exactly in line. Otherwise, this method won’t work. Go to System Settings > Displays > Arrange and drag the displays into position so that their bottom edges align with each other.
- The cursor passes through too quickly. If you just drag the cursor over the bottom edge of the screen, the Dock won’t move. You need to hold the cursor at the bottom of the screen for two or three seconds.

How to stop the Dock jumping between screens uninvited
So, you’ve moved the Dock to the screen you want it on and are using your Mac quite happily. Then, for no other reason you can think of, the Dock jumps back to the other screen. Then it jumps the other way again. What’s going on? Believe it or not, this is a feature, not a bug. The reason it’s happening is that the cursor is lingering at the bottom of the screen that doesn’t have the Dock on it. macOS interprets this as a request to move the Dock to that screen, so that’s what it does. In effect, you are accidentally employing the ‘quick’ method of moving the Dock. So, what can you do about it?
Aside from not letting the cursor linger at the bottom of the screen, there are a few steps you can take to avoid it happening.
- Move the Dock to the side of the screen. Remember we said that the ‘quick’ method only works when the Dock is at the bottom? Well, moving it to the side prevents it from moving accidentally. Go to System Settings > Desktop & Dock >Position on screen and choose Left or Right.
- Misalign the screens. Similarly, the ‘quick’ method only works when displays are aligned at the bottom edge. So, go to System Settings > Displays and drag one display slightly up or down so that they are no longer aligned.
- Check cable connections. If you have used the second method and the Dock moves, it could be that your Mac stopped sensing it for a brief time. Check that the cable connecting the display to your Mac is secure. And turn the display off and then on again.
Can you show the Dock on all screens at once?
In short, no. Apple made a conscious design decision — presumably for space and aesthetic reasons — that the Dock can only be on one screen at a time. The best workaround is to use the ‘quick’ method to swap between screens.
Keep your multimonitor Mac running smoothly with CleanMyMac
Running multiple displays on your Mac is more demanding of its CPU, GPU, and RAM. If it’s already weighed down by junk files, heavy background processes, and bloated caches, using multiple displays could cause slower frame rates, laggy performance, and slow window rendering.
The solution is to deal with all that junk and those background processes. CleanMyMac’s Smart Care can identify them quickly and help you remove them. And its Menu App allows you to keep track of the pressure on your Mac’s CPU and RAM so that you can see what apps and processes are placing the heaviest demands on your Mac’s resources. The result is a cleaner Mac that handles multiple displays without a problem. CleanMyMac makes it easier to achieve that without manual effort.

Start your free CleanMyMac trial — see how easy it is to keep your Mac running smoothly across every screen with its help.
Moving the Dock to a different screen on your Mac is easy once you know how. But the bigger challenge is keeping it there. The cursor method is quick but not permanent, moving the Dock to the side of the screen is a workaround when it doesn’t stick, and the primary display method is permanent. And for keeping your Mac performing well across multiple screens, CleanMyMac is the maintenance tool that works quietly in the background. Try CleanMyMac free.