Despite the popularity of cloud storage services like iCloud and Google Drive, external storage devices still have an important role to play for many people. Those external storage devices could take the form of a USB stick, external hard drive or SSD, an SD card, or even a NAS box. Most of the time, external storage just works: you connect the device to your Mac, it appears in the Finder, and then you access it like any other folder on your Mac. But what if it doesn’t appear in the Finder? We’ll show you what to do in this article as we show you how to fix SanDisk not showing up on Mac.
What is SanDisk?
Sandisk is a storage company that makes solid-state storage devices like flash drives, external SSDs, and memory cards in SD and Compact Flash formats. Owned at one time by Western Digital, SanDisk still makes solid-state storage under the WD branding, primarily for its line of internal SSDs for PCs and games consoles. However, Mac users are most likely to use its external SSDs or USB flash drives.
Why is SanDisk not showing up on my Mac?
The answer to that question depends on several factors, including the type of storage device you’re using. Here are a few common factors that may cause the issue:
- A faulty connection to a USB external SSD (including a faulty cable)
- A corrupt USB stick
- An incompatible format: A Compact Flash or SD card configured in a format that your Mac can’t read
- Misconfigured Finder settings
- A bug in the version of macOS running on your Mac
How to fix SanDisk not showing up on your Mac
1. Check Finder’s settings
If the issue you’re facing is that a SanDisk external SSD or USB stick doesn’t show up on your Mac’s desktop, open a new Finder window and check to see if it appears in the sidebar. If it does, follow the steps below to make it appear on the desktop:
- Click the Finder icon in the Dock.
- Choose the Finder menu and go to Settings > General.
- Select the checkbox next to External disks.
- Quit Settings.

The SanDisk SSD or USB stick should now appear on your Mac’s desktop.
If the SanDisk doesn’t appear in a Finder window sidebar, follow the steps below.
CleanMyMac’s Menu App allows you to keep an eye on your external storage, like SanDisk SSDs. With the storage device connected to your Mac, click a little iMac icon in the menu bar, and you’ll see it there. Click it to find out how much free space it has. If you click Organize, you’ll be taken to CleanMyMac’s My Clutter feature to scan it and clean it up. Get your free CleanMyMac trial — test it for 7 days free.

2. Disconnect the device
Disconnect the USB stick or cable from your Mac and reconnect it. Then, wait for a few seconds. If it still doesn’t show up.
If the disk is connected via a hub or dock, try connecting it directly to your Mac instead, if you can. If the issue is with a memory card, this may not be possible.
3. Remove the SanDisk and restart your Mac
Restarting your Mac clears out temporary files and frees up RAM. On Macs with Apple silicon, it also performs checks on your Mac’s startup disk and fixes any problems it finds as well as resets NVRAM and the system management controller (SMC).
4. Update macOS
If SanDisk still doesn’t appear, check whether there are any updates available for macOS:
- Click the Apple menu and choose System Settings > General > Software Update.
- Wait while it checks. If there is an update available, follow the onscreen instructions to install it.

5. Mount the disk via Disk Utility
If you’ve installed any available updates and the SanDisk drive still doesn’t show up on your Mac, the next step is to try to mount it in Disk Utility:
- Go to Applications > Utilities and open Disk Utility.
- If you see the SanDisk in the sidebar, select it.
- Click Mount in the toolbar.
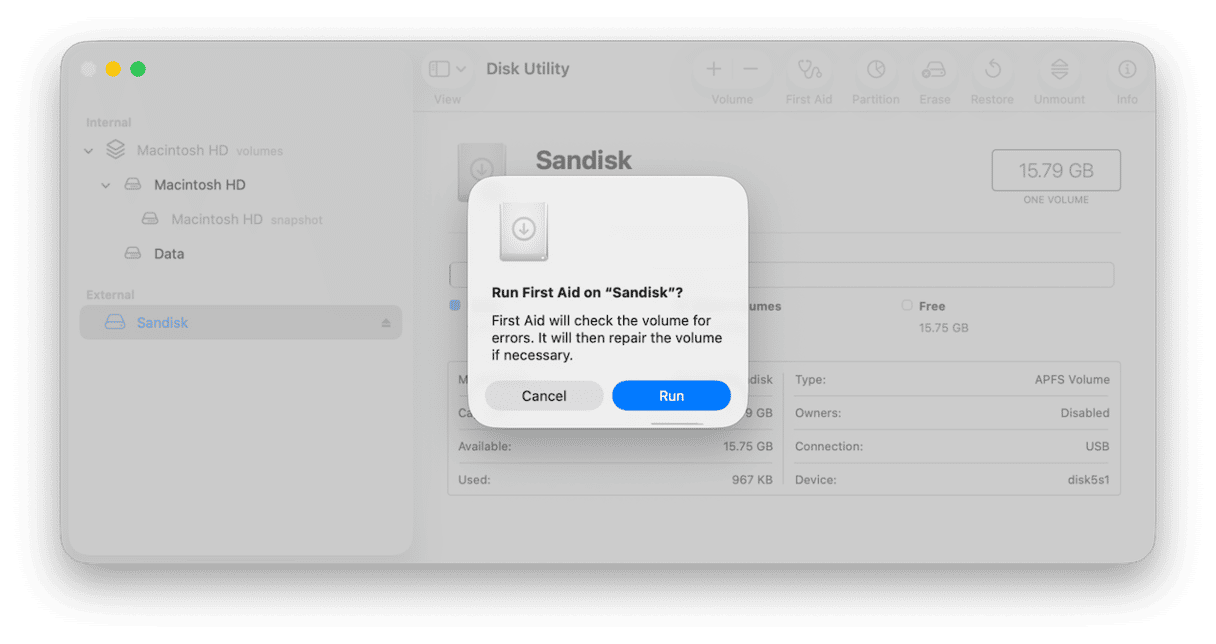
- If Mount is grayed out, or nothing happens when you click it, select the SanDisk again and choose First Aid. Confirm that you want to repair the disk and then wait for Disk Utility to do it.
- If Disk Utility reports that it has successfully repaired the disk, check to see whether it is now mounted in the Finder.

6. Use Terminal to mount the disk
If the disk doesn’t show up in Disk Utility or Disk Utility can’t mount or repair it, the next option is to try to mount it in Terminal:
- Go to Applications > Utilities and open Terminal.
- Type the following command:
diskutil listand press Return. You will see a list of devices connected to your Mac. Look for a disk with SanDisk in its name (or whatever you have named the disk previously). If you see it, note its identifier, e.g., disk 1s2. - Type the following command:
diskutil mount /dev/[identifier]where [identifier] is the name you noted in step 3. In our example, the command would look like this:diskutil mount /dev/disk1s2

7. Try mounting it on a different computer
If you have another Mac, connect the SanDisk drive to that and check if it mounts. Alternatively, connect it to the Windows PC and check if it works. If it does, it’s likely that it’s formatted in a way that your Mac can’t read.
If Windows reports an error on the disk and tries to repair it, let it do that. When it’s done, copy the data off it while it’s connected to the PC and reformat it on the Windows machine as exFAT. When that’s done, connect it to your Mac again, and it should mount. You can then reformat it in Disk Utility as APFS if you want to.
8. Boot into safe mode
If you don’t have access to another Mac or a Windows PC to check if the disk works on those, you can try booting your Mac into safe mode and checking whether it shows up. Safe mode loads only those extensions that are necessary for your Mac to start up. So, if an extension is causing a problem that is preventing the SanDisk from showing up, it should mount in safe mode.
If it does, you can boot your Mac normally, go to System Settings > General > Login Items & Extensions, and turn off all Extensions. Then, turn them back on again, one by one, rebooting each time until the SanDisk fails to show up again. You will then have found the extension that’s causing the problem.

The process for booting your Mac into safe mode is different depending on whether it is an Intel-based or Apple silicon Mac. You can find the steps for your Mac on Apple’s website here.
9. Reinstall macOS
If booting into safe mode doesn’t work, you really need the contents of the SanDisk and don’t have access to another computer, you can try reinstalling macOS. However, you should only do this if you have confirmed that the issue is not with the drive itself.
If the issue is with your Mac, reinstalling macOS should fix it. Make sure to back up all your data first, preferably using Time Machine, so you can restore it quickly if you need to. Once you’ve done that, follow the steps below to reinstall macOS:
- Boot your Mac into recovery mode.
If you have an Intel-based Mac, shut it down, press and hold Command-R, and then press the power button. Choose a Wi-Fi network if you’re asked to, then choose your startup disk and log in.
If you have a Mac with Apple silicon, shut it down and then press and hold the power button until you see Loading Startup Options. Choose Options when you see the gear icon. Click Continue. Choose your startup disk and then log in. - In both cases, you will see the macOS Utilities screen.
- Choose Reinstall macOS and follow the instructions on the screen.
- Once macOS has reinstalled, you will be guided through the process of setting up your Mac, and at that point, you will be able to restore data and/or settings using Time Machine.

What’s the point in backing up your Mac with tons of junk? These files — old temporary and cache files, application binaries you don’t need, language files for languages you don’t use, or settings files for applications no longer on your Mac — take up lots of space on your startup disk, sometimes several gigabytes’ worth. So, get rid of it before a backup. Sadly, it’s not easy since these files are stored in dozens of different folders in different places on your Mac. But you can deal with it if you use CleanMyMac’s Cleanup feature.

It scans your Mac, looking for all those files, and when it’s done, allows you to get rid of them all in one go or review what it has found and decide for yourself what to get rid of and what to keep. All you have to do is open CleanMyMac and click Cleanup > Scan > Clean. The best part? You can test this and other tools for 7 days — get your free trial here.
10. Recover your data
If the SanDisk doesn’t show up on another Mac or on Windows, it suggests there’s a significant problem with it. If you have important data on it, your focus now should be on recovering that data. The simplest way to do that is to use specialist data recovery software like Disk Drill. Many data recovery applications allow you to scan a disk for free, and you only need to pay if you want to recover data it finds.
Sometimes, even if the drive doesn’t show up in the Finder or Disk Utility, the data recovery app is able to see it and recover data from it.
11. Seek professional assistance
If the SanDisk device doesn’t show up in data recovery software, then your final option is to take it to a data recovery specialist. This is likely to be expensive, so you’d only want to do it for data that is very valuable, but the chance of success is good.
There are lots of reasons why an external storage device may not appear on your Mac when you connect it, ranging from the way you have configured the Finder to a problem with the device itself. Follow the steps above to fix it when SanDisk is not showing up on your Mac.