Did you know that your iPhone is capable of relaying your exact location to a friend or family member? While you may think you won’t ever require this functionality, it can serve as an important safety feature when you are traveling, hiking, or camping. Sharing your location on iPhone is also great for non-emergency situations, like when you need directions, are looking for friends at a festival, or want to keep tabs on your iPhone-toting teenagers.
This article will teach you how to share location on iPhone through text and a variety of apps. We’ll also go over how to stop sharing location information so this sensitive data is always within your control.
How to send location on iPhone
You can share your location using iMessage, Google Maps, Apple Maps, Find My app, Whatsapp, and more. Here’s an overview of all the different ways you can share location on iPhone.
While the easiest way to send your location will be with other iPhone users, it’s possible to send your location to an Android phone in a few different applications.
How to share my location on iPhone using iMessage or text
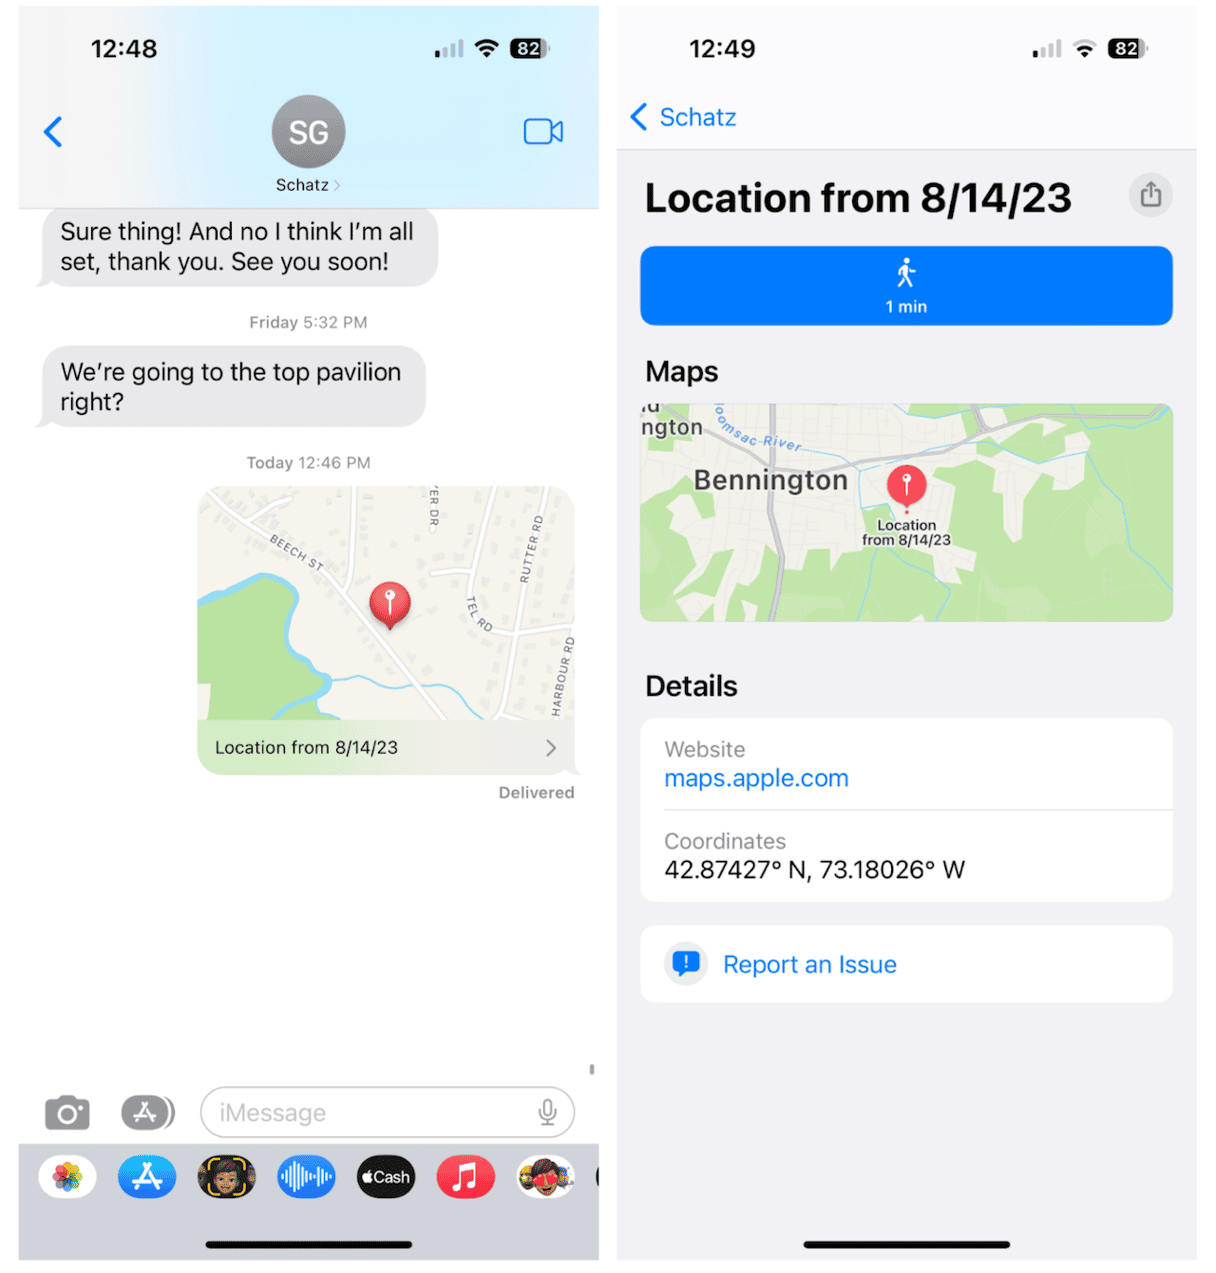
If you want to text someone your exact location, you’ll find this method one of the easiest to do quickly. Follow these step-by-step instructions and learn how to send location on iMessage:
- Open up a text message on your iPhone and tap the recipient’s name or profile picture.
- Tap ‘Send My Current Location.’
- A map of your location will be sent to the recipient.
- iPhone recipients just need to tap on the map thumbnail to be redirected to Apple Maps, where they can quickly get directions to your location. Android users will get a link to Apple Maps directions, but they will have to use it in a browser.
If you want to share a location that is changing or for a longer period of time:
- Open a text conversation and tap on the recipient’s name or profile image.
- Tap ‘Share My Location.’
- A pop-up menu will open asking if you want to ‘Share for One Hour,’ ‘Share Until End of Day,’ or ‘Share Indefinitely.’ Choose the most appropriate option for your situation.
- iPhone users will receive a notification that you have shared your location, and it will be added to their Find My app.
Note: This functionality only works when continuously sharing your location with other iPhone users. It will not work with Android phones.
How to use Share My Location on iPhone via the Find My app
You can use Find My to locate the devices associated with your Apple ID as well as to share your location with friends and family. This feature only works with other iPhone users with access to the Find My app.
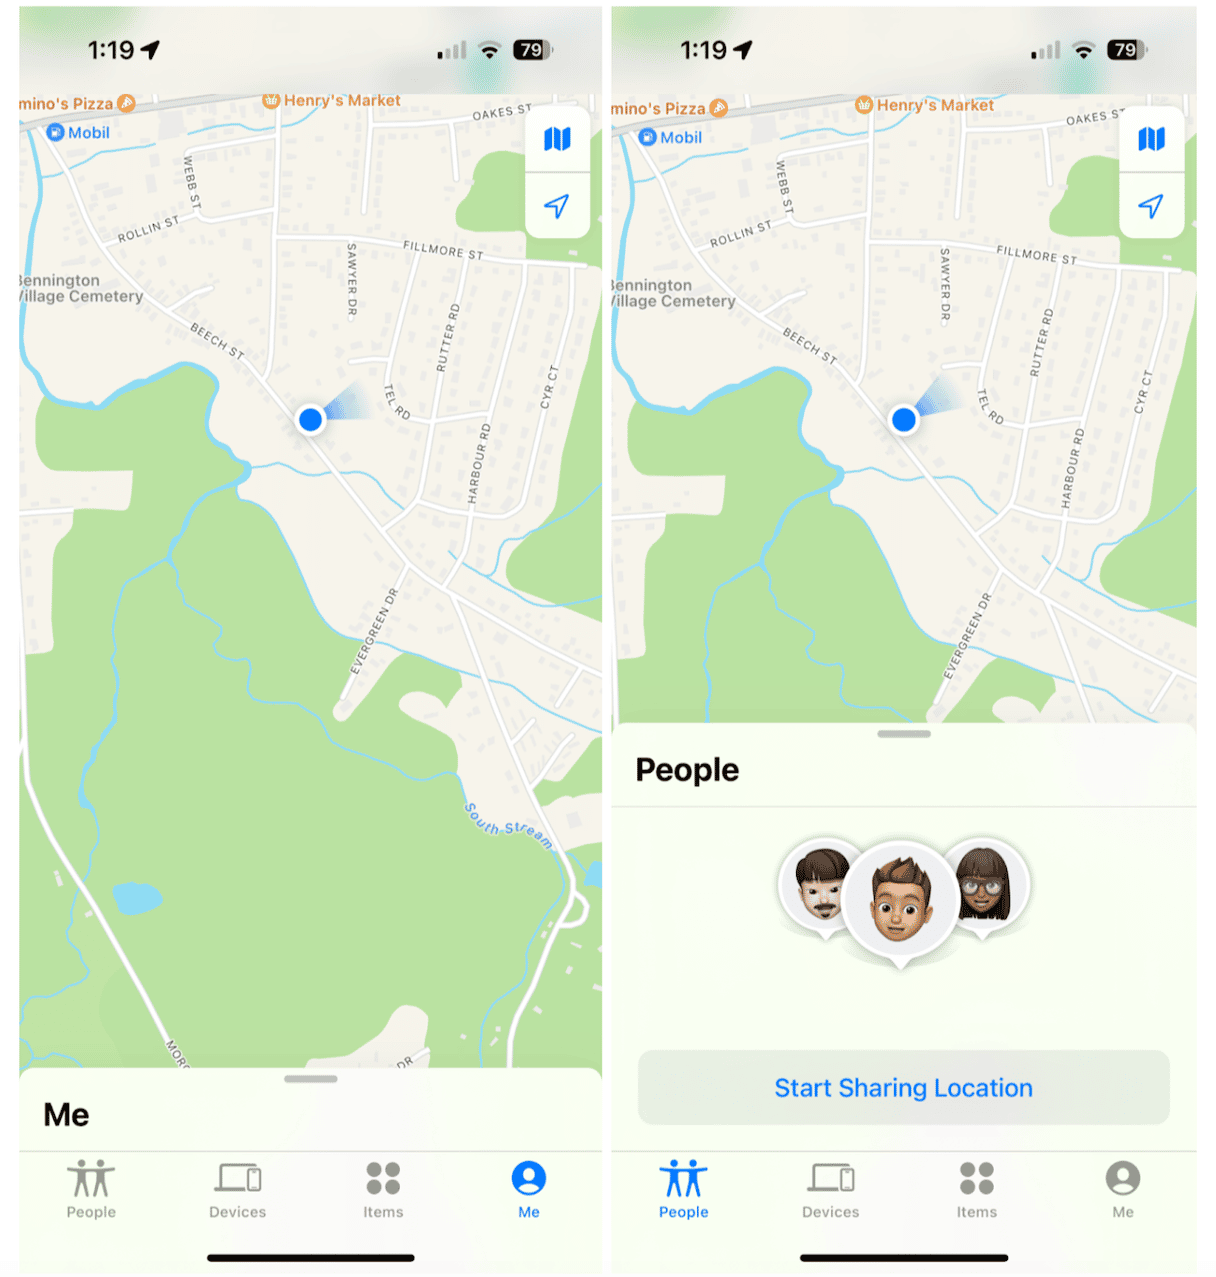
Here’s how to share your location using Find My:
- Open the Find My app on your iPhone.
- Tap on ‘People.’
- Tap ‘Start Sharing Location.’
- Choose one of the contacts from the drop-down menu to start sharing your location.
- Tap ‘Send.’
- A menu will appear asking how long you would like to share your location. Select the most appropriate option for your situation.
- You will receive a notification that states who you are sharing your location with. The recipient will also receive a notification, and your location will appear in their Find My app.
How to share your location on iPhone using Family Sharing
Family Sharing is a useful Apple feature that allows you to share various subscriptions and purchases with up to five people in your family. If you are already using Family Sharing, you can set it up to keep track of your location so that those same family members know your location. This feature only works with other iPhone users.
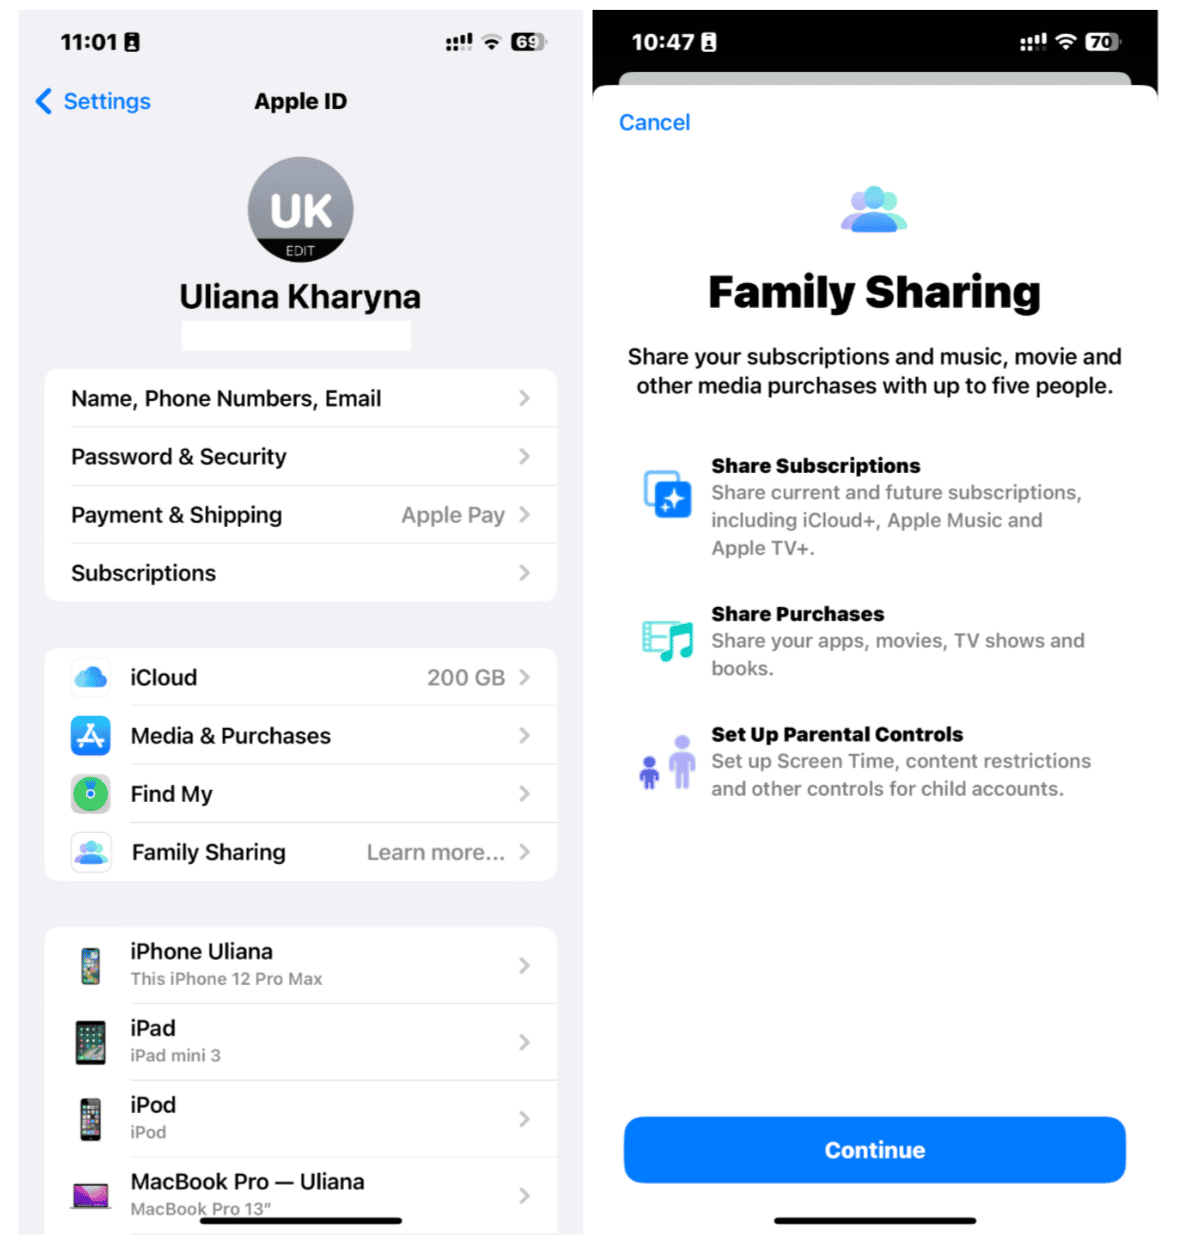
Here’s how to set up Family Sharing for location services:
- Open your iPhone and navigate to Settings.
- Tap on your Apple ID username.
- Tap ‘Family Sharing.’
- If you have never used Family Sharing before, you will have to invite them to join your ‘family.’ Choose family members to invite and tap ‘Send.’ They will receive a message to accept the invitation.
- Once you start using Family Sharing with someone, tap on ‘Location Sharing.’ You can always reach this by tapping Settings > Apple ID > Family Sharing.
- Tap ‘Share Location’ again. This will share your location with everyone in your Family Sharing group.
- From this same menu, you can easily toggle ‘Automatically Share Location’ on or off.
- Anyone connected to your account through Family Sharing will now be able to see you in their Find My app or when they tap on your profile in iMessage.
How to send your location on iPhone using Apple Maps
If you use Apple Maps as your navigational tool, you can use it to send your location details and your ETA if you are heading somewhere specific. Here’s how to share your location using Apple Maps:
- Open your iPhone and navigate to Apple Maps.
- Pull up from the bottom of the screen to open the search panel, and keep pulling up until you see the menu at the very bottom of the panel.
- Tap ‘Share My Location.’
- Choose from your Contacts or tap ‘Messages’ to add someone to share your location with.
- iPhone users will receive a thumbnail of where you are on the map. Android users will receive a link to your location that will open up in a browser.
If you are in the process of navigating using Apple Maps and you want to share your estimated time of arrival:
- Swipe up from the bottom of the screen to open the menu.
- Tap ‘Share ETA.’
- Choose a recipient from your contacts or tap ‘Open Contact’ to choose someone from your list. Now the recipient will be notified of your ETA via text message.
How to send your location on iPhone using Google Maps
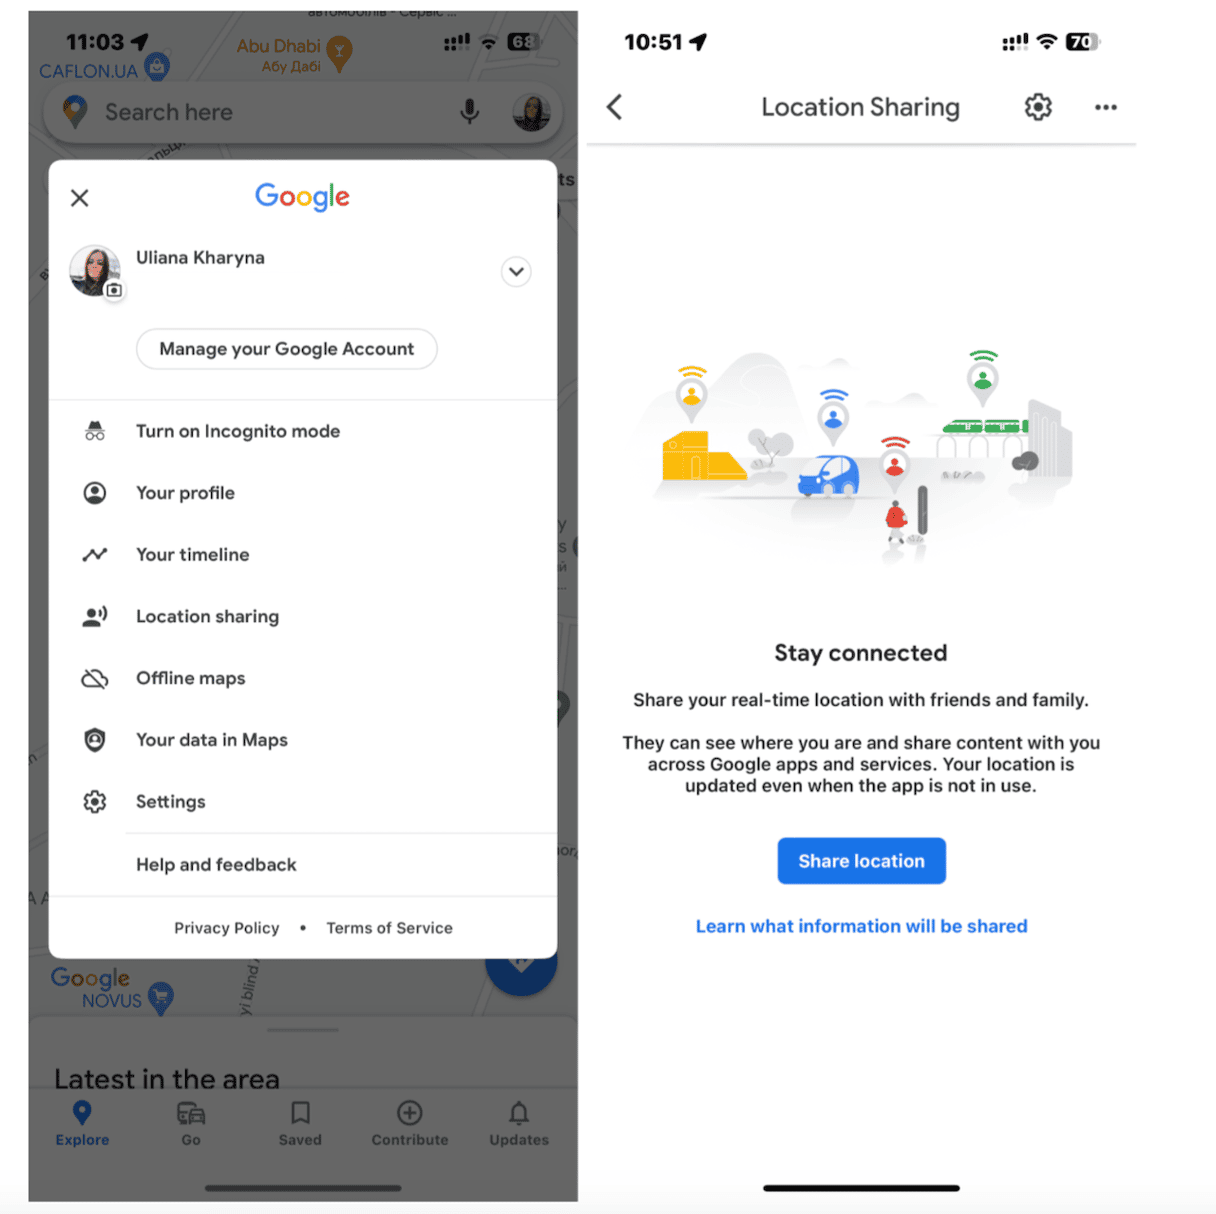
Many iPhone and Android owners use Google Maps for navigation. To share your location using Google Maps, you will have to log into your Google Account using Google Maps. With Google Maps open, follow these steps to share your location:
- Tap on your profile image within Google Maps.
- Tap ‘Location sharing.’
- Tap ‘Share location’ on the next screen.
- From the drop-down menu, choose whether to share your location for 1 hour or until you turn it off.
- Scroll through your contacts to choose the recipient or choose ‘More options’ to choose someone from your contacts.
- Your chosen recipient will receive a Google Maps notification as well as an email or text telling them to view your location on Google Maps. If the recipient doesn’t have Google Maps on their phone, they will receive a link that will take them to Google Maps in their browser.
How to share your location on iPhone using WhatsApp
WhatsApp is a popular messaging app that can be used internationally and is the preferred texting app for many people around the world. Here’s how to share your location using the Live Location feature on WhatsApp:
- First, you have to give permission for WhatsApp to access location services. Go to Settings on your iPhone.
- Tap ‘Privacy,’ then ‘Location Services,’ then ‘WhatsApp,’ then ‘Always.’
- Open WhatsApp and open a group or individual chat.
- Tap ‘Attach +’ and select ‘Location.’
- Tap ‘Share Live Location.’
- Choose the length of time you want to share your location with the recipient.
- Add a comment if desired.
- Tap ‘Send.’
How to stop sharing your location on iPhone
While you can’t unsend a text, message, or email with your past locations, you can stop sharing live updates of your location. Here’s how to do it using the various apps mentioned in this article.
- Using Find My: Tap on Settings > Apple ID > ‘Find My’ and toggle off ‘Share My Location.’ Alternatively, you can open the Find My app and choose the person you want to stop sharing your location with. Swipe up on their name and tap ‘Stop Sharing My Location.’
- Using Family Sharing: Tap on Settings > Apple ID > Family Sharing. Toggle off Automatically Share Location.
- Using Google Maps: Open Google Maps and choose your profile picture. Tap ‘Location Sharing’ to open up a list of recipients that you’ve shared your location with. Tap the person you don’t want to share with and then tap ‘Stop’ at the bottom of your screen.
- Using WhatsApp: Open the group or individual chat where you shared your location. Tap ‘Stop sharing’ and then ‘Stop’ on the next screen. You can also disallow location-sharing permissions for WhatsApp by going to Settings > WhatsApp > Permissions > Location > Don't Allow.
Sharing your location on iPhone is an easy way to find your friends when traveling and to stay safe while traveling alone. No matter how you choose to share your location, you can do it easily using your iPhone.


