It’s safe to assume that your whole photo library lives on your phone. When you get a new phone, transferring over your pictures is one of the most important tasks. But if you don’t know what to do or if you run into sync issues, it can all be a little headache-inducing.
Don’t worry — keep reading for instructions and helpful tips to keep you sane during this process. Whether you’re going from Android to iPhone or iPhone to Android, this article has you covered.
Before you start transferring photos from iPhone to Android
If you’re making the jump from iPhone to Android, you can naturally expect a bit of a learning curve for your new device, but there are a couple of straightforward ways you can move your photo library over. And thanks to cloud services, you can even transfer your pictures without connecting either phone to a computer.
Declutter before you transfer your pics
The larger your photo library is, the longer it will take to move it from your iPhone to another phone. Clean up the clutter with an app like CleanMy®Phone, which scans for duplicates, blurry pics, and old screenshots to help you quickly delete them.
How to transfer photos from iPhone to Android without a computer
Another way to move your pictures from your iPhone to an Android is by using Google Photos. The nice thing about using a cloud service like Google Photos is that you’re also backing up your pictures, in case something happens to them later.
To get started using Google Photos to transfer your library:
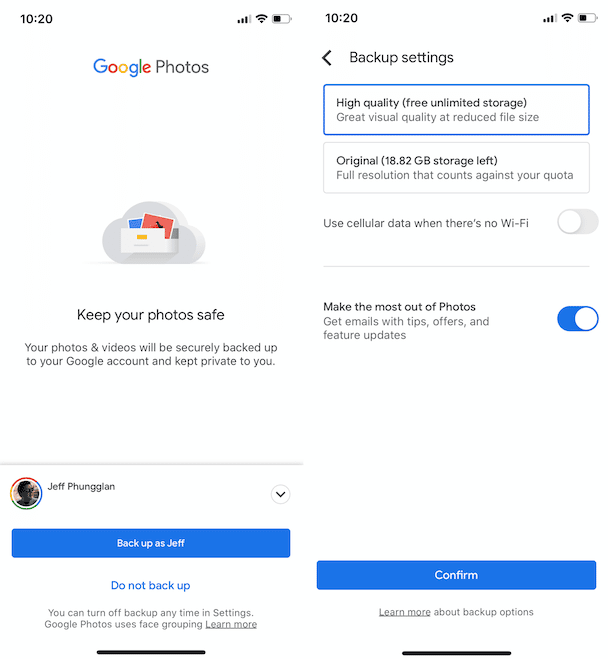
- Download and open Google Photos on your iPhone.
- Tap “Get started.”
- Tap “OK” when asked to allow Google Photos to access your photos.
- Tap “Continue.”
- Select “High quality” and then tap “Continue.”
- Tap “No thanks,” and wait for your photos to upload.
- While your pictures are uploading, download Google Photos on your Android.
- Open Google Photos.
- Sign in to your Google account.
- Choose “High quality” and then tap “Confirm.”
Depending on how big your photo library is, it can take some time for everything to sync properly.
Transfer photos from Android to iPhone
Making the transition from Android to iPhone can be daunting enough without worrying about how you’re going to transfer everything over. But thankfully, there are a couple of easy ways to ensure that your photo library follows you to your new iPhone.
How to transfer pictures from Android to iPhone with a computer
Using a computer to transfer photos from your Android to your iPhone is one of the fastest and easiest ways to get it done. If you’re using a Windows computer, you need to make sure that you have the correct drivers installed to see your Android. And on a Mac, you need to install Android File Transfer. After that:
- Connect your Android to your computer.
- Open My Computer > Your Android device > DCIM > Camera. (If you’re on a Mac, open Android File Transfer, then go to DCIM > Camera.)
- Choose the photos and videos that you want to move and drag them to a folder on your computer.
- Disconnect your Android and connect your iPhone to your computer.
- Open iTunes.
- Click on the device icon at the top.
- In the sidebar on the left side, click “Photos.”
- Check the box next to “Sync Photos.”
- Select the app or folder that you want to sync from.
- Choose to sync all photos and albums or selected albums.
- Check “Include videos.”
- Click “Apply.”
How to transfer photos from Android to iPhone using Google Photos
Cloud services like Google Photos are not only great for backing up your information, but they also make it easier to transfer your data. Fortunately, just as if you were going from iPhone to Android, you can use Google Photos to send your photo library from your Android to your iPhone.
If you weren’t already using Google Photos, you can download Google Photos to your Android phone and start transferring your pics.
- On your Android, open Google Photos.
- Sign in to your Google account.
- Choose “High quality” and then tap “Confirm.”
- Wait for your photos to upload.
- While they are uploading, download Google Photos on your iPhone and open it.
- Tap “Get started.”
- Tap “OK” when asked to allow Google Photos to access your photos.
- Tap “Continue.”
- Select “High quality” and then tap “Continue.”
- Tap “No thanks” to finish the setup and start the download of your pictures.
Remember, it can take some time to transfer your entire photo library over, depending on how many pictures and videos you have.
FAQs
How can I transfer photos from iPhone to Android using Bluetooth?
Unfortunately, there is no way you can transfer any files from iPhone to Android and vice versa. Those are two different operating systems and the only way is to use third-party tools like Google Photos, Dropbox, email or some apps like MobileTrans.
Can you use AirDrop between iPhone and Android?
Because AirDrop is a proprietary feature used only across Apple devices, you sadly won’t be able to use it with your Android. That being said, some other apps and websites offer similar functionality, such as Snapdrop.
Whether you’re going from iPhone to Android or Android to iPhone, you hopefully found this article informative. You can use a cloud service like Google Photos to move the pictures over, or you can use an app such as MobileTrans. No matter which method you choose for transferring your photos, they’ll all end up on your new device.


