Apple Music is both the name of Apple’s streaming music service and the app that plays music on your Mac, which can be a little confusing. If all you use the Music app on your Mac for is to play music stored on your Mac or an external drive, you don’t need to worry about authorizing or authorizing your Mac. However, if you have downloaded music from the iTunes Store and want to play it, you will need to authorize it. In this article, we’ll show you how to authorize your Mac for Apple Music and how to de-authorize it again if you need to.
What does authorizing a MacBook for Apple Music mean?
Apple places a limit on the number of devices on which you can play downloads you’ve purchased on iTunes. That limit is currently five, and in order to keep track of how many devices you’re using, it requires you to authorize them and associate them with your Apple ID. The devices you authorize for Apple Music are not necessarily the same as the devices that are associated with your Apple ID for other services like Find My and iCloud, though there is likely to be some crossover. Also, you only need to authorize a device if you want to play music you’ve downloaded from the iTunes Store, not music you stream from Apple Music or any other service. So, for example, if you have an Apple Music subscription but have never bought music from the iTunes Store, you don’t need to worry about authorizing.
How to authorize a MacBook for Apple Music
To authorize your MacBook to play iTunes downloads, do the following:
- Open the Apple Music app.
- Click the Account menu.
- If you’re not already signed in with your Apple ID, click Sign in.
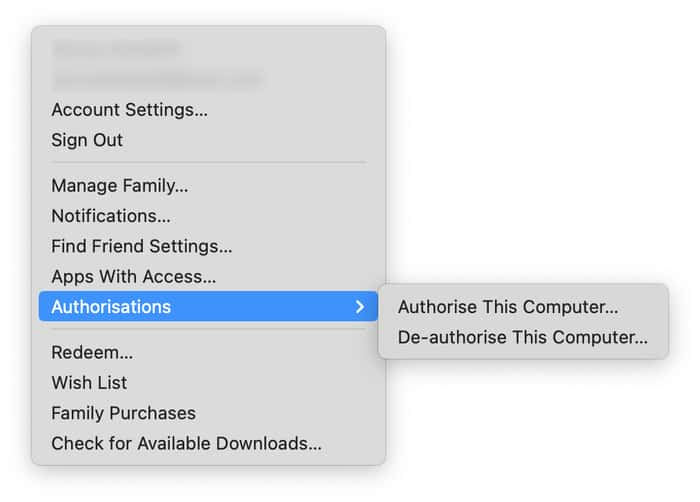
- Once you’re signed in, click the Account menu and choose Authorizations > Authorize this computer.

How to de-authorize a MacBook for Apple Music
If you’re selling or giving away your Mac, or you want to free up a slot for another device, you should de-authorize it.
- Click the Account Menu in the Music app.
- Sign in with your Apple ID if necessary.
- Click Account > Authorizations and choose de-authorize this computer.
How to check what devices are authorized
If you’re not sure how many devices are authorized to play your iTunes downloads or what they are, there is an easy way to check:
- Click the Account menu in Apple Music.
- Choose Account Settings.
- Scroll down to Downloads and Purchases.
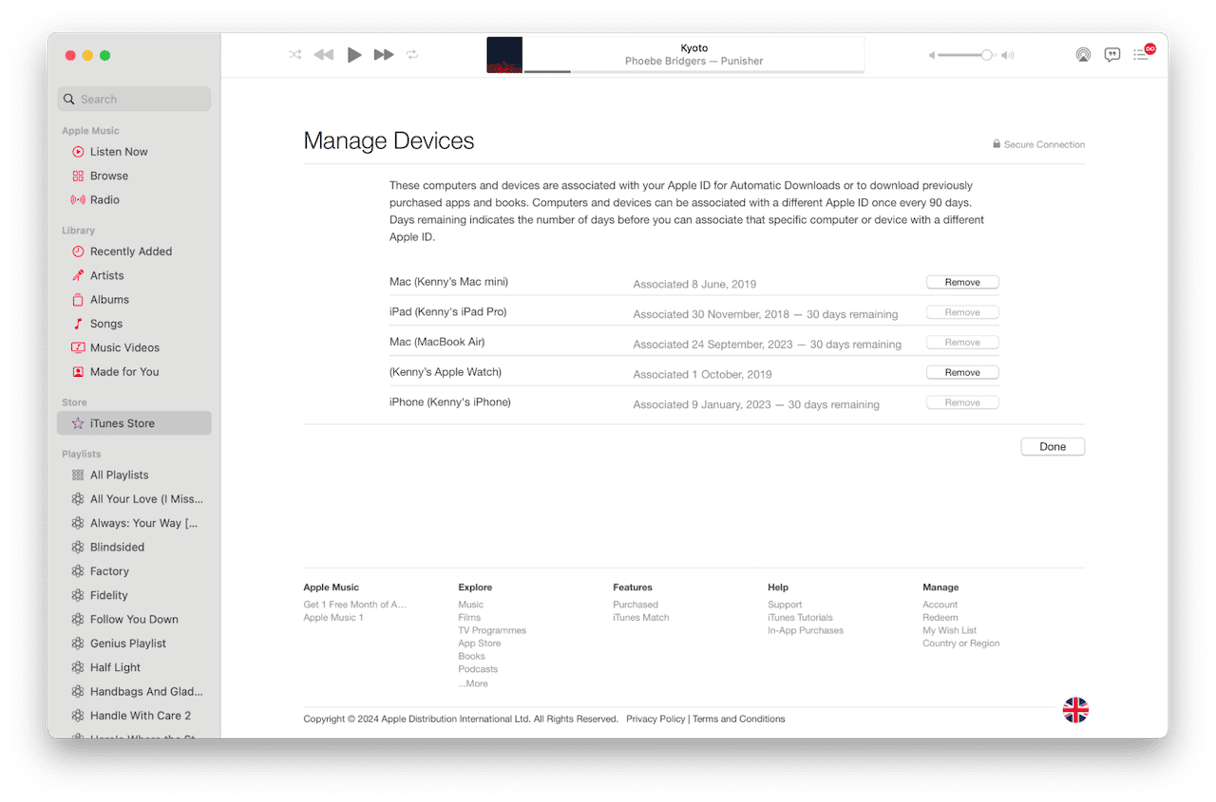
- Choose Manage Devices.

You will see a list of all the devices that are authorized to play music downloaded on your iTunes account. You may be able to de-authorize some devices by clicking Sign Out. Other devices — those that have been authorized in the last 90 days — will have a message telling you how many days you have to wait before you can de-authorize them.
If your reason for deauthorizing a MacBook for Apple Music is that you plan to sell it or give it to someone else, remember that deauthorizing it only prevents it from playing music downloaded from the iTunes Store on your Apple ID. You should also remove it from the list of devices associated with your Apple ID for other Apple services. To do that, follow these steps:
- Open Safari and go to appleid.apple.com
- Sign in with your Apple ID.
- From the menu on the left of the screen under your name, click Devices.
- Click the device you want to remove.
- Choose Remove from Account.
Once you’ve confirmed that you want to remove the device from your account, it will no longer have access to iCloud or any Apple services that rely on it.
How to improve your privacy
Removing your MacBook from your Apple ID account is an important step in maintaining your privacy when you sell or give away your Mac. It will, for example, prevent the new owner from using Find My to locate your other devices. However, it’s not the only thing you can do to improve your privacy. For example, you should also use the Transfer and Reset feature in System Settings > General to erase all your data and settings before you give or sell your MacBook to someone else.
And while you still own and use your MacBook, you can delete browser data like cookies, cache, history, downloads history, and previous searches. You can also remove items from your recent Items list, clear out the list of Wi-Fi networks to which you’ve previously connected, and review application permissions to make sure they can’t access any more of your Mac than they need to.
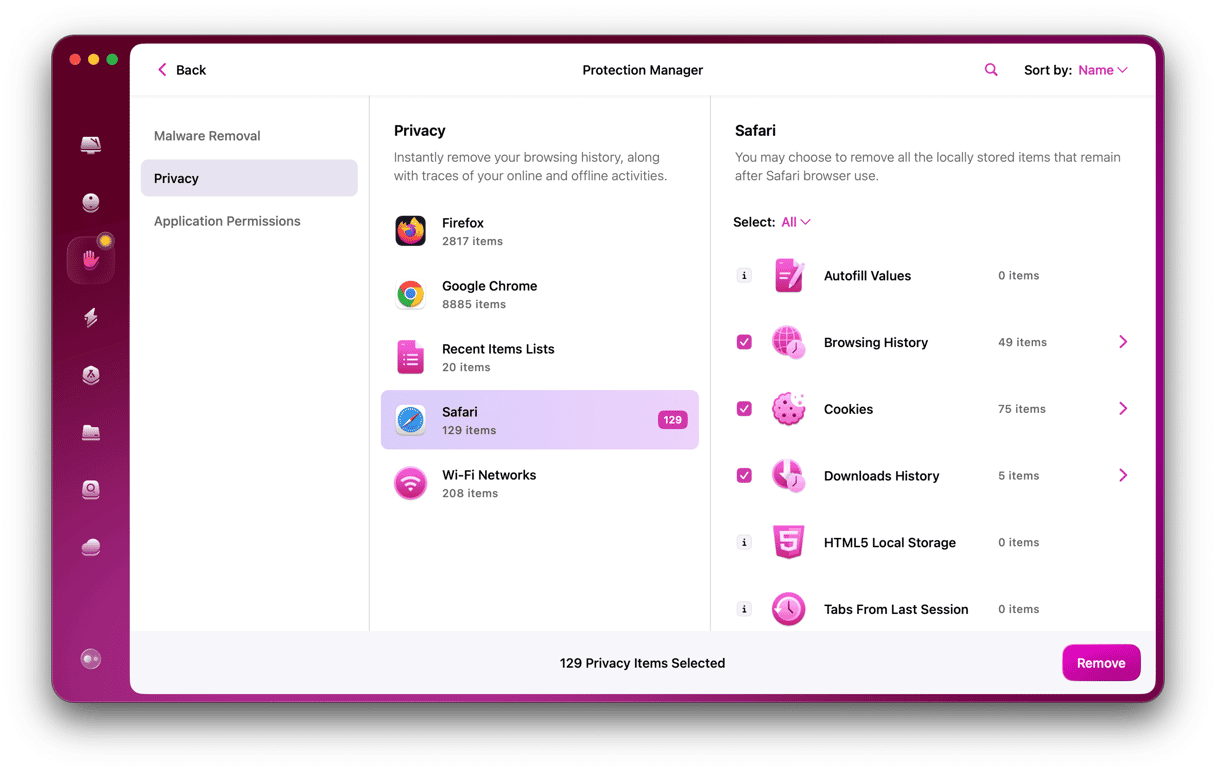
Doing all that manually is time-consuming. However, you don’t need to do it manually — CleanMyMac can do it for you. Its Privacy module can remove browser data, clear out your Recent Items list, and get rid of the list of Wi-Fi networks. This smart tool also makes it easy to revoke app permissions. Best of all, you can download it for free here.
Once you’ve downloaded and opened it, choose Privacy from the sidebar and then select the type of data you want to deal with, for example, Safari browser data. Then, select the data – cookies, browsing history, and autofill data, for example – and click Remove. It’s as easy as that.

Authorizing your Mac in Apple Music allows you to play music you have previously purchased from the iTunes Store, whether it’s stored on your Mac or on Apple’s servers. Without authorization, you will still be able to stream Music if you have a subscription, but you won’t be able to play downloads. Follow the steps above to authorize your Mac in Apple Music.


