There are a few situations where you might want to change the network location of your MacBook. And we’ll show you how to do that in this article. We’ll also explain how to secure network service and provide some tips on fixing connection issues. Let’s dive in!
What is changing location on MacBook?
There are two possibilities:
- Changing the apparent physical location so that websites you visit think you are in a different country or jurisdiction. There are a few reasons you might want to do that. You might be extremely cautious about privacy and want to reveal as little personal information as possible to websites you visit. Or you may have a specific reason for wanting to conceal your location. That could be so that you can access content that’s not available in the country in which you’re currently located. For example, you may subscribe to a movie streaming service that has different movies available in different countries and want to watch one that is not available in the country you are in. There are also more serious reasons for wanting to conceal your location, particularly if you are in a country where speaking out against the authorities is dangerous.
- Changing your Mac’s network location settings. The other meaning of changing location on your MacBook is to change the network settings so that you can connect to a network in a different location. For example, if you use your MacBook at home, in a coffee shop with public Wi-Fi, and in an office, you might have different network settings for each, such as a static IP address in the office. You can create these settings and save them as a location. Then, when you move location, just choose your new location from the preset.
We’ll show you how to change location on your MacBook for both of these scenarios.
How to change location on your MacBook
Apparent physical location
The best way to make your Mac look like it’s in a different location to the rest of the internet is to install a VPN. There are lots of them available. Most require a subscription fee to access all their services, but many have free trials and special offers on subscription fees. Using a VPN, you can choose where in the world you want your Mac to appear to be.

VPNs have the added benefit of improving security because they encrypt the data sent and received by your Mac. That means that it can’t be intercepted. It also means that your ISP doesn’t know which websites you are visiting or services you are connecting to, allowing you to keep online activity private — something that may be important for commercial confidentiality or other reasons.
Features to look out for when you choose a VPN include:
- Speed. Routing data through a VPN naturally slows it down, so look for one that slows it down as little as possible.
- Logging. Make sure that the VPN doesn’t track your activity or log which sites you visit.
- Location options. Some less expensive VPN options only offer a choice of three or four locations.
- Kill switch. The best VPNs cut your connection as soon as the VPN goes down to stop you from being unprotected online.
- Price. There’s usually a trade-off between price and features. However, there are free options if you only need the basics.
Network location settings
Changing location in network settings configures those settings automatically when your physical location changes, meaning you don’t have to change them manually every time you move from, say, home to office.
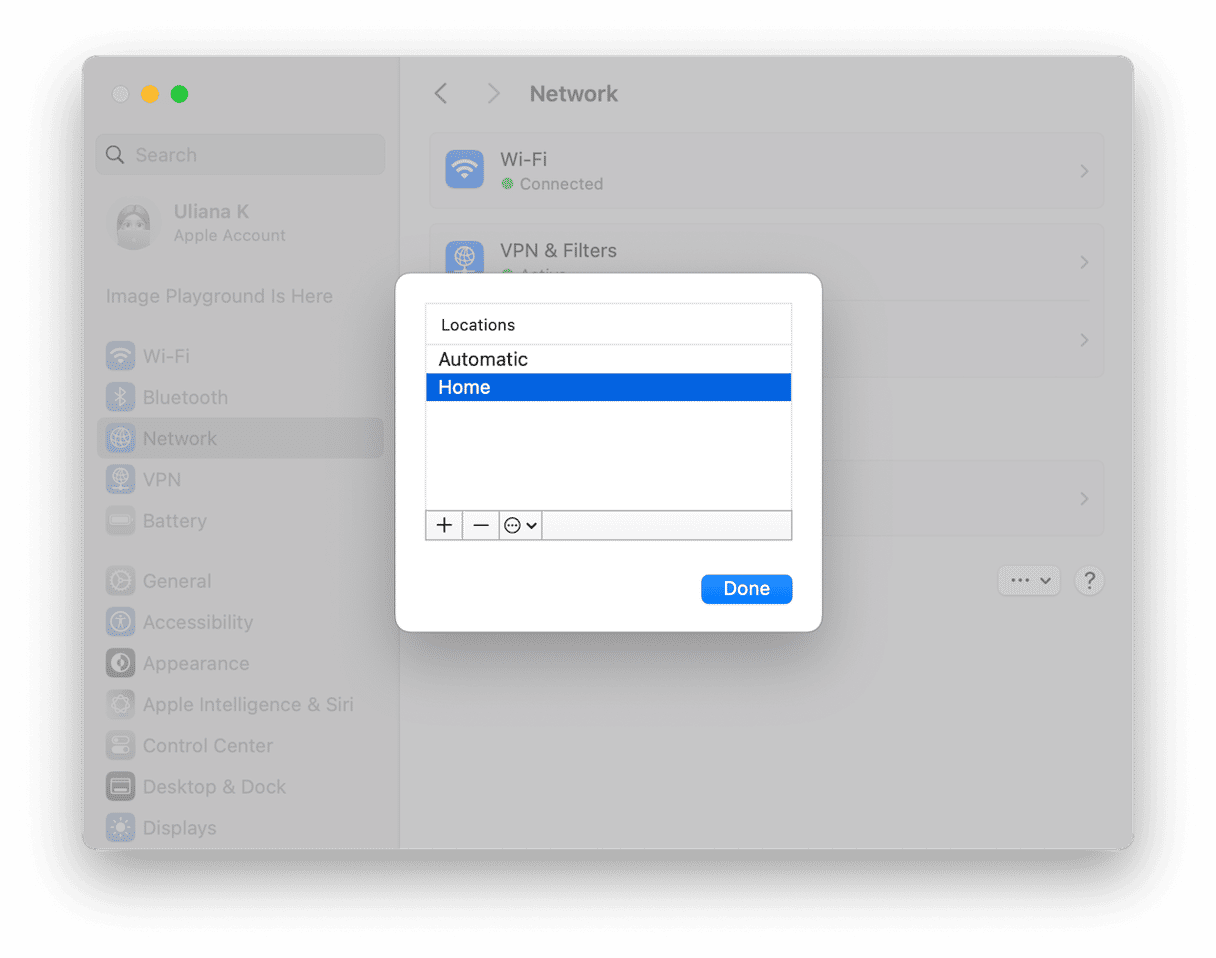
- Click the Apple menu and choose System Settings > Network.
- Click the dropdown arrow with three dots at the bottom of the window and choose Locations > Edit Locations.

- Click the ‘+’ to add a new location and give the new location a name that describes where you are currently. For example, ‘Home.’
- Next time you go to the office, for example, configure the network settings for that location, repeat steps 1-3 and give that location a name, say ‘Office.’
- Now, when you go back home, instead of reconfiguring network settings, just go to System Settings > Network > Locations and choose ‘Home.’ Do the same when you go to the office and choose ‘Office.’


You can copy a network location by choosing ‘Duplicate’ from System Settings > Network > Locations > Edit Locations. To do it, click the dropdown menu (ellipsis) at the bottom of the window. And you can remove a location in that window by clicking the ‘-’ button.

How to fix connection issues
If you are having trouble connecting to the internet in a web browser and you know the network you are connected to is working, one solution is to flush the DNS cache on your Mac. Doing that manually is not easy and would require using Terminal.
However, there is a much simpler way — the Performance feature in CleanMyMac can flush DNS cache with one click. It can also run other maintenance tasks like reindexing Spotlight, thinning out Time Machine snapshots, and freeing up purgeable space.
Here’s how to fix connection issues in just a few clicks:
- Get a free trial of the app.
- Open CleanMyMac and click Performance > Scan > View All Tasks.
- In the Maintenance Tasks tab, select Flush DNS Cache and click Run.

If you use public Wi-Fi networks a lot, you can use CleanMyMac and its Protection feature to clear out the list of Wi-Fi networks your Mac keeps, giving you protection from automatically connecting to an insecure network.
How to secure network service on your Mac
There are a number of things to make sure your network and your Mac are secure:
- Use a VPN — this will encrypt all the data your Mac sends and receives.
- Use a secure Wi-Fi password on your router to prevent any unauthorized user from accessing your Wi-Fi network.
- Make sure your Mac’s Firewall is turned on to prevent incoming attacks. Enable it in System Settings > Network > Firewall.
- Keep macOS updated. Check it in System Settings > General > Software Update.
- For additional security, filter IP addresses on your router to control which computers and devices can use the Wi-Fi network.
Whether you want to create different network locations for different places you use your Mac or make your Mac appear to be in a different location from where it actually is so you can keep watching your favorite streaming shows when you go traveling, it’s pretty easy to do. Follow the steps above to change the location on your Mac.