To make sure your Mac runs fast, you should keep at least 20% of your drive’s capacity free. Otherwise, the performance will drop. But how to clear system storage on Mac to have all these gigabytes free? Keep on reading, and we’ll show you tried and trusted ways to recover space on Mac and, hopefully, speed it up. You’ll find 13 different tips grouped into 5 broader cleanup categories. Let’s go!
How to check storage on Mac
It’s good to check your storage details before we get down to deleting things. For example, this is what disk storage looks like:

Here are some of the categories your storage could contain:
Documents: Files, downloads, and documents on your drive
Apps: Applications, plug-ins, and app extensions
System Data (named Other storage in macOS versions older than Monterey): Your caches, temporary files, and app localizations that waste space
macOS: That’s how much space your entire macOS takes
There can also be other folders, such as Music Creation, Photos, Other Users, Podcasts, etc. To view your storage details, click on the Apple icon > About This Mac > More Info > Storage Settings. For macOS versions older than Ventura, go to Apple menu > About this Mac > Storage.
Note: The storage graph is a rough, high-level overview of what takes up space rather than a precise, real-time diagnostic tool. It means that gigabytes of space may remain unaccounted in the colored bar, so it is better to check the breakdown next to categories for a more accurate estimate.

How to free up space on Mac
We’ve gathered some of the most effective tips on how to manage storage both manually and automatically. Keep on reading!
1. Clean up system files
Delete system junk
Potential space reclaimed: 2-5 GB
System junk is an excess burden to have on your machine — outdated files, browser cache, app localizations, and old Time Machine backups.
Deleting system junk manually would be a hot mess, even for an experienced user. So if you want to free up space on your Mac quickly, just run CleanMyMac once and forget it. This app is notarized by Apple, so you’re safe running it.
CleanMyMac has a dedicated Cleanup tool that removes unused app languages, outdated system logs, temporary document versions, old mail attachments, and other types of junk.
- Open CleanMyMac — get your free trial here.
- Go to Cleanup from the sidebar.
- After you run the Scan, preview by clicking Review what CleanMyMac has found and click Clean Up.

If you don’t want to run a third-party application, keep on reading — we have some recommendations about how to clear storage manually.
- To remove Time Machine backups, connect your external drive to your Mac and go to Backups.backupd folder. Delete unnecessary backups and empty the Trash afterward. You can also do it by running Terminal commands — check out this guide to learn more.
- To manage Time Machine snapshots, run this command in Terminal:
tmutil listlocalsnapshots /
After you get the list of all snapshots, run this one:tmutil deletelocalsnapshots [date of snapshot]
(e.g.,tmutil deletelocalsnapshots 2021-08-25-180516). - To get rid of log files, check out these locations in the Finder (Go > Go to Folder from the menu bar): ~/Library/Logs, /Library/Logs, and /var/log — delete files with caution.
- To clean up your Mail, remove attachments by going to the Message menu in the menu bar and choosing Remove Attachment. You will have to repeat the process for all messages with attachments. Alternatively, check out this location in the Finder ~/Library/Containers/com.apple.mail/Data/Library/Mail Downloads/
- To remove system caches, browse ~/Library/Caches and /Library/Caches. To reveal hidden files there, use the Command + Shift + Period (.) shortcut. Make sure to double-check what you send to the Trash to avoid deleting files vital for the proper functioning of macOS.
As you probably suspect, following the steps above is time-consuming, so it is way easier to run a cleaner app like CleanMyMac. Also, follow the steps below to manage startup disk space on Mac more effectively.
The benefits of using CleanMyMac
- Finds only safe-to-delete files: on average, users remove over 10.5 GB of junk using the Cleanup feature
- Trusted by users in 180+ countries with a Trustpilot rating of 4.7/5 (86% 5-star reviews)
- Not only an effective cleaner tool but also a pleasant-looking app — the winner of the Red Dot Award and the iF Design Award
Try CleanMyMac for free — test 25+ tools to clean, protect, and optimize your Mac for 7 days at no cost.
Remove browser cache
Potential space reclaimed: 1-3 GB
If you are a heavy internet user, your Mac’s drive is full of the browser cache. These are the kinds of bookmarks left on your drive by every site that you visit. What’s your primary browser? Here are the solutions for Chrome, Safari, and Mozilla Firefox.
To clear Chrome cache:
- Open Chrome and click the three-dot icon at the top right.
- Navigate to Settings > Privacy and security > Delete browsing data.
- Choose a time range to clear the browsing data
- Also, select the checkbox next to Cached images and files and click Delete from this device.

To clear Safari cache:
- Open Safari and go to Settings from the menu bar.
- In the Advanced tab, check Show Develop menu in menu bar (Show features for web developers in macOS Sequoia or later).
- Now, go to Develop in the top menu and select Empty caches.

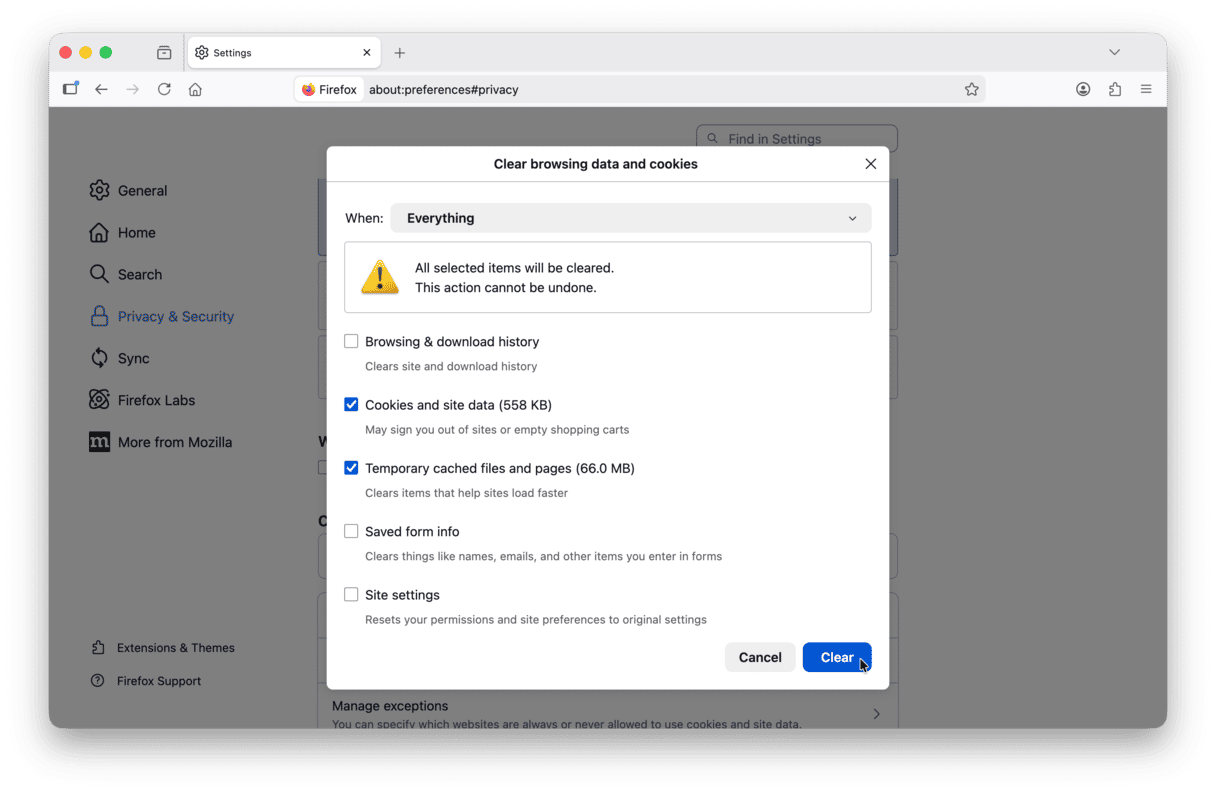
To clear cache in Mozilla Firefox:
- Go to Settings > Privacy & Security.
- Choose Cookies and Site Data > Clear browsing data.
- Mark Temporary cached files and pages and click Clear.

Alternatively, choose Clear History from the menu button (three horizontal bars) and select Temporary cached files and pages from the list.
2. Clean up unneeded media files
Transfer photos to external or cloud storage
Potential space reclaimed: 2-5 GB
Now that you have removed system files you no longer need, the next up in line for audit is your media. We are well aware that these are not just any files — they are captured memories we treasure so much. Want to keep them? The best way is to save them to iCloud or an external drive.
Transferring your photos to iCloud, follow these steps:
- Go to the main Apple menu > About This Mac > More Info > Storage Settings.
- Click Store in Cloud and choose what you would like to store.
- Click Store in Cloud again.

You can further modify Store in iCloud settings in System Settings > Apple Account > iCloud. Click See All next to Saved to iCloud. Remember, the iCloud free plan allows you to store up to 5 GB of data. To transfer more than that, you’ll have to buy a paid storage plan: 50 GB, 200 GB, or 2 TB of additional storage space.
We also suggest checking other recommendations. Together with the Store in iCloud option, they make up a built-in Optimize Storage tool, which may be valuable for managing storage after removing unneeded stuff.
Now, if you want to transfer media files to external storage, follow the instructions below:
- Go to the Finder menu > Go > Home.
- Choose the Pictures folder and drag it to a location on your external storage device.
- Done! Now, you can delete the original Photo library to free some storage. Just drag it to Trash/Bin. Then empty it.
Manage your Music library
There are two possible routes here: you can remove unneeded music files or move your library to an external drive.
To move iTunes/Music library, follow these steps:
- Open the Music app and go to Settings (from the menu bar) > Files.
- Next to Music Media folder location, click Change.
- With the external drive connected, choose it as your location.

If you still use iTunes and have an old macOS, you can find it in iTunes > Preferences > Advanced.
Note: you will have to keep your external drive connected to find your tracks and download new songs to this location, so it is not always a good option for portable Macs. In this case, remove unneeded downloads:
- In the Music app, go to View in the menu bar and choose Only Downloaded Music.
- Now, click Title in Songs under Library, and you will see whether you have any duplicates.
- Select any duplicate and press the Delete key.
- Click Move to Trash.
This way, you will declutter your Music Library. But note that it may delete the songs from other devices signed into your Apple Account. So, make sure to keep your absolute favorites.
Remove duplicate photos
While removing unneeded media files, don’t forget to get rid of duplicate photos. Depending on the size of your photo library, you can free up from a few megabytes to hundreds of gigabytes of space. Some users shared that they had 250 GB worth of duplicate images!
The easiest way to do it is to use a dedicated Mac cleaner app like CleanMyMac. It comes with a smart My Clutter feature that can find not only duplicate photos but also similar images and downloads.
Here’s how to use it:
- Open CleanMyMac.
- Click My Clutter > Scan > Review All Files.
- Navigate to the Duplicates tab.
- Select photos for deletion and click Remove.

You can repeat it for Similar Images and Downloads.
3. Remove unused apps and all their leftovers
Potential space reclaimed: up to 30 GB
Did you know there are three ways to delete apps on Mac? One is dragging them straight to the Trash/Bin from the Applications folder. The other involves Launchpad. And finally, you can use a third-party Uninstaller tool, which also makes sense because the first two methods leave parts of old apps on your drive.
Delete apps via Launchpad (pre-Tahoe)
We prefer deleting apps via Launchpad because it’s more fun. Open Launchpad from your Dock. Now, press the Command key and hold any app icon until they start shaking. You will see the [X] symbol above the icon — click it to delete the app. In macOS Tahoe, you will have to go to the Applications folder since Launchpad has been removed in this macOS version.

In macOS Tahoe, you will have to go to the Applications folder since Launchpad has been removed in this macOS version.
Delete your unseen apps
That was easy, but here’s the deal. Every Mac has apps that don’t show up anywhere. They may have installed themselves as parts of other apps or be small supporting applications that programmers call “Launch agents” or “Daemons.” In total, they may eat up a whole lot of space.
In our experience, of all app cleaners, CleanMyMac still tops the list. Our personal record is 30 GB which it was able to clear up on Mac (unused and suspicious apps). So what can you do?
- Get your free CleanMyMac trial.
- Click the Applications tab and run a scan.
- Click Manage My Applications.

From there, you can delete apps on a massive scale — simply select the ones you don’t need and click Uninstall. Make sure to check the Leftovers section. These are parts and pieces of your old apps that you can’t otherwise access.
4. Clean up other files
Clean up the Downloads folder
Potential space reclaimed: 2-5 GB
The moment you’ve decided to clean up your Mac, there is no better place to start than your Downloads folder. We, as users, download an endless amount of data on our computers. And let’s be honest, we don’t even need even a half of it! Time to reduce clutter by dumping all useless files into Trash/Bin. Here’s how you do it:
- Go to Finder > Downloads.
Optional step: click Size to filter your files and see the largest ones first. - Right-click the files you want to get rid of and click Move to Trash/Bin. To select numerous files, press and hold the Command key while clicking the files. You can use the Command + A shortcut to select all files.
- After you’re done deleting files, don’t forget to empty the Trash/Bin.

Find large files you don’t need
Potential space reclaimed: 2-5 GB
- Go to your desktop and press Command + F.
- Choose “This Mac.”
- Select Other… in the menu and choose File size from the list.

Well done! Now, you can type in different file extensions by pressing the + button and sort the results by size (note that you will have to follow the steps above but choose File extension from the Other… list). We recommend starting with the .DMG files or application installers. They are just dead weight, and you can live without them. The same goes for ZIP archives.
Deleting large files is the best way to reclaim more space in no time. But looking for those items can be very time-consuming. CleanMyMac can do the job quickly for you — it has the Large & Old Files tool that locates and removes the heaviest files.
- Open CleanMyMac — get your free trial here.
- Go to My Clutter from the sidebar and click Scan > Review All Files.
- Review the details and select what you want to remove.
- Click Remove.
- Also, check Duplicates, Downloads, and Similar Images to free up even more space.

Clean up your desktop
Potential space reclaimed: up to 5 GB
After cleaning up the Downloads folder and trashing large and old files, there is one more place to look for clutter — desktop. It can turn into a graveyard of forgotten files, especially if you use stacks. So, take your time to examine what’s hiding there and send unneeded files to the Trash.
Trash the old iPhone backups
Potential space reclaimed: 10-20 GB
Outdated iPhone backups may take up enormous space. If you’ve ever backed up your iPhone with your computer, your Mac probably stores all your phone’s data. It makes sense to check your drive for outdated backups before they grow out of proportion.
Here’s how to clear space on your Mac by deleting old backups:
- Open Finder > Click Go in the Finder’s menu > Go to Folder…
- Paste in ~/Library/Application Support/MobileSync/Backup and press the Return key.
- Move the insides of the folder to the Trash/Bin, and that’s it.

If you want to remove a specific backup, here’s how to do that:
- Connect your device to your Mac using a cable.
- Go to Finder > Locations > Select your device.
- Click Manage Backups.

Right-click the name of the backup to see the “Show in Finder” command. Move the backup someplace else or delete it using the Delete option.
Note: do this only if you are 100% sure you don’t need your iPhone backups.
Take out the Trash
Potential space reclaimed: 2-5 GB
This advice is the easiest of all. Nevertheless, people forget to do it all the time. We throw things down the Trash/Bin and think they are over with. But that’s just moving things from one pocket to another. To free it up, right-click the Trash/Bin icon. Then, choose Empty Trash/Bin.
How to empty the Trash/Bin automatically on Mac
If you don’t like to empty the Trash/Bin every time, there is a scheduled option. Your Mac will auto-delete it every 30 days.
- Open Finder > Settings (in the upper menu).
- Now, choose Advanced.
- Check Remove items from the Trash/Bin after 30 days.
5. Compress your files
Potential space reclaimed: up to 10% of the initial space occupied
Archiving or compressing files is a nice alternative to permanent deletion. Not all file types compress similarly well, though. For example, documents and presentations can be substantially reduced in size by compression, while movies are harder to shrink.
Luckily, you don’t need a third-party solution to zip things up — your macOS has its built-in tool.
How to free disk space on Mac using compression?
- Open Finder and go to your Documents.
- Control + click on a folder (or multiple folders).
- Choose Compress.
Be aware that macOS leaves the original file untouched, so once you have the archive, the original folder can be deleted. After you’re done, you may transfer the newly-created archive onto an external drive.
Well done, you’ve just saved some space! If you want to simplify the cleanup process in the future, consider using a Mac cleaner app. There are a lot of options to choose from — here’s our list of top 10 Mac cleaner software to narrow down the search for you.
Okay, we’ve told you our favorite ways to clear disk space on Mac. You can bookmark this article and revisit it next time when the annoying “Your disk is almost full” message pops up. Decluttering your Mac can add a fresh spark to your digital life — so try it today.
Frequently Asked Questions
What is the fastest way to clean up space on Mac?
There are a few, in fact. These are deleting unused apps and their leftover files, clearing out the Downloads folder, and cleaning up unnecessary media files or moving them to external or cloud storage.
But the best way to clean up space and manage your startup disk is to invest in a third-party cleaning app. The only con is that they are paid-for, so you will have to either buy a one-time license or pay for a subscription. However, they have a lot of pros to offer because they are quick, effective, and most importantly, would not delete files vital for your macOS.
Can I upgrade my Mac's internal storage?
Yes and no. If you still have an old MacBook with a traditional hard drive, then yes. However, if you have a newer Mac, you cannot replace its SSD since it is soldered into the motherboard. Instead, you can move your files to an external drive or a cloud storage.
What are the most surprising space hoggers?
These are system junk and cache files and old backups — if you do not remove them regularly, they can take up to 40 GB of space.
Is it safe to remove System Data and system junk?
If you follow the steps outlined in this article and double-check everything before deletion, it is absolutely safe to get rid of these files. If you feel uncomfortable with manual removal, use a third-party app, such as CleanMyMac, to do the job for you.
Why is my brand new Mac already full?
Most likely, you’ve restored your new MacBook from an old one and transferred all the junk files, too, along with the media files and settings. Other causes include automatic iCloud syncing of large Desktop/Documents folders, hidden system cache files, or cached data from restored backups. To fix it, you will have to check iCloud settings and remove cache files, cached data, and other system junk.