Anyone who has ever taken a photograph knows that it’s very rare to get everything you want in a shot and nothing else. Often, it’s people walking into the edge of the frame or elements on the edge of the frame that we hadn’t spotted at the time we took the photo that spoiled it. The solution to these undesirable objects at the edge of a photo is to crop it. If you do it well, you keep the original subject intact and get rid of the things you don’t want in the image. We’ll show you how to crop an image on your Mac in lots of different applications and with the help of online tools.
Why crop an image on Mac?
There are lots of reasons you might want to crop an image. As well as getting rid of undesirable elements, cropping an image allows you to change its shape. And it allows you to put the subject exactly where you want it to be. For example, if you want the image to follow the rule of thirds, you can crop it so that the subject sits on an intersection point of a three-by-three grid.
The reason for doing it on your Mac rather than your phone is that the Mac’s screen is bigger, and so it’s much easier to see what you’re doing and to accurately crop the image.
Things to consider when you crop an image on your Mac
1. What shape do you want the final image to be?
Many image editors allow you to choose the shape you want before you start cropping and then ’lock’ the relative dimensions of the long and short sides so that the image is always that shape.
2. Where do you want the focal point to be?
If the reason for cropping the image is to draw the eye to the subject, experiment with different shapes and crops to determine which works best.
3. Consider when to apply other edits
If you are going to adjust colors or lighting in the image, it’s a good idea to do those before you crop because when you see the adjusted image, it may affect the decision on how to crop. However, applying a vignette effect, for example, should be done after the crop because cropping the image afterward will ruin the vignette.
4. Make a duplicate before you crop
Even if you’re using an image editor like Photos which edits non-destructively and allows you to retrieve previous versions of an image, it’s worth duplicating the image and keeping a copy of the original. That way, you can compare the two versions and create another version from the original if you need to.
How to crop a photo on Mac: Preview
- Open Preview, click the File menu, choose Open, and navigate to the image. Then click Open.
- Click on the image at a point you want to be a corner of the cropped image (if you want the cropped image to be square, hold down the Shift key).
- Click on the Tools menu and select Crop or press Command+K.
How to crop image on Mac: Photos app

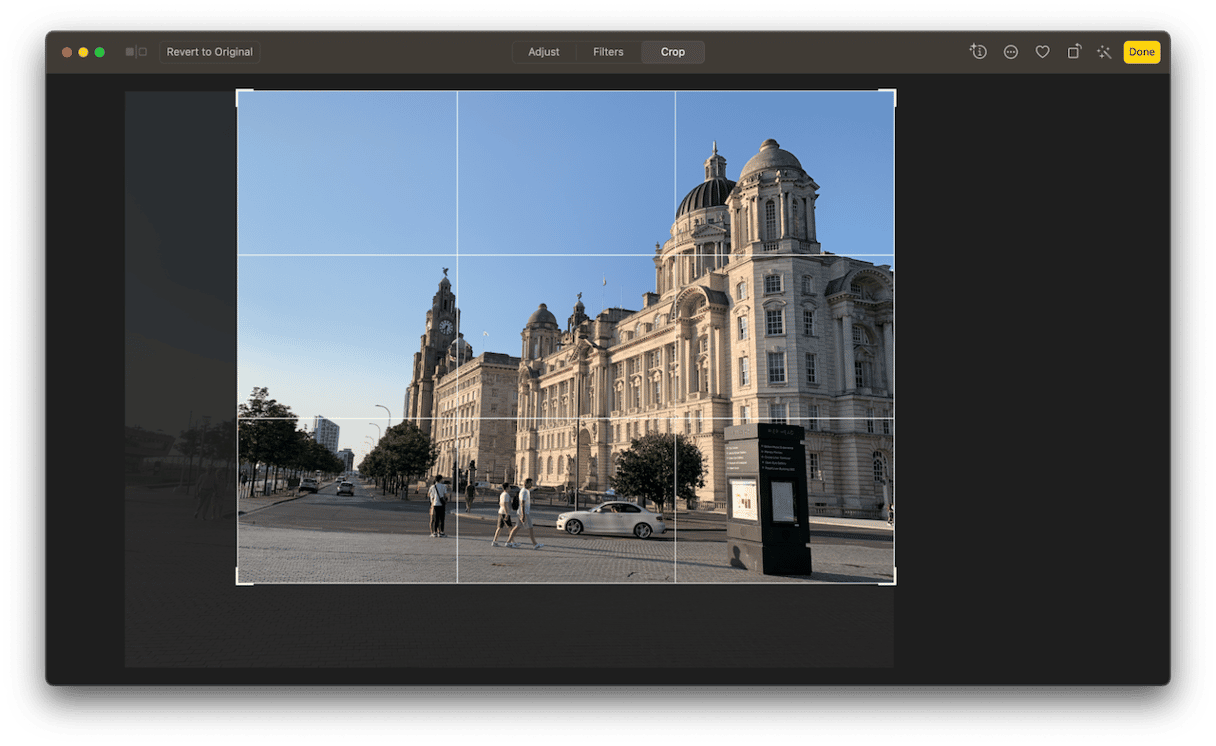
- Open Photos, locate the image you want to crop, and double-click it to open it.
- Click Edit at the top right of the window.
- Click Crop at the top of the window.
- Choose Aspect from the menu on the right.
- Drag a corner of the grid inwards.
- If you choose Freeform, drag the other corners to where you want them.
- To move the frame around, click on the image and drag it.
- Click Done to finish or reset to revert to the original.
How to unneeded images easily

If you regularly edit images on your Mac, they will very quickly take up lots of disk space. It’s a good idea to move those images onto an external disk, archive them, or, if you don’t need them, delete them completely to free up space. But it can be difficult to find and identify the images that are taking up the most space or that you haven’t opened in a long time. The Large & Old Files module in CleanMyMac makes it easy, though. It scans your Mac and identifies the files that are taking up the most space and those that haven’t been opened for a long time. You can then review them and decide which to get rid of and which to keep. When you’re ready to remove files, CleanMyMac can do that at the click of a button. You can download CleanMyMac for free here and try it for yourself.
Crop pictures with online tools
How to crop picture on Mac: Pixlr
- Upload your image at pixlr.com
- Click on the crop tool in the sidebar.
- If you want to constrain the cropped image to a specific aspect ratio, click Constrain in the toolbar, then choose a ratio from the Preset menu.
- Drag a corner of the crop frame inwards until it’s the size you want.
- Click inside the frame and drag to position it.
- Press Return.
How to crop photos on Mac: Fotor
- Upload your image to Fotor.com.
- Click on the crop tool in the sidebar.
- Choose an aspect ratio or Freeform.
- Drag a corner of the frame to make it the size you want.
- Click inside the frame and drag it into position.
- Click Apply.
Crops photos with third-party apps
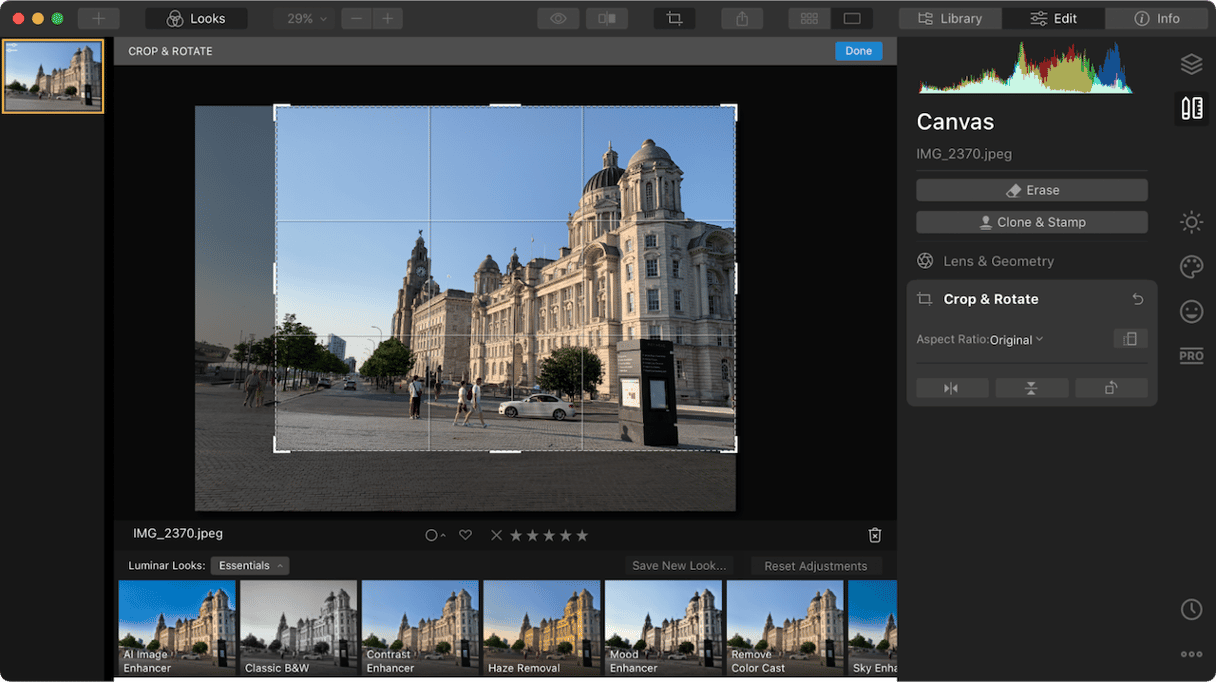
How to crop photo on Mac: Luminar

- Open Luminar. Now, click on the ‘+’ in the toolbar and select Edit Single Image.
- Navigate to the image you want to crop and click Open.
- Press the ‘c’ key on the keyboard.
- Click on the Aspect Ratio menu on the right and choose a ratio or choose free to crop freeform.
- Click on a corner of the crop frame and drag it into position.
- Click inside the frame so you see the hand icon and drag the image around until it’s positioned where you want it.
- Press Return to apply the crop.
How to crop an image in Pixelmator
- Open Pixelmator, click on the File menu, select Open, navigate to the image you want to crop, and then click Open.
- Click the crop tool at the bottom of the toolbar on the right of the screen.
- Click ‘Custom size’ to choose an aspect ratio.
- If you want to overlay a grid, say for the rule of thirds, click on Overlay and choose one.
- Drag the crop handles into position, then drag the crop frame to where you want it.
- Click Apply.
- Alternatively, you can click ML Crop to have Pixelmator crop the image automatically using its machine-learning algorithm.
Cropping an image is a very important part of the editing process. It’s very straightforward, but the method varies based on the tool or app you use. Choose the app or online tool you use from the sections above and follow the steps to crop your image in no time.


