With a 150-character limit, there isn't room in your profile bio for much more than a fun one-liner and some well-placed emojis. While you have the option to use different fonts on Stories, you’re only limited to one font in your bio. However, some tech-savvy people have figured out how to jazz up their Instagram bios with different fonts.
Jealous? Don't be. In this guide, we'll show you how to get cool fonts for Instagram.
How to get custom Instagram bio fonts
Using unique typography is a great way to stand out among the Instagram masses — and it's a relatively simple way to make your profile shine.
In the following sections, we'll go over a couple of different ways to get some fancy fonts for your Instagram bio.
Option 1. Copy and paste fonts for Instagram using Font For Instagram
By far, one of the easiest ways to get cool fonts for Instagram is by using an app that lets you simply copy and paste the text into your bio. While there are hundreds of iPhone and Android apps that have stylish fonts for Instagram, we'll show you how to do this using Font For Instagram. It's free to download in the App Store and has over 3,000 4.5-star reviews.
After you've downloaded the app, follow these instructions to add awesome fonts to your bio:
- Open the app.
- Press Get Started.
- Scroll until you find a font you like.
- Select the font.
- Type what you want your bio to say in the empty space above the fonts.
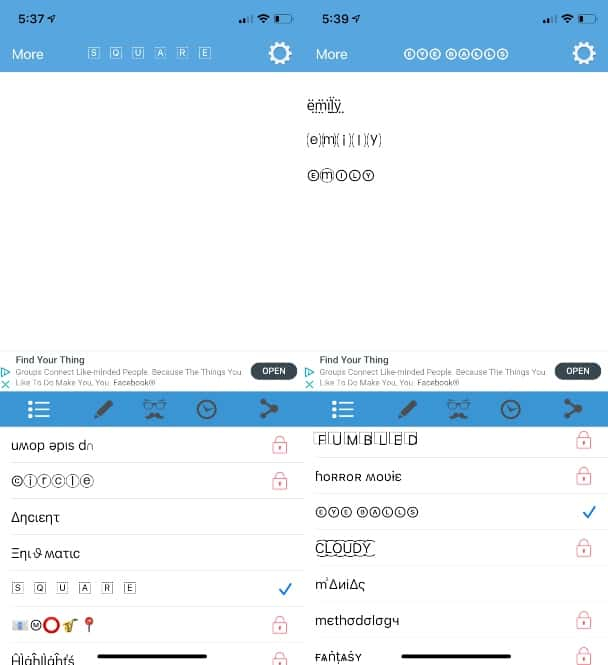
You can try out a couple of different fonts to see which one you like best. Most of the fonts are available for free, but the ones with a red lock next to them are only available on the Premium and Pro versions of the app.
After you've selected your font, follow the instructions below to add it your Instagram bio:
- Copy the font.
- Open Instagram > Profile > Edit Profile > Bio.
- Clear your current bio.
- Paste your new one.
- Press Done.
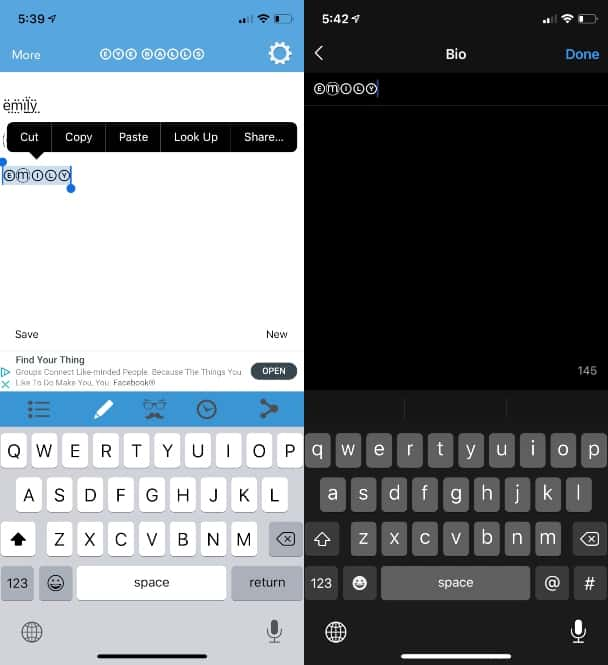
By following these steps, you’ll have a fancy font in your Instagram bio in no time.
Option 2. Design your own Insta bio font using Fonts
If you're confident in your creative abilities, you might be interested in creating your own unique fonts for your Instagram bio. Lucky for you, there are plenty of apps for that, but for the purposes of this tutorial, we're going to use the app Fonts.
Free to download and available in the App Store, Fonts has over 44,000 reviews and 5 stars. After you've downloaded the app to your iPhone, follow the instructions below to design your own font for your bio:
- Go to Settings > Keyboards.
- Turn the Font toggle on.
- Turn the Allow Full Access toggle on.
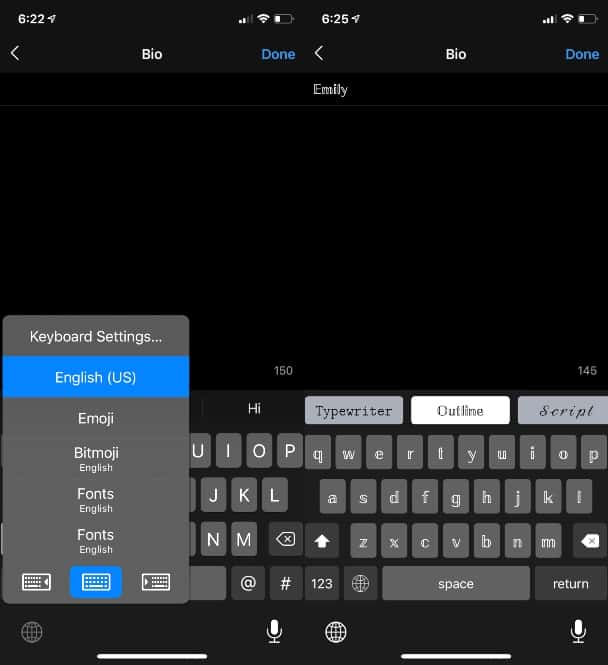
After that, the Fonts keyboard should successfully be added to your keyboards, where it will be available for you to use in iMessages, Snapchat, and, of course, Instagram.
Here's how to use it to add cool fonts your Instagram bio:
- Return to your Instagram bio settings by following the instructions in the previous section.
- Press and hold the button in the bottom-left corner to access your other keyboards.
- Select Fonts.
From there, you can scroll through the keyboards to switch between other fonts. Only a limited amount of fonts are available unless you buy the premium version of the app.
Using different fonts for Instagram
Using different fonts on Instagram is a quick way to make your profile look unique. Not only are there hundreds of options, but you can always change fonts — or return to the classic Instagram font — anytime you want.
What are some cool fonts for Instagram?
As you can see, there are tons of fonts and styles to choose from. And while everyone's preferences are different, we’ve decided to highlight a few of our favorites from the online font generator Instagram Fonts:
- ʜᴇʟʟᴏ
- Hello
- 𝙃𝙚𝙡𝙡𝙤
- ɧɛƖƖơ
- 🄷🄴🄻🄻🄾
- ollǝH
- 𝓗𝓮𝓵𝓵𝓸
- 𝙷𝚎𝚕𝚕𝚘
- ℍ𝕖𝕝𝕝𝕠
Like the apps we’ve gone over, Instagram Fonts allows you to take a string of text, try it out in different fonts, and then copy and paste it wherever you want. It is also free to use, and there is an option to design your own font.
Best practices for using custom IG fonts
Looking at all of these fresh and fancy Instagram fonts might tempt you to download some apps and start playing around with your own bio. However, there are a few things you'll want to keep in mind before you start customizing your fonts.
Not only can you use the fonts from apps and internet font generators in your bio, but you can also use them in the captions of your Instagram posts and when you comment on other people's posts. As far as best practices go, be careful not to go overboard with crazy typography. You want to ensure that your new font not only fits your brand's aesthetic but is also easy to read. This is even more important for business accounts.
Still, at the end of the day, it's your page. Be as tame or as wild with your fonts as you want.
How to format your Instagram bio text
Outside of creating customized fonts for your Instagram bio, there's not a whole lot else you can do. Still, we'll go over some of the other hacks people have found to make their Instagram bios pop.
Can Instagram bio text be in bold or italics?
Instagram doesn't allow you to make your bio text bold italicized within the app. However, you can make your text bold or italic by using a process similar to the one you used to create a customized font.
First, you need to find a letter generator. Lingojam has a generator for bold and italic letters and works with the Safari browser on iPhones. Follow the instructions below to make your bio text bold:
- Go to a letter generator on your iPhone browser.
- Type your text in the box.
- Choose which bold or italicized font you want to use.
- Copy the text.
- Open Instagram > Profile > Edit Profile > Bio.
- Paste the copied text into your bio.
And that's it! Using fonts that are bold or in italics is pretty much the same process as using any other font.
How to add line breaks to your Instagram bio
Another unfortunate limitation of Instagram bios is the inability to create line breaks. While you may have tried every hack under the sun, there is one fool-proof way that big brands and influencers all use to get line breaks in both their bios and their Instagram captions.
Here's how to create line breaks in your Instagram bio:
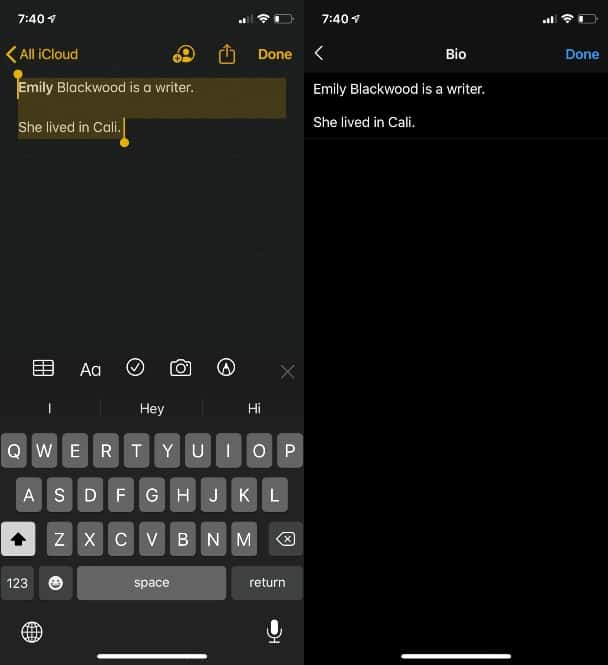
- Open your Notes app on your iPhone.
- Write your bio with the line breaks you want.
- Copy the entire text — including the line breaks.
- Open Instagram.
- Go to your Profile > Edit Profile > Bio.
- Paste your text into your bio.
This trick not only works in your bio but within your Instagram captions, as well.
Thanks to new apps and savvy Instagram users around the world, bios are more customizable now than ever before. With unlimited options for fancy fonts and line breaks, you can easily create a bio that best reflects you.


