Whether you have an iMac, MacBook Pro, MacBook Air, or another Mac device, Mac computers all have a finite amount of space. How you use it depends on how quickly or not that space fills up and whether you need to add more space — either internally (such as upgrading to an SSD) or by connecting to one or more external hard drives.
You may not know that the Mac boot drive is already partitioned. In all fairly recent models, the boot drive contains a hidden partition that includes the macOS Recovery System, some essential Mac first aid tools, and an installer should, for any reason, your macOS fail to install or reboot.
Before we go into partitioning a Mac hard drive or SSD, let’s consider the benefits and what you would need to do before partitioning a hard drive.
Benefits of making a partition in a Mac hard drive
One of the main reasons for implementing a partition is to run more than one operating system, such as macOS on one and Windows on the other. Or you can run two versions of the same OS on both sides of the partition, all from a single disk. Each disk drive, with its own volume, is found and treated separately in the Finder.
Once you know how to partition a hard drive on Mac or how to partition an external hard drive on Mac, you can format and manage them separately, effectively giving you two computers within one. Although, if you want to use the other volume to run an earlier version of your Mac — which you can, using Time Machine — the volume for that side has to be twice as large as the space it requires.
What to do before partitioning a hard drive
Before going ahead with a partition, it’s always helpful to tidy your Mac up. Most users find they have way more clutter and junk than they think. Between old folders and documents, images and videos, apps taking up space, hundreds of email attachment downloads, and local iOS backups, many people find they have at least 62GB of junk they simply don’t need. We recommend doing it with CleanMyMac, a powerful Mac cleaner ideal for decluttering your Mac before creating a partition. Get your free CleanMyMac trial. Then, open the app and click Smart Care > Scan > Run, and your drive is ready for partitioning.✅

How to partition a hard drive or SSD on Mac
There are several ways this can be done.
1. Use Boot Camp
Boot Camp is especially useful if you want to run Windows on your Mac. With Boot Camp comes Boot Camp Assistant, a handy app for partitioning your hard drive space so that one disk drive can run and operate macOS and the other, Windows. Note that it is available on Intel-based Macs only.

Following the on-screen instructions of this Mac app, you can partition your hard drive or SSD space to ensure that Windows will run smoothly on your Mac, almost as if it were operating on a native Windows PC or another device.
However, for those who don’t want to partition Mac for that purpose or have a Mac with Apple silicon, you can use Disk Utility.
2. Use Disk Utility
Disk Utility is another Mac application that will repair and, as needed, partition disk drive spaces.
As a Mac partition manager, it is a useful app that sits within your Utilities folder, inside your Applications folder.
Before starting a Mac partition exercise, it’s worth fully backing up the folder you want to copy using Carbon Copy Cloner — another useful tool that gives you an instantly bootable copy of the drive you are going to partition, working on the assumption that if anything goes wrong during this process, you will lose everything on that hard drive. So with a backup, nothing can go wrong, and if it does, you can quickly fix it.
Before partitioning:
- Clone the drive.
- Make sure the clone has worked, and with your cloned drive, you can boot this up from the startup menu.
- Plug the clone in and go to System Settings > General > Startup Disk.
- Check that cloned drive works, and then you can partition without any worries.

Now you are ready to partition the hard drive on Mac, starting with the following:
- Go to Utilities in the Applications folder.
- Double-click the Disk Utility application.
- In Disk Utility, select your Mac’s internal drive (or an internal SSD).
- You should see two options: First Aid or Partition.
- Click Partition.
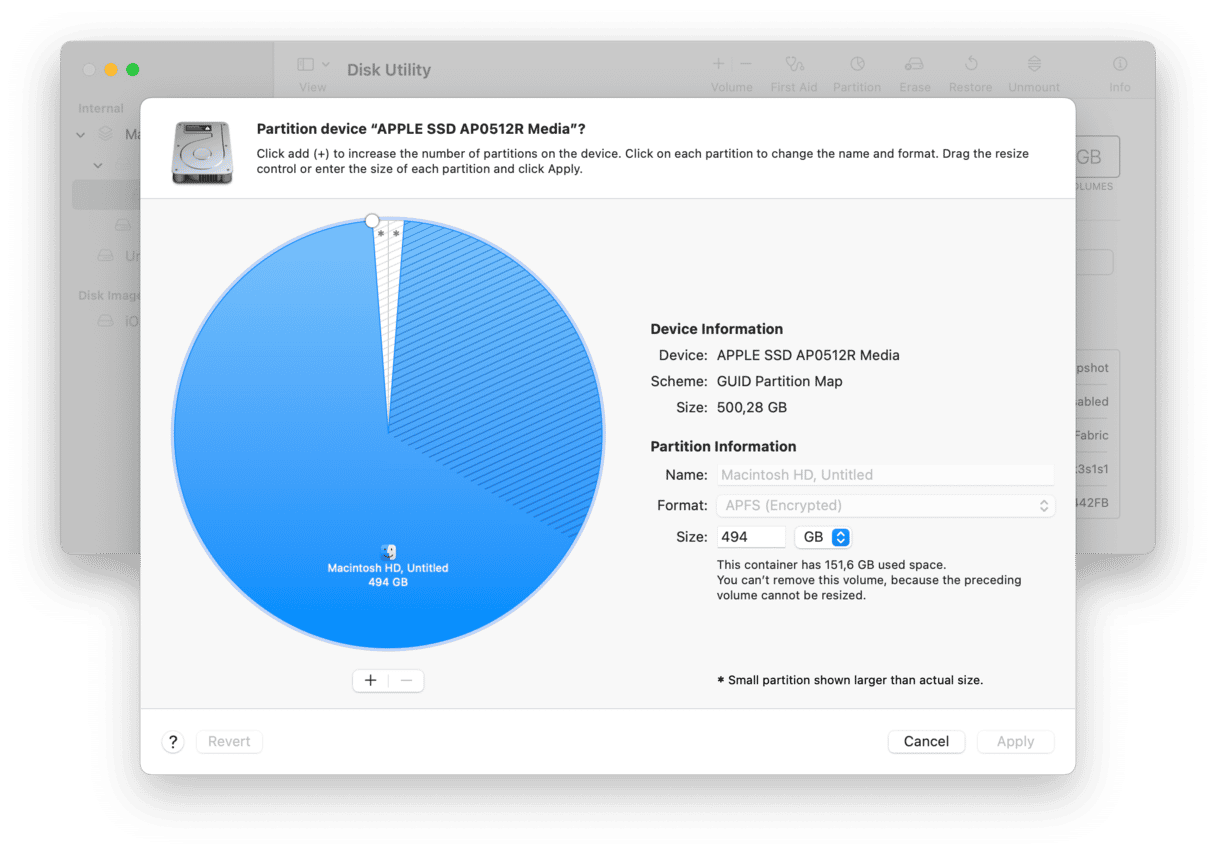
- Click the ‘+’ below Partition Layout.
- Now a new Partition will appear, and you can change the size according to what you need.
- Give this new drive a name.
- If it hasn’t worked exactly as you want, you can always click Revert to unpartition the hard drive on Mac.
- Or, once you are happy with the size, click Apply. You may also be asked to click a lock symbol in the bottom left-hand corner to confirm everything.


But don’t worry if you want to make changes down the road. Everything you have done is reversible, so you can change the size or repartition the hard drive on Mac.
Once the partition is done (which doesn’t take as long as you might imagine), you will have a completely new hard drive or internal SSD, identical to your original, except without anything on it. Upload anything you need, or use the cloned version to store everything that was in the original hard drive — which still exists — in this partitioned version.
Within Disk Utility, you have the option of increasing or decreasing the size, erasing altogether (just remember to backup anything you need first), which will restore the space lost in the partition to your primary hard drive. Always backup before making any changes to a partition.
And remember, before making a partition, clean up your Mac from all the junk it contains. The fastest and the safest way to do that is to use CleanMyMac. Try it today to rid your system of unwanted files and enjoy improved performance.