Cloud services are popular, but they cannot completely replace good old external drives: USB sticks, flash drives, external hard disks, or SSDs. Most of the time, they work flawlessly, but you may encounter a message telling you that the drive is read-only. Luckily, you can fix it in a few minutes. Keep on reading, and you’ll learn how to fix issues with the read-only file system on Mac and make your external drive do the job again.
What causes the “read-only” error?
There are two possibilities when you see a message telling you a hard drive, USB stick, or other external storage media is read-only:
- The drive is formatted in a way that means your Mac can read it but not write to it. This can happen with disks that are formatted as NTFS. Sometimes, you may encounter it if you switched from an older Intel-based Mac to a Mac with Apple silicon.
- Some permissions settings prevent your Mac or your user account from writing to the disk.
To determine which of these is causing the problem, select the disk in the Finder and press Command-I, or right-click it and choose Get Info.
Under General, you should see a list of parameters. Look at the one named Format. If it says NTFS, that’s the problem.
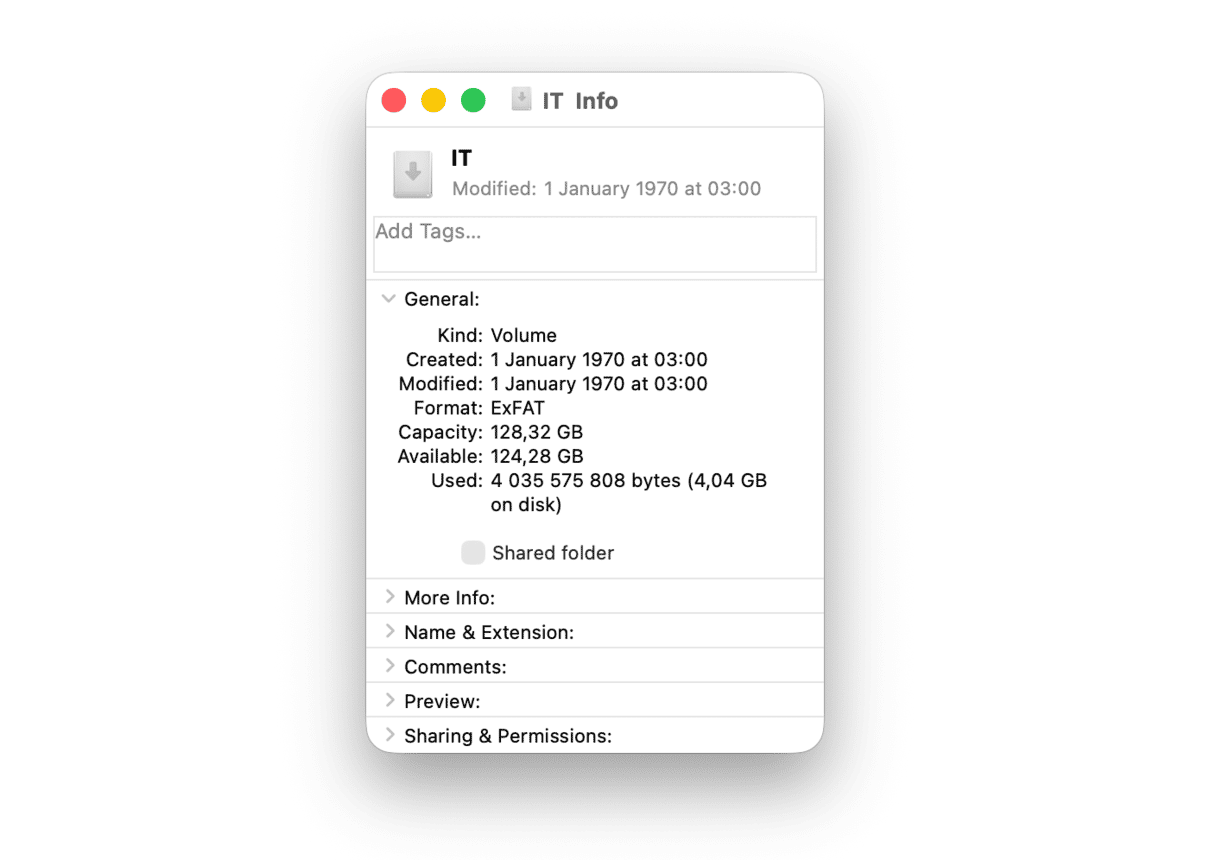
If the Format is APFS, MacOS Extended, or FAT 32, then that is not the problem, and you’ll need to check permissions.
- Look at the bottom of the Get Info window.
- Under Sharing & Permissions, it will tell you what access you have. If it says “read-only,” you know the problem is permissions-related.
Note:Following the same steps, you can change permissions for any file, folder, or even your Mac’s internal drive. Just select the needed item before pressing Command + I.
How to change permissions on an external hard drive on your Mac
The following applies to all drives in question — a hard drive, USB stick, SSD, or any other external media. There are several options, depending on what you identified as causing the problem.
How to fix hard drive read-only issue
There are two options here. One is to reformat the drive to a format your Mac can write to as well as read. This will wipe all the data from it, so you should make a backup or manually copy important files to another location first.
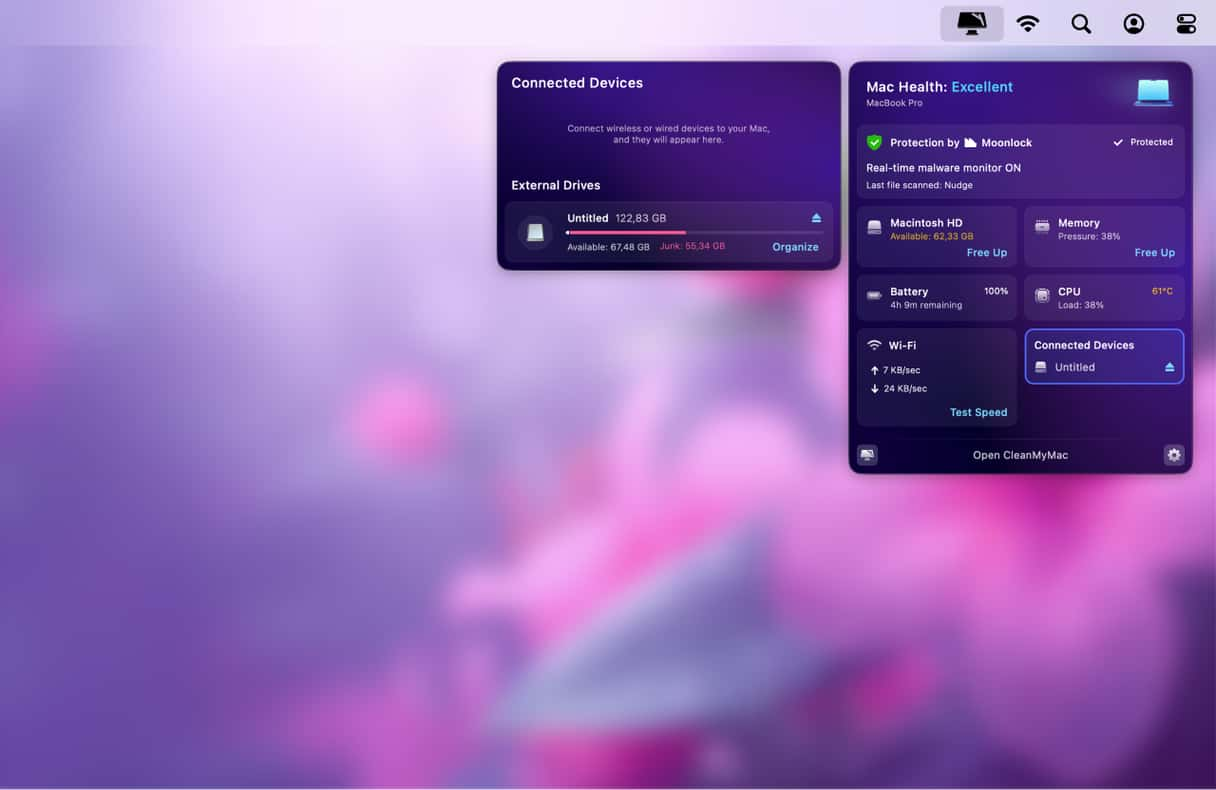
Before you back up your external drive, it is recommended to get rid of junk files it may have accumulated. The easiest way to do it is to use a smart tool that can do the job for you. We recommend CleanMyMac and its Connected Devices tool. It scans your external drive for junk files and lets you clean them up.
- Get your free trial here — use CleanMyMac for 7 days at zero cost.
- Then, open the Menu App by clicking a little iMac icon from the menu bar.
- Check the Connected Devices tab.
- Click Organize.
Depending on how you format it, it may also cause problems if you need to use the drive with a Windows PC. So, only choose this option if you know that the drive will only be used with Mac computers in the future.
The other option is to use third-party driver software to enable your Mac to write to an NTFS-formatted disk. There are a number of paid-for and some free options available.
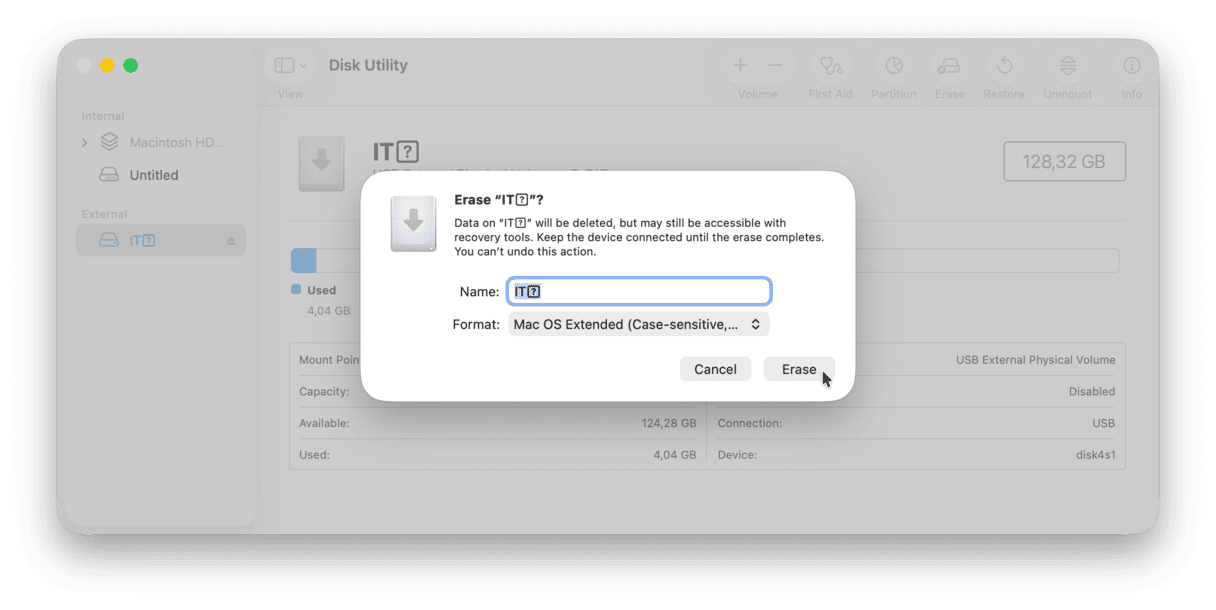
How to reformat an external drive:
- With the drive plugged into your Mac, go to Applications > Utilities and open Disk Utility.
- Choose the external disk in the Disk Utility sidebar.
- Select the Erase tab.
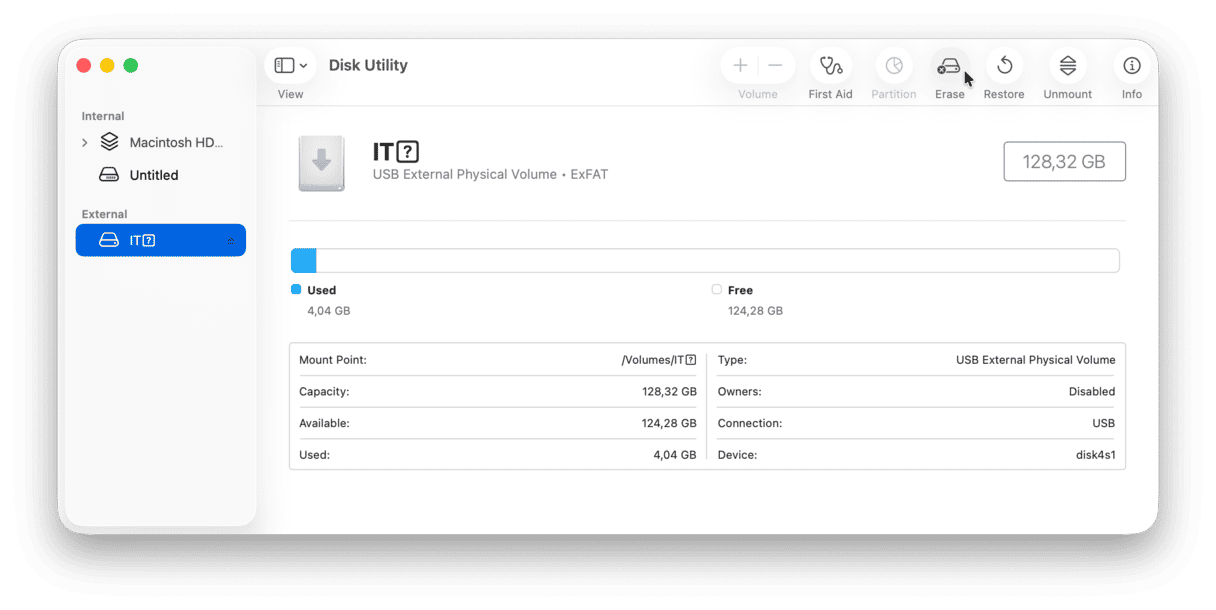
- Type in the name of the reformatted drive.
- Select MacOS Extended (Journaled) from the drop-down menu.
- Click Erase.
- The drive will be wiped and reformatted, and when it’s done, your Mac will be able to write to it.
How to fix permissions problems
If the drive is correctly formatted for the Mac and you can’t write to it, the problem is likely to be related to permissions. Here’s how to fix it:
- Select the drive in the Finder.
- Press Command-I to display the Get Info window.
- At the bottom of the window, click the arrow next to Sharing & Permissions to display permissions.
- Click the Privilege menu next to your username and choose Read & Write.
- Close the Get Info window.
If your user account is not an admin user, you may have to use the padlock to unlock permissions settings and type in an admin username and password. You may also need to restart your Mac to get the change to take effect.
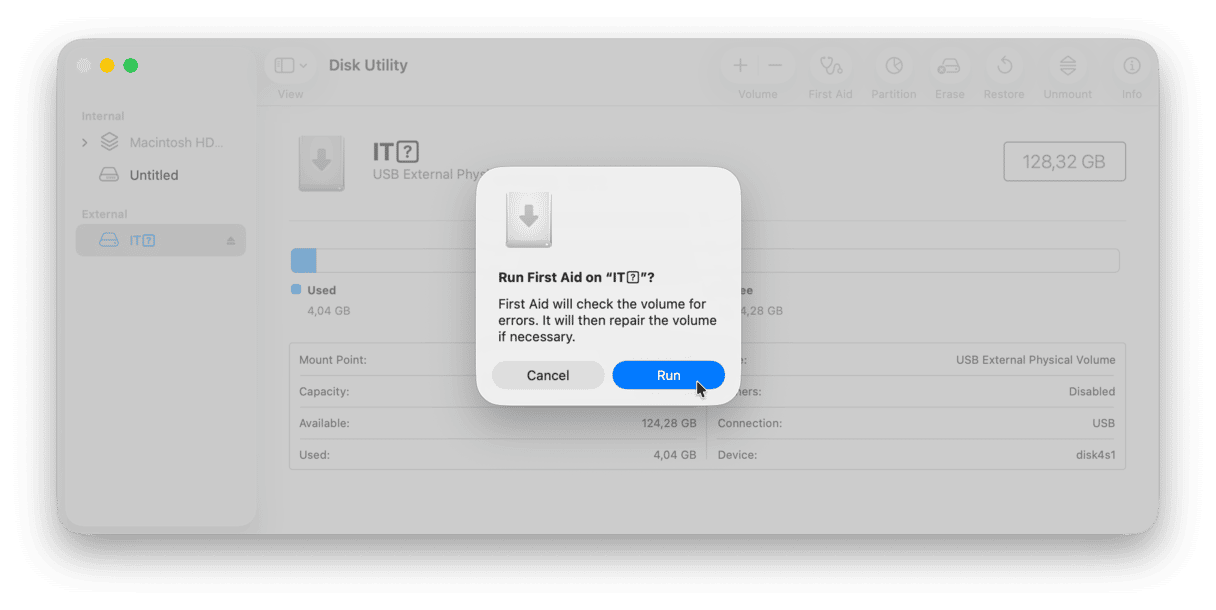
In some circumstances, you may not be able to change permissions in the Finder, or doing so may not fix the problem. If that happens to you, the next step is to use Disk Utility to fix the disk.
- Go to Applications > Utilities and open Disk Utility.
- Select the external disk in the sidebar.
- Click on First Aid.
- Click Run to confirm that you want to try and repair the disk.
In versions of macOS up to and including macOS 10.10 Yosemite, you could use Disk Utility to repair permissions. The option appears in the First Aid tab with two buttons, one to verify and one to repair permissions. If you are running a version of macOS where these options are available, you should use them instead of the steps described above.
First Aid can also help you fix issues with your Mac’s internal drive. Just select it and hit First Aid > Run.
How to write to a locked drive using Terminal
If you are comfortanle running a few Terminal commands, you can use them to enable writing to a locked drive. This way, you’ll be able to write to an NTFS-formatted drive, but use it as a one-off solution. If you need to use this drive all the time, reformat it.
Now, here’s what to do to enable writing to NTFS-formatted drives:
- Open Terminal.
- Type
nano /etc/fstab - Run this command
LABEL=DRIVENAME none ntfs rw,auto,nobrowsereplacingDRIVENAMEwith the actual name of your external hard drive. - Press Control + O to save the file and then Control + X to exit.
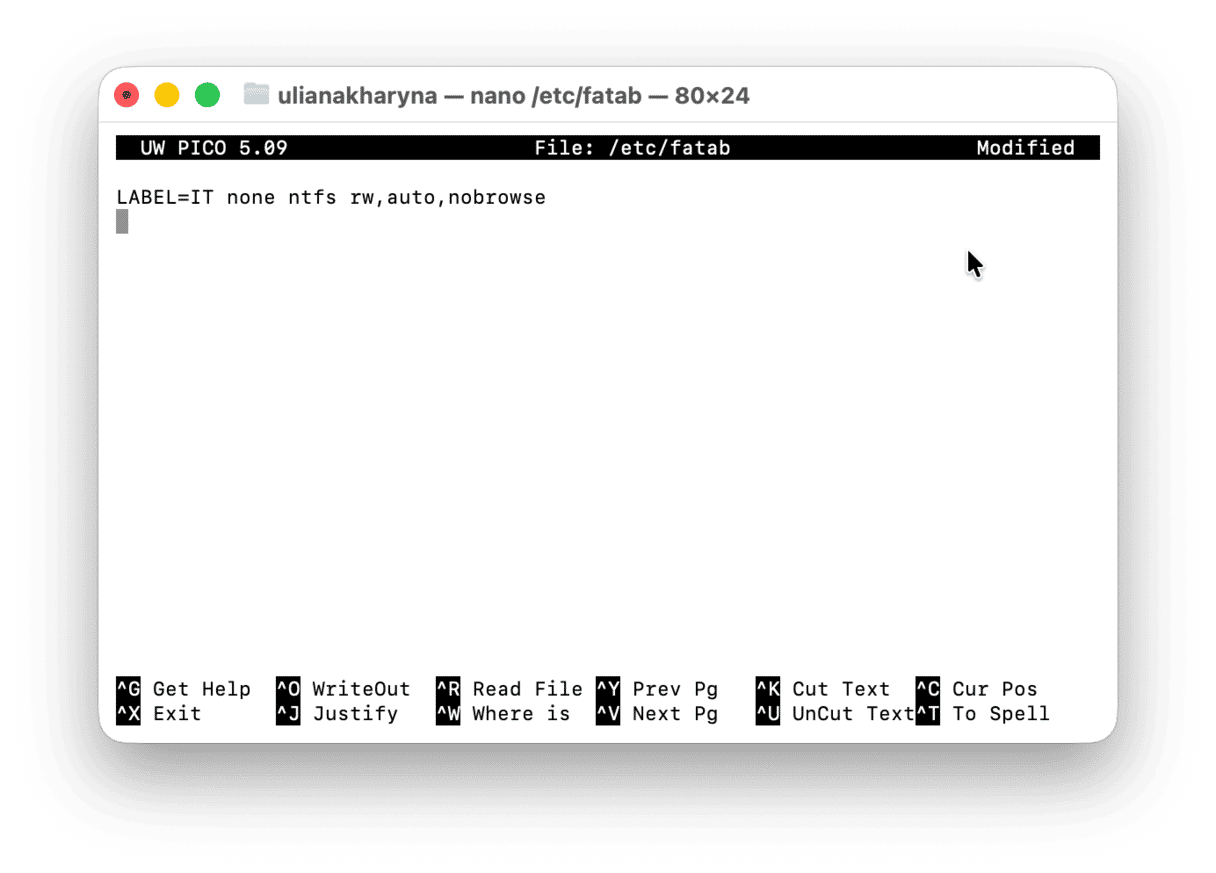
After that, you drive should be in Volumes. To access it, press Command + Shift + G in the Finder window and type /Volumes. Press Return and find your drive in the list.
If you encounter an issue where a hard drive is read-only on your Mac, or perhaps a USB stick or flash drive, it may be that it is formatted as NTFS, which can be read by macOS but not written to. It may also be a permissions issue. If you follow the steps in this article, you’ll be able to identify which it is and fix it quickly.
Frequently asked questions
How do I know if my drive is physically write-protected?
Some drives are physically write-protected. To check it, look for a small slider on the side of your drive. It may also be labeled as “lock.”
Why do I see read-only warning when connecting external drive to Mac?
If you see this warning, it means that there are formatting issues with the drive you are trying to use.
Should I use APFS or exFAT for Mac?
If you plan to use the drive with a Mac only, APFS is the best standard. However, if you need to use it with both Windows and macOS, choose exFAT.
How do I recover data from the disk?
Whatever the reason (either the drive is corrupted/unbootable or you want to recover data as a precaution before trying to fix permissions), you will need a third-party data recovery tool. You can use apps like iBoysoft Data Recovery or Disk Drill. Look for the Lost Data option.
How to I prevent the read-only permissions issue?
If the drive is yours, run regular checkups (e.g., use CleanMyMac to repair disk permissions) and have your disk in a macOS-supported format. If you are concerned about having the issue on someone else’s drive, ask them to add a Read & Write permission for other users, too.
What can I do in the Get Info window on Mac?
In addition to checking and changing permissions, you can change the owner of the file/folder, rename it, lock/unlock it, and add comments. For files, you can also choose the app with which to open them by default. For folders, you can make them shared or revert this change.
What is No Access permission on Mac?
Unlike Read only, this permission denies any action. If you are an admin, you can assign this permission so that standard users or even other admins cannot get into sensitive folders or files.


