One of the areas where Apple has made big improvements in recent versions of macOS is Spotlight, the tool that lets you search for anything on your Mac or online right from your desktop. But Sзotlight isn’t the only way you can search on your Mac. The Fшnder has pretty powerful search features, too, including the ability to create custom searches with multiple filters and save them as smart folders. In this article, we’ll show you how to use both Spotlight and the Finder to search on your Mac. We’ll also show you how to use the neat features in Photos to find photos using text searches.
How does search on Mac work?
At its most basic level, search in Spotlight or the Finder tries to match the term you type with the names of files on your Mac. However, it can do much more than that. It can also match your search term against metadata in files and against keywords. Type in a person’s name in Spotlight, and it will look for that person in Contacts, Mail, and Messages and show you what it has found. Spotlight can also search for images. Type in ‘dog,’ for example, and one group of results will contain photos of dogs it has found online. If you search in the Photos app, it’s even smarter. It uses AI to match your search terms with the content of your photos. So, if you search for ‘dog’ in the Photos app, it will show you all the photos you’ve taken of dogs.
How to search faster
The fewer files you have on your Mac, the faster your search will be. There are a couple of good ways to reduce the number of files on your Mac. One is to get rid of junk files like temporary files that were never deleted, old cache files, and files for languages you don’t need. The other is to archive the least-used and largest files on your Mac, which will free up lots of space quickly.
CleanMyMac has modules that do both of those, making it easy to both clear out the junk and identify the largest and oldest files on your Mac. You can then decide whether to delete them, move them to another disk, or leave them where they are. CleanMyMac is free to download here, so you can try it out for yourself.
Once downloaded, follow these steps to find unnecessary files:
- Open CleanMyMac and click System Junk.
- Click Scan, and wait for it to complete.
- Now, click Clean. You can also review details and select files for removal.
- Next, click Large & Old Files > Scan.
- Choose files for deletion and select removal type.
- Click Remove.

How to search on a Mac in Spotlight
Searching in Spotlight is easy:
- Click on the magnifying glass in the menu bar or use the keyboard shortcut Command-Space.
- Type your search term and press Return.

You’ll see results in the Spotlight window separated into categories. Locate the result you want and then click on it.
In addition to being a Mac search bar, Spotlight is a great app launcher, too. Just start typing the name of the app you want to open in Spotlight’s text box and click it when it appears.
You can change the content included in Spotlight results in System Settings.
- Click on the Apple menu and choose System Settings.
- Choose Siri & Spotlight.
- In the Spotlight section, deselect the types of content you don’t want to appear in the Spotlight search results.

How to find on Mac using the Finder
You can also use Spotlight to search for files on your Mac, but it’s better to use Finder. Finder will only return files as search results, so you don’t have to trawl through other types of content to find what you’re looking for. And you can modify searches with filters and save them as Smart Folders.
Here’s how to search on Mac use the Finder:
- Click on the Finder icon in the Dock.
- Press Command-N to open a new window, or click the File menu and choose New Finder Window.
- Click the magnifying glass at the top right of the window and type your search term in the text box.
- As you type, you will see results start to appear. By default, the search is conducted on the currently selected folder or disk. To search every disk connected to your Mac, click ‘This Mac’ in the bar under the toolbar.
- To narrow your search by adding filters, click the ‘+’ under the search box.
- Choose an option from the menu on the left.
- Choose options from other menus that appear after you make your first selection.
- If necessary, type a term in a text box that appears.
- To add another filter, click the ‘+’ again.
- Keep adding filters until you’re happy with the search.
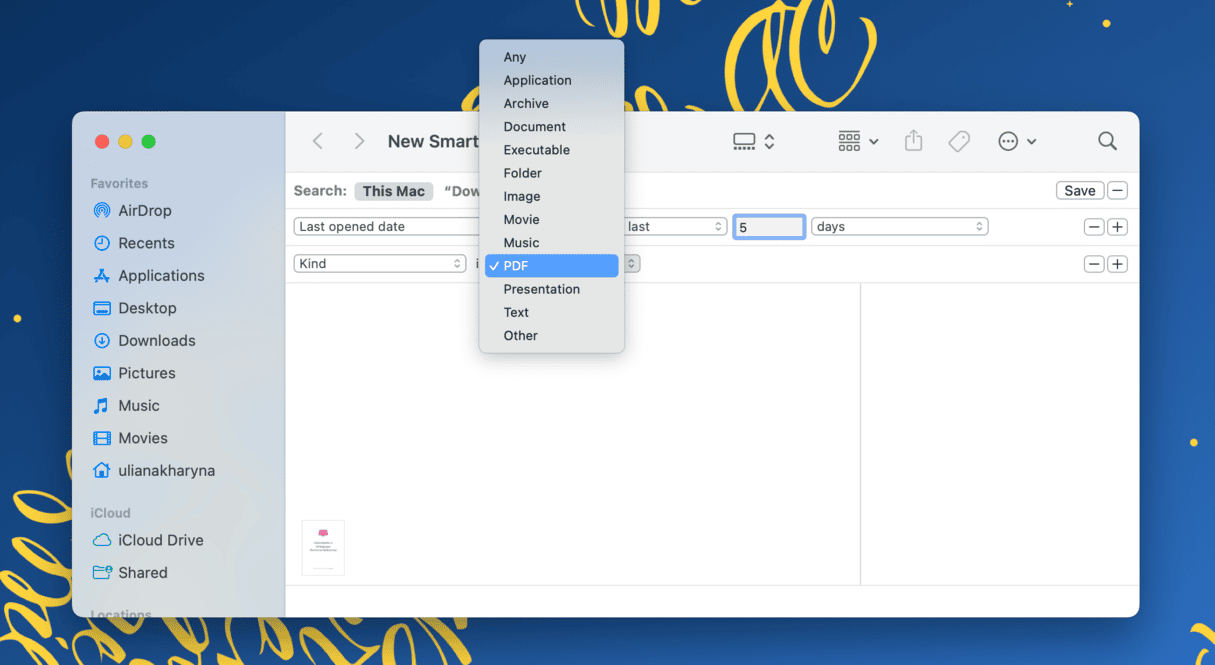
- To save the search as a smart folder, click Save under the search box.
- Give the smart folder a name, choose where to save it, and if you want to add it to the Finder window sidebar, select that box.
- Click Save.
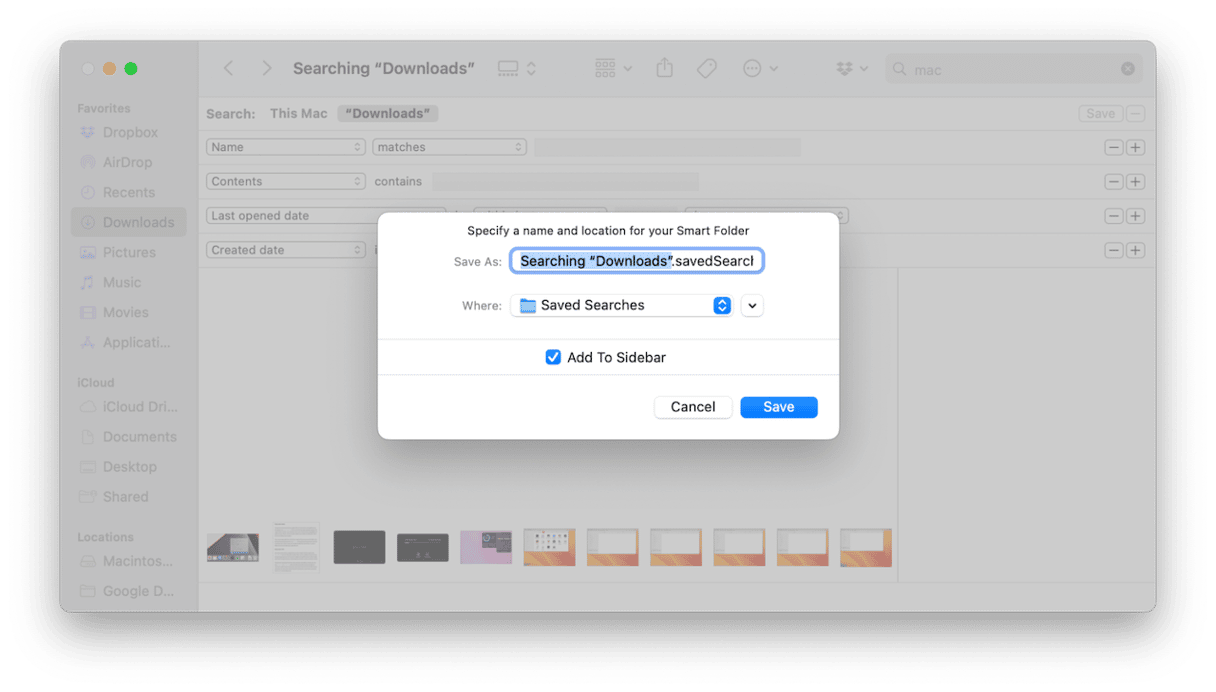
Smart folders are updated automatically. So, when you select one in the Finder, it runs the search again and shows the current results.
If the menu on the left doesn’t show the filter you’re looking for, click ‘Other.’ This will display a window with lots of other filters, along with explanations of what each one does. Select on and click OK to use it in your search. To add it to the menu so you don’t have to choose ‘Other’ next time you want to use it, select the box under ‘In Menu.’
How to search on Mac in Messages
You can also find whatever you need in the Messages app. Here’s how to word search on Mac using this app:
- Open Messages.
- Click in the search box near the top left of the window.
- Start typing your search term.
- You’ll see results appear beneath.
How to keyword search on Mac
You can add keywords to files in Finder by using tags. Once you’ve added a tag to files, you can search for it by starting to type in the name of the tag in the text box and then choosing it from the menu that appears. You can also add keywords to files in some applications, like Preview. And you can add a ‘Keyword’ option to smart folder filters by choosing Keywords from the Other menu in the tip above.
As you can see, searching your Mac is easy but can also be very powerful if you use multiple filters and save them as smart folders.


