Imagine that you’ve been waiting weeks for the latest version of macOS to ship. Then, finally, it’s available, and you click Download, only to be confronted with an error message telling you that you don’t have enough disk space. All those new features you were looking forward to trying out are gone. But it doesn’t have to be that bad. You can fix it if you understand macOS Sequoia space requirements. So, in this article, we’ll show you what to do if you don’t have enough space to install macOS Sequoia.
How much space does macOS Sequoia take?
Apple hasn’t directly answered the question, “how much space does Sequoia need?” If recent versions of macOS are a guide, the installer will be around 12GB, and you will need around twice that to install it. So, macOS Sequoia size is around 25GB.
However, there is one possible complication. One of the features of Sequoia is that apps will no longer require available disk space to be twice the size of the installer. It’s possible, though not confirmed, that that will be the case for the OS, too. In the meantime, the only system requirements Apple has specified are that Sequoia will only run on Macs that are covered by the list below:
- iMac 2019 and later
- iMac Pro 2017 and later
- Mac Studio 2022
- MacBook Air 2020 and later
- Mac mini 2018 and later
- MacBook Pro 2018 and later
- Mac Pro 2019 and later
How to check how much free space you have
The best way to check how much free space you have on your startup disk is to follow the steps below:
- Click the Apple menu and choose System Settings.
- Go to General > Storage.
- Look at the bar at the top of the window. It will tell you how much storage you’ve used and the total available. The difference between the two is the free space available.

How to free up space for macOS Sequoia
If you don’t have enough space to install macOS Sequoia and need to free up some more, there are a few things you can do to meet macOS Sequoia storage requirements.
1. Follow macOS recommendations
You may have noticed in the Storage section of System Settings that there are recommendations for how to save space. These may include Store in iCloud, where all your files are stored in iCloud and only those you access regularly are saved to your Mac, and Empty Trash Automatically, which does exactly what it says and stops you using Trash as somewhere to store files. Turning both those on should save you some space. You can also look at the options beneath those, like deleting downloaded books and podcasts to save space — you can always re-download them at another time.
2. Get rid of system junk
System junk includes temporary files that were never deleted, old cache files, settings files for applications that are no longer on your Mac, and language files for languages you don’t use. Getting rid of all these files manually would take quite a while because you’d have to track them all down and weed them out. However, you don’t have to do it yourself; CleanMyMac’s Cleanup tool can do it for you. It scans your Mac, looking for junk files and when it’s done, shows you what it’s found. You can then choose whether to delete everything it has found or review the results and choose for yourself what to delete. You can download CleanMyMac for free here.

3. Check your Downloads folder
Most of us don’t regularly clear out our Downloads folder. The chances are yours has disk images, application installers, PDFs, and other files in it that you don’t need. Clear out Downloads by deleting the files you don’t need and moving those you want to keep elsewhere.
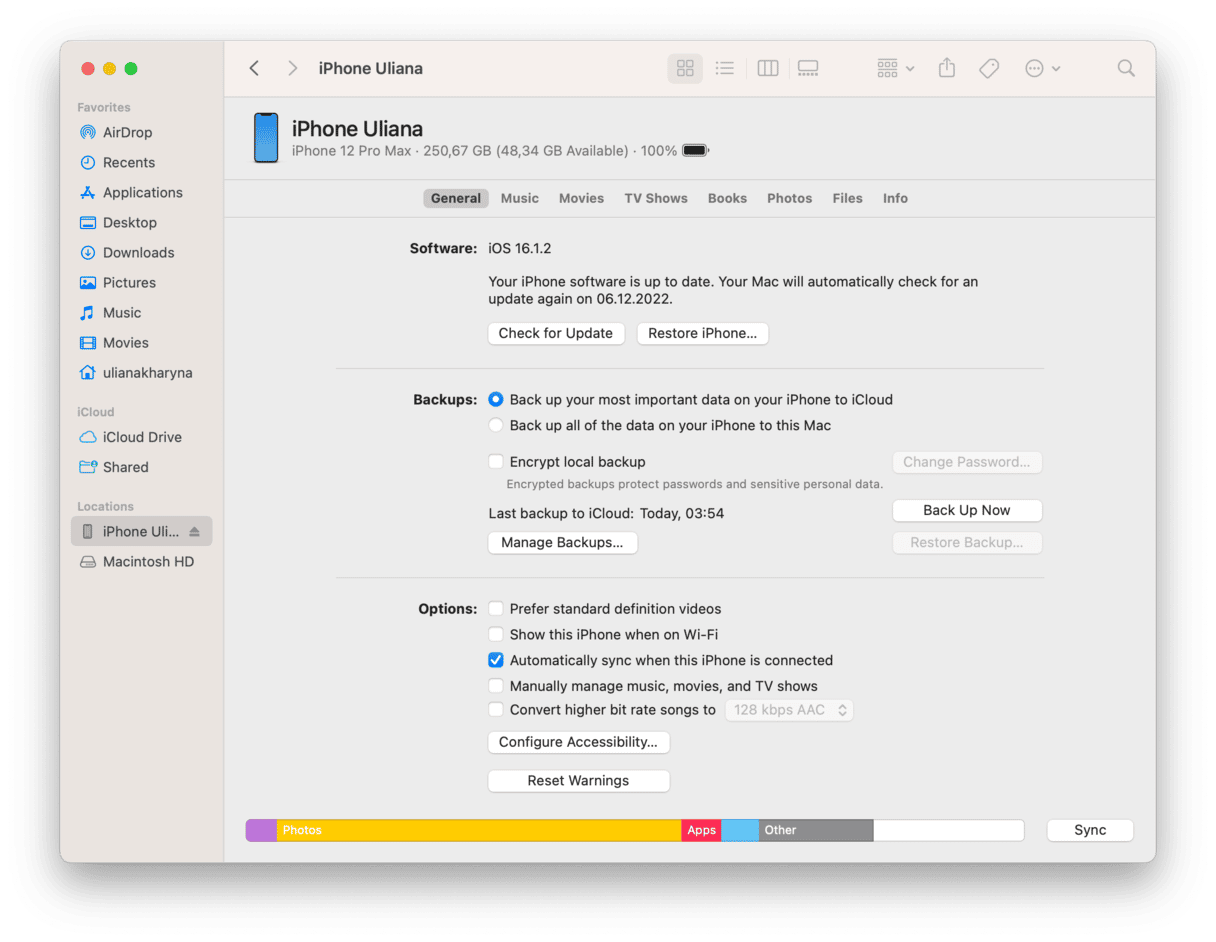
4. Delete old iPhone and iPad backups
Even if you don’t back up your iPhone or iPad to your Mac regularly, there may still be old backups stored on it. You may, for example, have backed your iPhone up before updating iOS. Follow the steps below to delete backups.
- Connect your iPhone or iPad to your Mac via USB.
- Open a new Finder window and select the device in the sidebar.
- In the main window, choose Manage Backups.
- Select the backup you want to remove and click Delete.
5. Delete podcasts
The Podcasts app allows you to download the latest episodes of shows you add to your Library. If you add lots of shows and leave the setting at, say, the latest three episodes, that could be quite a lot of downloads and quite a chunk of disk space. To delete them, open Podcasts and click Downloads in the sidebar. Click the three dots and choose Remove Downloads.

6. Get rid of large and old files
Deleting the largest files on your startup disk or moving them to an external disk will free up lots of space quickly. And doing the same with the files you haven’t accessed in a while will cause almost no disruption, so combining the two is a good way to free up space. The difficulty is in identifying those files. Who wants to trawl through the Finder, looking at file sizes and Last Opened dates? Thankfully, you don’t have to. CleanMyMac’s Large & Old Files feature (found within My Clutter) will do it for you. You can then filter the results by type and sort them by size or when they were last opened, making it easy to decide what to remove and what to keep.

7. Empty Trash
Do not ignore this step even if you’ve enabled the feature that automatically empties your bin after 30 days. Just go to Trash and click Empty, so everything you’ve just deleted does not stay there for another month.
It’s frustrating if you want to start using the new version of macOS and see a message telling you there’s not enough disk space to install macOS Sequoia when you try to install it, but it’s easy to fix. Follow the steps above and you’ll very soon have plenty of space to install it.


