

Visual Intelligence has been on the iPhone since the iPhone 16 came out. Now, with Golden Gate, it’s on Mac, too. And the good news is that it can do more than I expected it to, and it works pretty well, with one or two exceptions. In this article, I’ll explain what Visual Intelligence is and what it can do in macOS Golden Gate.
What is Visual Intelligence on Mac?
Visual Intelligence is Apple’s name for the bit of Apple Intelligence that works with images and gathers information from them. While on an iPhone, you can point the camera lens at a real-world object and then hold down the camera control button to conduct an image search or ask ChatGPT about the object. On Mac, Visual Intelligence works on the content of a section of the screen. Instead of using the camera control button, you take a screenshot of the part of the screen you want more information about. This can be a document, website, image, or anything else visible on the display. It only works in macOS Golden Gate, which means you need a Mac with Apple silicon. You will also need to enable Apple Intelligence if it’s not already enabled.
How to enable Siri AI on your Mac
Visual Intelligence is part of Siri AI, so if you haven’t already enabled Apple Intelligence on your Mac, you’ll need to do that first.
- Click on the Apple menu and choose System Settings.
- Go to Apple Intelligence & Siri and choose Try Siri AI (if that’s not available, choose Join Apple Intelligence Waitlist).

How to use Visual Intelligence on Mac
There are a couple of different methods for using Visual Intelligence. I’ll show you both.
Use the direct keyboard shortcut
- Press Command + Shift + 6.
- The cursor will change to a crosshair. Click on a point on the screen on which you want more information or click and drag the cursor over a larger area.
- You will see options for what to do next. Click Ask Siri.
- Type the question you want to ask.
- Alternatively, click the Image Search icon to conduct a Google image search.
Use the screenshot toolbar
- Press Command + Shift + 5.
- You will see the usual screenshot options, along with a Visual Intelligence icon (four corners of a square with a circle in the middle) and Ask Siri.
- Click the option you want.
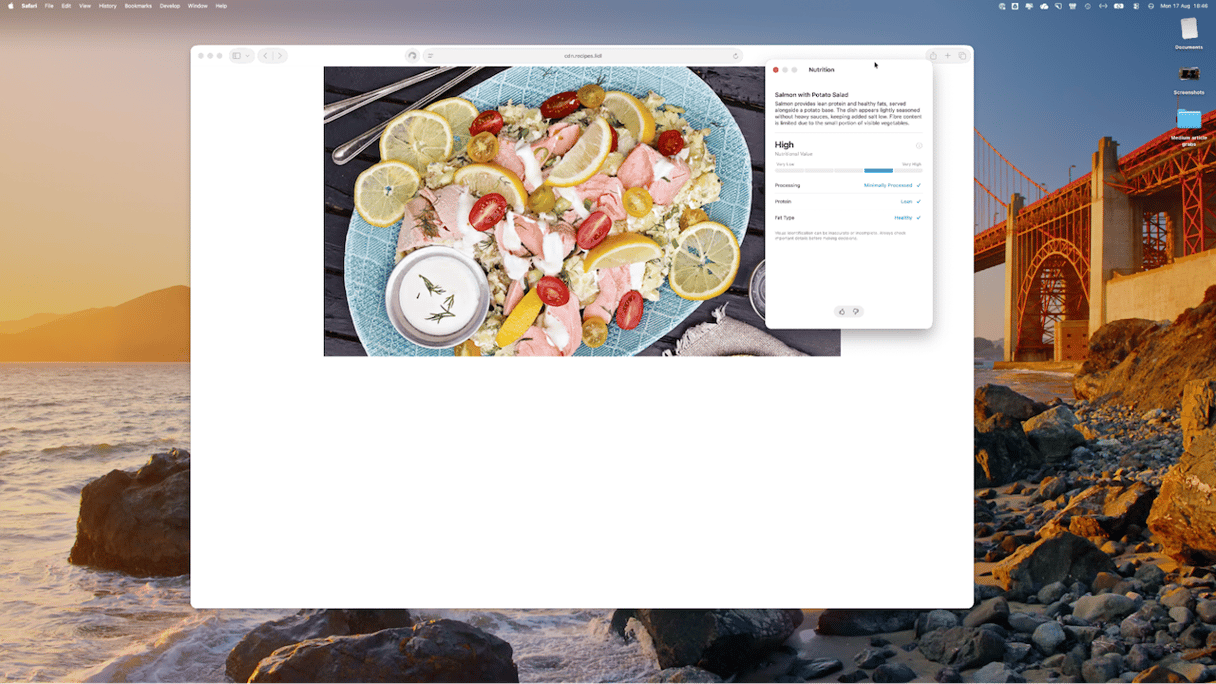
Depending on the context, Visual Intelligence may offer other options. For example, if you use Command-Shift-6 to take a screenshot of an image of food, you will see an option for retrieving nutritional information.
What can you ask Visual Intelligence?
I tested Visual Intelligence with lots of different screenshots. Here’s what I tried.
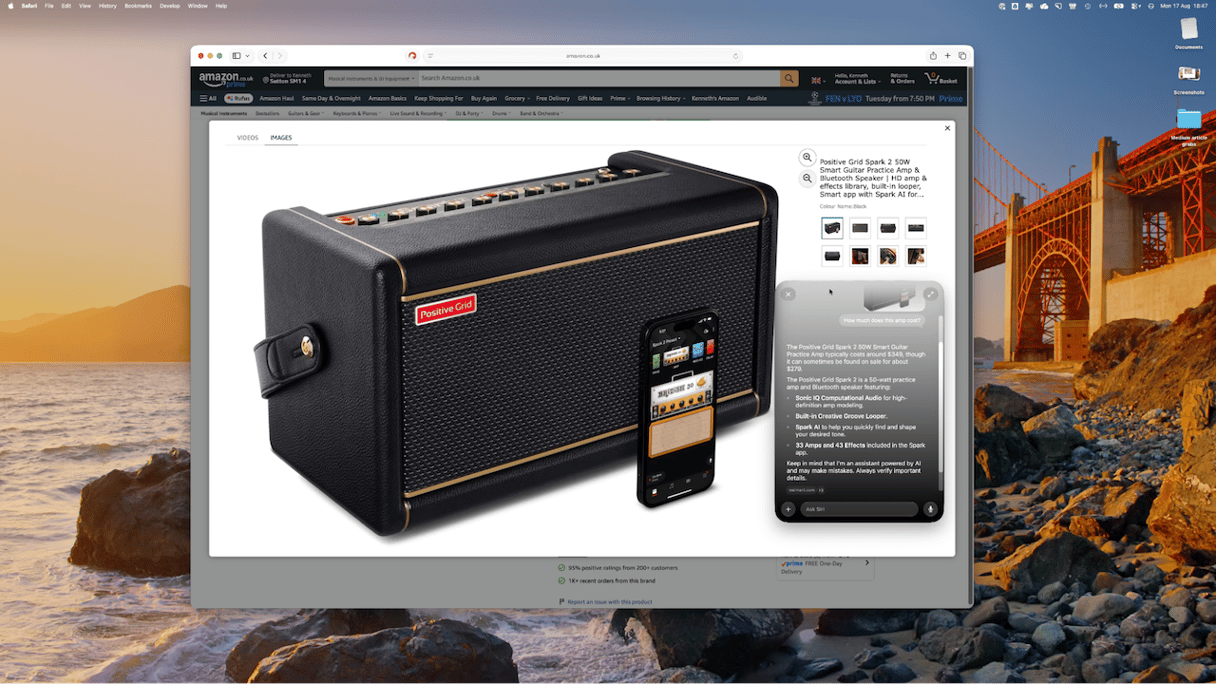
- I took a screenshot from an online shopping page and asked about the product, a guitar amplifier, in the image and how much it cost. I also conducted an image search for the amplifier.
- I went to the website of my favorite Thai restaurant, selected an area of the screen that included its address and opening hours, and asked Siri to tell me when the restaurant opened.
- I selected an area of the screen that included text in Spanish and asked Siri to translate it.
- I went to a listing for a gig that I’m planning to go to and asked Siri to create an event for it and add it to my calendar.

- I opened a photo of my dinner from the previous evening and asked for nutritional information on the meal.
- Finally, I selected a part of the screen that was full of text and asked Siri to summarise it for me.


What works and what still needs refinement?
It’s important to remember that the tests I ran were all done using a beta version of Golden Gate, and so rough edges are to be expected. It’s also likely that there will still be room for improvement in the .0 version of Golden Gate and that refinements will continue to be made. That said, I was pretty impressed with many of the results. Visual Intelligence did a good job of retrieving product information and the price, as well as the restaurant opening hours from its website. It also did well translating and summarising text. It was also pretty good when it came to identifying the meal and its constituent parts, as you can see from the screenshot. I couldn’t copy the information it showed in order to paste it elsewhere, which was disappointing. Image search results were decidedly mixed. I certainly wouldn’t rely on results from Visual Intelligence at the moment. It’s a good place to start, but for now you should confirm any information it gives you from a second source.
How to keep your Mac running smoothly when you use Visual Intelligence
Like everything else in Apple Intelligence, Visual Intelligence puts pressure on your Mac’s GPU, CPU, and memory. All that on-device processing is very demanding, and so it’s a good idea to make sure your Mac is in the best possible shape before you begin.
The easiest way to do that is to use the Smart Care feature in CleanMyMac. It hunts down junk files, duplicate downloads, vital app updates, and any malware that may have sneaked onto your Mac. And it tells you which maintenance tasks to run to improve your Mac’s performance. It’s easy to use and much quicker than carrying out all those tasks manually.
Here’s how to keep your Mac in top shape:
- Start your free CleanMyMac trial — you can test it for 7 days
- Choose Smart Care in the sidebar.
- Click Scan.
- When it’s finished, click Run.

Apple’s Visual Intelligence has the potential to be a great tool on Mac for all kinds of uses. For now, it has a few rough edges and areas that need improvement. But for some uses, like getting information on a product or opening times for a restaurant, it works very well.