Zooming in and out while we use our Mac is something that many of us do all the time without even thinking about it. But, as with many things on Mac, whichever method you use for zooming in and out isn’t the only way and may not be the best way. We all get into habits and tend to stick with them. So, to help you decide if there’s a better way to zoom in, here’s how to zoom in and out on a Mac.
What do we mean by zoom in and out?
Before we start, it’s worth defining what we mean by zoom in and out. Zooming in is the process of enlarging whatever you are looking at on screen and cropping the full view so that the element you want to focus on takes up more of the screen. Zooming out is doing the opposite.
How to zoom in and out on Mac
Read how to zoom in and out using the trackpad, Magic Mouse, keyboard shortcuts, or Accessibility features.
How to zoom in and out using trackpad
If you have a Mac with a trackpad, some apps, such as Preview and Photos, allow you to zoom in by unpinching with two fingers on the trackpad. You can zoom back out again by reversing the gesture and pinching with two fingers. In apps that don’t support pinching and unpinching, you can double-tap with two fingers to smart zoom in and double-tap again to zoom back out.
How to zoom in and out using Magic Mouse
You can’t pinch and unpinch to zoom on a Magic Mouse, but you can smart zoom by tapping with one finger on the top of the mouse.
How to zoom in and out on Mac using keyboard shortcuts
There are a couple of keyboard shortcuts that work almost anywhere:
- Command-Plus to zoom in
- Command-Minus to zoom out
There are also keyboard commands that work in some apps to control the degree to which you zoom in and out. For example, in Preview, you can use the following keyboard commands as well as Command-plus and Command-minus:
- Command-0 makes the document or image its actual size in the preview window.
- Command-9 fits the document or image to the window.
- Command-Shift-8 zooms into a selection you’ve made in the image.
- Command-Plus and Command-Minus also work in the Photos app, but you can also tap “z” to toggle zoom in and out.
In Photos, you can also use a slider at the top of the window to zoom in and out of a photograph. There’s a similar slider in the Finder’s icon view at the bottom of the window that allows you to zoom in and out, making application icons bigger and smaller.
How to zoom in and out on Mac using Accessibility features

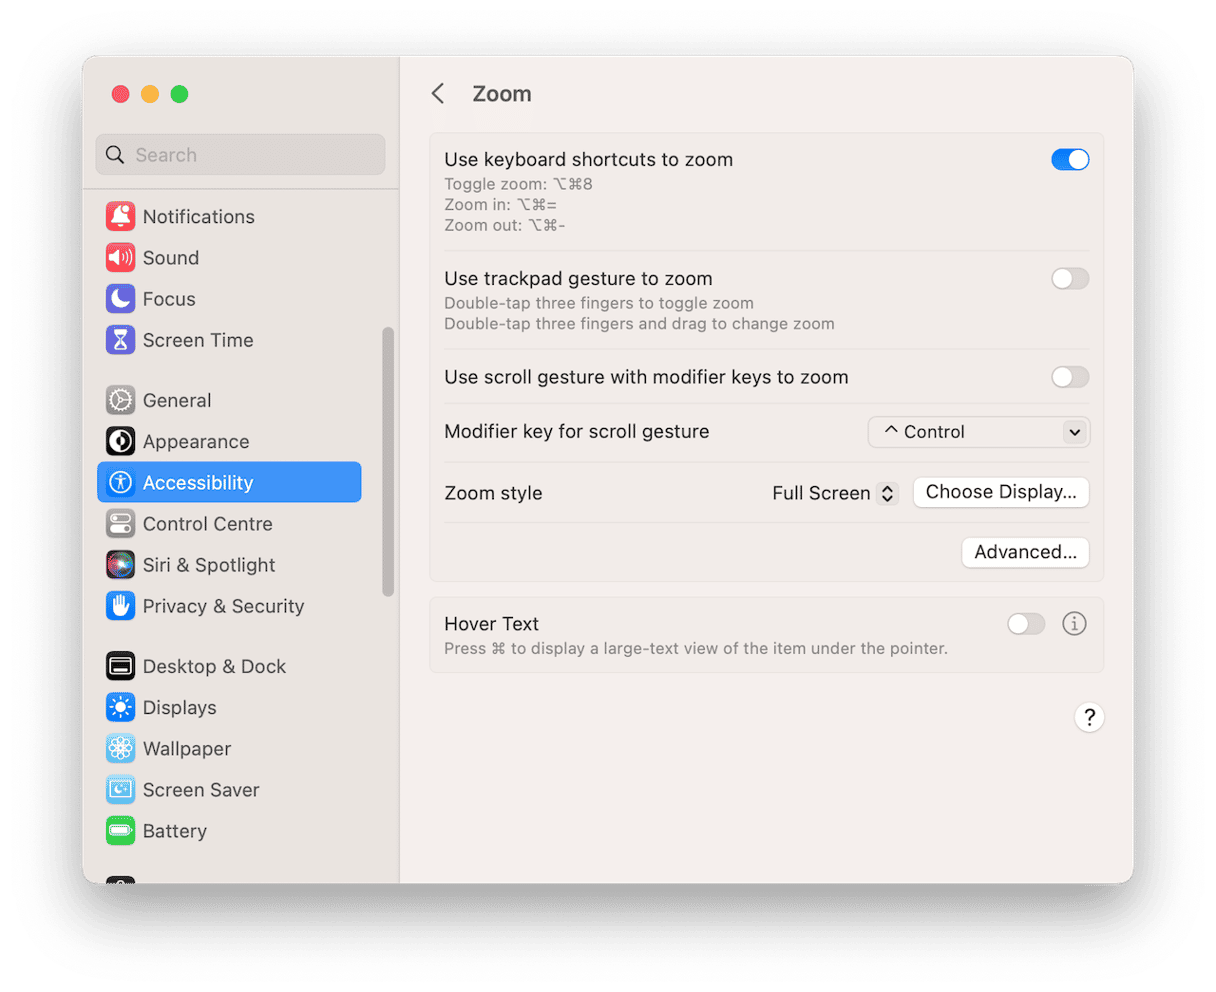
The Zoom section in the Accessibility pane of System Settings has a number of options for zooming in and out. The difference here is that, by default, instead of zooming in on an image in a window or on text on a page, the Accessibility zoom enlarges everything on the screen, including icons and the menu bar. However, you can configure it so that the section you zoom in on is shown picture-in-picture or in split-screen mode. Here’s how to use it.
- Click the Apple menu and choose System Settings > Accessibility.
- In the Vision section, choose Zoom.
- To use the keyboard to zoom, toggle “Use keyboard shortcuts to zoom”
- You will now be able to use Option-Command-Equals to zoom in and Option-Command-Minus to zoom out, or Option-Command-8 to toggle zoom.
- Configure the other settings for trackpad and gestures however you want them.
There are lots of different ways to zoom in and out on Mac. You probably use one of them already. But why not give the others a try? You might find one of them suits your workflow better.


