Over time, your Mac is going to fill up and run out of storage space. Most likely, duplicate photos will take up a good amount of your valuable space. Finding them is a chore. You can use the Duplicates feature in the Photos app to hunt down duplicate images in your library, but there’s more to removing clones. Keep on reading, and you’ll learn how to use this feature and how to clean your Mac of duplicates both with an app and manually.
Why is my Mac duplicating photos and other files?
There are a ton of reasons why your Mac could be loaded with duplicate files:
- You imported the same photos from your camera multiple times and didn’t realize it (sometimes, due to iCloud sync issues).
- You couldn’t find a photo or file you received via email or messages, so you just redownloaded it.
- You have identical libraries (and playlists) on different devices, so all of these copies are stored on your Mac.
- You deliberately created several copies of a document or a photo and forgot to delete them.
- You edited a photo and saved different versions of the same edits.
How to remove duplicate photos on Mac
Finding duplicate photos on your Mac can be tedious and time-consuming, especially if you’re trying to do that manually. You might even start wondering if it’s worth the effort. It is, since you can reclaim a few gigabytes of space — some users reported freeing up 30 GB of storage!
The problem with duplicate and visually similar photos has become so commonplace that knowing some tips can really help you out. So, let’s take a closer look at how you can sort your photos, both manually and with the help of the app.
1. Use a duplicate сleaner app
First, you need to find duplicate photographs in your gallery. Then, you have to figure out which version to delete in each case. All that takes loads of time if done manually, and CleanMyMac does 90% of the work for you.
CleanMyMac is an Apple-notarized Mac cleaner app that comes with a smart My Clutter feature that can remove duplicate images with just a few clicks. It scans your computer, looking for such photos, and then lets you choose which variant to keep and which one to delete. This way, you do not have to browse all folders.
Here’s how to get rid of duplicate photos with CleanMyMac:
- Start your free CleanMyMac trial — you can test it for 7 days at no cost.
- Open the app, go to My Clutter from the sidebar, and run a quick scan. You can select the location of the scan — even your external drive.
- When the scan is over, click Review All Files.
- All duplicate photos you have on your Mac will be grouped under Duplicates. You will see a number of duplicates next to every image. Click the group of photos to view them (CleanMyMac has a built-in photo preview).
- Once you choose which copies you want to delete, select them and proceed to the next set of duplicate images.
- Finally, click Remove to delete all selected photos. Note that duplicate screenshots are deleted right away, while photos are sent to the Recently Deleted album in the Photos app, so don’t forget to empty it.


The benefits of using CleanMyMac
- Based on internal statistics, with the help of the My Clutter feature, on average, users find and remove 4 duplicates after the first scan
- Not only does it remove duplicates, but it can also clean up your Mac: according to internal reports, on average, users find and remove 10 GB of safe-to-delete junk files (logs, caches, etc.)
- Comes with 25+ tools for cleaning, maintaining, and protecting your MacBook
Try CleanMyMac for free — see it in action on your Mac.
2. Remove duplicates from Photos app manually
When you import your pictures, the Photos app automatically detects duplicates, but it won’t help you with the ones already in your library. For those images already in your photo library, you’ll have to take a more manual approach.
It’s safe to assume most of your duplicates were taken at the same time or at least on the same day. Thankfully, the Photos app, by default, sorts your pics by the date they were captured, making duplicate photos a little easier to spot as you’re scrolling through your library.
But if you’re still having trouble finding all of your duplicates, you can further narrow down your search by using Smart Albums. You can filter your pictures by filename, camera model, lens type, and other criteria to help you figure out if a photo has been duplicated. Follow these steps to start using Smart Albums in Photos:
- Open the Photos App.
- Click File > New Smart Album.
- In the pop-up window, name your Smart Album and set the filter criteria.

- Select the pictures you want to delete.
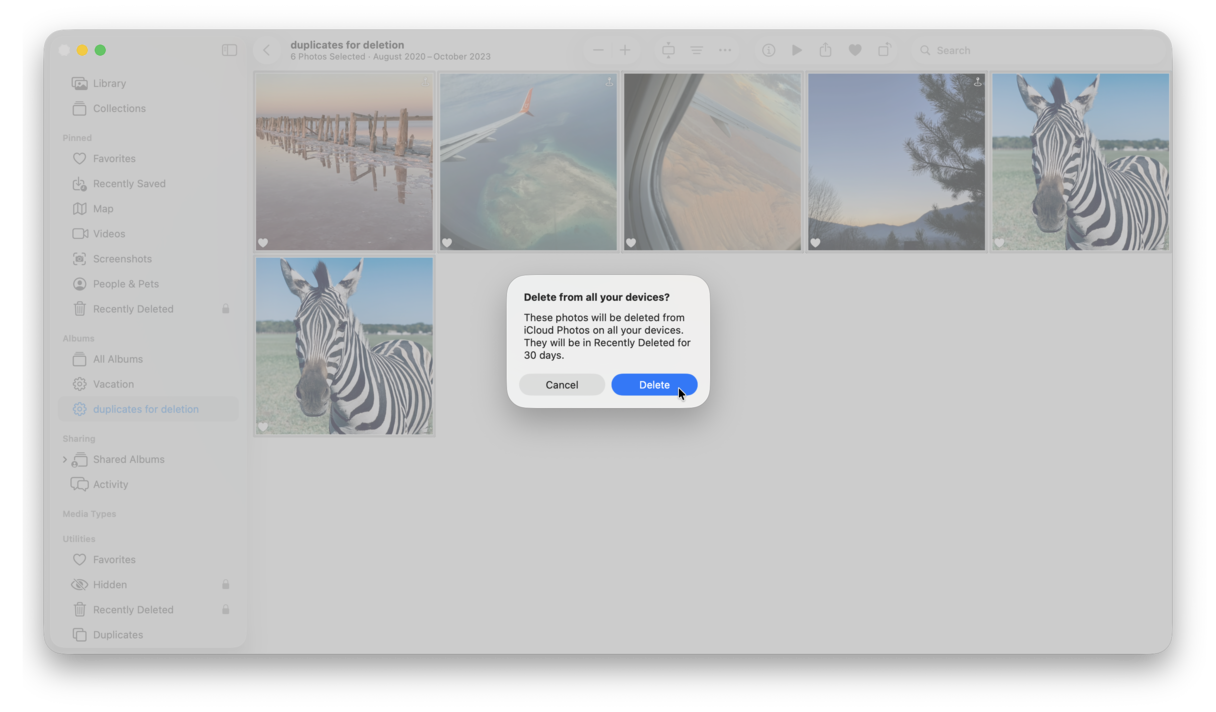
Tip: If you do not know which photo to choose for deletion, check metadata (date, time, device used to take a photo, etc.). Select any photo and press Command + I. Now, you will see metadata for any photo you select. You can close the window by clicking the red X top left. - Right-click (or hold down Command and click) any of those images and click Delete.
- A window will pop up. Click Delete to confirm.
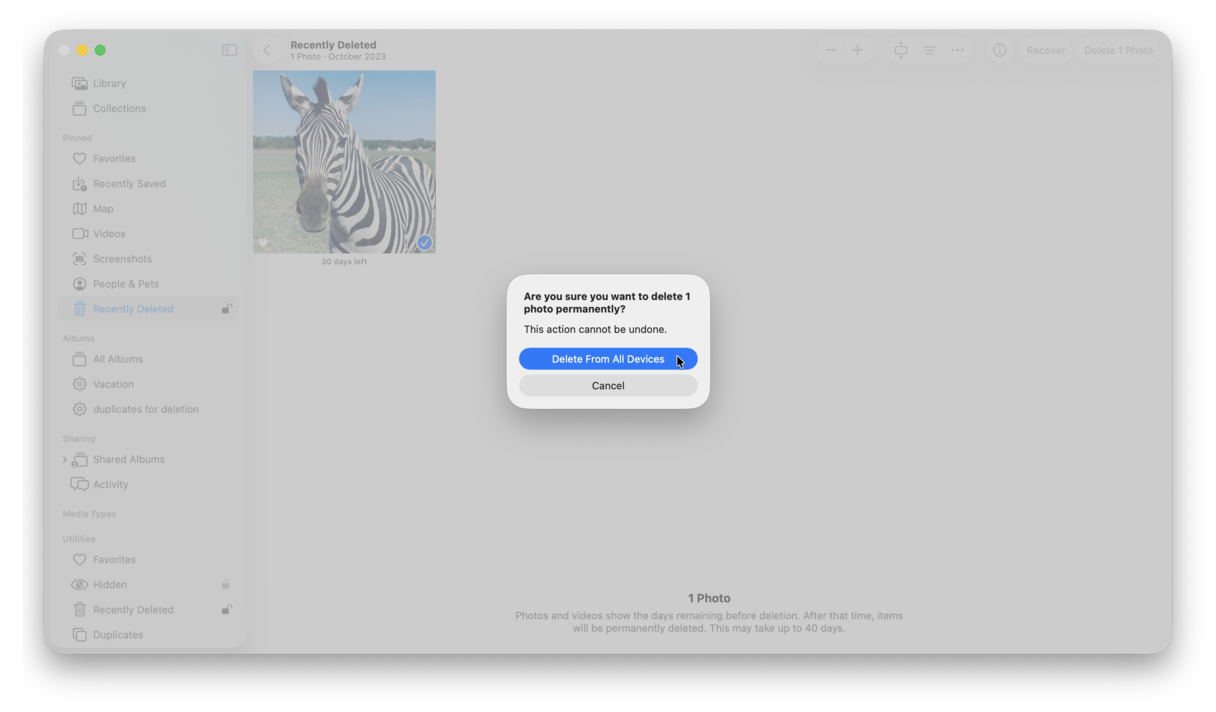
- In the sidebar, click Recently Deleted.
- Click Delete All in the top right corner and confirm.


Smart Albums are saved in the Photos app’s sidebar, so you can return to your cleanup at any time and pick up right where you left off, which you’ll find helpful if you have quite a few duplicates to go through.
Use a built-in duplicate finder
If your Mac operates on macOS Ventura or later, the Photos app comes with a built-in duplicate finder. It can merge identical images. Here’s how to merge all duplicate photos on Mac at once:
- Open the Photos app.
- From the sidebar, click Duplicates. It may take some time for the macOS to analyze your library and find duplicates.
- Select duplicate photos. You can choose one or several photos at a time. Press Command + A to select all.
- Click Merge [x] Items > Merge [x] Items. The Merge option combines nearly identical images into a single file to save space, keeping the best resolution and combining metadata.
- Deleted duplicates are now in the Recently Deleted album. You can delete them from there by following the steps above.

Note that if you cannot see the Duplicates album in the Photos app, you may need to quit it and open it again later. The thing is that the system needs some time to find exact duplicates. Make sure that your Mac is connected to the power source during this time. Then, the album appears automatically.
Important: Sometimes, the Merge option keeps the lower-quality image instead of the highest-resolution one when merging duplicates. It is because it prioritizes the image with the most metadata (EXIF data), the most recent edit, or the one synced via iCloud optimized storage, rather than just pixel count. The Photos app deems "edited" or "referenced" versions higher quality for user convenience, even if they have smaller file sizes. It may preselect photos that are not identical items. That is why we recommend reviewing each pair of images instead of selecting all files at once.
If the Merge button does not work, make sure that you're not syncing your Mac — iCloud sync delays are known to cause this glitch.
If you have an older Mac that does not support macOS Ventura or later, use CleanMyMac or any of the other methods described in the article to remove identical photos.
3. Find and remove duplicate photos in Finder
It’s normal for your Mac to fill up with duplicate files of all types, especially images. Sometimes, you edit a photo and save versions of your edits. Or you download the same image from an email multiple times. And because of that, you might not always find your photos in your Pictures folder. They can be spread all over your drive, from your Downloads folder to your Desktop.
Thankfully, you can set up Smart Folders in Finder to help you find and get rid of duplicates regardless of the specific folder they’re in. To use Smart Folders in Finder to find duplicates:
- Open a Finder window.
- Click File > New Smart Folder.
- Make sure This Mac is selected.
- Click the + in the top-right corner.
- Change the first drop-down menu to Kind and the second one to Image.
If you want to find identical files of other kinds, select the needed one instead of Image. - Click the Name column to sort your files by name. (It’s likely that duplicate images will have identical or consecutive names.)
- Select the duplicate photos you want to delete.
- Right-click (or hold down Command and click) any of those images and click Move to Trash.

One of the best ways you can try to prevent duplicates is to import your pictures directly into the Photos app. As you read earlier, it automatically detects duplicate images as you import them. But if the pictures are already in your photo library, then that’s when you’ll need one of the methods mentioned above.
The nice thing about manually removing pictures with Smart Folders in Finder is that you’ll be able to find and remove pics across your entire hard, not just the ones in the Photos app. But obviously, the more images you have on your computer, the longer it will take for you to review them one by one.
However, that’s where CleanMyMac really excels. It does all the hard work of finding the duplicate and similar-looking images on your computer for you. So, instead of manually finding and deleting them, you just need to review the selections made by CleanMyMac.
How to get rid of similar photos on Mac
Once you have duplicates off your Mac, it’s time to take a look at similar photos. See, CleanMyMac distinguishes between exact duplicate photos, which are several instances of the same image, and similars — near duplicate photos that have different editing or were shot at slightly different angles.
For instance, it will find photos with or without editing, as well as those with minor differences, and mark them as similars.
Here’s a quick reminder of how to use the My Clutter tool. This time, we’ll look at how to find similar images:
- Once again, open CleanMyMac.
- Click My Clutter > Scan > Review All Files.
- To see all similar photos the app has found, check the Similar Images section — right under Duplicates in the sidebar.
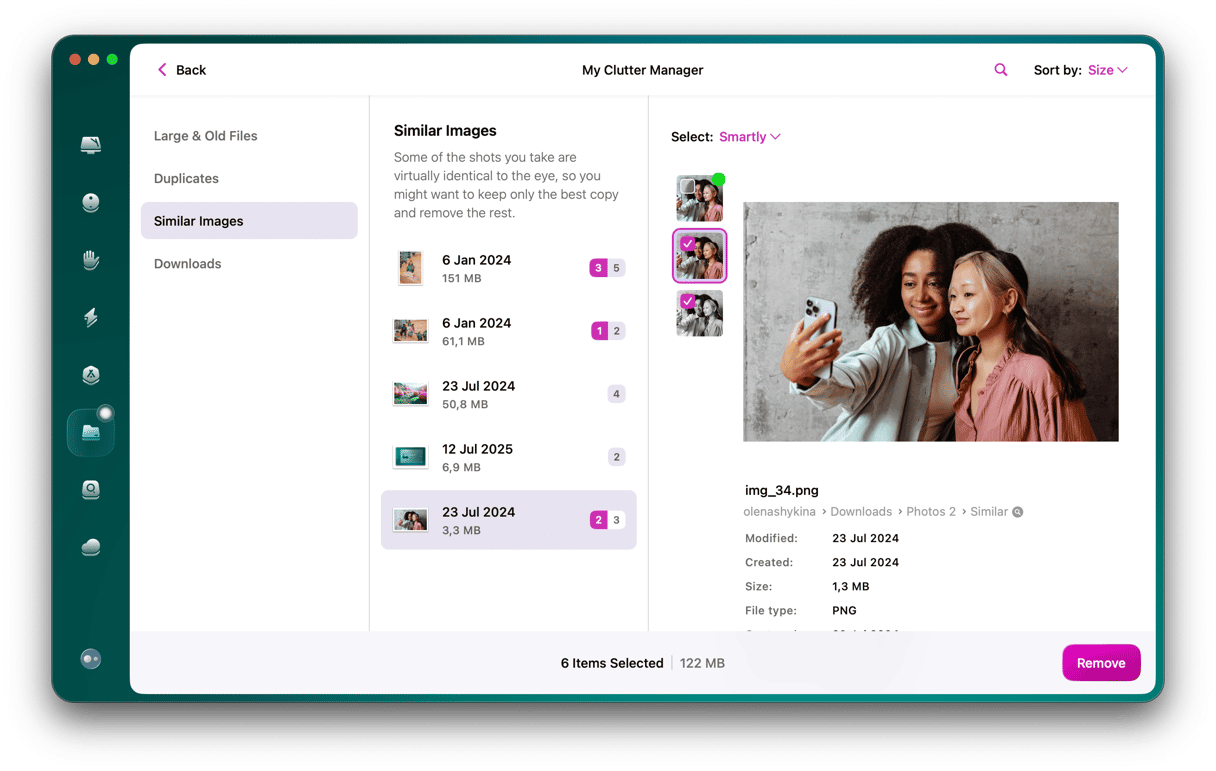


Go through similar shots just like you did with exact duplicate pictures, selecting those you want to delete. When you’re done, click Remove and delete all unwanted copies in bulk.
Dealing with similars is pretty rewarding in terms of disk space, they usually take up even more than duplicates. After you get rid of similar images, it’s easy to organize your whole gallery and leave only those pictures that you’ll actually use.
Bonus tips: How to find duplicate files on Mac
1. Find duplicate files with a Terminal
Before you jump into Terminal headfirst, you should only do it if you’re comfortable and know your way around Terminal. It’s a powerful tool that can mess up a lot if you don’t know what you’re doing.
Here’s how you search for duplicate files with Terminal:
- In Finder, go to Applications > Utilities > Terminal to open it.
- Navigate to the folder you want to scan with the cd command. For example, if you want to scan Downloads, type in
cd ~/Downloadsand hit Return. - Copy and paste this command:
find . -size 20 \! -type d -exec cksum {} \; | sort | tee /tmp/f.tmp | cut -f 1,2 -d ‘ ‘ | uniq -d | grep -hif – /tmp/f.tmp > duplicates.txt and hit Return.

This will create a text file in the folder you’ve specified, with a list of your duplicates inside. But there are two things you should keep in mind:
- This Terminal command overlooks a lot of duplicates.
- You’ll still need to locate those duplicate files and sift through them to separate the copies from the originals.
So, this command is more like a crystal ball: it gives you hints, but you still have to go and do the sorting and deleting manually. Which brings us to another option that will do a little more of the work for you.
Sometimes files won’t be flagged as duplicates because they have slightly different file names. But every file has what’s called an md5 hash, which is a unique identifier that stays with the file. So even if you move or rename a file, its md5 hash will remain the same.
Similar to the Terminal command above, you can generate a list that shows the md5 tag to verify all of the duplicates in a particular folder. Follow the steps below to create that list.
- Open Terminal from the Utilities folder.
- For this example, we’ll scan the Documents folder. Type into the Terminal window:
cd ~/Documents - Copy and paste this code:
find ./ -type f -exec md5 {} \; | awk -F '=' '{print $2 "\t" $1}' | sort | tee duplicates.txtand then hit Return.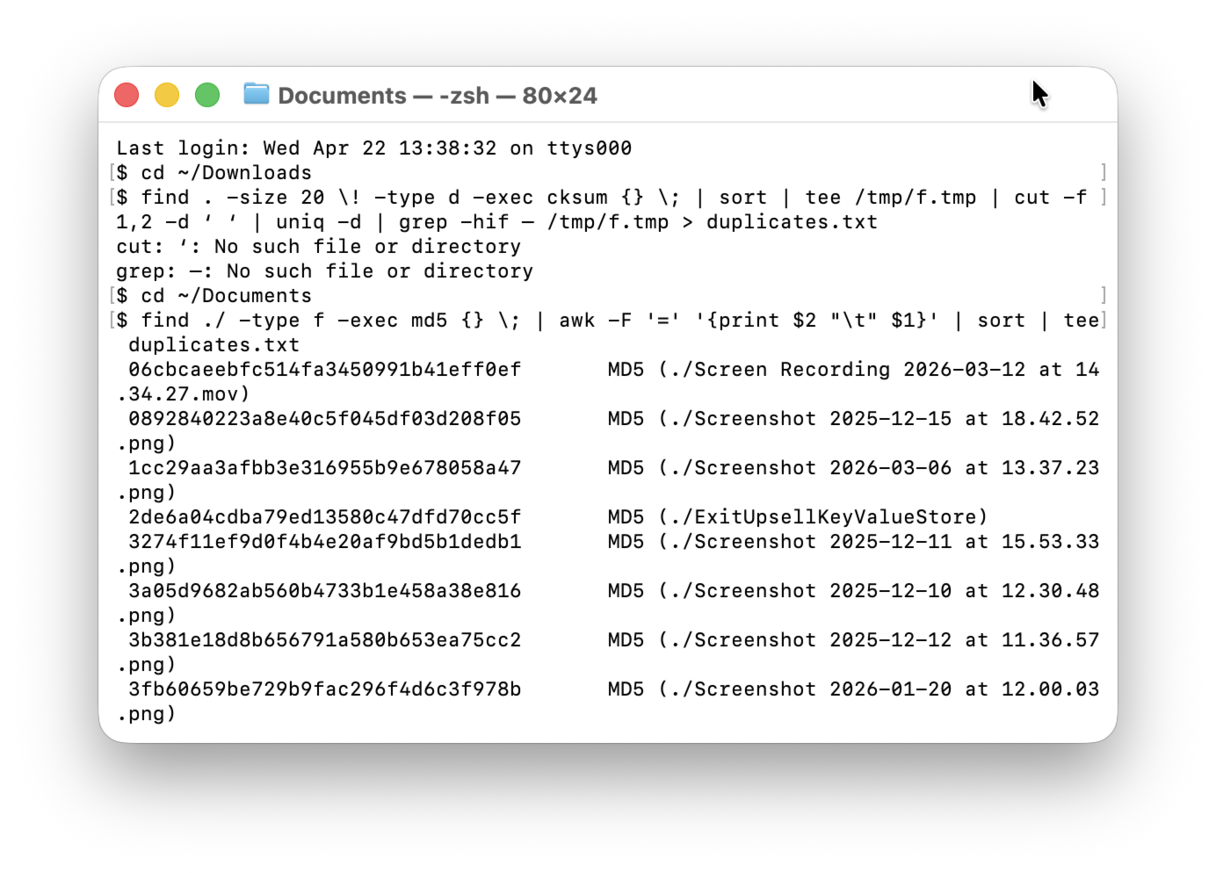
- Then, open the Finder window and navigate to your Documents folder.
- Open the duplicates.txt file.

This generates a list of all of the files in the folder you’ve specified, but you’ll at least be able to see the md5 tags to know which files are copies of each other.
2. How to delete duplicate music files
While hunting for duplicates, do not forget about your music library. The Music app comes with a built-in tool for detecting them. All you have to do is open the app, navigate to Recently Added in the sidebar, click File from the menu bar, and choose Library > Show Duplicate Items. If you press Option, you can also choose Show Exact Duplicate Items.

3. How to find duplicates in Mail Downloads
Here’s a common scenario: a colleague emails you a document, and you open the attachment in Mail to take a look at it. You’re going to need this file, so you download it onto your Mac for safekeeping. No duplicates, nothing to talk about here. Right?
Not exactly. See, the Mail app has quietly downloaded this attachment the moment you opened it, and stashed it in its very own downloads folder. So, now you have two copies of the same file on your Mac.
The Mail Downloads folder is not particularly easy to find. You really have to know where to look to get to it. Follow these steps to access it:
- Open Finder.
- In the Menu bar, click Go > Go to Folder…
- Type this path:
~/Library/Containers/com.apple.mail/Data/Library/Mail Downloads and hit Return.

This will open a new Finder window where all of your Mail attachments live.
The good news here is that there’s nothing to compare or sort. These files are automatically downloaded to make it faster to open the next time you need them. But all the attachments still live on your email server and can be redownloaded at any time. Meaning, if there’s nothing you would miss, you could empty this entire folder.
Key takeaways
- Recommended method for most users: Built-in Duplicates album in the Photos app or the My Clutter feature in CleanMyMac
- Safety tip: Review items sent to the Recently Deleted album before emptying it
- Important precaution: Back up your Mac using Time Machine so that you can restore accidentally deleted photos or files
- When to use Finder/Smart Folders: If your Mac does not support macOS Ventura or later or if you store images somewhere out of the Photos app (e.g., in the Downloads folder and have not imported them to the Photos library)
So, there we have it. This was our take on finding and deleting duplicate and similar images from Mac. Don’t let those useless files eat up the drive space you need for future memories. It’s best to deal with space wasters long before you run out of storage by either letting CleanMyMac do the job for you or following the manual steps we’ve provided above.
Frequently asked questions
What is the difference between "merging" and "deleting" duplicate photos in the Photos app?
"Merging" duplicates in the Photos app intelligently combines identical photos, keeping the highest quality version and merging metadata (captions, keywords) from others into one, while moving extras to "Recently Deleted." "Deleting" simply removes the extra photos, often without smart quality assessment, also sending them to the Recently Deleted album.
What is a Photos library and how does it store my images on disk?
A Photos library (.photoslibrary) is a specialized database package used by Apple's Photos app to store, organize, and manage images and videos. By default, it is stored in the Pictures folder on a Mac, holding original files, edits, thumbnails, and metadata in a structured "package" that should not be manually altered.
How do I use the iCloud Shared Photo Library and remove duplicates from both libraries at once?
To use iCloud Shared Photo Library, set it up via Settings > Photos > Shared Library to invite up to five people, sharing either all or specific past photos. On a Mac, you can remove duplicates across both Personal and Shared libraries by going to Photos > Albums > Duplicates and setting the library view to "Both Libraries" to merge them at once.
Why do duplicates keep coming back after I delete them in Photos?
Duplicates reappear after deletion primarily because cloud services (iCloud, Google Photos, or OneDrive) immediately re-sync the deleted images back to your device, or because you are deleting from a local device album rather than the master cloud library. Other causes include incomplete syncing, database glitches, or multiple apps (e.g., Facebook, WhatsApp) backing up the same media simultaneously.
How do I manage duplicate photos across multiple Photos libraries on the same Mac?
To manage duplicate photos across multiple Photos libraries on a Mac, use the built-in "Duplicates" tool in the Photos app (Utilities sidebar) for quick merging within one library, or use third-party tools like CleanMyMac to merge multiple libraries while keeping albums intact. The same applies to managing duplicates after merging libraries.


