Upgrading to a new version of macOS like Ventura is exciting. Most of us can’t wait to take advantage of the new features and improvements. That elation disappears pretty quickly, though, if your Mac doesn’t boot after the upgrade and all you see is a black screen. That can be both dispiriting and worrying. However, it’s rarely a serious problem and usually pretty straightforward to fix. We’ll show you how below.
Why won’t Ventura boot?
The temptation when your Mac won’t start after upgrading to Ventura is to blame the update. However, that’s not necessarily the cause and could be a coincidence. There are a number of other reasons you may see a black screen after updating to Ventura, from basic (the power cable has come loose) to more complicated ones (an issue with the system management controller, for example). So, the first and most important step is to identify the problem and what’s causing it.
macOS Ventura won’t boot: possible causes
There are lots of possible reasons why your Mac may appear not to have booted, and it’s important to rule them out one by one.
| It hasn’t finished updating | As with any major update, upgrading to Ventura takes a while and goes through different stages. Your Mac may reboot several times during this process. So, what you think is your Mac failing to boot after an upgrade may just be your Mac not having finished upgrading. Give it at least a couple of hours after you start the process before you assume that there is a problem. If it hasn’t finished by then, Ventura may be stuck in a boot loop. |
| Lack of power | The first thing to do if you’re using a desktop Mac is to make sure the power cable is plugged in securely. Your Mac won’t boot if it’s not getting mains power. Similarly, while a MacBook can run on battery power, you should keep it plugged into the mains while you upgrade. If your MacBook has been unplugged for a while, let it charge for an hour before attempting to boot it again. |
| Display not working | If you use an external display with your Mac, it’s possible that what seems to be a failure of your Mac to boot might just be your display not working properly. If your Mac doesn’t chime on startup, it can be difficult to tell whether the problem is with your Mac or display. |
Make sure the display is connected to power and switched on. Then, make sure the cable is securely connected to your Mac and your monitor. Next, check the status light on your Mac: is it on? If so, then it is likely to be a problem with your monitor. Try power cycling the display by unplugging it from the mains, waiting a few seconds, and plugging it back in again. If that doesn’t work, try a different cable to connect it to your Mac.
How to fix it when Ventura won’t boot
Now that we’ve ruled out the most obvious causes, it’s time to accept that there was a problem with the update and that you’re going to have to fix it.
1. Reset the SMC
The system management controller (SMC) is responsible for managing power on your Mac. So, resetting it could help fix problems with booting. If you have a Mac with Apple silicon, you can skip this one because the SMC resets every time you boot your Mac. If you have an Intel-based Mac, the process differs depending on whether it has a T2 security chip or not and whether it’s a desktop or a laptop. You can find instructions for your Mac on Apple’s website here.
_1663925879.png)
2. Boot in Safe mode
If your Mac still won’t boot normally, it could be an issue related to the extensions that load at boot time. To test that, boot in Safe mode. Safe mode performs some checks and fixes some issues and only loads those extensions needed to boot your Mac. If your Mac boots in Safe mode, the issue is likely to be one of those extensions.

To test which one it is, once your Mac has restarted, go to System Settings > General and disable all login items and launch agents, and then restart normally. If your Mac boots properly, turn on the login items and launch agents you need one at a time, rebooting each time until your Mac doesn’t boot; then, you’ll know where the problem lies.
3. Boot in Recovery Mode
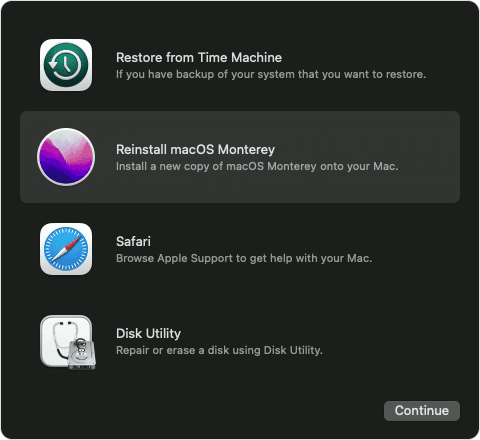
Booting your Mac in Recovery mode boots it from a separate partition from the one you normally boot from, so your Mac should start up if it won’t boot normally. When it does, you will see a macOS Utilities screen from where you can use Disk Utility to repair your boot disk or, if necessary, reinstall macOS Monterey.
To boot a Mac with Apple silicon in Recovery mode, press and hold the power button and keep holding it until you see the macOS Utilities screen.

To boot an Intel-based Mac in Recovery mode, press and hold Command-R while pressing the power button.
If none of the above work and you still can’t boot your Mac, you should book an appointment with an Authorized Service Center or a Genius Bar at an Apple Store to have it repaired.
If your Mac won’t boot after installing macOS Ventura, the solution is probably straightforward. Follow the steps above to discover the problem and fix it. Then, keep your Mac well-maintained in the future.


