Getting tagged in Facebook photos by friends and family is always a nice surprise—but when it comes to keeping your favorite memories safe, Facebook isn’t the ideal place to store them.
The good news? Downloading photos from Facebook to your iPhone is easier than you might think. Whether you’re looking to save a single image or an entire album, this guide will walk you through the simple steps.
How to download Facebook photos on iPhone
Saving photos from Facebook to your Camera Roll is straightforward. You can download almost anyone's pictures if the post is public or you are friends with them. Facebook doesn't notify users when someone downloads their photo, so they won't know. However, always get the person's consent before downloading their photos. Respecting privacy helps maintain trust.
Here are instructions for how to save your photos from Facebook to your Camera Roll:
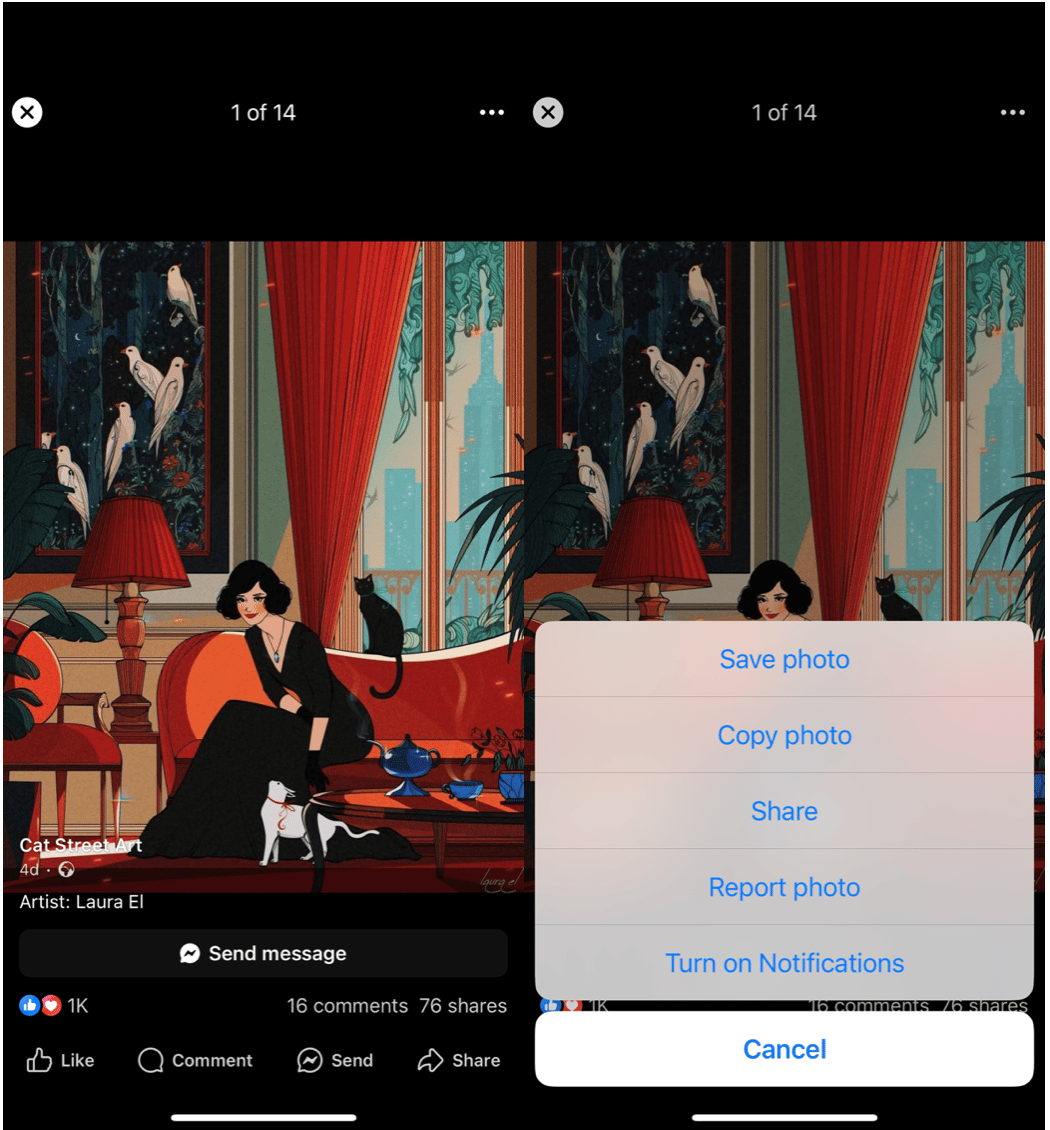
- Open your Facebook app.
- Locate the photo you want to save.
- Press on the photo.
- Press on the three horizontal dots button in the top right corner of the screen.
- Press Save Photo.
Once you complete these steps, you'll get a notification from Facebook at the top of your screen, alerting you that your photo has saved. You’ll be able to find that photo in the Recents folder on your iPhone (formerly Camera Roll).
How to clean up photos on iPhone?
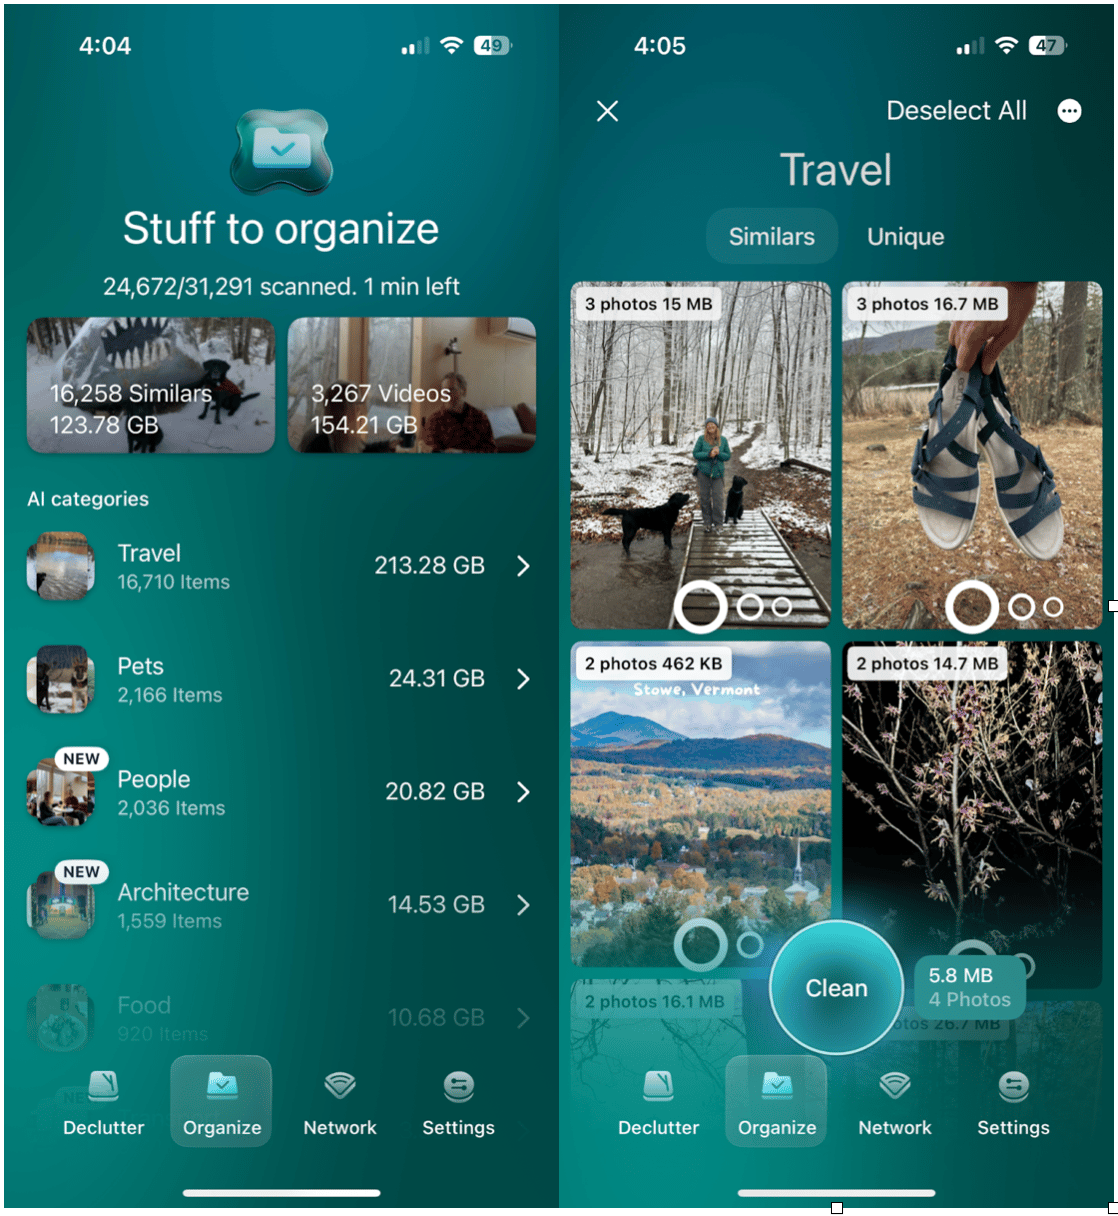
Once you start saving all your Facebook photos to your Camera Roll, chances are, your storage will fill up quickly. CleanMy®Phone can help you delete duplicate and blurry images on your iPhone to make room for more Facebook photos.
How do I download my Facebook profile picture?
Now that you’ve learned how to download and save photos from Facebook from posts, you might be wondering if the same rules apply to your profile picture. They do, but with one extra step.
Here’s how to save your Facebook profile picture:
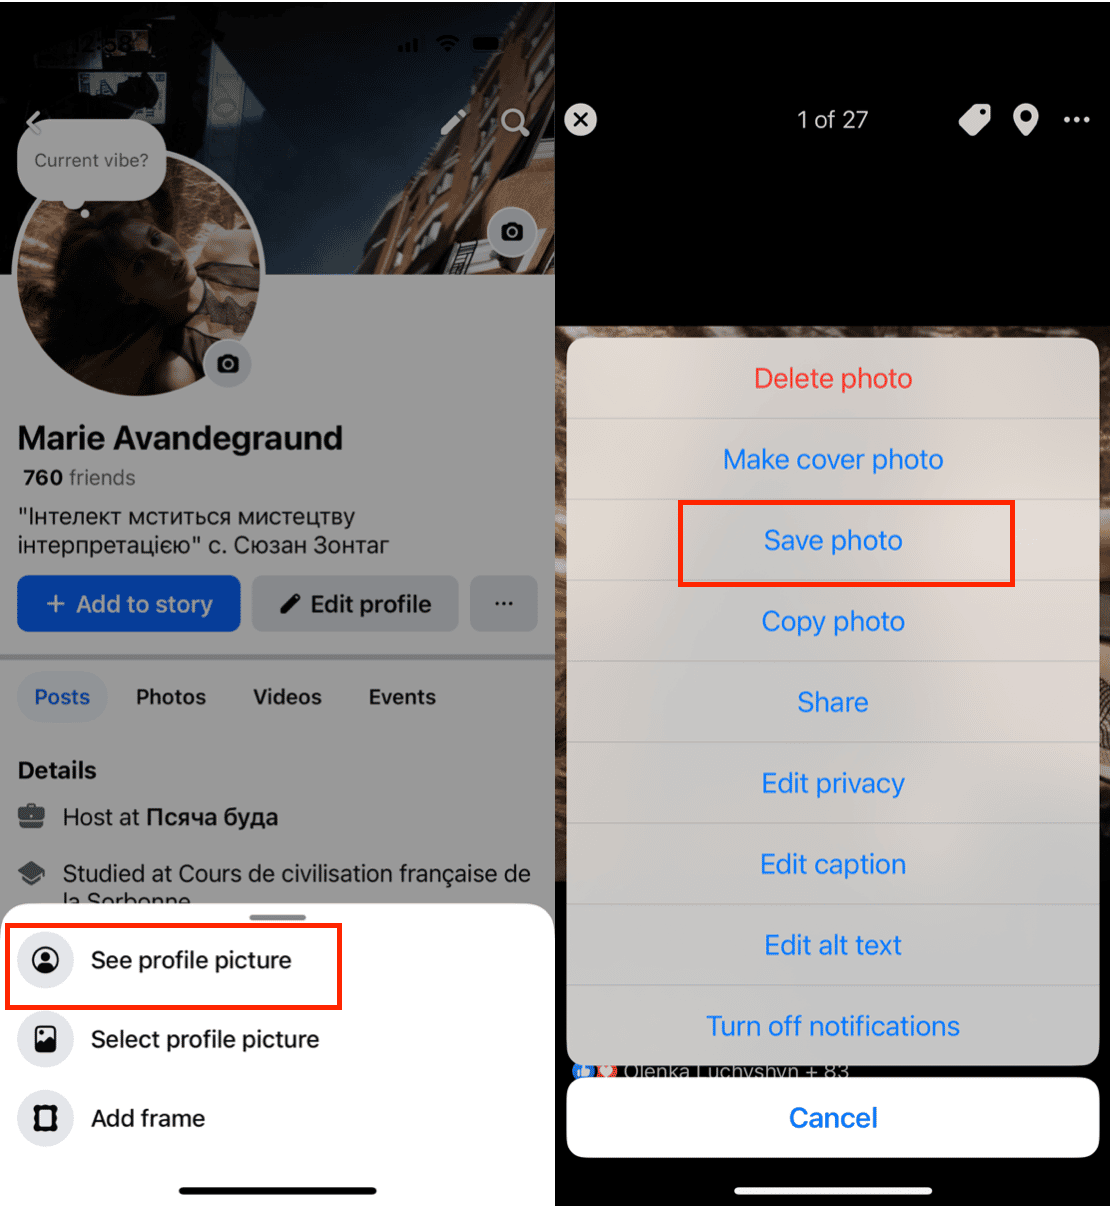
- Go to your profile.
- Press on your profile picture.
- Press the View Profile Picture option.
- Press on the three horizontal dots button at the top right of the page.
- Press the Save Photo option.
Again, completing those steps will result in a notification from Facebook, alerting you that your photo was saved. Then you’ll be able to immediately access it in your Recents folder.
How to download all your Facebook photos
Unfortunately, there is no way to download all your photos from Facebook. Instead you can download all your Facebook history and data on your iPhone through the Facebook app. Sad news, photos are not included.
If you're still curious, here’s how to download all of your information from Facebook on your iPhone:
- Press on the three lines button at the bottom right corner of your screen to access your settings.
- Choose Account center.
- Then choose Your information and permissions.
- Press the Download Your Information option.
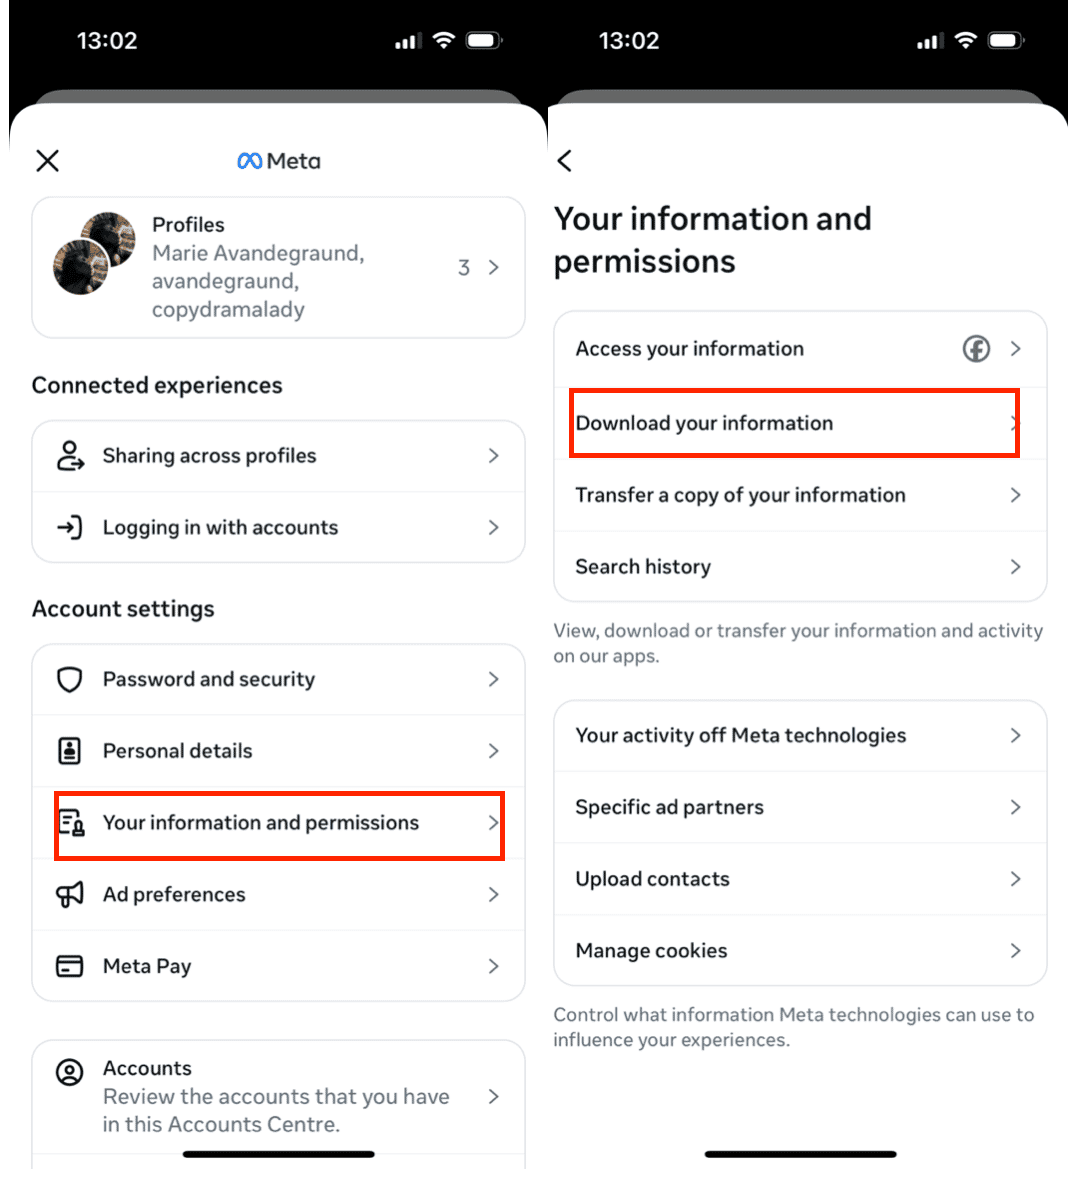
The length of time required for downloading depends on how much it is. You’ll receive an email within 10 to 30 minutes with a link to download your personal data. Just note—you’ll have only 4 days to download the file before it expires.
How to download a photo album from Facebook
Maybe you don’t need every photo you’ve ever posted on Facebook downloaded to your iPhone but would like to save a specific album. The good news: It can be done! The bad news, however, is that you can only do it from Facebook’s website on your desktop browser.
Still, it’s a pretty simple process. Here’s how you do it:
- Log in to your Facebook account on your desktop browser.
- Go to your profile.
- Press on the Photos option.
- Press on the Albums tab.
- Locate and press on the album you want to download.
- Press on the gear button on the right side of the page. This will open your Settings.
- Press the Download Album option.
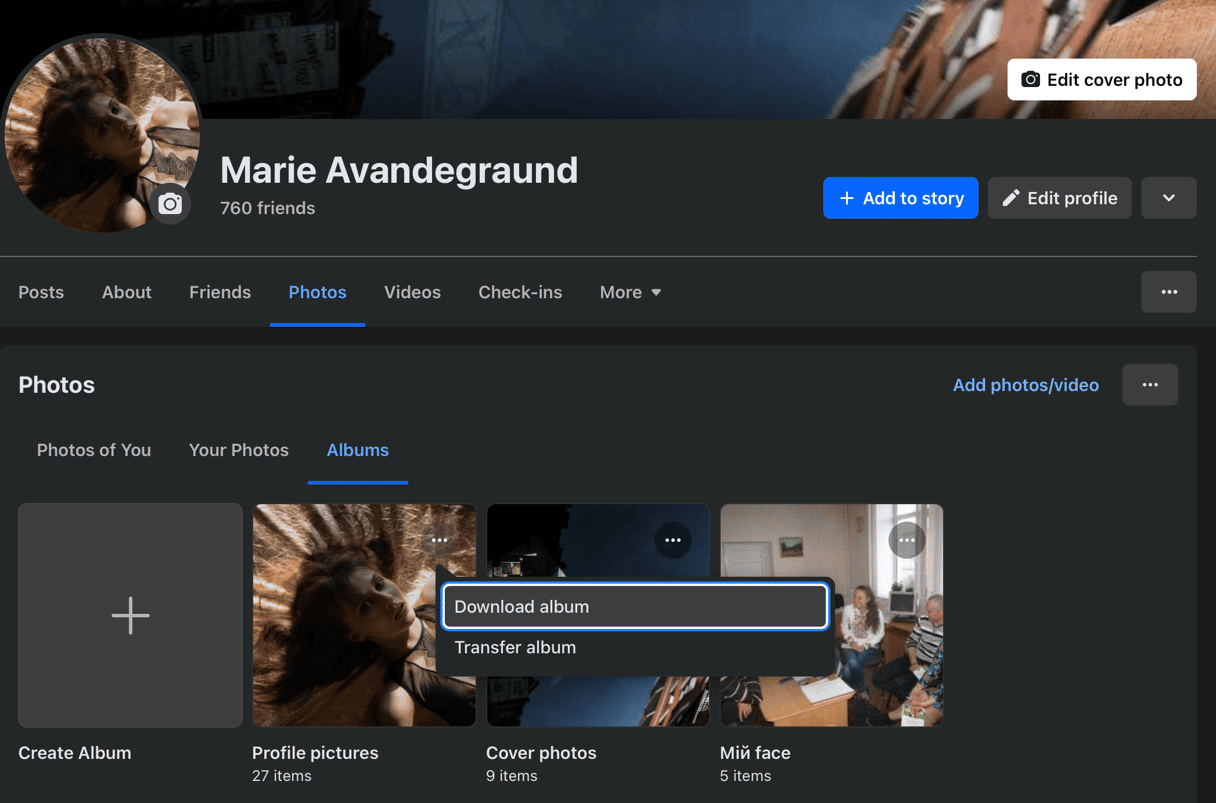
After pressing Download Album, you’ll receive a notification through the Facebook website that reads, “It may take a few minutes for your photos to be ready to download. We’ll notify you when they're ready.” Press Continue and wait until you receive the notification.
After receiving the notification on the website, open it. A pop-up will open that asks you to enter your password. Enter it, and press Continue. Your album will be downloaded as a ZIP file, and you can save it to your computer. You can transfer those photos from your computer to your iPhone.
How to download high-quality pictures from Facebook
Unfortunately, Facebook resizes images when you upload them, so you don’t usually get high-quality photos when you save them individually from the app. And you cannot specify image quality in the app as well.
Does Facebook alert when you save a photo?
The short answer is no—Facebook does not send any alerts when you save a photo, whether it’s from a friend’s post or a public image. You can freely save photos to your device or account without the photo owner being notified.
This policy ensures user privacy, so you can collect images without worrying about making the original poster aware. Additionally, Facebook lets you manage your privacy settings to limit who can view and potentially save your photos.
You might also like: How to create long exposure photos on iPhone
It's important to store your photos somewhere other than Facebook. Whether you're downloading a new photo or your entire Facebook history, keep a backup elsewhere — just in case.


