There are many situations in which you may need to transfer files from Windows to Mac. You might have been using a Windows PC as your main computer and have now switched to Mac. Or you might use a Windows machine for work and a Mac at home. Or maybe you use both platforms for different things and just need a few files from your Windows machine on your Mac. In this article, we’ll show you several different ways to transfer files from Windows to Mac.
How to transfer files from Windows to Mac
How you transfer files will be dictated by the reason for the export and the size and number of files. Here’s a list of some of the options:
- Migration Assistant — Apple’s app for transferring data and settings files from one Mac to another, from a Time Machine backup, or from a Windows PC to a Mac.
- File sharing — a feature on both Windows and Mac that allows direct transfer of files to and from designated folders on each machine.
- Email — the simplest way to transfer files between machines but only useful for a small number of small files.
- Cloud storage — suitable for larger files. Services like iCloud Drive, OneDrive, and Google Drive allow you to create accounts and access them from multiple computers and devices.
- External storage — a USB stick, portable hard drive, or SSD formatted in a way that allows it to be read on both Mac and PC and can be physically connected to each other.
- Network-attached storage (NAS) — a server designed for home or office use to which you can connect on Mac and PC and use to store files. Just copy the files you need from the Windows machine to the NAS box and then from the NAS box to the Mac.
Now you know the options, it’s useful to know when to use each of them. Here are a few scenarios in which you might want to transfer files from PC to Mac and the recommended solution.
Setting up a new Mac
This is exactly the situation Migration Assistant was designed for. If you install Migration Assistant on the Windows machine and launch the Mac version on your new Mac when both are connected to the same network, you can transfer all your files from Windows to Mac.
The advantage of using this method is that it is simple and will put files in the right place on your Mac. So, files from the Pictures folder in Windows will go into the Pictures folder in the user Home directory on the Mac. The same applies to Music, Movies, and Documents.

It’s worth noting that Migration Assistant will create a new account on Mac, so it can map files and folders between the two. So, you should use Migration Assistant before you create a user account on the Mac to avoid ending up with two accounts. It’s also worth noting that this is the only method that only works one way — Windows to Mac. You can’t transfer files from Mac to Windows using Migration Assistant.
Here’s how to use it:
- Open Migration Assistant on both computers.
- On a Mac, select From a Windows PC and click Continue.
- On a Windows PC, follow the on-screen instructions until you can enter the code you see on your Mac.
- After you enter the code, both computers will connect.
- Select the information to transfer and click Continue. After the transfer is complete, you can log into your Mac using the credentials you had on your Windows PC.
For macOS versions older than Sonoma 14.3.1, follow the steps on Apple’s website.
After you transfer files from Windows to Mac, it’s a good idea to get rid of unnecessary ones. The best way to do that is to remove large and old files, similar images, and duplicates. The easiest way to do that is to use CleanMyMac’s My Clutter feature. It scans your Mac looking for these files and lets you quickly remove them. Get your free CleanMyMac trial — test all tools that come with the app for 7 days at zero cost.

Transferring a few documents
This is the perfect situation in which to use email. Just open your email app on Windows, create a new email, and attach the files. Then, open your email on the Mac and drag the attachments to the folder where you want to keep them. Make sure that the files you send are in a format that can be read by an application on your Mac.
Transferring between computers in a different location
If the Windows PC you want to transfer files from is in a different location to your Mac — say, an office in the city while your Mac is at home — using a cloud storage service is a great idea. Just drag the files you want to copy from their folder in Windows onto the cloud storage folder and then go home. By the time you get to your Mac, they will be waiting in the cloud storage folder in the Finder.

Transfer files on home network
In this scenario, either using file sharing or a NAS box would work. To transfer using the NAS, just drag the files onto it in Windows and, when they’ve copied, connect to the NAS on your Mac and drag the files onto the Desktop. To use file sharing, do the following.
- On the Windows machine, go to the folder containing the files you want to transfer, right-click it, and choose Properties > Sharing. Click Share.
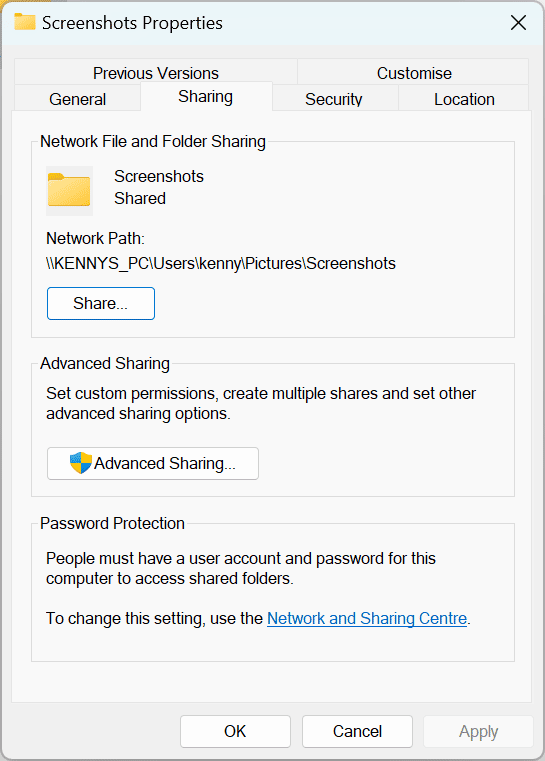
- Choose the Windows user account you want to share the files with or choose Everyone. Confirm you want to change the settings for the folder.
- Go to Network Settings on the PC and take note of the IP address.
- On your Mac, in Finder, click the Go menu and choose Connect to Server. Type ‘smb://’ followed by the IP address of the PC and enter the username and password for your Windows account.


You should now see the folder you shared in the Finder window and be able to copy the files from the shared folder to a folder on your Mac.
Choose the scenario above that best describes your situation and follow the steps to transfer files from Windows to Mac.
Frequently asked questions
How to transfer files from Windows to Mac without Migration Assistant?
If you don’t want to use Migration Assistant, you can transfer files by copying them to a properly formatted external drive — FAT32.
How to transfer files from Mac to Windows?
The easiest way is to use an external drive, but you can also transfer files via email, cloud storage, or NAS like we outlined in this article.