The Sharing pane in macOS System Settings is one of the most overlooked tools on the Mac. It has a wealth of options for sharing files, printers, your Mac’s screen, and network connections. In this article, we’ll show you another trick you can enable from that pane — how to share your Mac’s internet connection with other devices and turn your Mac into a Wi-Fi hotspot.
What is a Wi-Fi hotspot?
What do we mean when we say Wi-Fi hotspot? It is any device connected to the internet to which another device can connect via Wi-Fi and share its internet connection. In this case, your Mac is connected to the internet, and another device can connect to it and share its internet connection. There are some limitations, though. The most important one is that if your Mac is connected to the internet using Wi-Fi, you can’t connect the other device to it via Wi-Fi. So, if your Mac is connected to a Wi-Fi network, you’ll need to share that connection using Bluetooth, Ethernet, USB, or Thunderbolt.
Apple doesn’t explain the reason for this limitation, but it’s likely to be related to bandwidth. If you use your Mac’s Wi-Fi to connect to a router and connect to another device, its bandwidth will be split between incoming and outgoing connections.
The other main limitation is that the Mac you use as a hotspot must be running macOS Lion or later. But given how old Lion is now, that shouldn’t be too much of a restriction.
How to create a hotspot on your Mac
First, you’ll need to decide how you want to share your Mac’s internet connection. Remember, if your Mac is connected to the internet using Wi-Fi, it can’t connect to the device using it as a hotspot via Wi-Fi. For this example, we’ll assume that the Mac is connected to a router with an Ethernet cable and that the other device is going to connect to Mac’s hotspot over Wi-Fi.
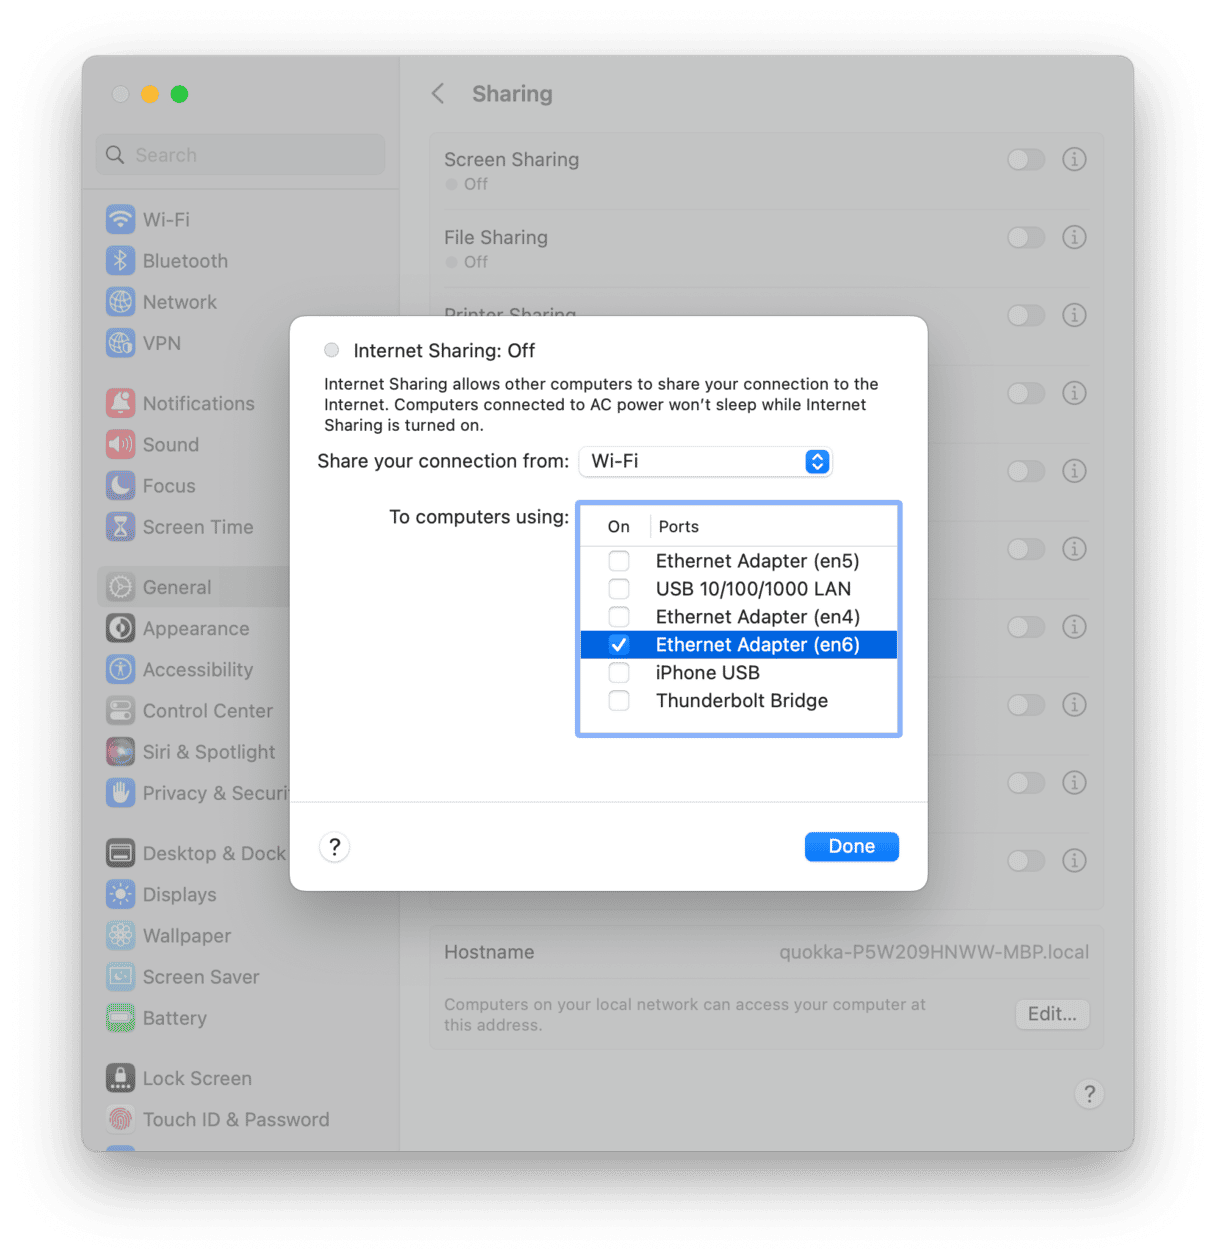
- Go to Apple menu > System Settings > General > Sharing.
- In the right part of the window, locate Internet Sharing.
- Click the i icon menu next to Internet Sharing and choose an option. We’ll select the Ethernet Adapter. Click Done.
- Now, go back to find the Internet Sharing pane and switch it on. Confirm the action.
- Quit System Settings.

Your Mac’s hotspot is now set up. All you have to do on the device you want to connect to is go to its Wi-Fi settings, choose the network name you created, and type in the password. If you choose to connect via Bluetooth, go to Bluetooth settings instead. And if you chose a tethered method, like USB or Ethernet, you’ll need to plug the device into your Mac.
When you want to stop sharing your Mac’s internet connection, go back to System Settings > Sharing and disable Internet Sharing.
You might notice that when you share your Mac’s internet connection, it slows down your Mac. It makes sense that if you share your internet bandwidth with another computer or device, it will be slower than it would be if your Mac had that bandwidth all to itself. However, there are a few things you can do to mitigate the problem. One of those is to make sure your Mac is running optimally so that any further slowdown doesn’t have too much of an impact.
The easiest way to do that is to use the Performance feature that comes with CleanMyMac. This handy tool scans your Mac and recommends specific operations to improve its performance, such as removing login items or shutting down background processes.

You can also use CleanMyMac to clear out junk files on your Mac, which could free up gigabytes of space, and run maintenance routines, such as repairing disk permissions and reindexing Spotlight. Finally, CleanMyMac’s Menu app, which you can access from the menu bar, displays network usage, so you can quickly see the difference in your network when you share your Mac’s internet connection with another device. Get your free CleanMyMac trial to try out all the features mentioned.
It’s also worth noting that your Mac keeps a record of every Wi-Fi network you connect to so that you can connect to it quickly again next time you need it. If you feel that is a privacy risk, CleanMyMac’s Privacy tool can remove those networks.

It’s very easy to set up a Mac hotspot so you can share your internet connection with other devices or computers. Just follow the instructions above and remember to turn off sharing when you no longer need it.


