With almost 3.5 billion users worldwide, Google Chrome is the king of web browsers, even on MacBooks that come with a built-in Safari as a default option. But sometimes Chrome can suddenly stop working. It may refuse to open, freeze, crash unexpectedly, or become completely unresponsive. If that is your case, you’ve landed in the right spot.
Whether Google Chrome stopped working after a macOS update, keeps crashing because of a faulty extension, or simply won't launch, the issue is usually fixable. In this guide, we'll walk you through 12 proven solutions to get Chrome working again.
Is it your Mac or Chrome that is slow?
Chrome isn’t an independent entity; it’s a part of a whole Mac system. So before you deal with Chrome, make sure the problem isn’t in your macOS. A quick example — the outdated system caches causing your Chrome plug-ins to crash. Or is your Mac gasping for free space?
A clever path is to give your macOS a good cleanup first. We like CleanMyMac for this purpose, as it finds and cleans all redundant and conflicting files across all your folders. So, take 2 minutes to tidy up your Mac with CleanMyMac. Here’s how:
- Start your free CleanMyMac trial — this app is notarized by Apple, so no worries.
- Install and open the app.
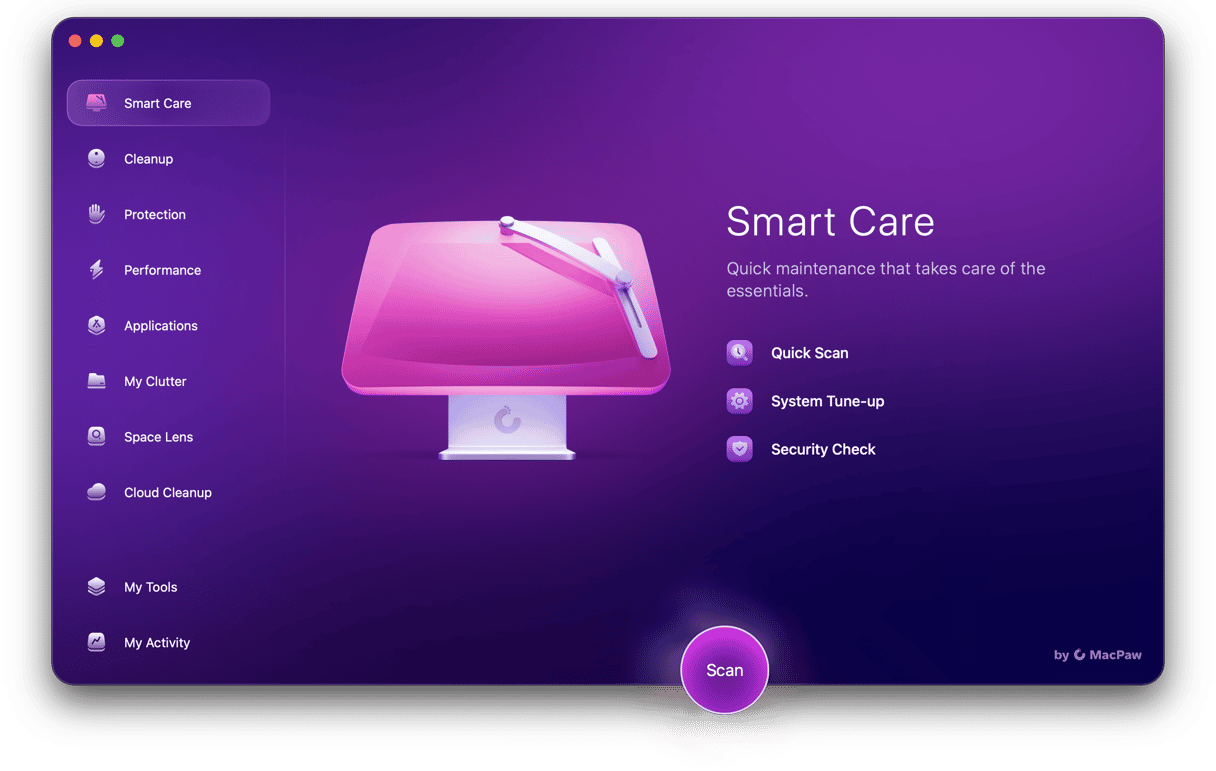
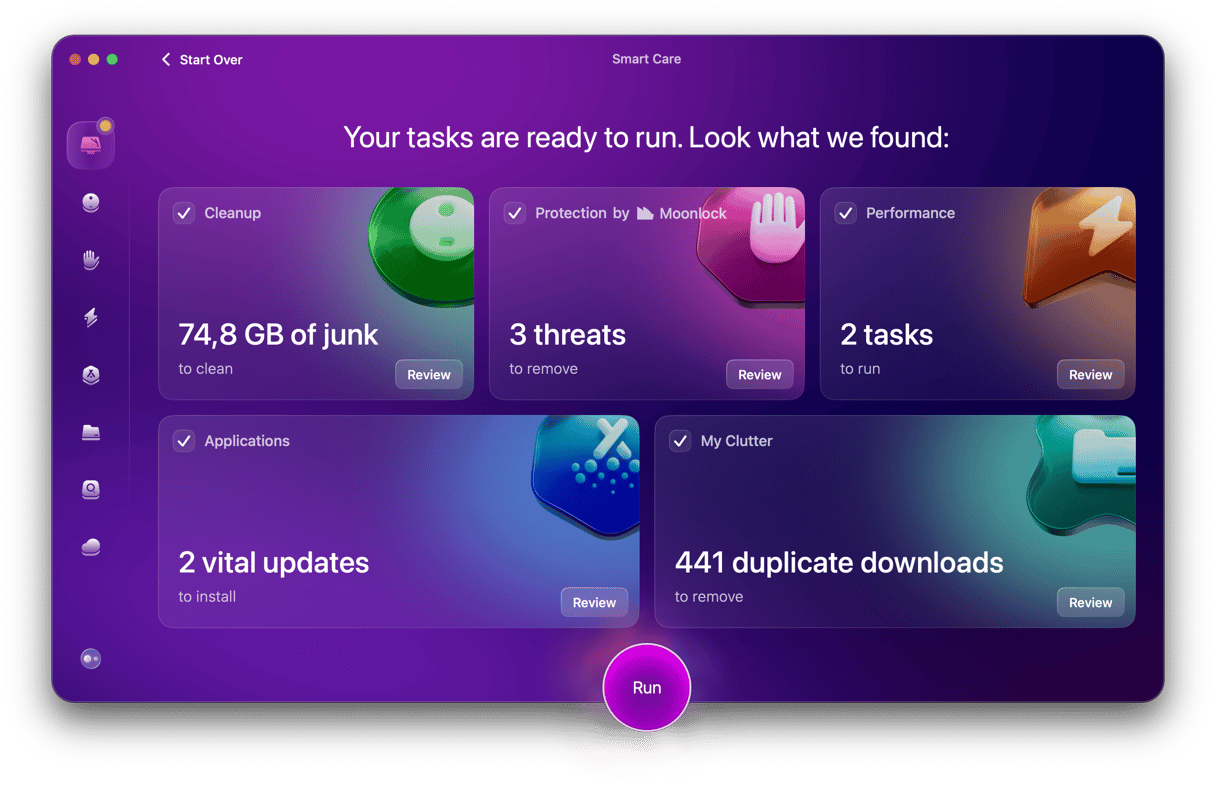
- Click Scan in the Smart Care feature.
- Once the scan is complete, click Run to remove junk files and clutter, get rid of any malware that may be lurking around your system, run tasks to optimize and speed up your Mac, and update your apps.


Why is Google Chrome not working on my Mac?
Like any app, Chrome can stop working for a number of reasons. The symptoms you see often point to different underlying problems:
- Chrome won't open usually means there's an issue with the app itself, such as corrupted files, permission problems, or an incompatible update.
- Chrome keeps crashing is often caused by damaged browser data, buggy extensions, or outdated software.
- Chrome freezes or becomes unresponsive typically happens when a tab, extension, or another process is using too many system resources.
Luckily, all of these issues are usually fixable. Here are the most common reasons Chrome may stop working:
- Chrome bugs or an outdated version
- Cache files causing software conflicts
- Misconfigured or resource-intensive Chrome settings
- Malware
- Corrupt Chrome extensions
- Insufficient available RAM or other system resource issues
How to fix Google Chrome on Mac?
Troubleshooting Chrome not working on Mac is not a too complicated task. All you have to do is follow the steps below one by one. If you’re ready to fix Chrome, let’s go!
1. Force quit Chrome
Whenever any app, including Chrome, is not working, the first step is to force quit it. It may be all you need to do to get it up and running again. Here’s a quick reminder of how to do it:
- Go to the Apple menu and choose Force Quit.
- Select Google Chrome and click Force Quit.
- Confirm the action.

This was the simplest way. But did you know that there are five different ways to deal with unresponsive apps? Here is our comprehensive guide to how to force quit Mac applications, so you can pick your favorite one.
Now, check if Chrome is working. If not, let’s proceed with other fixes.
2. Reset Chrome
If force quitting has not helped, a reset of Chrome may be in order. To reset Chrome, follow these steps:
- Open Chrome and go to Settings.
- Scroll to the bottom and click Reset settings.
- Click Restore settings to their original defaults, read the pop-up, and click Reset.
- Try to open Chrome.

Note: Resetting Chrome this way will not remove your bookmarks, history, and saved passwords.
If the browser is still not working, make sure that you have enough RAM and run some maintenance tasks. Keep on reading to learn how.
3. Run maintenance tasks & free up RAM
As we’ve mentioned above, sometimes, hardware may be the cause of Chrome not working on Mac. It may be that some of the maintenance tasks that are supposed to run automatically were missed, or that your Mac lacks RAM. So, to rule it out, run quick maintenance.
Luckily, you don’t have to do it manually since there is a tool designed for the job — CleanMyMac. It has the Performance tool that can run maintenance tasks and the Menu App that can free up RAM. Here’s how to use it:
- Get your free trial here.
- Click Performance and run a scan.
- Click Run Tasks.
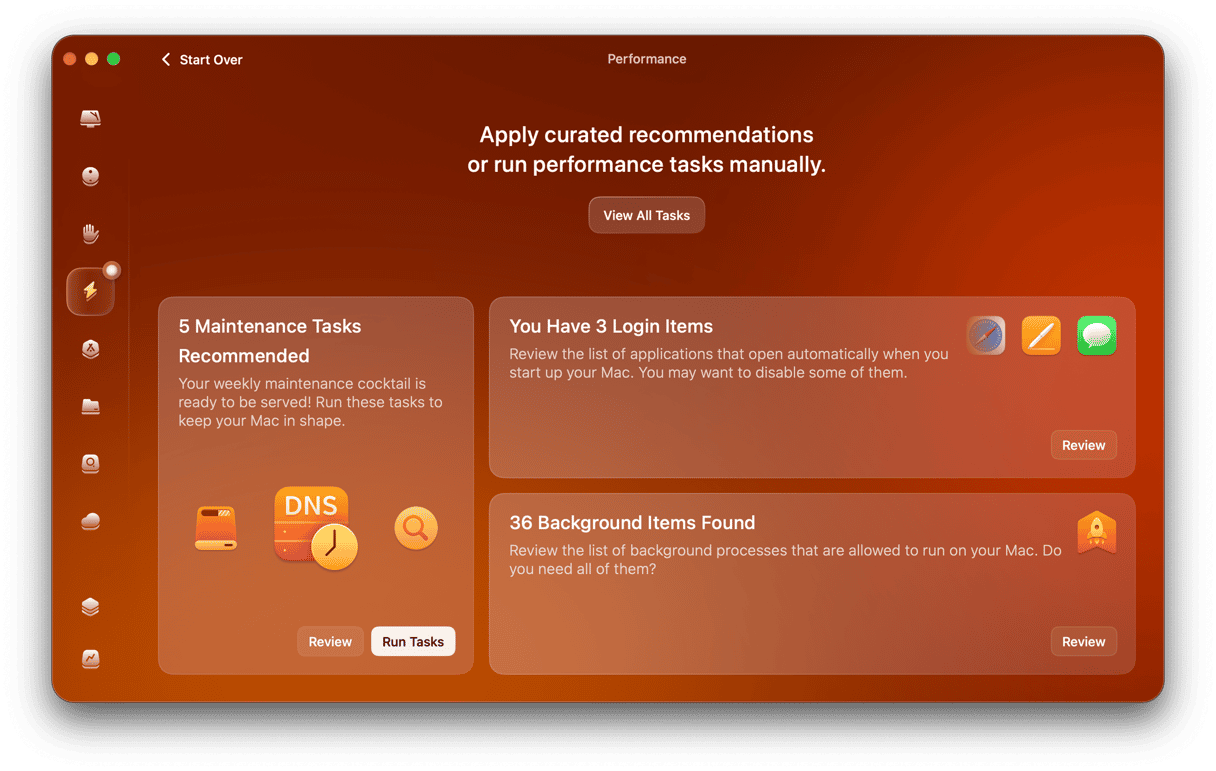
- Now, click a little iMac icon in the menu bar to open the Menu App.
- Under Memory, click Free Up — it will free up RAM.


How easy that is, isn’t it? If you’re still out of luck, and Chrome won’t work, check additional software tips below.
4. Clear cache and browsing history
Let’s start by focusing on the cache. Chrome loves storing lots of your web browsing data. At first, it can help speed things along, but soon Chrome’s pockets are being weighed down by cache, particularly if your Mac is low on space or memory. You can also clear browsing history to ensure that even more unnecessary data possibly causing software conflicts is removed.
To delete your Chrome cache and browsing history on Mac:
- Open Chrome and click Chrome in the top menu.
- Click Delete Browsing Data.
- Choose All time next to Time range.
- Select the checkboxes next to Browsing history, cached images, and cookies.
- Click Delete data.

If Chrome files were not the culprit, it’s now time to run a Mac virus scan.
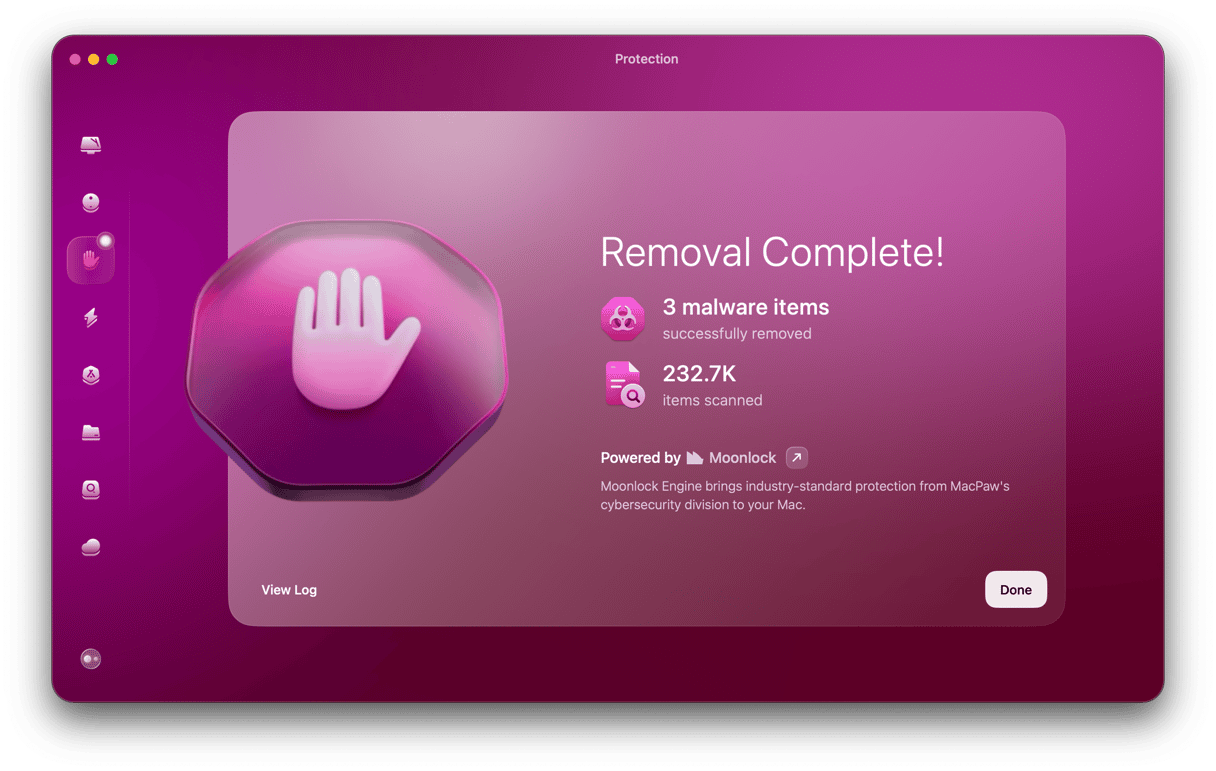
5. Scan your Mac for viruses and malware
It’s not always the case, but malware and viruses may cause all kinds of browser issues. It is because they may consume too many resources that won’t let your browsers work properly, or they can also change browser settings. If you notice other signs, like pop-ups or overall Mac’s performance drops, it’s worth checking your Mac for malware.
If you’ve already used CleanMyMac to run a Smart Care scan as described at the beginning of the article, you can skip this step because it already scanned your Mac for viruses. Otherwise, follow these steps:
- Open CleanMyMac once again.
- Click Protection > Scan.
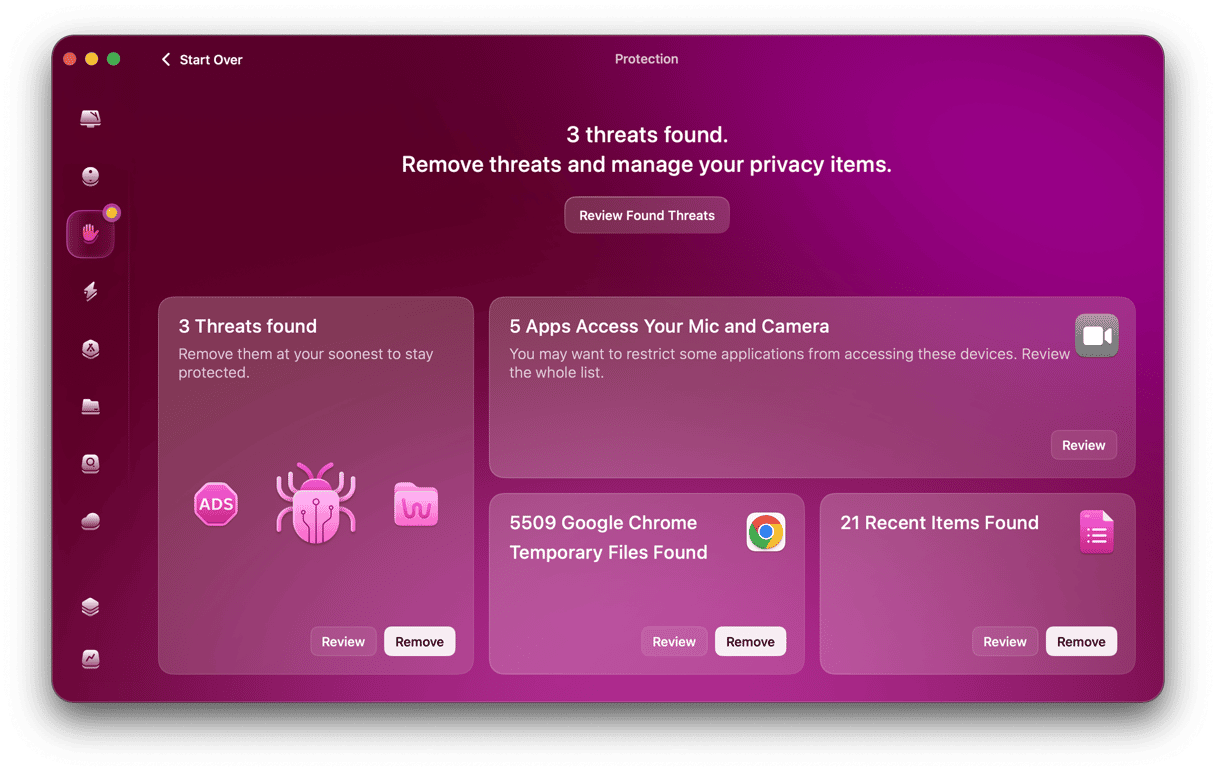
- If any malware is detected, you will see the Remove button.
- Click it, and any virus or other threat is gone. Easy!


After checking your Mac for infections, it’s working ensuring that you run the latest version of Chrome. We’ll show you how further in the article.
6. Update Chrome
Did you know that running an outdated version of Chrome can cause bugs, crashes, or compatibility issues? The same applies to macOS. Keeping both Chrome and your Mac up to date is one of the easiest ways to prevent browser problems.
Here’s how to update Chrome on Mac:
- Open Google Chrome.
- Click Chrome in the menu bar and choose About Google Chrome.
- Let it check for an update.
- If there is one available, click Relaunch.

👉If you're using macOS Sequoia or macOS Tahoe, make sure both Chrome and macOS are fully updated. Compatibility issues between Chrome and newly released versions of macOS can sometimes prevent the browser from launching or cause unexpected crashes until both updates are installed.
If Chrome is still not working, continue with the steps below.
Chrome won't open after a macOS update
Sometimes Chrome stops opening immediately after installing a major macOS update. This can happen because your current version of Chrome isn't fully compatible with the updated operating system or because the browser's installation has become corrupted during the upgrade.
Before changing any settings, make sure you've installed the latest version of Chrome. If the browser still won't launch, the quickest solution is usually to reinstall it:
- Remove Chrome from your Mac
- Download the latest version from the official Google Chrome website
- Install it again and sign in to your Google Account
Reinstalling Chrome replaces damaged application files while your synced bookmarks, passwords, and other browsing data can be restored after you sign back into your Google Account.
7. Reinstall Chrome
To reinstall Chrome, you have to delete the app and install it from scratch.
So, the first step is removing Chrome. Go to your Applications folder and drag it to the Trash.

If Chrome says "The application Google Chrome can't be opened"
If you see the message "The application Google Chrome can't be opened," don't worry. It usually means something went wrong with Chrome itself. For instance, an update may not have been installed correctly, or some of the app's files may have become damaged.
Before reinstalling Chrome, try these quick checks:
- Restart your Mac.
- Make sure that both your macOS and Google Chrome are up to date.
- Download a fresh copy of Chrome from the official Google Chrome website.
- If macOS displays a security warning, go to System Settings > Privacy & Security and allow Chrome to open if prompted.
Now, make sure that you delete all leftover files to ensure complete app removal. To do it, check /Library and ~/Library folders to find any Chrome-related files and send them to the Trash. For a complete list of locations, check out this article on how to uninstall apps on Mac.
Finally, go to the official website and download Chrome. Install it and check if it works.
Reinstall should have helped. Now, check out some additional tips to prevent Chrome not working or further troubleshoot it if the reinstall hasn’t helped.
8. Run a Safety check
The latest version of Google Chrome has a feature called Safety check. Here’s how to use it:
- Go to Chrome Settings and locate Safety check from Privacy and security on the left.
- Click Go to Safety Check. The browser will run a quick check to determine whether Google Chrome is up-to-date and protected from threats.

9. Remove Chrome extensions
If that didn’t work, it’s time to turn off your extensions and turn them back on, one at a time. This way, if Chrome is working until a certain extension is turned back on — that’s when you’ve probably found the problem.
To turn off browser extensions manually:
- Open Chrome and go to Window > Extensions.
- Disable a few extensions or click Remove to completely delete them.
- Restart Chrome.
Spend some time using Chrome without extensions, and then slowly turn each one back on until your issue returns. When you think you have the culprit, simply click Remove next to that extension in Settings > Extensions.
10. Use Chrome Task Manager to identify the problem
If Chrome still opens but freezes, slows down, or becomes unresponsive, Chrome's built-in Task Manager can help you show what's causing the issue before you continue troubleshooting.
How to use it:
- Open Chrome.
- Click Window > Task Manager.
- Sort by Memory footprint or CPU.
- Look for tabs, extensions, or processes using an unusually high amount of resources.
- Select the process and click End task.
If the same website or extension keeps appearing at the top of the list, try closing that tab or removing the extension to see if Chrome becomes stable again.
11. Disable or relaunch hardware acceleration
Hardware acceleration is supposed to speed up your Chrome at the cost of your Mac’s hardware resources. But quite often, this feature crashes things. Hardware acceleration is found here:
Chrome > Settings > System
In newer Chrome versions, it has been renamed to graphics acceleration.

The final tip is to check if Chrome is not using too many resources. Head over to the next step to learn how to do it.
12. Use Activity Monitor
Google Chrome not working on Mac may be a sign of general memory overload on your computer. Try opening your Activity Monitor and checking off a few top consumers.
- Open the Launchpad and type Activity Monitor in the search bar.
- Now, sort by Energy and use the [x] button to quit a process.
- You can repeat the process for Memory and CPU.
That’s it. Hopefully, these fixes have made your web surfing better than it’s ever been. It just goes to show that even drastic problems like Chrome not working on Mac can be solved with a little know-how and helpful apps like CleanMyMac.
Thanks for reading, and stay tuned!
Frequently asked questions
1. What to do if Chrome is not working on Mac but Safari is?
Basically, follow the steps we’ve outlined in this article one by one. Here’s what to start with: restart Chrome and your Mac, clear browsing data, and check for Chrome updates.
2. How to fix both Safari and Chrome not working on Mac?
If both browsers have stopped working, it is most likely a system issue. Check your internet connection first. Then, check for app updates (to update Safari, you will need to update your macOS). Besides, disable VPN and iCloud Private Relay if you’ve enabled them.
3. Why is Chrome not working on Mac after update and how to fix it?
If it happens after the macOS update, check if there is an update available for Chrome. It may be that your current Chrome version is incompatible with the macOS version. If, instead, Chrome stopped working after you’ve updated the app itself, try restarting your Mac, checking for macOS updates, and if it opens and then crashes, clearing out all browser data. You can also try deleting profile settings found in ~/Library/Application Support/Google/Chrome/Defaul
4. Why does Chrome keep crashing on macOS Tahoe?
Chrome may crash on macOS Tahoe if you're using an older version of Chrome or if Chrome and macOS don't work well together after an update. Browser data or extensions can also cause problems. Make sure both Chrome and macOS are up to date. If Chrome still crashes, clear your browsing data, turn off your extensions, or reinstall the browser.
5. Will resetting Chrome delete my bookmarks?
No, resetting Chrome changes your browser settings back to their defaults, but it doesn't remove your bookmarks, passwords, or browsing history. If you sync Chrome with your Google Account, your data will still be there.
6. Should I switch from Google Chrome to Safari?
If Chrome continues to have problems after you've tried all the fixes in this guide, Safari is a solid alternative. It's optimized for macOS and integrates seamlessly with Apple devices. But if you rely on Chrome extensions or Google services, fixing Chrome is usually the better long-term option.


