Being able to connect to the network is essential for using your Mac as intended in almost all cases. Usually, it just works, but sometimes, you experience all kinds of issues — from losing Wi-Fi connection to a painfully slow connection. There could be numerous reasons why your Mac won’t connect to Wi-Fi: a new software update, wrong Wi-Fi preferences, or several networks conflicting with each other. Keep on reading to learn what to do if MacBook Wi-Fi won’t turn on.
How to troubleshoot Wi-Fi problems on Mac
1. Run Wireless Diagnostics
Running Wireless diagnostics is a good place to start. You can do that with the native tool your macOS already has.
- Press Option and click the Wi-Fi icon in the top right corner.
- Click Open Wireless Diagnostics.

2. Reset Wi-Fi network settings
This step will reconfigure your existing Wi-Fi settings and launch the network experience from scratch. But before you begin, we recommend backing up your Mac with the Time Machine.
- Turn off Wi-Fi and shut down your browsers.
- Apple menu > Go > Go to Folder.
- Paste in the following line:
/Library/Preferences/SystemConfiguration/
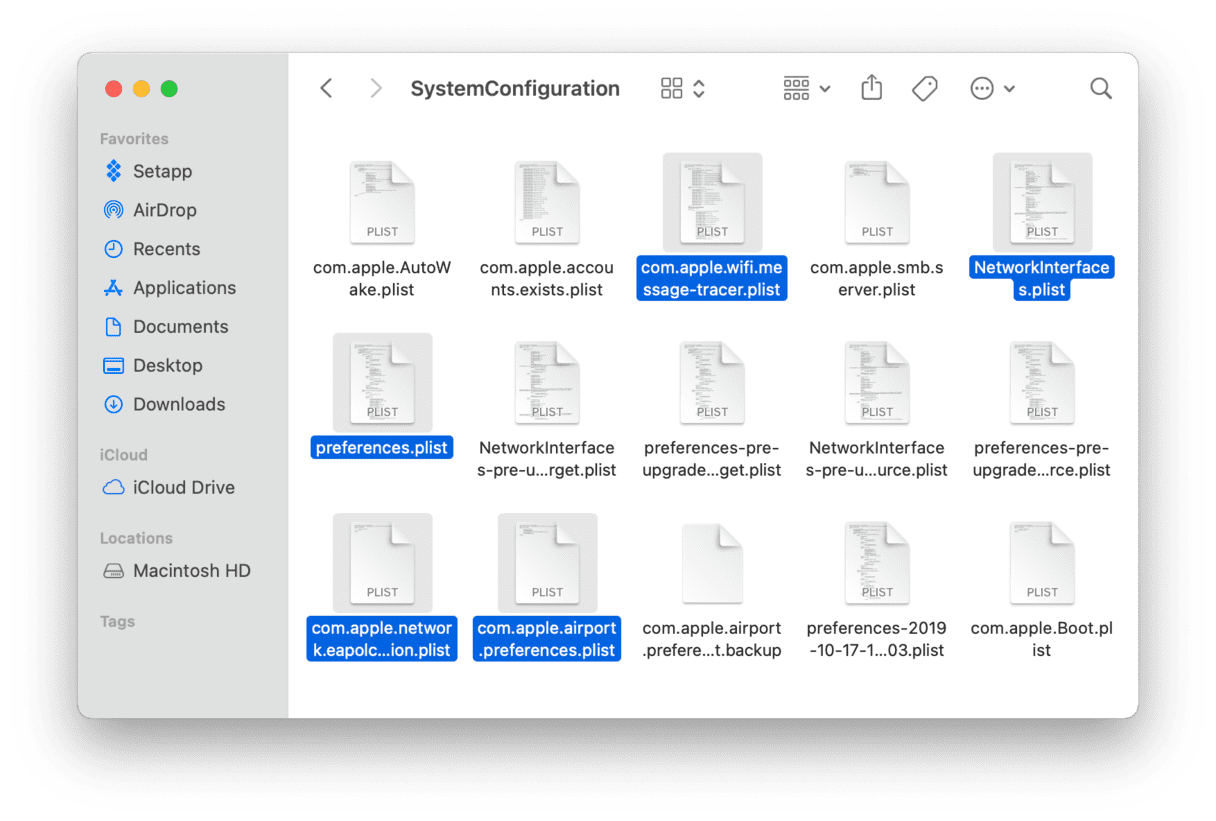
Select the files listed below (as shown on the screenshot):
- preferences.plist
- com.apple.wifi.message-tracer.plist
- com.apple.network.eapolclient.configuration.plist
- com.apple.airport.preferences.plist
- NetworkInterfaces.plist

4. Lastly, move these files to a new folder on your Desktop. Restart your Mac.
After that, you will have to revisit Wi-Fi settings (Click Wi-Fi Settings under the Wi-Fi icon). Turn Wi-Fi on and select your Wi-Fi network again.
The path above proved to be a good remedy when the Wi-Fi connection drops off after upgrading to the latest macOS. If the issue persists, consider reinstalling macOS.
3. Reset Wi-Fi sleep mode settings
In some cases, sleep mode settings cause Wi-Fi drops on Mac, so it wouldn’t turn on again. Try this simple fix that many users found helpful:
- Go to System Settings > Battery > Options.
- From the dropdown next to Wake for network access, select Never.

Now, check your Wi-Fi (cross your fingers). Did it do the trick? If not, let’s move on to the next step.
4. Flush DNS cache
Another way to fix Mac Wi-Fi not working is to flush your DNS cache. DNS service helps your Mac find IP addresses, much like a phone book. It even has a cache folder of its own. Removing these cache files is helpful when your Wi-Fi slows down or you can’t access certain websites.
Here’s a quick workaround to save you from meddling with critical system folders:
- Download CleanMyMac (you can get it here, it’s free).
- Click Performance in the sidebar > Scan > View All Tasks.
- Go to Maintenance Tasks and select Flush DNS cache.
That’s it! This solution is 100% free and takes no more than a minute.
By the way, CleanMyMac is pretty much an indispensable tool if you want to keep your Mac clean and junk-free. It removes up to 74 GB of junk files on an average Mac, giving it a spin, just in case.
5. Reboot your Wi-Fi router
Plug off your router and leave it for a minute or two. Then plug your router back in and try to connect other Wi-Fi devices in the room. This way, you can find out if the problem lies in a router.
Additionally, try placing your router in a different place. You can lose your Wi-Fi signal due to neighboring networks or catching a “dead zone” in your house.
6. Check VPN and security software
Sometimes, VPN and security software may interfere with Wi-Fi, especially if the Wi-Fi signal is weak. It’s because they interact with your network connection and may affect it in a way you don’t expect. So, another hack to help you fix your Wi-Fi on Mac is to disable them to find out if the issue persists. If it helped, you may then enable them one by one to find out what was at fault for connectivity issues.
Additionally, you can check the time and date from System Settings > General, update security software that is at fault, try switching to another network, or delete a VPN or an app.
7. Check Wi-Fi range
Another trick that can help fix it when Wi-Fi is not working on a Mac is checking Wi-Fi range. To do it, follow these steps:
- Press Option and click Wi-Fi icon from the menu bar.
- Look at the number next to RSSI.
RSSI stands for Received Strength Signal Indicator. Anything between -30 dBm and -67 dBm points out a good connection. Anything between -70 dBm and -90 dBm is a poor connection. If you see -90 dBm, the signal is bad, meaning that you are almost out of Wi-Fi range and have to move closer to the router.
8. Customize MTU and DNS settings
MTU stands for Maximum Transmission Unit and describes the packet size exchanged via the network (measured in bytes). The solution described below implies lowering MTU size, making your WI-Fi connection less laggy. At the same time, customizing DNS location has also proved effective in solving even the most bitter Wi-Fi problems on Mac.
But don’t let these geeky terms put you off. The path takes just about a minute, and you’ll be proud to have fixed your Mac Wi-Fi not working — the Apple Genius way.
Step 1:
- Go to System Settings > Network.
- At the bottom of the window, click the ellipsis icon > Locations > Edit Locations.
Step 2:
Now, create a new location by clicking the plus button. Name it anything you like. Click Done.
Step 3:
- Then select your standard Wi-Fi network in System Settings > Wi-Fi.
- Click Details next to its name.
- Go to TCP/IP tab and click Renew DHCP Lease.
Step 4:
Go to the DNS tab, and by clicking the + button, enter 8.8.8.8 and 8.8.4.4 as IP addresses, each in a separate line. These two are Google’s alternative DNS servers that the company recommends using — they are safe. But before you do this, make sure to copy your current DNS address on paper.
Step 5:
- Go to the Hardware tab from the previous step.
- Under the Configure dropdown menu, choose Manually.
- Click MTU and set the custom size to 1453.
- Click OK.
Well done! May the Wi-Fi be with you! Thanks for reading.