Google Meet is a video conferencing tool similar to Zoom that can be used by anyone with a Gmail or Google Workspace account. Like Zoom, Meet gained hugely in popularity with the shift to remove work in 2020. Also, like Zoom, Meet works very well most of the time but can occasionally go wrong. Here’s how to fix it when your Google Meet camera has failed.
Make sure your camera is working
A hardware issue is the least likely cause of the problem, but it’s also the easiest to rule out, so let’s do that first. If you use a Mac mini or Mac Pro with a USB web camera, check if it’s plugged in correctly.
Next, open FaceTime to check that it is able to access the camera. If so, you know it’s a software issue. If FaceTime can’t detect your camera, try QuickTime (File > New Movie Recording) and Photo Booth. If none of those can access your camera, it’s likely a hardware problem. If you use an external camera, try a different one. If you use the built-in camera of your Mac, try using an external camera.
Check if Google Meet has permission to use your camera
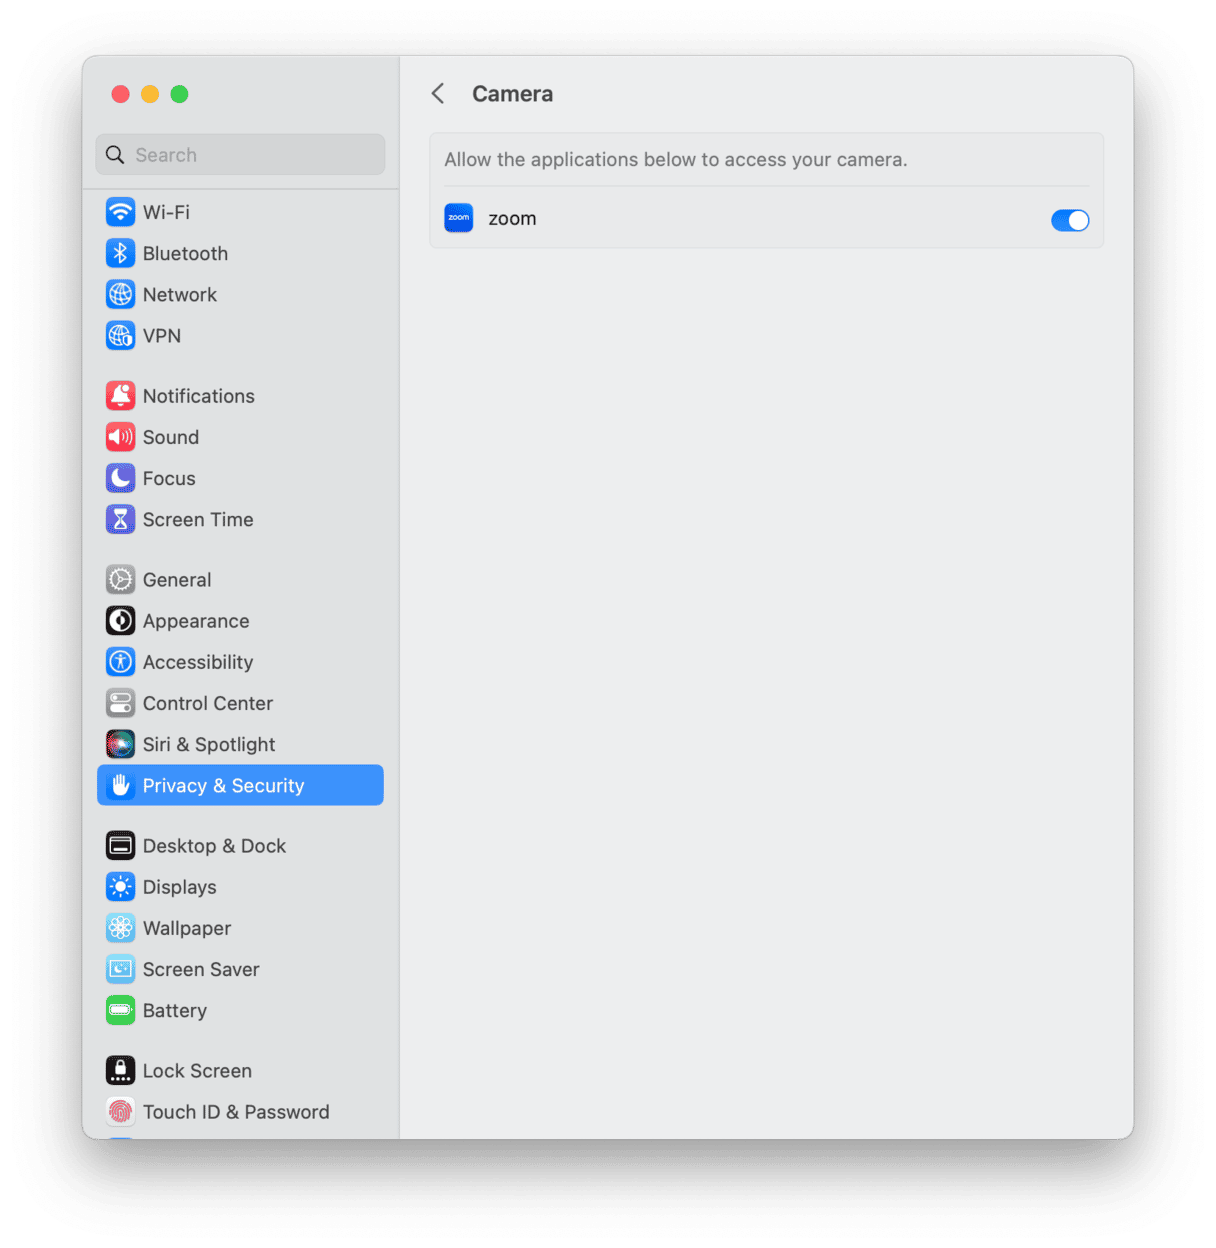
- Go to the Apple menu and click System Settings.
- Choose Privacy & Security.
- Under the Privacy pane, navigate to Camera.
- Scroll to the name of the browser you use for Google Meet and make sure that it is turned on.

You can use CleanMyMac’s Privacy module to manage permissions for all the apps on your Mac, including those for the camera, microphone, and those that control access to folders on your Mac.

- Download and install CleanMyMac if you don’t already have it.
- Choose Privacy in the sidebar and click Scan.
- Check Application Permissions and scroll down to the browser you use for Google Meet.
- Click the drop-down arrow and make sure the Camera is present.
You can also use CleanMyMac to remove permissions for the apps that you stopped using.
Make sure your software is up to date
Updates contain security patches and important software improvements. Make sure the browser you use with Google Meet is up to date.
To update Chrome:
- Go to chrome://settings/help
- Install new updates if there are any and reopen Chrome.
To update Firefox:
- Go to the Firefox menu and click About Firefox.
- Install new updates, if there are any, and click the “Restart to update Firefox” button.
Safari updates often come with macOS updates, so update your OS to the latest version. Go to the Apple menu and click System Settings > General. Click Software Update to check for updates and install the new OS.

Check your browser’s settings
If you use Chrome with Meet, make sure it is configured to use your camera.
- Paste the following into Chrome’s address bar: chrome://settings/content/camera
- Disable the setting “Sites can ask to use your camera.”
- Under Allow, delete https://meet.google.com:443 if it’s there.
- Restart Chrome and allow camera access when prompted.

If your camera is still not working in Google Meet, try quitting any other apps you have open that have access to your camera. If that doesn’t work, restart your Mac.
You should also try using a different browser. If you normally use Google Meet in Chrome, try it in Firefox or Safari.
Reset or reinstall your web browser
If nothing above has worked, the next step is to reset or reinstall the browser you use with Google Meet.
CleanMyMac makes it very easy to reset apps to their default state and uninstall them if resetting doesn’t work. The exception is Safari — you can remove files like Preferences, User Data, and Supporting files and reset the app, but you can’t uninstall Safari, as it’s installed with macOS.
Here’s how to reset Chrome:
- Open CleanMyMac and choose Uninstaller.
- Locate Chrome.
- Select the box next to Chrome and choose Reset from the drop-down menu.
- Click Reset.

To uninstall it, choose Uninstall at Step 3 and click Uninstall. The process for resetting or uninstalling Firefox is the same as for Chrome. You will then need to download and install the latest version of the browser.
How to fix other Google Meet problems on your Mac
Camera problems aren’t the only issues that can occur when you use Google Meet on your Mac; there are a few more. Of those, the most common are performance issues on your Mac and network connection problems. Here’s how to fix those.
Performance problems on your Mac
- Close browser tabs you don’t need.
- Quit other applications.
- Use Activity Monitor to detect applications and processes that are using significant amounts of RAM or CPU cycles and quit them.
CleanMyMac has several tools to help you boost your Mac’s performance. These include:
- The Maintenance module that runs maintenance scripts frees up RAM and repairs disk permissions.
- Space Lens identifies files and folders taking up large amounts of space on your boot drive.
- System Junk finds and removes old cache files, logs, and other junk files you don’t need.

Network problems
If you are experiencing problems in Google Meet because of a poor connection, try the following:
- Connect via Ethernet if you can.
- Move closer to your router.
- Turn Wi-Fi off and then on again on your Mac.
- Switch to 5GHZ if you can.
- Avoid using network bandwidth for other tasks during calls.
- Restart your router.
Can’t hear the sound in Google Meet
If you can see images in a Google Meet session but can’t hear the sound, check the sound output you have set up on your Mac. If you have Bluetooth headphones or a speaker connected, make sure they are powered up and working. If you want to use your Mac computer’s built-in speaker, make sure it’s selected in System Settings.
- Go to the Apple menu and choose System Settings.
- Choose Sound.
- Select Output.
- Click the built-in speakers.

There are several reasons your camera might have failed in a Google Meet call. They could be caused by hardware or software issues. If you follow the steps above, you will be able to identify and fix the problem. If you use CleanMyMac, you may be able to complete some of the steps more quickly and will also have a Mac that’s free from junk and runs more smoothly.