Mit iCloud hast du sofortigen Zugriff auf Dateien und Apps, die du auf allen deinen Geräten benötigst. Dir stehen 5 GB Speicherplatz kostenlos zur Verfügung, und zusätzlicher Speicherplatz ist relativ kostengünstig. Wenn du also mehrere Apple-Geräte besitzt, ist dies definitiv die bequemste Art der Dateiverwaltung. Dieser Speicherplatz ist jedoch begrenzt, sodass die Meldungen „iCloud-Speicher fast voll“ oder „Nicht genügend Speicherplatz“ unvermeidlich sind. Hier erfährst du, wie du damit umgehen kannst.
Warum ist mein iCloud-Speicher voll?
Ein Standard-Account verfügt nur über 5 GB kostenlosen Speicherplatz. Das reicht kaum für Backups, ist aber in der Regel ausreichend für die Synchronisierung von Kontakten und Notizen. Du synchronisierst Fotos, Dateien und Videos mit iCloud Drive und verwendest iCloud zum Sichern deiner Geräte? Dann ist der Speicherplatz ziemlich schnell voll, selbst wenn du ein Upgrade auf 50 oder 200 GB durchgeführt hast.
Ein weiterer Grund für einen vollen iCloud-Speicher ist die Aktivierung der Funktion „Mac-Speicher optimieren”. Diese verschiebt Dateien in die Cloud und löscht sie aus dem lokalen Speicher. Das hilft zwar, Speicherplatz auf dem MacBook zurückzugewinnen, verursacht jedoch ein weiteres Problem. Glücklicherweise kannst du aber einiges tun, um Platz in deinem iCloud-Speicher zurückzugewinnen.
Überprüfe deinen iCloud-Speicher
Beginnen wir mit den Grundlagen – der Überprüfung des iCloud-Speichers. Die Schritte variieren je nach verwendetem Gerät.
Mac
Öffne die Systemeinstellungen > Apple Account > iCloud

iPhone & iPad
- Öffne die Einstellungen.
- Tippe auf „Account“ > „iCloud“.
- Warte, bis das Speicherdiagramm geladen ist.

Wenn du sowohl deine iPhone- als auch deine Mac-Daten mit iCloud synchronisierst, dann wird der Speicherplatz früher oder später wieder voll sein – es sei denn, du lernst, wie du ihn sinnvoller nutzen kannst. Wir zeigen dir im Folgenden ein paar Schritte, mit denen du schnell Speicherplatz in iCloud freigeben und deine iCloud in Zukunft regelmäßig bereinigen kannst.
Schritt 1: Beseitigen Sie Junk-Dateien auf Ihrem Mac und entfernen Sie iCloud-Datenmüll effizienter
Wenn Sie iCloud zur Synchronisierung Ihres iPhones und Macs verwenden, kann es passieren, dass Ihr Mac unbemerkt Ihren Cloud-Speicher füllt. Cache-Dateien, veraltete Dokumente, App-Reste und System-Junk können alle mit iCloud synchronisiert werden und mit der Zeit eine große Menge an Daten verursachen.
Sie könnten versuchen, diese manuell zu entfernen, aber das ist riskant und zeitaufwendig. Eine bessere Option ist die Verwendung eines Tools wie CleanMyMac. Damit können Sie Datenmüll sicher beseitigen und das Tool enthält jetzt eine Funktion zur effektiveren Verwaltung Ihrer Cloud-Konten.
So verwenden Sie es:
- Starten Sie Ihre kostenlose CleanMyMac-Testphase.
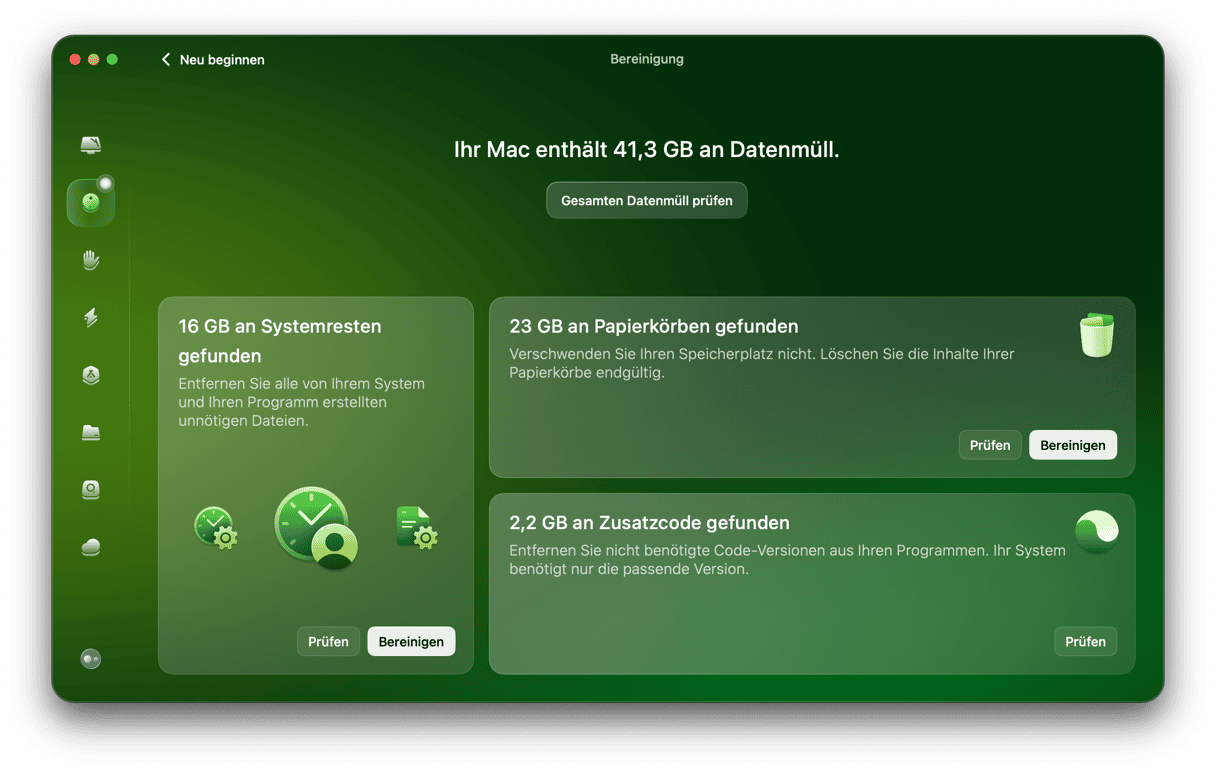
- Klicken Sie zunächst auf „Bereinigung“, um Ihren Mac nach unnötigem Datenmüll zu durchsuchen. Überprüfen Sie die gefundenen Elemente und entfernen Sie die unnötigen.
- Wechseln Sie dann zu „Cloud-Bereinigung“, um Ihre iCloud- und andere Cloud-Speicherkonten zu verbinden.
- Nach der Synchronisierung sehen Sie, welche Dateien lokal und welche in der Cloud gespeichert sind. Mit nur wenigen Klicks können Sie die nicht mehr benötigten Dateien überprüfen und entfernen.
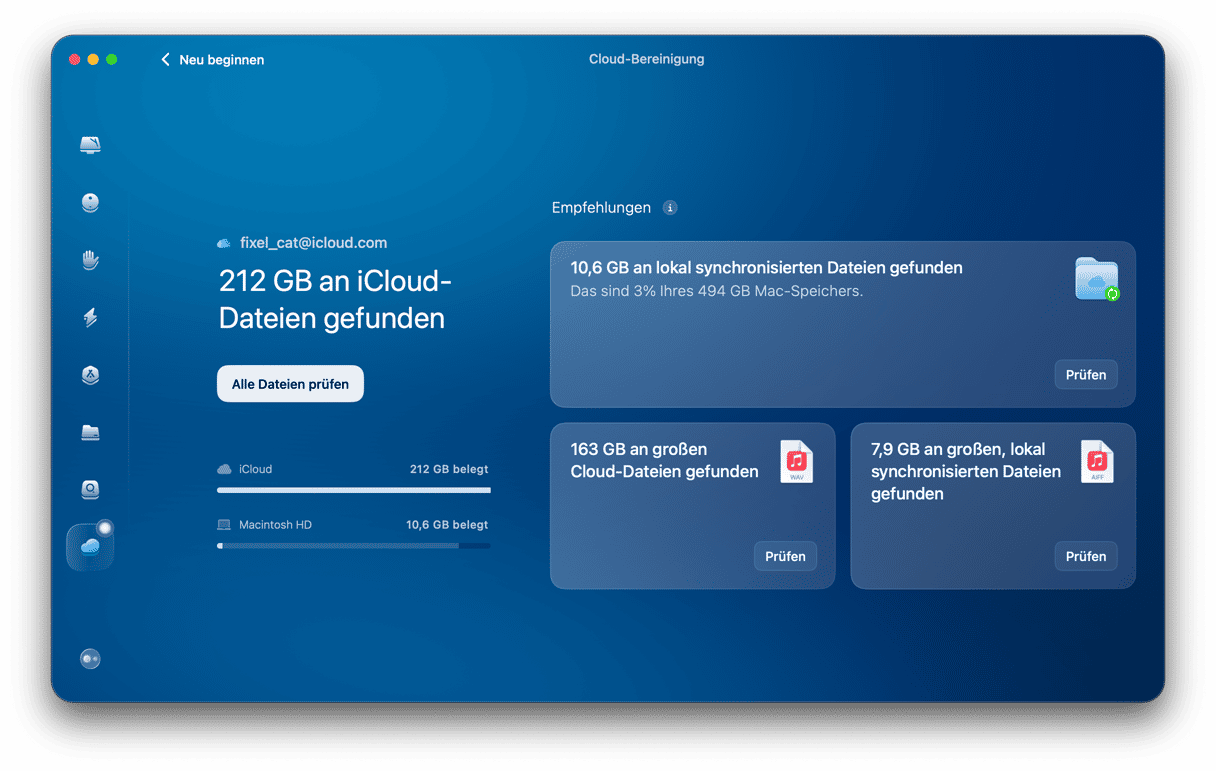


So erhalten Sie einen klaren Überblick darüber, was wirklich Ihren iCloud-Speicherplatz belegt – nicht nur auf Ihrem iPhone, sondern auf allen Ihren Geräten.
Schritt 2: Alte Dateien in iCloud Drive finden
Seit macOS Sierra speichert das System alte Dateien – wie Filme, die du bereits gesehen hast – automatisch in iCloud, wodurch du Speicherplatz auf deinem Mac sparst. Das Problem ist jedoch, dass diese Dateien immer noch Speicherplatz belegen, nur dass es sich jetzt um den wertvollen Speicherplatz in deiner iCloud handelt. Gehe wie folgt vor, um zu sehen, was du dort hast und was du löschen kannst:
- Melde dich bei deinem Account auf icloud.com an.
- Klicke auf „Drive“.
- Gehe die Liste durch und markiere Dateien, die du nicht mehr brauchst.
- Klicke auf die Ellipse und wähle „Ausgewählte löschen“ aus. Vergiss nicht, den Ordner „Zuletzt gelöscht“ zu leeren, indem du auf „Alle löschen“ klickst.

Fertig. Wenn du macOS High Sierra verwendest, ist iCloud Drive auch als Ordner im Finder verfügbar, sodass du dasselbe auf deinem Mac tun kannst.
Schritt 3: Überflüssige E-Mails in iCloud löschen
Wenn du einen iCloud-E-Mail-Account (der mit @icloud.com endet) verwendest, werden alle E-Mail-Nachrichten in iCloud gespeichert. Die E-Mails selbst beanspruchen zwar nicht viel Speicherplatz, die Anhänge jedoch schon. PDFs, Fotos und andere Dateien, die dir im Laufe Zeit geschickt wurden, können sich auf einige Gigabyte summieren. Gehe also deine alte Korrespondenz durch und mache einen Frühjahrsputz.
- Melde dich erneut bei deinem Account auf icloud.com an.
- Klicke auf Mail.
- Überprüfe deinen Posteingang und lösche alles, was du nicht mehr benötigst. Klicke mit der rechten Maustaste auf eine E-Mail und wähle „Nachricht löschen“.
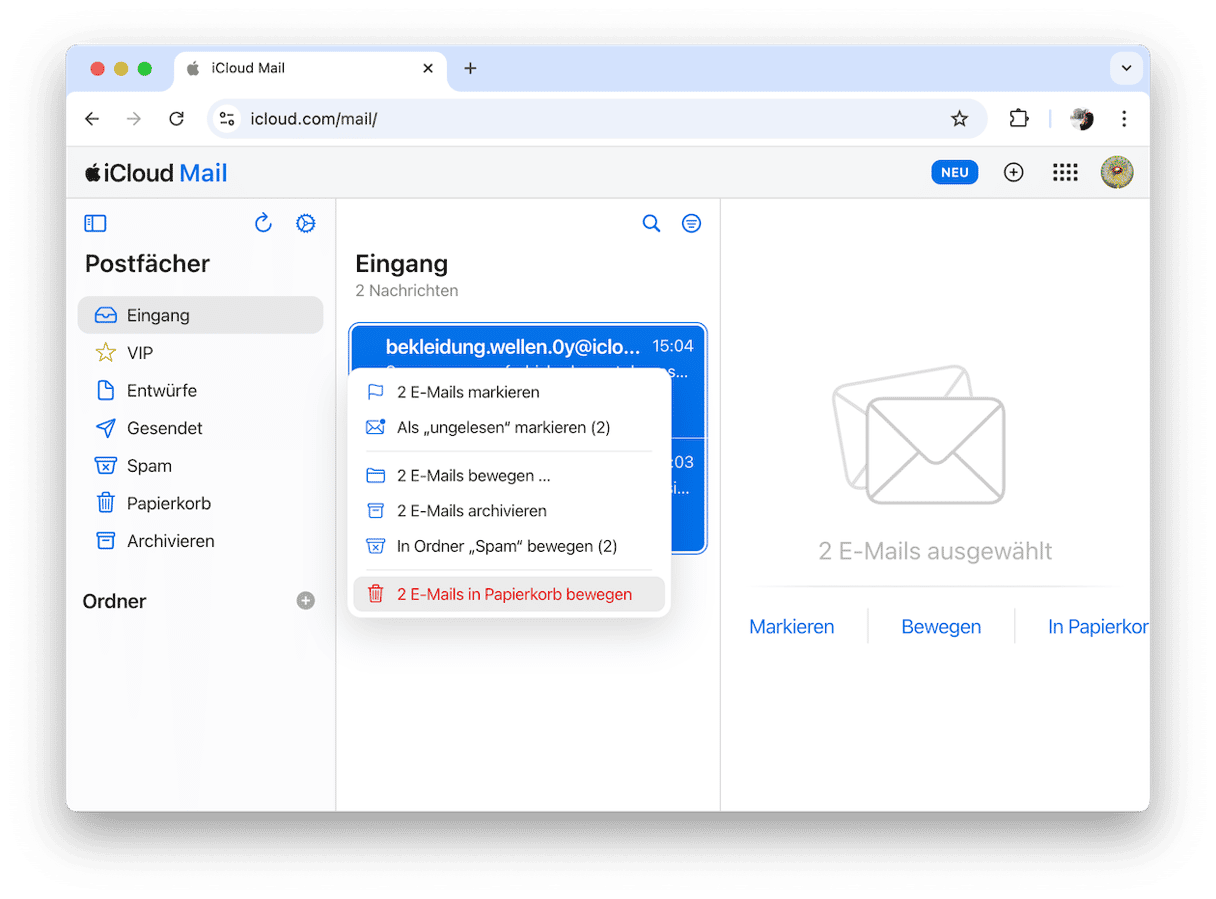
- Verfahre genauso mit „Gesendet“ und „Archiv“.
- Gehe nun zum Papierkorb, drücke Befehlstaste + A und klicke auf „Löschen“. Oder klicke mit der rechten Maustaste auf eine beliebige E-Mail und wähle „[x] Nachrichten löschen“ aus.


Um Speicherplatzprobleme von vornherein zu vermeiden, solltest du dir angewöhnen, E-Mails, von denen du weißt, dass du sie in Zukunft nicht mehr brauchst, sofort zu löschen.
Schritt 4: Alte iOS-Backups entfernen
Die regelmäßige automatische Sicherung deines iPhones durch iCloud ist eine großartige Möglichkeit, deine Daten zu schützen, falls etwas mit dem iPhone passiert. In diesem Fall benötigst du jedoch nur das zuletzt erstellte Backup und keine Backups, die vor Monaten erstellt wurden.
So kannst du auf all deine Geräte-Backups zugreifen und alte Backups löschen:
- Gehe auf dem Mac zu „Systemeinstellungen“ > „Apple Account“ > „iCloud“.
- Klicke auf „Verwalten“ und dann auf „Backups“.
- Wähle das Backup aus, das du entfernen möchten, und klicke auf „Löschen“.

Es ist wichtig zu wissen, dass beim Löschen eines Backups das Backup-Feature für dieses Gerät deaktiviert wird.
Schritt 5: Nachrichten und E-Mail-Anhänge aus iCloud löschen
Alte Nachrichten und Anhänge nehmen ebenfalls viel Speicherplatz in Anspruch, daher sollten sie gelöscht werden. Wie löscht man Nachrichten aus iCloud? Wie bei allen oben genannten Schritten gibt es auch hier unterschiedliche Möglichkeiten für iPhone und Mac. Wir beginnen mit dem Entfernen von E-Mail-Anhängen auf dem Mac und wechseln dann zum Löschen alter Nachrichten und Nachrichtenanhänge auf Mac und iPhone.
In der Mail-App auf deinem Mac:
- Öffne die Mail-App.
- Wähle eine oder mehrere Nachrichten aus. Du kannst auch Befehlstaste + A drücken, um alle Nachrichten auszuwählen.
- Klicke auf „Nachricht“ > „Anhang(e) entfernen“. Wiederhole dies für alle Postfächer.

Kommen wir nun zu den Nachrichten. Auf dem Mac:
- Öffne die Nachrichten-App.
- Klicke mit der rechten Maustaste auf die Konversation, die du löschen möchtest, und wähle „Löschen“. Bestätige die Aktion.
- Klicke nun auf „Ansicht“ > „Zuletzt gelöscht“ und lösche die Konversationen ein für alle Mal.

Wenn du die Konversation nicht löschen, sondern nur die Anhänge entfernen möchtest, dann öffne den Dialog und klicke auf das i. Wähle unter „Fotos“ aus, was du entfernen möchtest, klicke mit der rechten Maustaste und wähle „Löschen“ > „Anhang(e) löschen“. Beachte, dass die Anhänge nicht wiederhergestellt werden können.
Auf deinem iPhone:
- Öffne die Nachrichten-App.
- Tippe auf „Bearbeiten“ > „Nachrichten auswählen“.

- Wähle die Nachrichten aus, die du nicht benötigst, und tippe auf „Löschen“.
- Bestätige den Löschvorgang.
- Tippe nun auf „Bearbeiten“ > „Zuletzt gelöscht“ > „Alle löschen“ > „[x] Nachrichten löschen“.
![Tippe nun auf „Bearbeiten“ > „Zuletzt gelöscht“ > „Alle löschen“ > „[x] Nachrichten löschen“](https://cdn3.macpaw.com/cdn-cgi/image/format=auto,quality=60,width=1824,dpr=2/images/content/image_1738943958.png)
Der nächste Schritt ist das Löschen von Anhängen auf dem iPhone. Beachte jedoch, dass sie aus den Nachrichten gelöscht werden und nicht wiederhergestellt werden können. Gehe daher mit Bedacht vor.
- Öffne die Einstellungen > Allgemein > iPhone-Speicher.
- Scrolle zu „Nachrichten“.
- Tippe auf „Fotos“ > „Bearbeiten“ und wähle aus, was entfernt werden soll.
- Tippe oben rechts auf das Papierkorbsymbol.
- Führe die gleichen Schritte für GIFs und Sticker aus.

Alternativ kannst du auch Nachrichten öffnen, eine Konversation mit Anhängen auswählen und oben auf die Kontaktblase tippen. Tippe nun neben „Fotos“ auf „Alle anzeigen“ und drücke auf „Auswählen“ > „Löschen“ > „Anhang löschen“.
Schritt 6: Alle Papierkörbe entleeren
Man vergisst leicht, dass Dateien im Papierkorb (oder bei Fotos im Ordner „Zuletzt gelöscht“) immer noch Speicherplatz belegen, sei es in der Cloud oder lokal. Entleere also unbedingt den Papierkorb, nachdem du die Schritte 1 bis 6 abgeschlossen hast.
In der Fotos-App auf deinem iPhone:
- Öffne die Fotos-App.
- Gehe zu dem Album „Zuletzt gelöscht“.

- Tippe auf „Auswählen“ > „Ellipse“.

- Tippe nun auf „Alle löschen“ > „Von diesem iPhone löschen“.

In der Mail-App auf deinem iPhone:
- Öffne die App.
- Tippe auf „Papierkorb“.
- Tippe auf „Bearbeiten".

- Wähle „Alles auswählen“ und dann „Alles löschen“.

In der Fotos-App auf deinem Mac:
- Öffne die Fotos-App.
- Tippe auf „Zuletzt gelöscht“.
- Klicke auf „Alle löschen“ > „Von allen Geräten löschen“.

In der Mail-App auf deinem Mac:
- Öffne die Mail-App.
- Klicke oben in der Menüleiste auf „Postfach“.
- Wähle „Objekte endgültig löschen“ aus dem Dropdown-Menü aus.
- Wähle deine iCloud-E-Mail-Adresse aus und klicke auf „Endgültig löschen“.

Das war's! Dies sollte dir helfen, mehr iCloud-Speicherplatz zu erhalten, zumindest vorerst. Führe diese Schritte alle 1–2 Wochen durch, um sicherzustellen, dass deine iCloud nicht wieder verstopft wird.
Schritt 7: Doppelte Fotos vom iPhone löschen
Wenn die iCloud-Fotomediathek auf deinem iPhone aktiviert ist, wird jedes Foto automatisch mit der Cloud synchronisiert. Jedes einzelne Foto nimmt nicht viel Platz ein, aber wenn du jedes Mal 3-4 Aufnahmen machst, bis du das gewünschte Foto hast, dann summieren sich diese Megabytes schnell.
Eine Lösung besteht darin, deine Mediathek zu durchsuchen und diese nicht benötigten Fotos manuell zu löschen. Schneller geht es, wenn du CleanMy®Phone herunterlädst. Diese iPhone-App optimiert den Prozess, indem sie ähnliche Fotos, Aufnahmen in geringer Qualität und Screenshots findet und eine Vorauswahl trifft, sodass du nur noch auf „Löschen“ tippen musst.
Wenn die iCloud-Fotomediathek aktiviert ist, werden die Fotos, die du auf deinem iPhone löschst, auch aus der Cloud entfernt, sodass du ganz einfach etwas iCloud-Speicherplatz freigibst. Die App kann kostenlos heruntergeladen werden, also probiere sie doch gleich auf deinem iPhone aus.

Ein zusätzlicher Vorteil ist, dass du deine Fotos viel einfacher und schneller von iCloud herunterladen kannst, falls du dich irgendwann entscheidest, die App nicht mehr zu nutzen. Wenn deine Mediathek nicht mit nutzlosen Duplikaten und alten Screenshots überfüllt ist, lassen sich Dateien viel einfacher in und aus dem Cloud-Speicher verschieben.
So verwaltest du den iCloud-Speicher auf Mac und iPhone/iPad
Diese Lösung bietet sich an, wenn dein Budget nicht zu knapp ist und es dir nichts ausmacht, jeden Monat Geld für Speicherplatz auszugeben.
Aber wie kann man den iCloud-Speicherplatz erweitern? Mehr Speicherplatz zu bekommen ist einfach und geht von jedem Gerät aus, auch von deinem iPhone. Beachte, dass die Verwaltung des iCloud-Speichers in beide Richtungen geht. Du kannst ihn entweder erweitern oder verkleinern. Schauen wir uns beide Optionen an, beginnend mit der ersteren.
Cloud-Speicher kaufen
Gehe auf deinem Mac zu „Einstellungen“ > „Apple-ID“ > „iCloud“ > „Verwalten“ > „Speicherplan ändern“.

Auf dem iPhone sind die Schritte fast identisch, nur dass du unter Einstellungen > Apple-ID > iCloud zu „Account-Speicher verwalten“ und dann zu „Speicherplan ändern“ gehst.
Das Upgrade deines Speicherplans ist unkompliziert und dauert nur wenige Minuten. Sobald du das Upgrade abgeschlossen hast, steht dir der zusätzliche Speicherplatz sofort zur Verfügung. Zusätzlich zu extra Speicherplatz erhältst du Premium-Features wie das iCloud Privat-Relay, „E-Mail Adresse verbergen“ und Unterstützung für HomeKit Secure Video. Zudem kannst du deinen Plan mit Familienmitgliedern teilen und eine eigene E-Mail-Domain nutzen. All das macht iCloud+ aus.

Apple bietet verschiedene Speicherpläne für unterschiedliche Bedürfnisse an, und du kannst deinen Plan jederzeit ändern oder kündigen. Achte darauf, deine Zahlungsmethode auf dem neuesten Stand zu halten, um Unterbrechungen deines iCloud-Dienstes zu vermeiden.
Nun stellt sich natürlich die Frage, wie viel der iCloud-Speicherplatz kostet. Das hängt in erster Linie von deinem Standort und der gewünschten Speicherkapazität ab. Es gibt Optionen für 50 GB oder 200 GB und sogar bis zu 12 TB. Die genauen Kosten werden direkt im Menü angezeigt, neben dem Speicherplan.
Wenn du dich für ein Downgrade deines iCloud-Speicherplans entscheidest, folge den gleichen Schritten wie oben. Wähle dabei jedoch einfach einen Plan mit weniger Speicherplatz aus.
So löschst du Inhalte aus iCloud
Meistens ist die Antwort auf die Frage, wie man Daten aus dem iCloud-Speicher löscht, denkbar einfach. Öffne dazu einfach den iCloud Drive-Ordner und lösche die gewünschten Dateien direkt dort. Du kannst sie hier nach Größe sortieren, indem du die Listendarstellung wählst.
Das war’s schon – diese Dateien werden nun auch auf anderen Geräten nicht mehr angezeigt. Um Dateien zu löschen, ziehe das Icon einfach in den Papierkorb oder markiere die Datei und drücke Befehl(⌘)-Löschen.

„Ordner Schreibtisch & Dokumente“ nicht mehr synchronisieren
Die Ordner „Schreibtisch“ und „Dokumente“ sind oft wahre Friedhöfe für vergessene Dateien. Wenn man sie nicht im Blick behält, verbrauchen sie schnell den gesamten iCloud-Speicherplatz. Falls du sie nicht regelmäßig aufräumst, solltest du die Synchronisierung dieser Ordner lieber deaktivieren.
- Öffne die Systemeinstellungen > Apple Account > iCloud > Drive
- Deaktiviere „Ordner Schreibtisch & Dokumente'“.

Fotos aus iCloud löschen: Anleitung
Wie du dir sicher denken kannst, gibt es unterschiedliche Szenarien für Fotos in deinen Mediatheken und Streams. Das Löschen bestimmter Fotos aus der iCloud funktioniert auf zwei einfache Arten:
- Lösche Bilder direkt in der Fotos-App. Öffne die App, wähle die zu löschenden Bilder aus und drücke Befehl(⌘)-Löschen. Beim nächsten Synchronisieren werden sie aus deiner iCloud entfernt.
- Lösche sie über die iCloud-Website. Melde dich dazu auf icloud.com an und gehe zu „Fotos“. Dort findest du die Bilder, die du nicht mehr benötigst, und kannst sie entfernen.

Wenn du gar keine Fotos mehr in der iCloud speichern möchtest, kannst du die Synchronisierung komplett deaktivieren. Gehe dazu zu Systemeinstellungen > Apple Account > iCloud > Fotos und deaktiviere die Option „Diesen Mac synchronisieren“. Dies trennt alle Bilder in deiner Fotomediathek von der iCloud. Du kannst die Verbindung jederzeit wiederherstellen, indem du den Vorgang rückgängig machst und die App wieder aktivierst.

So löschst du Filme aus iCloud Drive
Der Vorgang ähnelt dem Löschen von Fotos aus dem Cloud-Speicher. Du kannst sie direkt aus dem iCloud Drive-Ordner entfernen oder die Filme auf icloud.com löschen.
Alternativ kannst du bereits gesehene Filme mit den integrierten Tools zur Speicheroptimierung löschen:
- Öffne das Apple-Menü und wähle die Systemeinstellungen.
- Klicke auf „Allgemein“ > „Speicher“.
- Suche den Bereich „Empfehlungen“ und klicke auf „Optimieren“.

Apps aus iCloud löschen: Anleitung
Dieser Teil ist etwas knifflig, da es darauf ankommt, was du unter „Apps löschen“ verstehst. Falls du nur Apps loswerden möchtest, die gegen deinen Willen synchronisiert werden, kannst du einfach die Systemeinstellungen öffnen. Gehe zu Apple Account > iCloud, klicke auf „Alle anzeigen“ und deaktiviere die entsprechenden Apps.
Klicke außerdem auf Drive > Apps, die auf iCloud Drive synchronisiert werden, um sicherzugehen, dass du keine App übersehen hast.

Falls du eine Installationsdatei einer App (nur das Icon, nicht den Inhalt) im iCloud-Ordner hast, kannst du diese wie jede andere Datei löschen. Ziehe sie einfach in den Papierkorb oder nutze den Kurzbefehl Befehl(⌘)-Löschen.
iCloud-Speicher reduzieren
Wenn du dein iCloud-Speicherplan herabstufen möchtest, dann befolge diese Schritte:
Auf deinem iPhone:
- Open Settings.
- Tap Apple ID at the top of the screen.
- Select iCloud.
- Tap Manage Account Storage.
- Select Change Storage Plan.
- Select Downgrade Options and enter your Apple ID password.
- Choose a lower-tier storage plan and tap Done.

Auf deinem Mac:
- Öffne die Systemeinstellungen.
- Klicke auf „Apple-ID“.
- Wähle „iCloud“.
- Klicke auf „Verwalten“.

5. Wähle „Speicherplan ändern“.

6. Wähle die Downgrade-Optionen aus und gib das Passwort für deine Apple-ID ein.
7. Wähle einen Speicherplan mit geringerer Speicherkapazität und klicke auf „Fertig“.

Jetzt kennst du die verschiedenen Möglichkeiten. Egal, wofür du dich entscheidest – ob du iCloud-Speicher freigibst oder einfach mehr Speicherplatz kaufst – die Faustregel lautet, dein iPhone und deinen Mac frei von Datenmüll zu halten.
Häufig gestellte Fragen
Was ist iCloud-Speicher?
iCloud-Speicher ist ein Dienst von Apple, mit dem du deine Dateien, Fotos und App-Daten in der Cloud speichern kannst. Er synchronisiert deine Daten auf allen deinen Apple-Geräten, sodass du von überall aus auf deine Informationen zugreifen kannst.
Was passiert, wenn mein iCloud-Speicher voll ist?
Wenn dein iCloud-Speicher voll ist, erstellen deine Geräte keine Backups mehr und deine Apps werden nicht mehr synchronisiert. Auch Fotos, Dateien und Videos werden erst wieder in die Cloud hochgeladen, wenn du Platz schaffst oder deinen Speicherplan erweiterst.
Warum ist mein iCloud-Speicher nach dem Löschen von Dateien immer noch voll?
Es kann sein, dass die iCloud noch synchronisiert oder Restdaten speichert. Prüfe, ob du die Ordner „Zuletzt gelöscht“ geleert hast, da Dateien dort sonst 30 Tage lang verbleiben. Gib dem System zudem etwas Zeit für den Vorgang; das Aufheben der Synchronisierung kann einige Stunden dauern.
Werden geteilte Alben auf meinen iCloud-Speicher angerechnet?
Diese Alben werden dem Speicher der Person zugerechnet, die sie erstellt hat. Sie verbrauchen also nur dann deinen Speicherplatz, wenn du der Ersteller bist.
Lohnt sich ein iCloud-Upgrade oder sollte ich lieber aufräumen?
Das hängt ganz von deinen Bedürfnissen und deinem Budget ab. Es empfiehlt sich, mit einer Bereinigung zu beginnen. Wenn danach immer noch nicht genug Platz da ist, kannst du über ein Upgrade nachdenken. Das Upgrade wirkt zwar günstig, ist aber eine monatliche Zahlung.
Kann ich alternative Cloud-Speicher statt iCloud für große Dateien nutzen?
Ja! Die günstigste Alternative ist eine externe Festplatte. Hier musst du zwar einmalig investieren, aber es zahlt sich über die Zeit aus, da keine monatlichen Kosten anfallen. Wenn du nicht lokal speichern möchtest, kannst du Dropbox, OneDrive oder den Google-Account nutzen, wobei diese Dienste ebenfalls kostenpflichtig sind.
Was sind die größten Platzfresser in der iCloud?
Meistens sind das Backups, Fotos, Videos und App-Daten. Lösche unnötige Objekte aus diesen Kategorien, wann immer du iCloud-Speicherplatz freigeben musst. Bereinige diese Bereiche am besten regelmäßig, damit der Speicher in Zukunft nicht so schnell voll wird.


