Paragon NTFS, or Microsoft NTFS for Mac by Paragon to give its full name, is a software tool that allows you to access disks formatted in Microsoft’s NTFS format. Most of the time, once it’s installed, it works just fine. However, if you have installed it and it doesn’t work for you, or you no longer need it, you should uninstall it to free up space and prevent potential conflicts with other files in the future. In this article, we’ll outline our NTFS for Mac uninstall guide.
What is NTFS for Mac?
NTFS is a file system — a bit like APFS or FAT. However, unlike those two formats, macOS can’t write to NTFS-formatted disks. If you plug an NTFS-formatted disk into your Mac, you will be able to see the files on it but won’t be able to copy files to it or edit the files that are already there. And that’s often a problem because NTFS is a popular file format with Windows users. So, if you need to access files on a disk that’s been formatted for use with Windows, say a shared server, you will need additional software to do that. That’s where NTFS for Mac comes in. When you install NTFS for Mac, you will be able to write, edit, copy, move, and delete files on an NTFS-formatted disk. It also allows you to mount, format, verify, and even set an NTFS-formatted volume as a startup disk.

Why uninstall NTFS for Mac?
The main reason for uninstalling NTFS for Mac is that you don’t use it anymore. It’s good practice to uninstall any application that you no longer use to free up space and prevent possible file conflicts in the future. This is particularly true for applications that operate at as low a level in the file system as NTFS for Mac. In addition, out-of-date applications can be a vector for malware. And because most people don’t regularly update apps they don’t use, those apps are vulnerable.
Before uninstalling NTFS for Mac
Before you go ahead and uninstall NTFS for Mac, you should make sure you don’t need to copy files to an NTFS formatted disk. Once you’ve uninstalled it, your Mac will only be able to read NTFS disks. If you still have NTFS formatted disks and want to be able to use them with your Mac after you uninstall NTFS for Mac, you can always back up the data on them by copying it to another disk, then reformat the NTFS disk as APFS (or FAT if you want to be able to use it with a Windows PC, too), and then copy the files back onto it.
How to uninstall NTFS for Mac
There are several different ways to uninstall NTFS for Mac, some easy, some not so easy. We’ll show you them all, and we’ll start with the easy one and proceed with manual app removal.
Uninstall easily
The easiest way to uninstall NTFS for Mac — or any other app — is to use a specialist uninstaller like the Applications tool in CleanMyMac. You can then uninstall not only one app but multiple apps at the same time. With just a couple of clicks. As well as that, you can use CleanMyMac to remove files left over by other applications that were not uninstalled correctly or to reset apps that are misbehaving. Get your free CleanMyMac trial. Once you’ve downloaded and installed it, follow the steps below to uninstall NTFS:
- Open CleanMyMac and choose Applications.
- Run a scan and click Manage My Applications > Uninstaller.
- Locate NTFS for Mac on the list of all apps.
- Select NTFS for Mac and click Uninstall.

CleanMyMac will now track down and remove all the files NTFS for Mac has placed on your computer.
Uninstall from the application
- Open NTFS for Mac.
- Click on the application name menu at the top left of the screen and Choose Settings.
- Select the General tab.
- Click the padlock in the bottom left corner and then type in your admin password.
- Click Uninstall. Wait for the uninstaller to complete.

Uninstall from the Installer package
If you still have the installer package for NTFS for Mac, you can use that to uninstall it. Here’s how:
- Double-click the installer disk image to mount it.
- When it’s mounted, open it.
- Double-click Uninstall NTFS for Mac.
- Click Uninstall and then Restart.

Uninstall manually
If you can’t uninstall NTFS for Mac using the .dmg file, the next step is to do it manually. It’s a lot of work, but it should mean that you successfully remove all the files NTFS for Mac has placed on your machine.
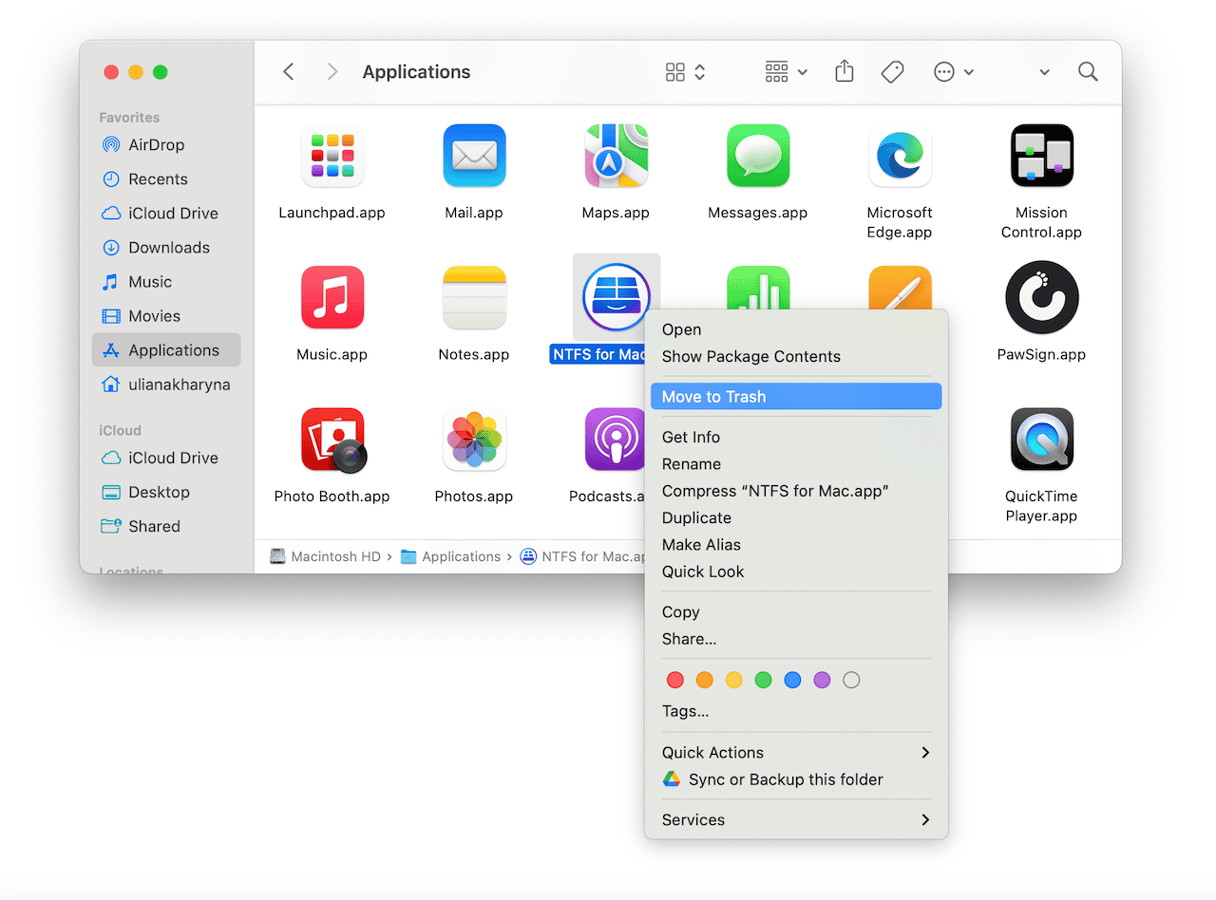
- Locate NTFS for Mac in your Applications folder and send it to Trash.
- Click the Finder icon in the Dock. Choose the Go menu > Go to Folder.
- Paste each of the file paths below one at a time into the text box, pressing Return after each path, and at each location, look for files or folders with NTFS in their name and drag them to the Trash.
~/Library/Application Support/
~/Library/Containers/
~/Library/Caches/
~/Library/Preferences/
~/Library/Cookies/
~/Library/Logs/
~/Library/LaunchAgents/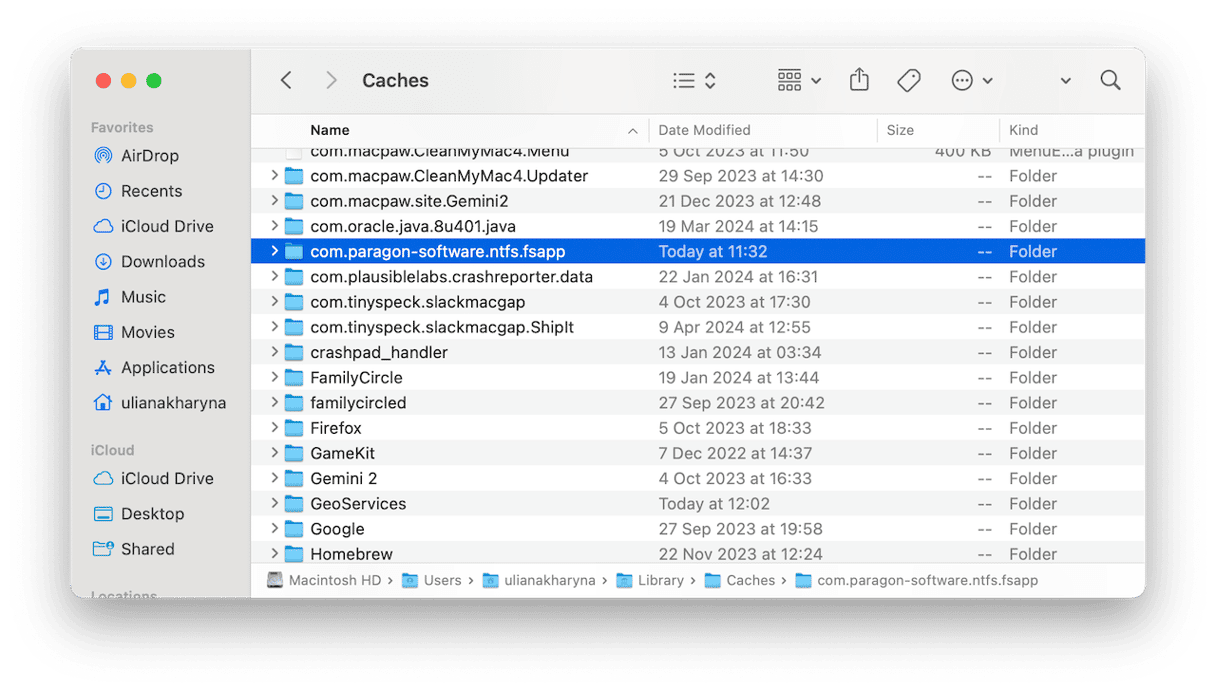
- If there is more than one user account on your Mac and NTFS for Mac is installed for all of them, you should also check the folders above without the ‘~’ — that will take you to the folders in the global Library folder instead of the one in your user folder.
- Empty the Trash.


If you’ve installed NTFS for Mac to be able to access files on an NTFS-formatted disk and no longer need to access that disk, you should uninstall it to free up space and prevent future conflicts with other software on your Mac. It’s also sensible to uninstall apps you don’t use because you are less likely to keep them updated, which means any security flaws won’t be patched, and so the app could be a vector for a malware infection. Follow the steps above to uninstall NTFS for Mac.


