When it comes to iCloud, people generally think of it as an automated way to wirelessly backup an iPhone. And if you've ever used it to back up the contents of your iPhone, then you know how easy that is. However, iCloud can also be used to sync and store your photos, either as a backup of all your pictures or as a way to save storage space on your iPhone.
After a quick setup to enable iCloud Photos, all your new photos will automatically back up to iCloud the next time you connect to Wi-Fi. You can also let iCloud help you save space on your iPhone by only keeping smaller, compressed photos on your device.
In other words, uploading photos to iCloud makes a lot of sense. We’ll show you how to set it up and explain what to look out for along the way.
Uploading your photos from iPhone to iCloud
Honestly, turning on iCloud Photos couldn’t be any easier. The biggest thing to be aware of is that it can take some time, depending on how many pictures you have on your iPhone. But before you make any big changes and save photos to iCloud, it’s always smart to back up your device, either to iCloud or through iTunes, and then make sure your iPhone iOS is up-to-date.
Before you move photos from iPhone to iCloud
Another thing you’ll want to do before turning on iCloud Photos is decluttering and cleaning up your photo library. By using an app like CleanMy®Phone, you can quickly scan your iPhone for similar and blurry pictures.
Those similar looking photos can use up a lot of storage on your device, and then ultimately in iCloud. Using CleanMy®Phone before your first sync will not only help you save iCloud storage, but also make the transfer much faster.

How to upload photos to iCloud from your iPhone
Now that you’ve backed up and cleaned up, you’re ready to start uploading your photos to iCloud. In addition to making sure your iPhone is connected to Wi-Fi, you might also want to connect it to power. Once everything is set up, do the following:
- Go to Settings > Photos.
- Tap on the toggle next to iCloud Photos to turn it on.
- Choose either Optimize iPhone Storage or Download and Keep Originals.
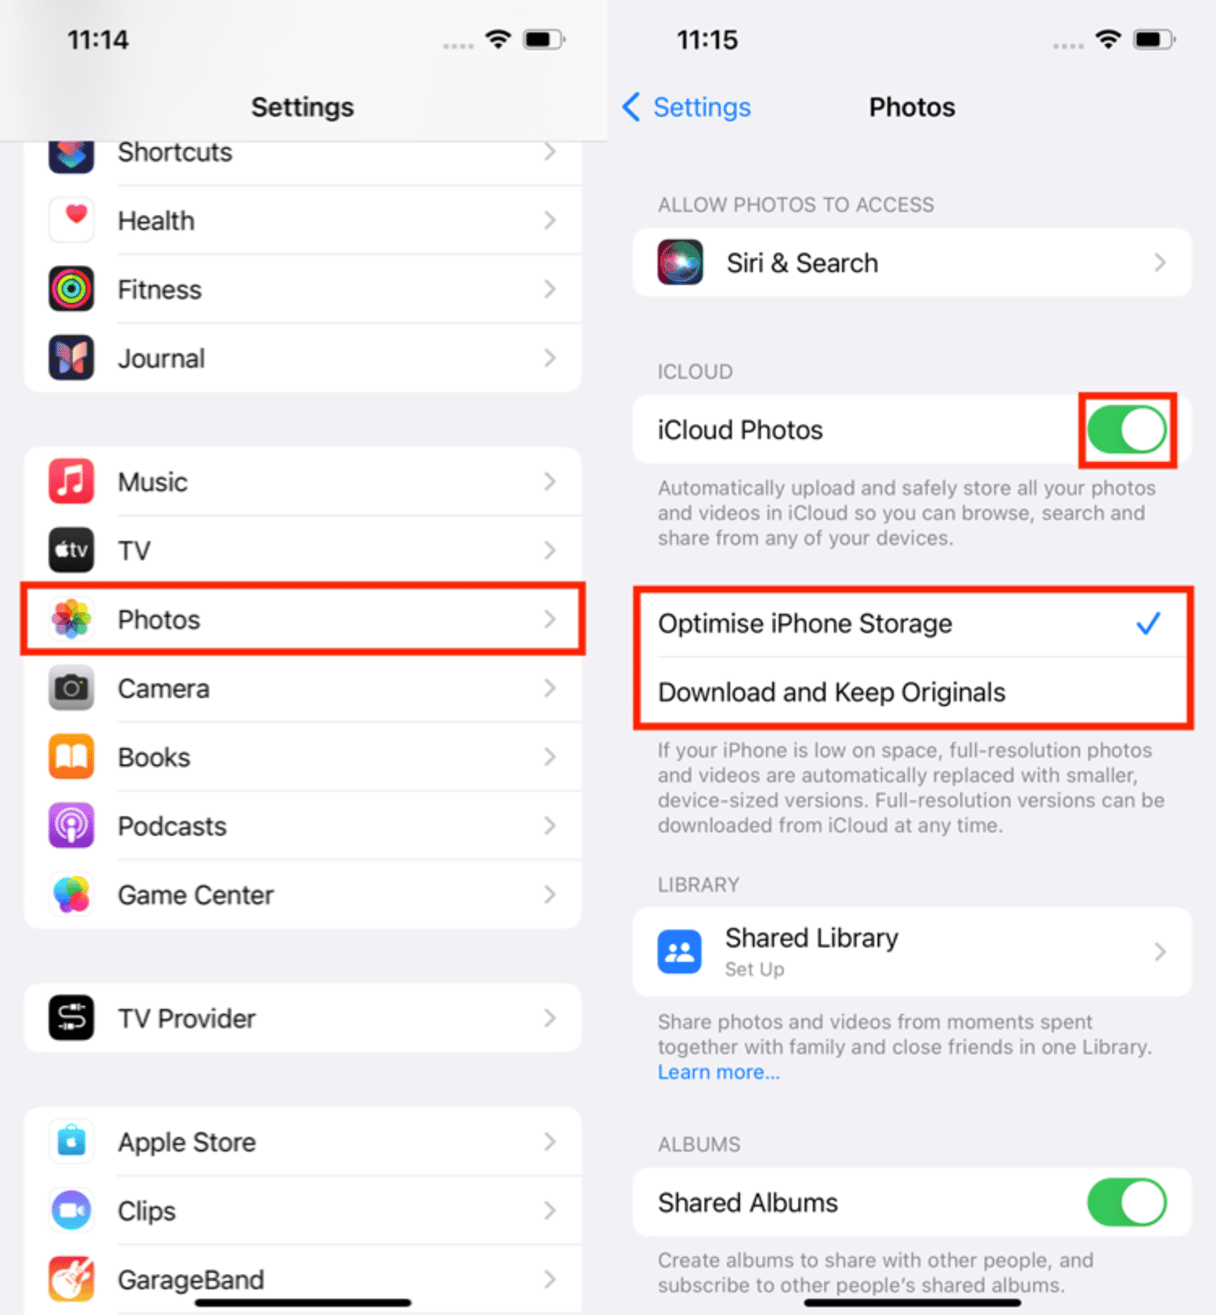
Optimize iPhone Storage is the feature that we briefly mentioned earlier. It’s when the original versions of your photos is stored in iCloud, and only lower-resolution previews are available on the device. Because the file sizes of the pictures are typically smaller when you have this turned on, it means the transfer times are a bit faster as well.
Download and Keep Originals is exactly what it sounds like. The highest possible resolution your iPhone is capable of shooting at is what’s stored on your device. There’s no compression whatsoever added. The obvious pro to this is that if you want to connect your device to a larger screen and show your pictures, they’ll likely be at a resolution suitable for that screen.
How long does it take to sync photos to iCloud?
The speed of transferring photos to iCloud is entirely dependent on two things: the size of your photo library and the speed of your Wi-Fi connection. If you know you’re on a slow connection and you need to backup photos to iCloud without hiccups, you might want to consider pausing the upload and running an app like CleanMy®Phone. If you haven’t already, shave a gigabyte or two off your photo library.
If your upload still takes some time after that, try letting it run overnight. Even then, for some users with very large photo libraries, it can take multiple nights to successfully upload all their pictures.
How to backup photos to iCloud
Backing up your photos to iCloud is essential to ensure that all your memories are safely stored and easily accessible. Follow these steps to back up your photos:
- Open Settings on your iPhone.
- Tap on your Apple Account at the top, then select iCloud.
- Tap Photos, then turn on iCloud Photos.
- Ensure you have enough iCloud storage to back up all your photos.
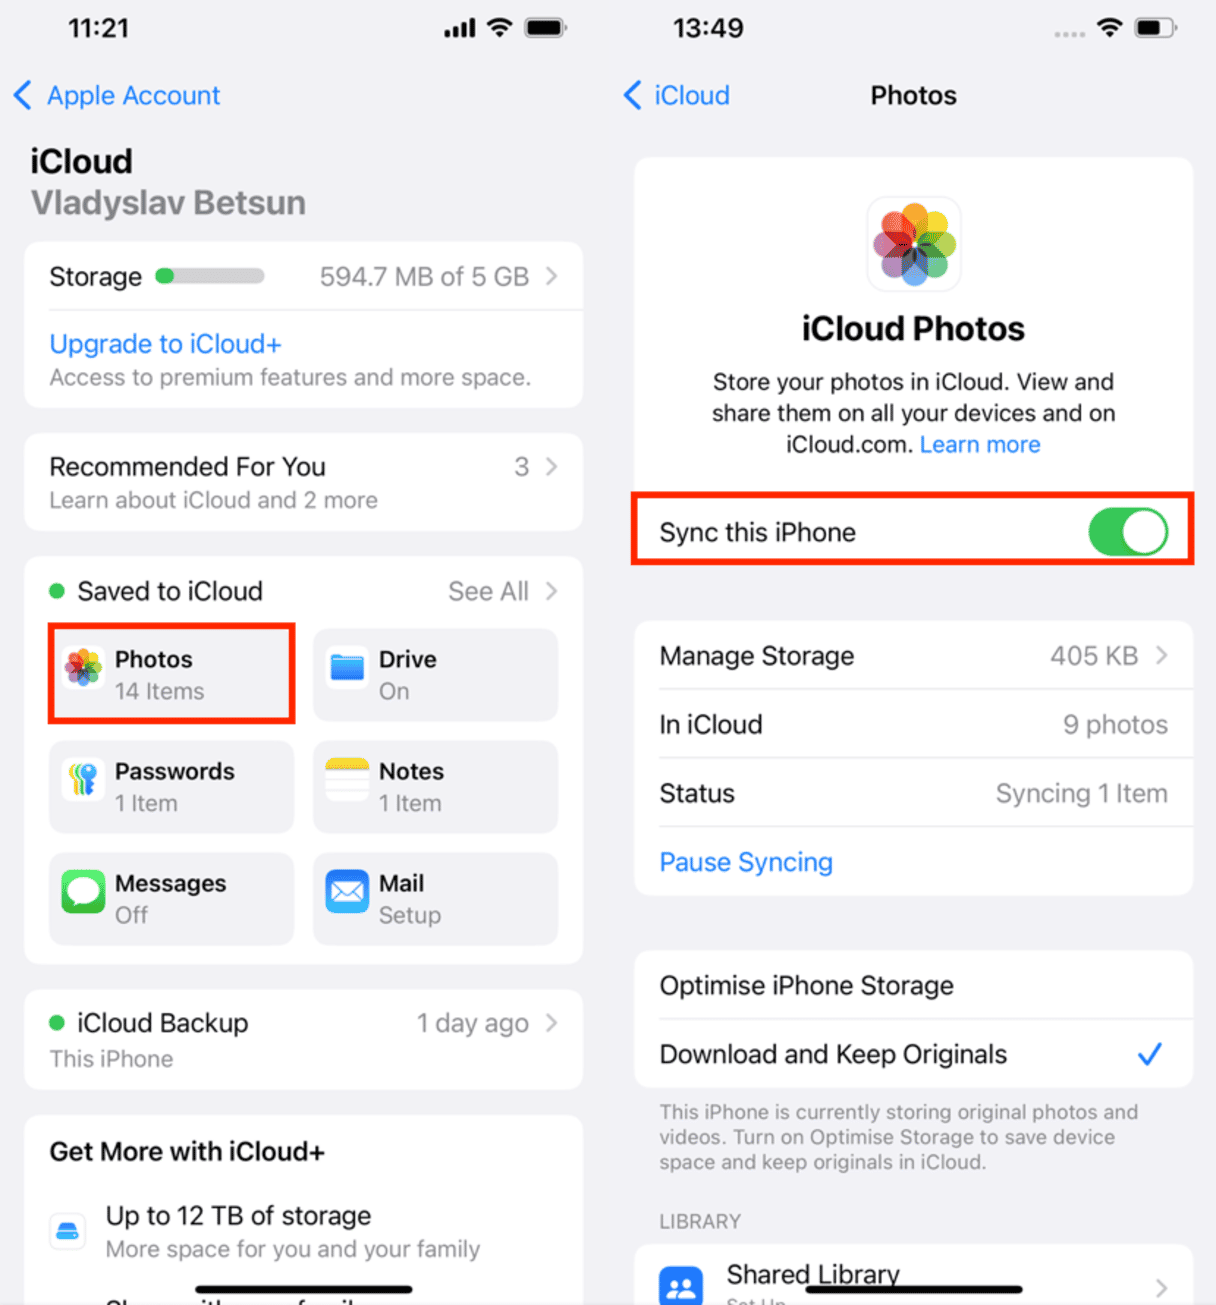
If you want to know how to back up photos to iCloud, make sure to follow the above steps.
How to upload specific photos to iCloud from an iPhone
Turning on iCloud Photos will upload all of the photos to your iPhone, so you won’t be able to upload only selected ones. A workaround for this is to turn on iCloud Shared Albums. To do that:
- Open Settings > Photos.
- Tap the toggle next to Shared Albums to turn it on.
Then, to upload the photos you want:
- Open the Photos app.
- Select the pictures you want to upload.
- Tap the Share button.
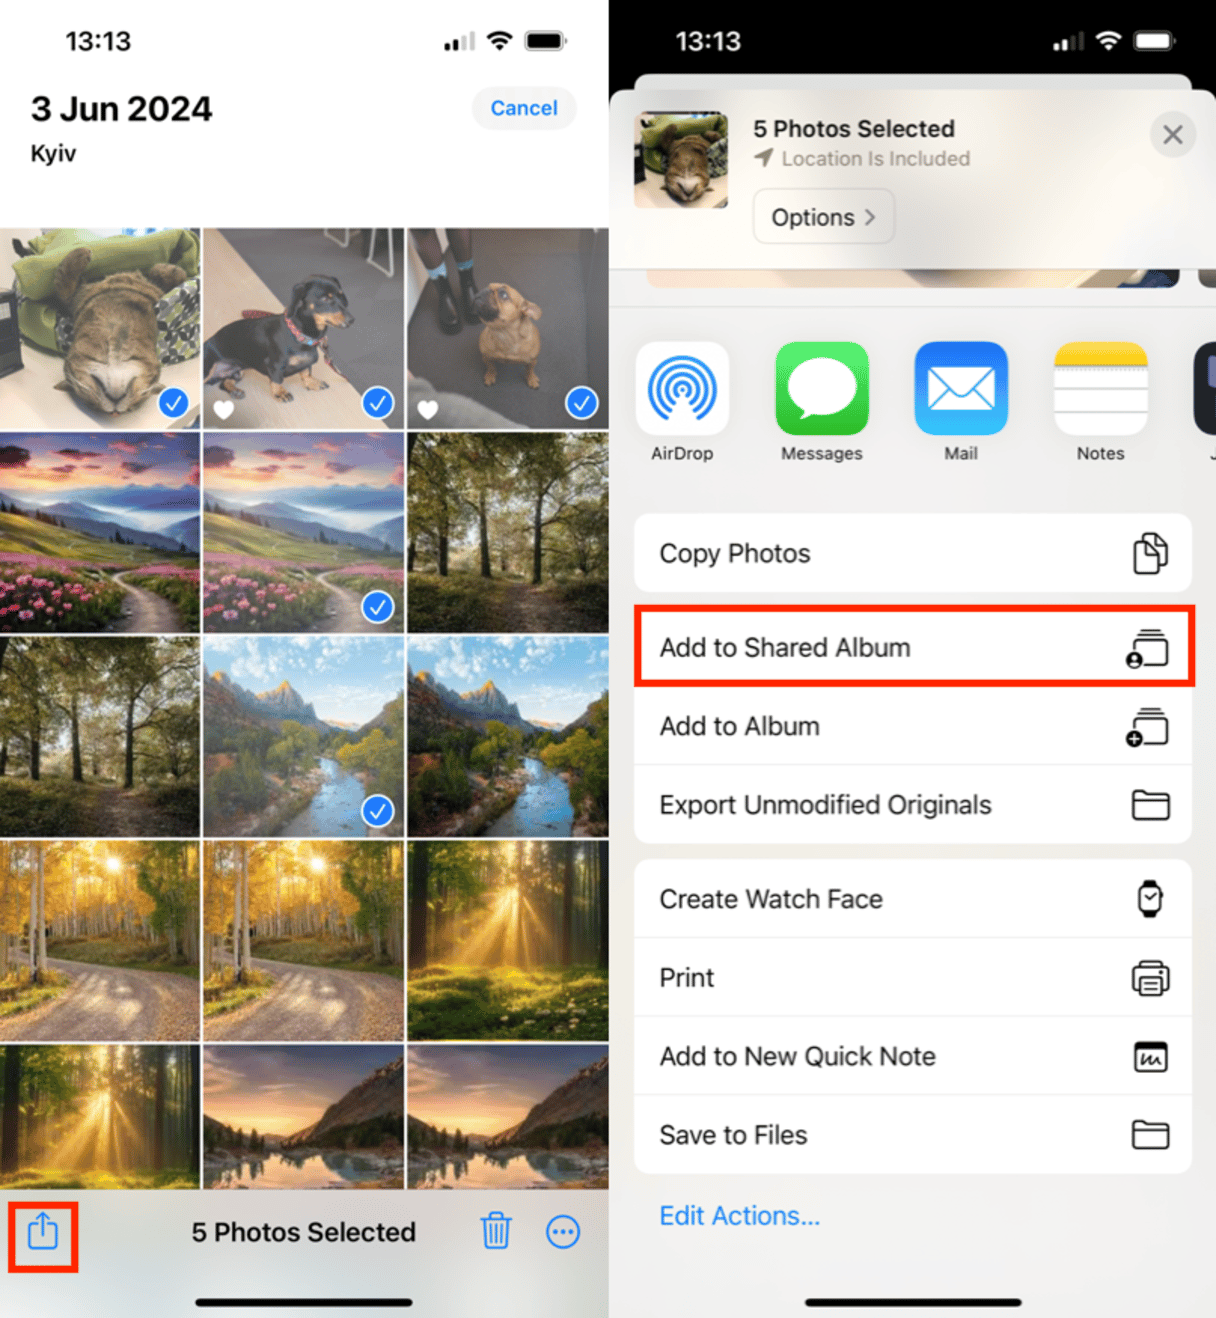
- Select Shared Album.
- Choose which album you want to add it to or create a new one.
- Tap Post.
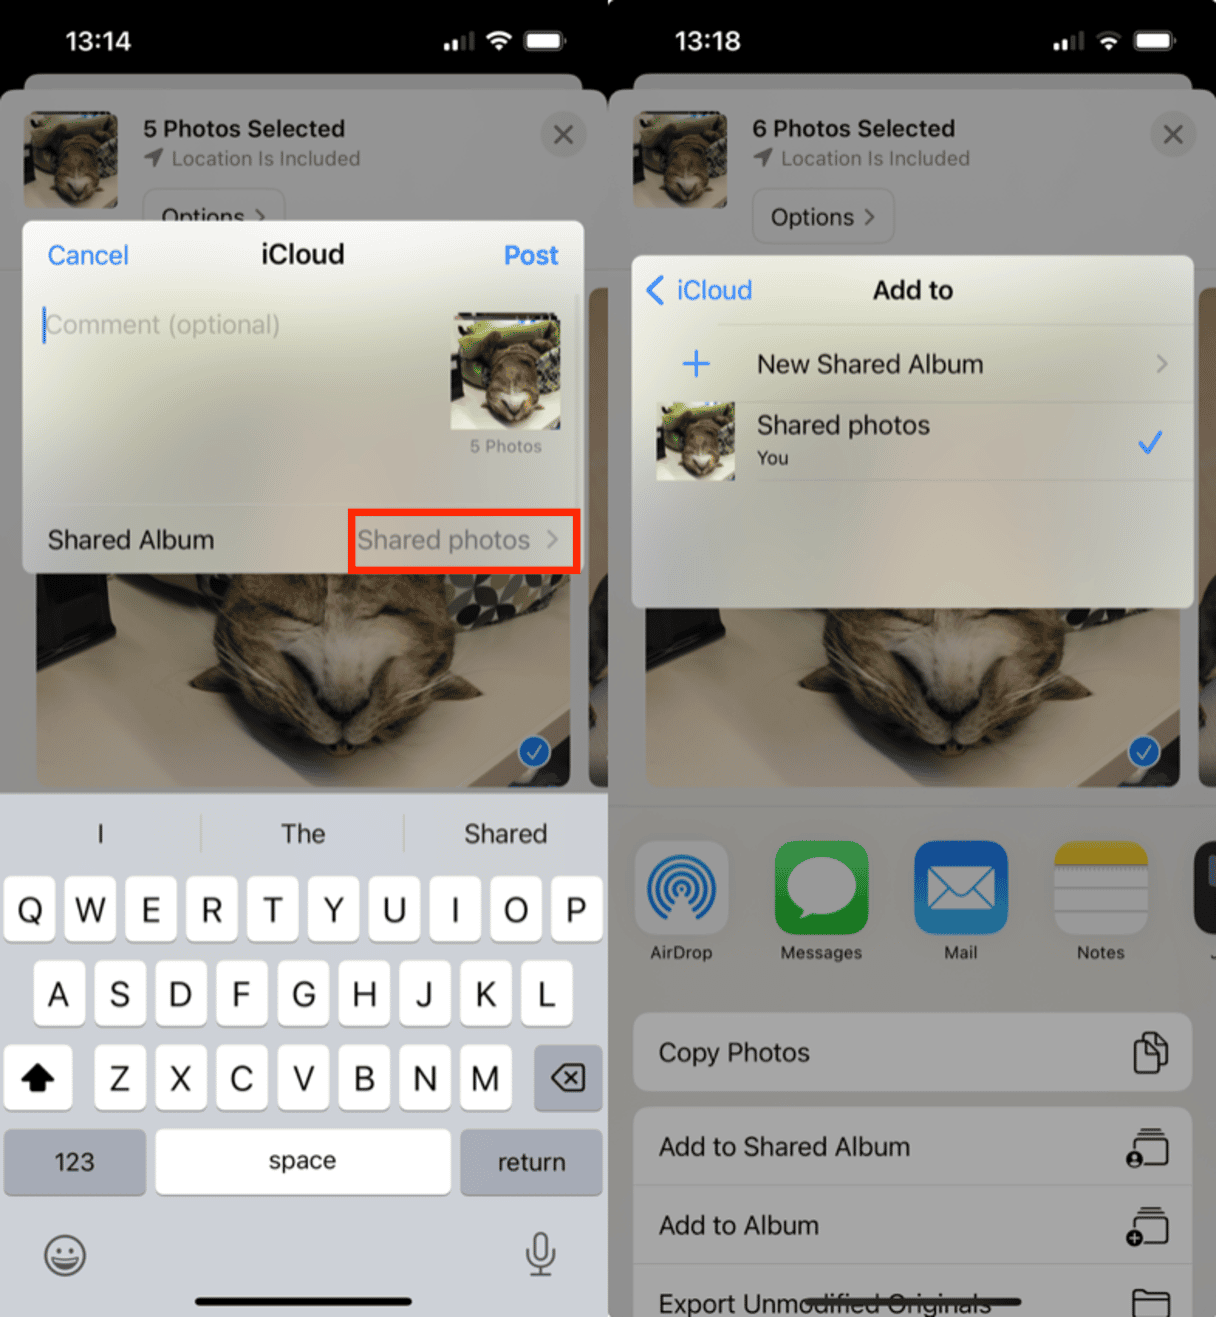
While this process is more manual than uploading all of your photos, it allows you to selectively choose when and where you want to add photos to iCloud. Basically, you save specific photos to iCloud.
Why are my photos not uploading to iCloud even when I have enough storage?
If you log into iCloud via a browser on your computer and you do not see the pictures you’ve recently taken with your iPhone, there are a couple of common things that could be causing this.
- iCloud Photo Library is not enabled. Follow this guide to iCloud Photo to learn how to enable and disable it.
- You’re out of iCloud Storage. To see how much space is available in your iCloud, go to Settings > Your name > iCloud on your iPhone. You can always download photos from iCloud to free up some space.
- You’re having a network issue. Make sure you’re connected to Wi-Fi or enable Cellular Data syncing in Settings > Photos > Cellular Data.
- There’s a login issue with your iCloud account. On your iPhone, go to Settings > Your name and make sure you’re logged into iCloud.
Just like the rest of iCloud, the experience of uploading your photos is an easy and seamless one. After your initial upload, all of your photos are backed up, and you can easily access them on a different iPhone, or even on a Mac or iPad for that matter. And all that without having to give it a second thought.


